The main purpose of cable channels is to protect wiring from mechanical damage and protect against fire in the event of a malfunction in the electrical network. At first glance, determining the required type of cable support systems should not cause difficulties. But when choosing, you can get confused by the widest range. Do you agree?
We will tell you how to correctly select a cable channel for electrical wiring, taking into account the complexity of the wiring diagram and operating conditions. The article we presented describes in detail the most popular varieties and provides their technical characteristics. Using our tips, you can't go wrong in finding the best option.
The concept of external trays
Boxes made of plastic or metal, most often U-shaped, designed to accommodate electrical wires are called cable channels. They are used outdoors or indoors.
The components of the channel are a box and a cover. The vast majority of these products are square or rectangular, but there are also other shapes for special tasks. The body is mostly monolithic, less often with perforations intended for ventilation inside the box. The connection between the lid and the body occurs through a lock that snaps into place when pressed. You need to pay attention to high-quality closure when purchasing, since you will have to use it quite often when adding a new cable or making repairs. A channel with a double lock would be optimal.
Some trays can be divided internally into sections. Such a device will help separate power lines from low-current ones, such as television antennas, network cables, alarms and control wires. Partitions can be stationary or removable. For the latter there are special mounting connectors. It is important that the plastic channels are non-flammable or non-flammable. This characteristic is indicated in the product description.
Advantages
Trunk boxes provide easy access to cables. The removable cover is separated from the profile without special tools and equipment, which allows you to quickly replace a section of damaged wire. Other advantages of the product:
- It is easy to install sockets and switches in wall and floor boxes.
- A wide range of accessories for cable channels, which facilitates and speeds up the installation of wiring: plugs, T-shaped corners, external and internal corners.
- No special skills are required to install the cable support system.
- White cable channels fit well into any interior, be it a residential or office space.
In addition to the white box, you can purchase wood-look products, as well as perforated products.
Selecting an electrical box
Plastic trays with a lid are ideal for installing power supply networks indoors. The sale is dominated by various shades of white, which look harmonious against the background of the many colors in which the walls and ceilings of houses are decorated. The main selection criterion will be the width of the box, which should accommodate all the cables being mounted. It is calculated with a reserve for future needs.
Reserves are also required for the length of the route. Usually it is ten to fifteen percent of the total length of the line. The width of the main line box is, as a rule, larger than the branches to other consumers.
When purchasing the main wiring part, you must not forget about the fittings: transitions, plugs, joints. These elements will simplify the installation process and make the appearance of the route much more aesthetically pleasing.
And, of course, all parts of the structure should not have cracks, chips, or other defects. This is especially true for the ends, which are difficult to fit perfectly if cut unevenly. Some buying tips:
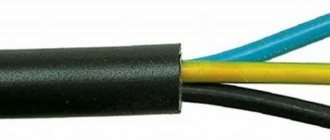
- Cable ducts in the form of corrugated pipes are intended exclusively for flexible wire.
- Small profile boxes are cut with a sharp knife, wide ones - with a saw with a fine tooth. When using an angle grinder, the profile may melt.
- Installation of cable channels begins with electrical fittings (lights, sockets, switches, junction boxes).
- The quantity of fasteners is purchased at the rate of one piece for every half meter of tray.
- Rigid profile boxes are installed on flat surfaces.
How to choose a cable channel for wiring installation?
Even an insignificant, at first glance, characteristic of the electrical box can be a key factor in choosing the required option.
So, what properties can be considered when purchasing a product:
- Material. Pay attention to safety, durability, level of protection in case of possible fire.
- Construction type. Cable channels for electrical wiring can be produced in the form of smooth or corrugated pipes, tracks, trays, etc.
- Specifics of application. The characteristics of systems used for industrial premises, private homes or equipment may differ significantly.
For example, more stringent requirements are imposed on the fire safety of cable boxes used for installing electrical wiring in wooden houses, while static structures are not suitable for wiring used in moving mechanisms.
In addition, pay attention to color. This factor is relevant in the case of open wiring, in which the elements of the cable channel are visible and must meet aesthetic requirements.
Cable channels are available in various colors. The most popular colors are white, steel, gray, black, natural wood color
Types and sizes
There are several types of cable channels . They do not shine with a wide variety of forms ; only the trays for special conditions of use, the standard size and the material for their manufacture differ.
Cable trays in baseboards
For the production of cable systems at home, this is the best option. The wires are placed in the body of the baseboard. In this case, you can avoid labor-intensive and dusty work on cutting hidden wiring and get a beautiful and reliable power supply circuit at the output. Aesthetics are achieved through an expanded color range of finished products and imply a creative approach to the process.
A wide range of additional components are available for such products, which will help make transitions, turns and route endings unnoticeable. There are plinth fittings for various cable outlets, which allows you to mount sockets, connectors and adapters at floor level.
Sizes vary slightly among different manufacturers:
- The Legrand company produces two series of decorative cable ducts for external wiring. This is a Mini collection with dimensions 20 by 12.5 mm, 32 by 12.5 mm, 40 by 12.5 mm, 32 by 16 mm, 40 by 16 mm, 60 by 60 mm, 60 by 20 mm, 75 by 20 mm and DPL with dimensions 35 by 80 mm; 35 by 105 mm, 50 by 80 mm, 50 by 105 mm, 50 by 150 mm, 65 by 150 mm.
- SL Hager offers a choice of the following dimensions: 20 by 50 mm, 20 by 70 mm, 15 by 100 mm, 25 by 100 mm.
Floor boxes
Such installation products have a semicircular cross-section. This was done to ensure human safety when moving, since the name suggests that such channels are attached to the floor surface. Such systems are used mainly to replace carriers and extension cords. It turns out beautifully and is not dangerous: it is not difficult to trip over a dangling wire.
Trade enterprises offer a choice of products with dimensions: 50 by 12 mm, 75 by 17 mm, 92 by 20 mm, 160 by 65 mm. Standard colors include white, gray and black channels. You can choose turns, bends and transitions for them. The lid snaps into place. Cable channels for the floor have a degree of protection IP40.
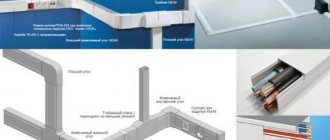
Parapet profile
Such cable trays are called trunk cable trays. They differ from baseboard ones in shape and installation location. They do not have a variety of colors and are available in white or milky color. All kinds of fittings are available to facilitate installation. Most often they are used for laying cables in the office or in production. Often such products are used when installing air conditioners.
The standard width of parapet boxes is 80, 100, 120, 150 millimeters, wall height is 40, 55 or 60 millimeters.
There is a version of these trays with smaller sizes. There are no additional accessories available for them, and during installation the box is cut out at the desired angle. A wide variety of sizes allows you to mount the combination for any type of cable:
- Width from ten to one hundred millimeters.
- Height - from ten to sixty millimeters.
Angled cable management systems
For installation work at the joints of walls or ceilings, there is an angular cable channel. They are made in the likeness of a ceiling plinth and at a quick glance they resemble part of the decor. Their dimensions are limited and are not suitable for laying a large bundle of cables. There are no docking points for them. The most common channels are forty by forty millimeters in size.
Corner trays with a transparent lid are suitable for laying lighting lines from LED strips. Suitable for illuminating furniture.
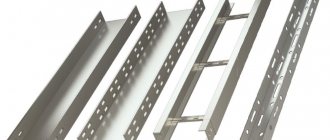
Metal cable ducts
Such boxes are used for installing wiring in wall cavities - frame or panel houses. They are used in production to connect various equipment. The material is usually galvanized metal. For connections or bends, special products with screw fasteners are used.
Such structures are widely used for laying wires for various purposes inside suspended ceilings. With the help of such trays, the process of installing power supply circuits is accelerated and simplified, since the standard length (three meters) allows you to assemble long sections of the main line at once, without resorting to various fasteners. The width of the tray is from fifty to six hundred millimeters or more, the height of up to one hundred millimeters allows you to lay any number of wires.
Flexible channels
Such channels are also called track channels because of their appearance, reminiscent of a tank caterpillar. The main purpose of such products is to provide power to the moving elements of the electrical circuit. There are also flexible channels in the form of a corrugated PVC tube. It is used mainly in industrial facilities. The varied diameters of the products allow for laying cables of several sections. The production material for flexible trays is non-flammable plastic.
Preparation for installation
Necessary tools and equipment
To install the cable channel, the following tools are required:
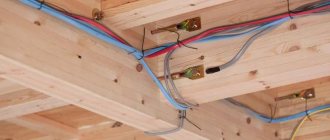
The fastening of the channels depends on the surface. For wood, self-tapping screws are used; for stone or concrete surfaces, the channels are attached to dowel-nails. Liquid nails are used to attach the cable duct to smooth tiles or metal.
Before starting installation of the cable channel, it is necessary to perform calculations.
- First, decide on the material and type of channels. Create a plan of your room, which will indicate the necessary types of ducts for all rooms. In the plan, show the route of each cable, the location of additional accessories in the form of connectors or bends. All this should be recorded in footage. Consider outlets and switches in your plan. Also, when drawing up a plan, keep in mind that the main canal should be thicker than the adjacent canals.
- The cable channel can be placed at any wall level. The location of the channel depends on the interior of the room. If you plan to attach the channels with glue, make sure the walls are level in advance. Adhesive fastening can only be used for small channel models containing no more than 3 wires.
- Before starting work on installing cable ducts, prepare fasteners suitable for your surface. For a concrete wall, use dowels; for a wooden wall, use regular metal screws. For gypsum board, butterfly dowels are most often used.
- After preparing the fastening materials and necessary tools, the last preparatory step will be marking the wall. Mark the straight lines of the future channel with a pencil. Use a level to get straight lines.
- Another important preparatory step is to determine the location of the base, as well as an idea of which wires will go into the cable duct. The cables must be freely located inside the channel. A large number of wires can cause them to overheat.
- If the walls are uneven, the base may become bent and the lid may be difficult to snap into place. When installing the system after finishing work, do not stain the channels.
- If you do not have the opportunity to purchase fasteners, you can purchase special channels in the store with adhesive tape attached to the base. These fasteners are considered temporary, as they are not capable of performing their function for a long time. You need to cut such channels with the lid latched.
Installation of electrical wiring from cable ducts
The process and features of arranging power supply are interconnected with the type of cable trays that will be used in the work. You need to decide on the number of auxiliary components and cable channels, the sizes that are available for sale. If there are special manufacturer requirements, they must be studied and followed.
Selection of dimensions
Before starting work, you need to familiarize yourself in detail with the future wiring diagram. Determine the number of wires and the cross-section of their cores in order to measure the thickness of the conductor bundle in each individual section. By adding the necessary margin for laying possible cables in the future, the size of the cable channel for each thread of wiring is determined.
If power and low-current wires are to be placed in a common tray, it is recommended to purchase a channel with a dividing wall. If this is not available, you can leave a distance between the conductors and tighten them with flexible clamps according to the voltage class.
The number of wires laid in one cable channel is limited only by its dimensions. As long as the lid does not squeeze out and if necessary, you can get free access to any wire.
Features of laying cables in trays
The basic rule of any wiring is that the installation is carried out strictly horizontally and vertically. Corner areas are not permitted, with the exception of staircases. The edges of the cut boxes must be smooth, which is achieved by using rulers, measuring squares and sharpened tools. For metal trays, you can use an angle grinder.
The rule is measure seven times, cut once , in this case it is used for any marking of profiles of the required length. Marking is done on the assembled cable channel, and only before cutting is the cover removed.
When forming angular internal bypasses, the cover is cut on the walls for bending, and on the outer ones it is cut slightly longer than the channel itself.
Products for fastening are selected depending on the coating material with which to work. The trays are nailed to the wooden base with wide-headed nails, to the brick using dowels and nails, and to the drywall with self-tapping screws. In places where boxes are joined, the distance between the fastening elements should be within four to six centimeters, in other cases - fifty to sixty centimeters.
To make the joints less noticeable visually, the boxes and lids themselves need to be connected in different places. Wires can be laid in the prepared route. On long sections, the harnesses can be tied with clamps and secured with jumpers. And don't forget to latch the lids.
No. 1. Basic selection options
A cable channel is a special hollow structure with space for electrical wires. The product consists of a tray, which is installed on the surface of a wall, floor or ceiling, and a lid. There are boxes with a slightly different design, but this is the most common. Cable channels can also be used to lay telephone, Internet and television lines; they are often used to disguise air conditioner wires. In large offices, where it is necessary to provide each workplace with electricity, the Internet and a telephone line, cable channels are completely irreplaceable.
When it is not possible to hide wiring in the wall, a cable channel is a real salvation. The main advantages of such a solution are:
- protection of wiring from ultraviolet radiation and mechanical influences;
- increasing the fire safety of the premises, although many are ready to dispute this point, because the cable channel is a closed space, and the wires certainly heat up, i.e. the heat remains inside the structure, which means the risk of ignition is much higher than when laying the wire without protection. But it is also worth considering the fact that the cable channel is a sealed structure, there is almost no oxygen supply, so the fire will not be able to spread, and the ignition will go out. In addition, there are perforated channels, which, due to the influx of fresh air, cool heated cables;
- the ability to instantly replace the wire or lay a new branch. If the cable is in the wall, then any manipulation will lead to serious damage;
- the ability to lay several wires in one channel, incl. different types, such as wiring and telephone lines. For these purposes, there are special designs with internal partitions;
- quick installation of electrical wiring.
as a disadvantage , since a plastic channel running along the wall is unlikely to decorate the room, but everything is learned by comparison. A neat cable channel is clearly much better than a hanging bundle of wires. If we take into account the presence of numerous modifications of the channels, the wiring can be made almost invisible. There are products that are indistinguishable from ceiling or floor plinths, there are models painted to look like wood - there are a lot of options, however, such solutions with increased aesthetics are more expensive than the simplest products made of white plastic.
The disadvantages include the fact that the cable takes up a little space. Yes, often such a loss does not bring any inconvenience, but there are times when every centimeter counts. In addition, high-quality wiring using cable channels is only possible when using a large number of auxiliary elements, i.e. In addition to the channel itself, tees, corners, etc. will be needed. Please also take into account the fact that a protruding element on a wall or floor can easily get caught and damaged.
When choosing a cable channel for electrical wiring, consider the following factors:
- material of execution , which affects the level of durability, strength and fire resistance;
- design features . The cable channel can have a rectangular, angular or semicircular cross-section, it can be flexible or lattice - there are a lot of variations, each will be indispensable in a given situation, and we will consider each type further;
- features of the room where the wiring is being laid. For example, a channel for a wooden house must meet increased fire safety requirements, but for moving structures it is unacceptable to use stationary cable channels;
- appearance . Aesthetics are important for residential premises, so the color and shape of the cable play an important role;
- size . The more wires you need to hide, and the larger their cross-section, the larger the cable channel will be needed, but we will return to this later.
Advantages and disadvantages of electrical channels
Having settled on the option of open installation of cable routing, it is necessary to analyze the pros and cons of this method and try to maintain the advantages during the work, and reduce the negative phenomena or avoid them altogether.
Pros of using trays:
- Low labor intensity compared to wall gating.
- They can be installed anywhere.
- Constant free access in case of a malfunction or the need to lay an additional power line.
- Quite a high degree of protection of wires from mechanical damage.
- High speed of route installation.
- A large number of cable channel options allows you to combine the power supply line with the interior of the premises.
Minuses:
- The need for additional space, albeit minor.
- Need for additional fittings.
- Possibility of accidental damage (especially in the floor version).
- Sometimes it is not possible to choose a tray exactly to match the main interior background.
Having dealt with all the subtleties in installing cable channels when installing electrical wiring, you can always find a suitable solution that suits you in terms of reliability, ease of use, and design. Moreover, new engineering solutions for laying wires without major interventions in the design of buildings and structures are appearing on the market.
Preparation for installation
Necessary tools and equipment
To install the cable channel, the following tools are required:
The fastening of the channels depends on the surface. For wood, self-tapping screws are used; for stone or concrete surfaces, the channels are attached to dowel-nails. Liquid nails are used to attach the cable duct to smooth tiles or metal.
Before starting installation of the cable channel, it is necessary to perform calculations.
- First, decide on the material and type of channels. Create a plan of your room, which will indicate the necessary types of ducts for all rooms. In the plan, show the route of each cable, the location of additional accessories in the form of connectors or bends. All this should be recorded in footage. Consider outlets and switches in your plan. Also, when drawing up a plan, keep in mind that the main canal should be thicker than the adjacent canals.
- The cable channel can be placed at any wall level. The location of the channel depends on the interior of the room. If you plan to attach the channels with glue, make sure the walls are level in advance. Adhesive fastening can only be used for small channel models containing no more than 3 wires.
- Before starting work on installing cable ducts, prepare fasteners suitable for your surface. For a concrete wall, use dowels; for a wooden wall, use regular metal screws. For gypsum board, butterfly dowels are most often used.
- After preparing the fastening materials and necessary tools, the last preparatory step will be marking the wall. Mark the straight lines of the future channel with a pencil. Use a level to get straight lines.
- Another important preparatory step is to determine the location of the base, as well as an idea of which wires will go into the cable duct. The cables must be freely located inside the channel. A large number of wires can cause them to overheat.
- If the walls are uneven, the base may become bent and the lid may be difficult to snap into place. When installing the system after finishing work, do not stain the channels.
- If you do not have the opportunity to purchase fasteners, you can purchase special channels in the store with adhesive tape attached to the base. These fasteners are considered temporary, as they are not capable of performing their function for a long time. You need to cut such channels with the lid latched.
Photos of cable channels
Read here! Cable corrugation - technology for laying electrical wiring in special corrugations (80 photos)
Size range
The sizes of plastic boxes differ in length, width and thickness. According to the requirements of GOST 61084-1-2007, this device is recommended to be produced in straight sections with a length that can consist of a size in increments of 0.5 m and with a minimum section length of up to 2 m.
A mark on the cross section inside the profile is also required. It indicates the free area for the cable. The width depends on the number of wires intended for this device.