In cases where insulated electrical cables are laid along walls or ceilings, the wiring is called open wiring. It is not found in new apartment buildings, but in wooden buildings such installation is justified by fire safety precautions . The issue of how to lay the cable needs to be decided at the stage of designing the house.
No. 1. Requirements for wiring in a wooden house
Wood is one of those types of materials that ignite easily and burn well. A wooden house can easily catch fire from a simple short circuit in the electrical circuit, so the wiring process is to minimize the likelihood of a short circuit, and if it does occur, to minimize the consequences. The following requirements are put forward for wiring in a wooden house :
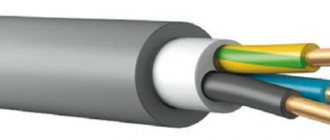
- use only copper conductors with a fireproof sheath;
- insulate conductors in non-flammable material;
- perform the correct calculation of the cross-section of the electrical cable so that the current load does not exceed its capabilities;
- It is better to use open wiring;
- hidden wiring must be located in a metal pipe - using a metal hose or even PVC corrugation with a self-extinguishing effect is not recommended;
- the panel must have an RCD and a circuit breaker;
- It is better to use high-quality materials from trusted manufacturers, since the savings associated with buying cheap Chinese products can result in big problems.
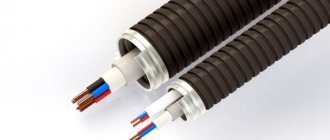
Corrugation for drywall
Electrical corrugation for plasterboard is produced from the following materials:
A characteristic feature of all types of electrical corrugation is the presence in it of a so-called probe. A probe is a metal wire placed inside a corrugated pipe to tighten an electrical cable into the corrugation.
Please note that the presence of a probe in the corrugation clearly indicates its electrical purpose. The absence of a probe, especially in small-diameter flexible pipes, may (but does not necessarily) indicate that this product is NOT for electrical purposes.
The second sign that allows you to distinguish a corrugated wire is its rigidity. You must understand that corrugation is a flexible pipe, and not a decorative product. The electrical corrugation should be hard to the touch and not wrinkle when pressed and twisted. Of course, you cannot walk on such a pipe, but its rigidity should be tactilely felt.
No. 2. Hidden wiring in a wooden house
Electrical wiring in wooden buildings can be done in two ways:
- hidden;
- open.
Hidden wiring in a wooden house is more difficult and has a lot of risks. It is better to trust such work to specialists. Internal wiring is installed when the wooden walls of the house are sheathed on top with finishing material, for example, clapboard or plasterboard. In this case, the wires are placed between the main wall and the cladding layer. Naturally, you cannot leave the wires unprotected - they must be hidden in a metal pipe. Many craftsmen make a mistake and use plastic sleeves, PVC corrugation or metal hoses for these purposes. This cannot be done for a number of reasons:
- there is no guarantee that the cable insulation will not be damaged and a short circuit will not occur, and the walls of the boxes and pipes will not be able to withstand such a load. The result is a fire. Insulation can be damaged not only due to installation errors, but also as a result of manufacturing defects, improper storage and transportation. Most measuring instruments do not detect microcracks in insulation, and over time, when exposed to constant loads, the insulation weakens more and more;
- plastic corrugation and box are a weak barrier for rodents, who can easily damage it by exposing the wires;
- For the installation of hidden wiring, voids are prepared in wooden walls, and over time, wood dust tends to accumulate in them, and a small spark is enough to ignite it. Localizing such a fire is problematic.
That is why hidden electrical wiring in a wooden house must be installed using metal pipes. They can provide reliable protection against short circuits, but a number of conditions must be met:
- such pipes must have an anti-corrosion layer inside and outside;
- It is better to install pipes at a slight angle to allow condensate to drain freely;
- the pipes must be connected to the ground loop;
- sharp edges that are formed when cutting pipes can damage the wire; plastic bushings must be placed on them;
- the pipe connection must be sealed;
- Channels must be cut in the walls.
The best option is copper pipes, but it will not be cheap.
using plaster does not violate safety standards , although, at first glance, it does not seem entirely suitable. To ensure proper protection, the cable must be surrounded on all sides with a layer of plaster at least 10 mm thick, but to ensure that the cable can be replaced, it must be placed in a metal hose. In fact, it turns out that replacing the cable is very difficult, and over time, the plaster begins to crack under the influence of the “breathing” of the wood.
Types of corrugated metal hoses
According to the molding method, the sleeve is divided into:
- Accordion type. It is completely sealed and holds its shape perfectly.
It is usually made of stainless steel. It has two serious drawbacks: it is very expensive, and limited in flexibility. Curvature radius up to 20 sleeve diameters. If you bend it too much, it will simply burst. It is used to a limited extent, only for use in special conditions. - Mass corrugation of turn type. The most common hose: used without restrictions both in industrial facilities and in residential premises.
A complex configuration of joints: on the one hand, allows you to obtain a strong, unbreakable pipe, on the other hand, the sleeve can be bent to small radii. The only drawback is that the coil sleeve is not sealed. If moisture gets inside, it stays there for a long time. - Corrugated with PVC coating. A polyvinyl chloride sleeve is located on top of the coil spring.
This reduces flexibility, but the pipe becomes completely sealed. The strength characteristics are unchanged: steel coils protect from mechanical stress. Fire safety is also not reduced: flame propagation does not occur in a closed environment.
According to the material of the main shell:
- Mostly, the coiled metal hose is made of galvanized steel. This is a relatively inexpensive material that resists corrosion for a long time. If the corrugation is static after installation, its service life is measured in decades.
- For suspended installation, when the hose can move, it is better to use stainless corrugation. The galvanic zinc coating on the coils does not wear off; the steel is more durable than galvanized steel: such a hose is almost eternal.
- A sealant is placed between the turns to provide tightness and reduce friction. This can be asbestos thread, cotton fabric, or polypropylene film. Of course, 100% tightness is not ensured, but the gasket protects against raindrops and local splashing.
No. 3. Open wiring in a wooden house
Laying electrical wires inside wooden walls is not only very dangerous, but also technically difficult. With the open method, the owner can fix the problem at any time, since access to the wires is always open, so this installation option has become more popular. Among the shortcomings, only unaesthetics are mentioned due to the visibility of the wires, but today even this disadvantage can be dealt with.
For open installation of wiring in wooden houses use:
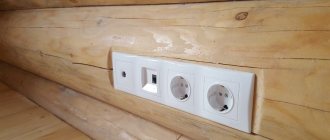
- cable channels, or electrical boxes. This is the most convenient and popular method. Such channels are relatively easy to install on a wooden surface, and if you choose the right color, they will be minimally noticeable. Manufacturers produce boxes with colors and patterns to match different types of wood. In terms of aesthetics, cost and ease of access to wires, this is the best option, but correctly calculating the number of required elements, turns, corners and plugs is not always easy;
- electrical skirting board - the most modern option that allows you to achieve the most aesthetic results. It is equipped with core clamps;
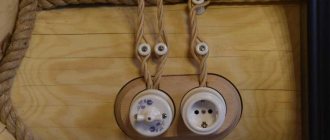
- rollers for insulation. These are small ceramic elements that are mounted on a surface and hold the wiring. All the wires will be visible, so in terms of aesthetics, this option is not the best, but it allows you to create a retro-style interior. This installation method is usually used in houses built from rounded logs;
- special staples. This is the cheapest and simplest option, but it doesn’t look very good;
- metal hose used for open wiring only in non-residential buildings, since the room becomes similar to a production one. No matter how hard you try, the corrugation will not lie perfectly, it will sag, and, moreover, collects dust.
Comments:
It’s better to get confused like this than to do retro wiring with porcelain “bumps”.
Why use copper pipes? Isn't it too expensive?
Stepanych, copper pipes bend easily and are very light, because... They have thin walls, so it is very convenient to lay wires in them. Moreover, such a pipe can first be laid empty inside a wooden structure and only then the cable can be pulled through it.
Leave a comment Cancel reply
Features, technical capabilities and tips for choosing a high-quality cable for wiring in the house Perforated cable channel for organizing wiring in electrical cabinets Do-it-yourself wiring in a country house - features of organization and installation sequence Features and scope of use of multi-core flexible copper cable
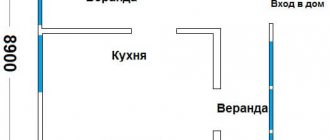
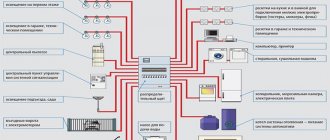
No. 4. Creating a Wiring Diagram
Installation of electrical wiring in a wooden house begins with the creation of a diagram that is agreed upon with Gosenergonadzor. It is necessary to indicate on it the places where all sockets, switches, as well as the panel and meter will be located . The diagram also shows the future location of the cable, indicating the distance from the floor, ceiling, window and door openings. It is better to take the house plan as a basis, where the exact parameters of all rooms are indicated.
To correctly draw up a diagram, follow these rules:
- It is necessary to think in advance about the location of large household appliances, as well as the lighting scheme. This will eliminate problems with extension cords in the future;
- determine the maximum power of devices;
- create connection groups. The rules dictate that each room be provided with two branches of wiring: one for sockets, the second for lighting. Each powerful appliance (washing machine, boiler, etc.) is placed in a separate group - a separate cable must be laid for them. Residential lighting is another group, but it is often connected to a separate circuit breaker to be able to turn on the lighting when no one is home. For each group, the maximum load is calculated;
- sockets can be located at any height. The main thing is that they are convenient to use, so consider the type and number of electrical appliances;
- switches, as a rule, are located at a height of 80 or 150 cm. It is advisable that they are all at the same height;
- the distribution panel is mounted at a height of 150 cm so that small children cannot reach it;
- The wiring can only run vertically and horizontally, and turn at right angles.
When the scheme is agreed upon and the necessary power is allocated, you can move on.
What causes the need for grounding?
Grounding of electrical equipment, armored cables, as well as electrical wiring laid in a metal hose creates conditions for protection against electric shock in the event of a breakdown of the insulating sheath of the current-carrying elements in them.
When the cable insulation resistance drops below normal, the metal hose will be exposed to leakage current, which will go into the ground along the grounding jumper. If a person touches it, another circuit is created parallel to grounding, but since the resistance of the human body is much greater than that of the grounding jumper, an insignificant current will pass through it, which is safe for health and life. According to the PUE, when installing cable lines, the metal hose that serves as protection for the wiring must be grounded and this must be done in accordance with the requirements of regulatory documents (PUE clause 1.7.76, see Chapter 1.7).
( 1 rating, average 5 out of 5 )
No. 5. Laying cables to the house
There are two ways to route the power cable into the house:
- underground;
- air.
Underground installation is a more reliable and modern technology, but also more difficult to implement. It is justified to use it when building a new house. Under the ground, the cable experiences much less stress than the one hanging in the air and lasts longer: it will not break from the wind or a tree falling on it. Plus, a house without wires hanging around it looks much better. Installation is complex, time-consuming and expensive. You will need to dig a trench at least 80 cm deep; entry into the house is carried out by installing metal sleeves from thick-walled pipes. Power copper wire is used.
Overhead installation will cost less and will be completed faster, but be prepared to be left without electricity in the event of severe bad weather. Carrying out such work is possible if the distance to the object is no more than 25 m - otherwise you will have to install additional support, which costs money. For connection, a self-supporting insulated wire with a cross-linked polyethylene sheath is used; the cross-section and number of cores depends on the connection power.
Aluminum wiring is not installed inside the house - only copper is used, so a VVGng cable is used from the connection point to the input distribution board. For connection, sealed clamps are used, and the VVGng cable, according to the rules, must be enclosed in a metal sleeve made of a thick-walled pipe. In the same sleeve, the cable is led to the distribution panel, if the latter is not placed outside or is not located at the entrance to the house.
The shield is installed in a safe place, ensuring easy access to it. Circuit breakers and RCDs are installed in the switchboard.
Clamp or solder
The contact point between the grounding conductors and the metal hose must have mechanical strength, reliability and minimal resistance.
If you follow the correct installation technology, this result can be achieved in both ways. Soldering will be more appropriate when implementing large-scale projects, since it does not require additional equipment, the use of soldering acids, and requires certain skills. Anyone can install the clamp using a regular screwdriver. Today the market offers products of various diameters and designs.
It is important to note that before installation, the surface of the metal hose must be cleaned to remove foreign substances and eliminate the oxide film. This procedure will significantly improve the quality of contact.
No. 6. Laying cables across rooms
The cross-section of the wiring cables depends on the load that will be placed on them. This is the subject of serious calculations, but you can also use tables in which the cross-section of wires has already been calculated depending on current, power and voltage.
Open wiring in cable channels
Before starting work, it is best to mark the future locations of sockets and switches . For safety and aesthetic reasons, it is best to install open wiring in cable ducts in a wooden house. They are made of self-extinguishing plastic, are a box with a latch, the size and color may vary. The wiring process in this case is as follows:
- choose a cable channel that corresponds to the number of wires and their cross-section;
- remove the cover and attach the channel box to the surface with self-tapping screws;
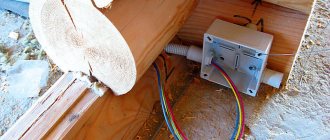
- Distribution boxes are installed at the cable connection points;
- the base of sockets and switches (only those intended for external wiring are used) are fixed to the designated places;
- the cable is laid in the channel and covered with a lid;
- The ends of the cables will be connected in junction boxes. Connect the cable to sockets, switches and circuit breakers.
Internal wiring in a metal pipe
If you decide to install hidden wiring in a wooden house, then the procedure will be as follows:
- preparation of grooves and installation of open junction boxes; they must be freely accessible even after wall cladding;
- wiring through walls This is done using metal pipes called feed-through sleeves. First, a hole of the required diameter is prepared in the wall, then a sleeve is placed; it should have a plastic sleeve at the edges. Special metal sleeves are placed under sockets and switches;
- The diameter of the pipe is chosen such that after installing all the cables, there will be 60% free space left in it. Preference is given to copper pipes, which bend well and are easy to cut. After cutting, the ends of the pipes are well ground or provided with plastic rims. Pipes are attached to a wooden surface with clamps, to metal sleeves - thanks to the flaring of the pipe inside the sleeve;
- pull the cable through the pipe and check the insulation;
- connecting cables in junction boxes and connecting to sockets and switches.
Installation of corrugations under drywall
Corrugation for drywall is mounted into the structure frame along the planned electrical wiring routes. The corrugation is attached to a metal frame or sheet. The fastening must be rigid to ensure the possibility of pulling and re-tightening the wiring.
Corrugated routes should not have more than one turning angle less than 130-145˚. The laying of the corrugation should be smooth. This will ensure trouble-free cable pulling and quick replacement.
In practice, I note that the corrugation cannot be rotated exactly 90˚. When laying it, the corners are smoothed and the larger the turning radius, the better.