Lighting in the Cellar
Lighting in the cellar is quite important. Natural lighting in the basement is almost always used, but electric lighting is also installed.
After all, sometimes you have to go there even in the dark. There are certain requirements for basement lighting and they must be met, and your safety depends on it.
Choosing lamps for the garage
For garage lighting, you can use incandescent, halogen, fluorescent and LED light sources. They differ in the principle of operation, power consumption and the amount of luminous flux per 1 W of energy.
Incandescent and halogen
Incandescent lamps work by heating up a tungsten filament. This metal has a high resistivity, so when an electric current passes, it intensely releases heat. A hot filament emits light.
The advantages of incandescent lamps are their low cost, lack of blinking when starting, independence from air temperature and the number of starts. Disadvantages include high power consumption (40-100 W), low efficiency, short service life (up to 1000 hours) and loss of brightness over time. The light from a tungsten lamp has a warm, pleasant hue; the light output from 1 W of power is 7-15 Lm.
Halogen (halogen) lamps also operate by heating a metal filament. The sealed flask of the device is filled with iodine or bromine gas. Gas allows you to increase the temperature of the filament, increase light transmission and extend the service life of the product. The reaction of halogens with tungsten prevents intense evaporation of the metal and a decrease in the brightness of the glow due to the condensation of its vapor on the walls of the flask.
The disadvantages include the strong heating of the bulb and sensitivity to frequent switching on. Like standard incandescent lamps, they can produce a warm light, although they are somewhat inferior in color rendering quality. Light output is 15-22 Lm/W.
Luminescent
The operating principle of luminescent (gas-discharge) devices is based on the passage of an arc discharge and the glow of a phosphor under the influence of UV radiation. The potential difference at the internal contacts of the bulb leads to the formation of an arc. The phosphor layer converts ultraviolet radiation from the discharge into visible light.
Gas-discharge devices consume 4-5 times less than incandescent lamps. Each watt of power produces 40-60 lm. The average service life of the device is 6000-8000 hours. Due to the low color rendering index (60-80%), fluorescent sources emit predominantly cool colors. Frequent switching on and off leads to breakdown of the built-in start-discharge equipment.
In addition to the inert gas, the sealed flask contains mercury vapor, so such devices cannot be disposed of along with other waste.
LED
Bright lighting plus economy.
Lamps of this type are equipped with LEDs, a converter (driver), board cooling radiators and a diffuser. When power is applied, two semiconductors come into contact, upon contact of which a luminous flux occurs.
Light-emitting diode (LED) sources are insensitive to shaking, voltage surges, cold and high humidity. Due to good color rendering (80-90%), these lamps can emit both cold and warm light. You can select the color temperature according to the product labeling:
- warm white (WW) is warm white light, its color spectrum is from 1800 to 3300 Kelvin (K);
- neutral white (NW) - natural white, its color temperature is from 3300 to 5000 K;
- cool white (CW) - cold white, emitted by lamps with a spectrum from 5000 K.
LEDs with a color value of 3300 K or higher are suitable for non-residential premises. Cold light invigorates and gets you ready for work, but often causes discomfort. For long-term work in the garage, it is recommended to choose neutral sources.
LED sources are the most expensive of these. The price is compensated by low power consumption (4-14 W) and long service life (15,000-25,000 hours). The light output of the diodes reaches 100 Lm/W. This indicator is determined by the quality of the lamp and the voltage on the power source.
Comparative table of power consumption for lamps of various types.
| Luminous flux, Lm | Incandescent, W | Luminescent, W | LED, W |
| 250 | 20 | 5 | 3 |
| 400 | 40 | 8 | 4 |
| 700 | 60 | 15 | 10 |
| 950 | 75 | 19 | 11 |
| 1300 | 100 | 26 | 14 |
| 1800 | 150 | 36 | 20 |
Safety requirements
In conclusion, we cannot ignore the topic of requiring electrical safety rules during work and operation. There are not many of them, but a person’s health and sometimes life can depend on them. So:
- In damp and damp rooms (for example, in inspection pits), it is necessary to use portable and stationary lamps with protection class IP65 powered by 12 V, which is ideal for LED lamps;
- Electrical wiring in the garage must be double insulated and have a cross-section corresponding to the power consumed by the lamps;
- Lamps with a 220 V power supply must be explosion- and moisture-proof; it is advisable to connect them using an RCD;
- All electrical wiring must be laid in protective boxes, and in work areas where mechanical processing of metal parts is planned - in armored (metal) sleeves, which must be additionally grounded;
- It is not permissible to connect wires “with twists”; to prevent sparking it is necessary to use special terminal blocks;
With a serious approach to the work performed, any car owner can arrange ventilation and lighting to his liking, efficiently and at minimal cost, the main thing is to carefully study the electrical goods market and fulfill the basic requirements given in this article.
Wiring installation
The basic rules for installing cables are to use high-quality components selected taking into account the likely load. It is determined by calculation, and is taken with a small margin (to avoid overloading the power units). When installing lighting in the basement, the cross-section of the wire (it is best to take copper) is also selected a little larger than required.
Any connections should be avoided - with twists, terminals, soldering: the fewer connecting points of wiring lines in the basement, the higher the likelihood of its trouble-free operation. Electricians recommend installing a special device for protection against electric shock (RCD) on the switchboard with the transformer. This additional measure will increase the safety of people using electrical wiring and lighting.
Wiring in the basement is carried out with the mains completely de-energized, starting from the installation of fittings and connecting wires. It ends with a connection to a step-down transformer. It would be useful to lay the cable in a sleeve (preferably not subject to corrosion) - the current-carrying conductors must be reliably protected from the influence of the external environment.
Choosing lamps for garage lighting
Choosing lamps for garage lighting
The choice of products to make good garage lighting is currently very wide. But each garage lamp of one type or another has its own advantages, disadvantages and has some requirements: where to place it, how to install the power supply system, what shades are required for lamps of the selected type. The choice of luminaires and lamps is significantly influenced by the following factors:
- The height of the ceilings in the room and its area;
- Color and material of interior walls and ceilings. It is known that wood paneling “steals” light flux, while glossy paint on metal successfully reflects light;
- The size of the working area and its location;
Let's look at the main types of lamps that can provide high-quality light in the garage.
Halogen
Halogen lamps
They have a powerful luminous flux and a significant service life. Disadvantages include sensitivity to power surges and the need to install a reliable lampshade. They are often used as portable lighting in an inspection hole, which is quite easy to install in the garage with your own hands.
Incandescent lamps
Incandescent lamps
Their main advantages are low cost, ease of installation and replacement. Disadvantages - short service life, high energy consumption, low quality luminous flux, flickering. Among other things, this type of lamp can even be dangerous: when they burn out, sparks are formed, which in a garage, where there may be vapors of flammable substances in the air, can lead to a fire or explosion.
Fluorescent lamps
Fluorescent lamps
They are economical, provide a high level of luminous flux, but are quite capricious. In low temperature conditions, such light sources may simply fail, which means they should only be used in heated garages. In addition, when the starter fails, the lamps begin to blink, which does not add convenience to operation.
Energy saving
Energy-saving lamps
As the name suggests, they have low energy consumption. They are quite durable and provide high-quality lighting. Their disadvantages are sensitivity to low temperatures, which complicates their ignition, and high cost.
LED Garage Lights
LED bulbs
Having appeared relatively recently, they quickly gained well-deserved popularity. The only negative is that the high cost is successfully offset by numerous advantages. LED lighting in the garage can be carried out using small-section electrical wiring, since the power consumption of an LED lamp is truly insignificant. They are unpretentious and absolutely safe, so they can be installed without shades. It is also important that such light sources are available in various types and the most picky car owner will be able to choose his own LED lamp for the garage. Lamps of this type can be shaped like fluorescent lamps or with a base like incandescent lamps; they are also produced in the form of LED strips. Such strips come in either a monochrome glow or universal ones with the ability to change the color of the luminous flux; they are powered by a 12, 18 or 24 V power supply. An impressive service life of about 50 thousand hours exceeds the performance of other lamps by tens of times, which only emphasizes the rapid self-sufficiency against the backdrop of extremely low electricity consumption. In addition, LED garage lighting is harmless to humans in terms of the materials used, has a more natural and powerful luminous flux, and is absolutely insensitive to low temperatures.
Location examples
The most common arrangement of lamps in a garage is ceiling. In this scheme, all lighting fixtures are located on the garage ceiling. This arrangement ensures optimal and uniform distribution of light over the garage area with a minimum number of light sources. Due to this, this scheme is popular among car enthusiasts.
The wall layout of lamps is used no less often. Simplicity of installation and ease of maintenance determine its popularity. This scheme allows you to save space along the height of the garage, if this is necessary to perform some type of work. However, wall lighting is inferior in terms of illumination to the central one.
A combined arrangement of lighting devices is often used. This makes it possible to perform many types of repair work in the garage. This scheme is considered universal. Connection to the power supply network is carried out separately. Wall lights are connected to one circuit breaker, and ceiling lights are connected to the other. This makes it possible to use each scheme separately.
If repair work involves frequent use of the inspection pit, stationary wall lighting with a voltage of 36 Volts is installed in it. In this case, the use of a carrier will not be necessary, which is an advantage of this method of placing lamps.
For the best placement of lamps in the garage, you can consider a few tips:
When installing street lighting in a garage, attach a motion sensor to the lamp. This will save energy.
- In a heated room, install fluorescent lamps or LED lamps if the garage is not heated.
- To protect your garage lighting system from short circuits and overloads, install RCD circuit breakers.
- It is necessary to install a grounding circuit for the electrical wiring to avoid accidents.
- Be sure to install emergency lighting and power it from a 12 Volt battery. You can think about alternative energy sources.
- Do not skimp on the quality of component materials. Remember that the miser pays twice.
To learn how to make LED garage lighting with your own hands, watch the following video.
Advantage of installation
The option of placing electrical communications in the basement of a building has a number of positive aspects:
- Keeping the main part of the wiring away from the residential areas of the house reduces the risk of electric shock.
- Installing electrical wiring and cables in the basement is much easier, since there is no need to make the wiring hidden.
- If the cable is damaged, repair work is not carried out in a residential area.
We will reveal the features of laying cables in the basement in this article. We also recommend that you read the instructions on how to!
Carrying out lighting calculations
When choosing a particular type of lighting, you must adhere to SNiP standards. This document contains all the requirements regarding the creation of an optimal lighting system that will not affect the car owner’s vision. If the light is too strong/weak, it will soon become a reason to consult a doctor.
Calculation of the required power of light sources
To independently calculate lighting, you can use one of the ready-made utilities (for example, the DIALux program), in which it is carried out according to predefined parameters, or you can do everything yourself using a special formula:
SxP/N
Here P is the specific power, S is the area, and N is the number of lamps.
But this formula is only suitable for incandescent lamps, and for LEDs or halogen lamps the calculations must be carried out slightly differently.
Experienced people know one fairly simple way to determine the power of lamps - the optimal parameter ranges from 16-20 W per 1 m² of area. To obtain more specific figures, you should measure the height of the walls and make adjustments to the calculation result:
- if the height does not exceed 2.5 m, then nothing needs to be corrected;
- if the height is 3 m or more, then the data obtained must be multiplied by 1.5.
The interior decoration of the room also plays an equally important role. To achieve optimal lighting, you need to follow one simple rule: the darker the finish, the more watts are added.
To increase efficiency, some craftsmen line the garage walls with reflective material (for example, thick foil).
Various types of lighting made with LED spotlights
Due to their advantages, versatility and energy efficiency, LED-based floodlights are widely used to illuminate various areas and types of lighting.
For sports ground
Sports grounds can be located on the street or inside buildings and structures, therefore the type of floodlights used, in terms of performance, must correspond to the conditions of their operation. Otherwise, the selection and installation of light sources at such objects is carried out similarly to other types of illuminated areas.
The lighting of the sports ground should be comfortable both for the players and athletes, and for the spectators watching them. In addition, the lighting devices used should not blind everyone present.
The basic conditions for lighting sports fields are:
- Illumination in accordance with the requirements.
- No glare effect.
- The presence of even, flooded light over the entire area of the site.
Currently, the LED market offers a fairly wide range of products, including those used for lighting sports fields. These are products of domestic and foreign companies, of which the most popular in the group of goods produced in Russia are:
- SVT "STARK" series, ;
- “Pandora LED” series, produced by “Experimental Instrumentation Plant” LLC;
- Series "LGT-Street-Solar", ;
- “Viled” series, produced by JSC “VILED”.
For garage
To illuminate a garage, regardless of its area and other operational characteristics, various light sources are used, including LED spotlights.
Calculation of lighting for garage work areas is carried out in accordance with the above methodology, and the main conditions for lighting such areas are:
- Creation of the required illumination in accordance with the nature of the work in a specific area of the garage (vehicle storage area, inspection pit, workbench and repair area).
- Fire safety of use.
- Possibility of use at low-order voltage (12.0 Volts DC) - especially in the inspection pit area.
- Ability to work at different ambient temperatures.
For general illumination of the garage area, linear spotlights are used, and for illumination of the inspection pit and workbench area, directional ones are used, creating a narrowly directed luminous flux.
The criteria for choosing a light source for use in a garage will be the following:
- The purpose of the device and its type of execution.
- Technical characteristics (electric power, luminous flux and supply voltage).
- Method of installation and fastening.
- Manufacturer's brand and its cost.
For aquarium
When designing the landscape design of an area and creating an individual style for various types of premises, LED spotlights are used to illuminate architectural forms and various types of structures.
This type of lighting also includes illumination of aquariums located both inside buildings and outdoors, in regions where weather conditions allow this.
As a rule, spotlights are used to illuminate aquariums of large geometric dimensions, with a large volume of water and depth of structure.
There is no specifically developed methodology for calculating the lighting of aquariums, but usually the ratio of water volume and illumination is taken as a basis, which is 40 Lux (40 Lux) per 1 liter of water for conventional systems, and 60 Lux for aquariums with light-loving plants and algae.
When choosing a device to illuminate an aquarium, you need to pay attention to:
- The attitude of the inhabitants of the aquarium to the intensity of light emitted by lighting devices.
- The degree of protection (moisture resistance) of the lighting device must correspond to the operating conditions.
- The type of mounting of the spotlight must correspond to the location where it is installed.
Safe components
The most reliable and safe electrical fittings are those that were purchased in specialized stores and have all the required protection elements, and are not found in the ruins of spontaneous markets. Before choosing lamps for the cellar, a voltage reduction unit, as well as switches and sockets, you must make the necessary calculations.
You need to pay attention to the amount of electric current in the network and power consumption, and based on them, select equipment. It is permissible to use modern LED lamps or LED basement lamps in a silicone tube: they are characterized by reliability, durability, and efficiency. They also shine brighter than regular light bulbs and are not much different in price. In addition, there are lamps for the basement in 12 versions.
Switches are definitely with a high level of protection, and not ordinary keypads. This precaution will save you from unpleasant surprises with a short circuit to the housing and electric shock.
Attention. Installation of electrical outlets in basements and cellars is strictly prohibited, since none of them can be absolutely sealed and safe. Failure to comply with this requirement is a direct path to creating a traumatic situation.
How to do installation work yourself?
Many people ask the question: “How to make light in the garage?” Everything is banally simple; it is necessary to complete several stages of design, installation of lamps, cables and switches, as well as connection to the power line. For example, you can easily replace old lamps with LED lamps, whose power is several times lower. If you additionally use an LED strip, you will have to buy a 220/12 V power supply.
Correctly placed lampsLighting layout
During design, it is necessary to take into account that LED garage lights must be mounted so that there is optimal lighting anywhere in the room. To do this, you will need to attach light sources along the contour of the garage, but in this case it is necessary to diffuse the flow of light. To attach LED strips, you need to clean the surface in the lampshade, where they are then placed on glue.
Connecting LEDs and switching lines
The length of the LED strip depends on the size of the garage and the area that needs to be illuminated. You can make two of these lamps yourself and hang them either on the walls or on the ceiling. After the installation is completed, you will need to connect the strips located in the homemade lamps together and connect to the power source. You can also use a portable spotlight. It is suitable for those who do not have lighting in the inspection pit, or if it is poor in hard-to-reach areas.
Main lighting fixtures are usually installed on the ceiling. The one that will be placed above the hood of the car should not create a shadow or blind the owner. Spotlights can be installed directly in work areas.
The presence of an inspection hole in the garage determines the provision of high-quality lighting in that area. This is due to the fact that the car completely blocks the incoming light flow. For bright lighting, you can use LED strip or lamps that are mounted in places convenient for the owner.
LED lamp above the workbench
An electrical cable is laid to connect to the network. It is better to install the illuminators in the pit in special grooves. This will save them from mechanical impact, and also the person will not constantly cling to them. The luminaire housing must have IP67 protection. This is due to the fact that the pit is located below floor level and moisture, dust constantly accumulates in it, and oil can spill. The power supply to the luminaires in the inspection pit must be supplied from a separate circuit breaker designed for a minimum operating current.
Switching to LED lighting is currently an expensive proposition. This is why many garage owners use incandescent lamps.
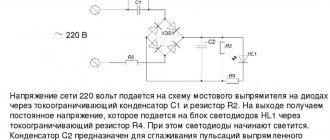
Difavtomat
Lighting in basements at 220 volts is permissible only if there is a concrete floor and it is impossible to install low-voltage lighting. To increase electrical safety, it is necessary to install with an operating current of no more than 30 mA. All wires must be laid in corrugation, and their connections with junction boxes and consumers must be reliably sealed.
Residual current circuit breaker
You can do the lighting in the basement yourself. All work must be carried out with the voltage turned off. If possible, it is better to install a step-down transformer in the electrical panel of the house, or make a separate panel for it, also located in the house. If this is not possible or there is not enough space, the transformer is mounted in the basement. In this case, it is necessary to place it as high as possible above the floor to protect it from moisture. It can be installed in a metal panel or on corner brackets, which must be connected by wire to the transformer core and grounded. It is advisable to mount the circuit breaker nearby so that if an accident is detected, it is possible to quickly turn off the voltage.
Installation option for an electrical panel with a step-down transformer
Lighting for workshop inspection pit
The pit is an important area of the auto repair garage. Due to the fact that the pit will be more humid than the room itself, it is recommended to use lamps that have a sealed design to illuminate it. This will help prevent condensation from accumulating inside the lamp.
For safety reasons, lighting the inspection pit (as well as the garage cellar, if there is one) is allowed only with the help of a step-down transformer. The network voltage in the pit is recommended to be no more than 42 V. Installing a switch or socket in the pit is strictly prohibited. At the same time, you can make as many lamps as you like. If you use it often, you can install three or four lamps (one on each side in the recesses). It is advisable to purchase lampshades for this place with protective grilles.
On the forums, car enthusiasts recommend taking care and installing a transformer that lowers the voltage to 12 V. It will help avoid electric shock. This is reasonable, since dampness and humidity can accumulate in the pit.
If you will use a portable lamp to work in dark areas of the car in the inspection hole, then you need to choose a low-voltage model. Such a lamp must be connected to a four-meter wire. Attach the lighting fixture to a hook screwed into the wall.
An alternative to carrying is a flashlight, which is mounted on the head. It is sold in tourist stores, but some craftsmen make it themselves using a regular battery-powered flashlight and a belt.
You can get inspired by ideas for installing lamps in the garage by watching two videos:
As practice shows, it is easier to arrange lighting in a garage than in an apartment. if you choose the lamps wisely and design everything in advance. Most owners prefer to do the wiring themselves. The main thing is to remember safety!
A step-down transformer
In the basements of old houses there is a transformer with an output voltage of 36 V, used for lighting. A cable with a cross-section of at least 5 sq. mm is connected to it through an automatic protective switch, to which wires from lamps and switches are supplied. It is advisable to use copper wire, but aluminum can also be used. For ease of installation, lamps are connected to the cable not individually, but in groups of 3-6 pieces, connected by a wire of smaller cross-section (to save cable). Such a group usually illuminates a separate corridor, room or passage. All connections are made in junction boxes using terminal clamps.
Installation of a corridor lighting group using terminal clamps
Lighting in the basement of a residential building
The structure is much simpler than that of an apartment building. This is due to the significantly smaller area of the basement. To get 36V voltage there are two solutions:
- purchase a small 36 V step-down transformer,
- use ready-made power supplies or autotransformers.
The transformer is connected to the lighting network through an automatic protective device. All other requirements for wiring installation are the same as for apartment buildings.
Step-by-step instructions for organizing lighting in the garage
To ensure adequate lighting of the room, the garage owner must adhere to the proposed sequence. The type of lighting equipment is pre-selected.
Choosing a wiring diagram in the garage
The electrical wiring diagram is drawn up based on the type of lamps (spot or general) and the needs of the garage space. Decide on the location of the wiring (hidden or external). Draw a general view of the garage on the diagram and note on it:
- Installation location of the distribution meter and panel;
- Places for laying cables - on the walls or ceiling;
- Installation points for distribution boxes, sockets and switches;
- Connection points for general and local lighting;
- If necessary, connection to any equipment.
After this, all data is transferred to the wiring diagram. An example of such schemes is shown in the figures.
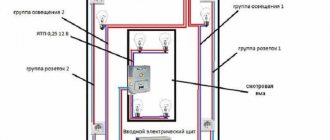
Rice. 1: Garage lighting scheme
Figure 2: Lighting diagram without pit
Rice. 3: Lighting circuit for two terminals
Calculation of the number and power of lighting points
First, determine the lighting power required for the garage. For example, you chose 20 W LED lamps and decided that 5 W would be enough for one square meter. Measure the area of the garage, for example, the dimensions of the garage are 6 m × 4 m = 24 m2.
The number of points is calculated by the formula: N = (S × Pm)/Pl, where S is the area of the entire room, Pm is the lighting power for one square meter, Pl is the power of one light bulb. For the above parameters, we obtain the calculation N = (24 × 5) / 20 = 6. Accordingly, you will need to install 6 lamps, but their location in the garage should provide uniform lighting, so the next step is to choose the place and method of their location.
Selecting the location of light sources
Depending on the chosen type of lamps and the area of the room, lighting can be achieved with one lighting device in the center of the ceiling. But this will not always provide the required level of illumination near the wheels, bumpers, under the hood, etc. Therefore, when choosing the location of artificial lighting in the garage, you should be guided by the following principles:
- Spotlights should not only be placed at an equal distance from each other, but also be directed strictly into the work area from different sides.
Avoid unnecessary dispersion of flow on walls and ceilings. Rice. 4: Example of the location of lamps on the ceiling - In addition to general lighting devices, you can use portable lamps that will provide light in hard-to-reach places.
For them, install a sufficient number of accessible sockets around the perimeter. Figure 5: Example of portable light installation - If you install one lamp on the ceiling, then it is better to mount it on a rotating bracket, which will allow you to change the angle and redistribute the light flux.
- With a ceiling height of 3 m or more, it is necessary to provide light from three levels at different heights, for example, the first at a height of 0.4 - 0.5 m from the floor, the second 0.75 - 1 m and the third 1.5 - 1 .8 m. The specific height should be selected on site, in accordance with the individual characteristics of the room.
- If there is a metalworking table or workbench above it, it is advisable to install a separate lighting element aimed at the surface of the table, movable spotlights and a group of sockets for connecting power tools.
Rice. 6: Table lighting
Required tools and materials
To mark the walls for wiring, use a level and marking pencils. When drawing lines on the walls for grooves, placement of cable ducts or corrugations, mark the attachment points for lamps and sockets.
From the tools, take those that will help in installing the lighting and mounting it: a hammer drill for drilling walls and a screwdriver for installation work. A screwdriver can be replaced with a regular screwdriver, but it will require much more effort and time.
The materials you will need are lighting devices (lamps, lamps, LED strips) and switches for them. For the point of entry and distribution of the electrical network, take a panel with an RCD. Sockets and electrical wires are selected based on the load on them. To do this, the power of the devices powered from them is summed up, from which the minimum cross-section is determined according to Table 1.