One of the stages of conducting electricity to the site is the selection of a suitable cable from the pole to the input panel. It is important not only to correctly calculate the cross-section of the conductor, but also to choose a brand that will satisfy the requirements of the energy supply company inspector and at the same time will last a long time. In this article we will look at what cable is needed to connect a house to the power grid over the air and underground.
Wire cross-section from pole to house. What cable is needed to enter the house?
When planning to build a house, you need to supply electricity to the site where it will be located. Let's look at how you can conduct electricity from a pole to a house. Cable entry into the building is carried out following the completion of construction in two ways: underground or overhead. The overhead electrical line is easy to install and maintain; any damage that occurs in it is easily corrected.
This method of supplying electricity is used more often than underground, as it is cheaper. Connecting electricity from the pole to the house by air is carried out in two stages. First, the wire is laid from the pole to the house, then electricity is introduced into the building. A branch from a pole, that is, wiring, is a section of cable stretched from a pole to an insulator mounted on the outer wall of a building.
By input is meant the section that goes from the insulator to the panel in the house. When the distance from the pole to the house is from 10 to 25 meters, the wires must be taken with a cross-section: aluminum wires provide a minimum cross-section of 16 square meters. mm, copper - not less than 4 mm. If the distance from the house to the pole is more than 25 meters, then it makes sense to install intermediate poles.
The standard distance between electric poles is up to 50 meters. External electrical wiring is placed so as to avoid contact with balconies, metal fences, fences; the height of the location must also be sufficient. The wires run along the walls, and horizontal wiring above the roof and under the balcony requires a distance of 2.5 m, under the window - 50 cm.
Vertical wiring allows an acceptable distance to the window of 75 cm, to the balcony - 1 m, and possible vibration of the wires must be taken into account. The cable is introduced into the building through the walls in insulating pipes. Entering an electrical line underground is much more expensive due to expensive consumables than an overhead entry, although it is more aesthetically pleasing, since hidden wires do not spoil the appearance of the site, unlike an overhead entry.
To perform underground entry, the cable is laid down to the trench along a pole, protected by a steel pipe from any mechanical influences to a height of up to 3 meters. The cable laying depth, taking into account the voltage, is expected to be from 70 cm to 1 meter. There must be a distance of at least 70 cm from the underground cable to the foundation of the building.
It is not allowed to pass electrical lines under the foundations of buildings or in the ground. When laying a cable in the garden, you should remember that the distance from the cable to the trees cannot be less than 2 meters, and the acceptable distance to the bushes is 75 cm.
How to choose a cable from a pole to a private house?
It is best to use SIP wires from the pole to the house, that is, self-supporting insulated wires. It is dangerous to connect electricity to a private home with your own hands; it is better to have this work carried out by specialists. To do this, you need to contact the distribution network of the area where the house is located, write an application for connection, and also indicate the power consumption.
Connection to the electrical network of private houses is most often made using SIP cables (self-supporting insulated wire).
This is a specialized cable suitable only for external networks (it contains aluminum cores). The cable is connected through an overhead branch from the power line.
According to the technical regulations, the installation of SIP cable from the pole to the house must be carried out by certified specialists. It is not recommended to do such work with your own hands, so this article is given for informational purposes only.
Subscriber branch: concept, principle of operation
On each street there are main power lines, the voltage through which comes from the nearest transformer substation. A higher potential difference of 6 or 10 kV arrives at the transformer. But this information is solely for general development, since the main line voltage is 380 V, and between the phase and the neutral wire - 220 V.
To lay a cable from a pole to a separate consumer - a private house, it is necessary to install a subscriber branch from the main line. A subscriber branch is the supply of electricity to an individual consumer. With this procedure, you must correctly calculate the wire through which the electricity will be supplied.
Advantages of SIP
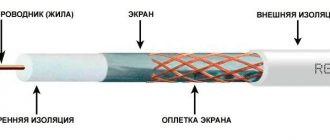
A SIP type cable includes several cores, combined by twisting into a single structure. The entire surface of this bundle is covered with insulation, which is cross-linked or thermoplastic polyethylene.
The technical capabilities of SIPs allow us to achieve better technical performance in comparison with old type wires (A or AC). Legacy cables did not use an insulating layer, but rather each core was installed individually using dedicated insulators located on the crossarms. In SIP, the device is much simpler, since the harness pre-tensioned by a winch is simply fixed to the support.
SIPs can even be installed on walls, which was impossible with the old type of wires. This feature is especially important in urban conditions, since it becomes possible to use short supports and install cables near low-current lines.
SIP allows you to save material and technical resources. For example, such a cable does not require wide forest clearings for power lines, as is the case with old-style wires. In addition, SIPs are reliable: such wires are less susceptible to breaks and overlaps, and therefore to short circuits. And the SIP structure itself is stronger: breaking four tightly twisted wires is not easy.
SIP is resistant to moisture, low temperatures and temperature changes. If an ice crust inevitably forms on ordinary wiring in winter (resulting in broken lines), then the SIP wires are protected by an insulating layer that prevents icing of the material.
The only exception to the above is the two-core modification SIP-1, in which the load-bearing conductor is not covered with insulation. In other cables, the supporting conductors are either inside the bundle (SIP-4) or insulated.
It should be said that SIP has become a technical standard: all energy sales organizations require the use of this particular type of cable to organize new connections.
One of the motivations of marketers: SIP allows you to avoid unauthorized connections (in other words, theft of electricity), which is easy to organize in the case of uninsulated wiring.
In addition, thanks to special devices, it is possible to arrange branches from the main cable without turning off the power. This possibility is provided by the presence of an insulating layer. Consequently, another advantage of SIP is operational safety.
And, finally, another advantage of SIP is the smallest losses among competitors when transporting energy over long distances. This is achieved by low reactance (for old type cables this figure is three times higher).
Required safety standards
To ensure the electrical safety of installed wiring in a country house, the use of elements such as protective grounding, RCDs and automatic circuit breakers should be provided in advance.
Protective grounding
As mentioned earlier, in most cases, old four-wire power lines are used to power country houses. This means that a combined neutral and ground wire is used. If it breaks, life-threatening voltage may appear on the equipment housing. The machine will not turn off due to the rated current flowing through it. To eliminate such situations, it is necessary to install an additional grounding circuit on the site.
Design of a protective grounding loop
Note! To install a grounding system in a dacha, it is recommended to use factory-made modular-pin circuits. They can be installed in any type of soil without loss of performance characteristics
RCD
Installing a residual current device allows you to ensure the safety of a person from electric shock, as well as prevent the development of a fire. The RCD reacts to leakage currents that are formed when the insulating coating of the cores is damaged or when the neutral wire breaks. It is recommended to mount the RCD directly at the power input.
The shutdown setting is selected taking into account the calculated leakage currents of all electrical equipment used in the country. The resulting value must be increased three times. RCDs with the following rated differential currents are available for sale: 10, 30, 100, 300 mA.
Connection diagram for RCDs and circuit breakers
Automatic circuit breakers
To protect cable lines from overload currents and short circuits, circuit breakers should be used. They are established for each individual consumer group. Selection is carried out in accordance with the calculated current consumption. As a rule, individual machines are mounted on lighting and socket networks.
Selection of section and grade
When choosing a brand of SIP, you should take into account the following factors:
- purpose of the overhead line;
- operating conditions, installation location, safety requirements;
- the required number of phases;
- total estimated power.
Design features of different brands of SIP:
- SIP-1: bare steel core on a zero load-bearing core;
- SIP-2: the zero of the load-bearing core is covered with insulating material;
- SIP-3: each core has a reinforced core enclosed in an insulating layer;
- SIP-4: the cores are insulated, but the cores are not used;
- SIP-5: there are no cores, and light-stabilized polyethylene is used as insulation. The cable is marked “NG”, which indicates its non-flammability. SIP-5 can be used even inside buildings, although to a greater extent this SIP, like any other, is intended for external lines.
The easiest way is to select the SIP section. The fact is that the minimum cross-section of such a cable cannot be less than 16 square millimeters. This is more than enough to provide electricity to an average-sized private home.
If you need to insert a cable into a large private house or apartment building, you will have to use special reference tables to calculate the required cross-section.
The most common SIP is two-wire (zero and phase) or four-wire (two additional phases). Cables with five cores and an additional PE protective conductor are very rarely used.
No. 5. Marking of power cables
Looking at the cable markings, an experienced person will immediately tell what it is made of and under what conditions it is best used. According to domestic GOST, letter marking :
- the first letter indicates what metal the current-carrying conductors are made of: for aluminum - A, for copper there is no designation;
- the second letter is the insulation material. If it is paper impregnated with resins - C (sometimes there may be no markings at all), if non-flammable rubber - NR, if PVC - B, if polyethylene - P, cross-linked polyethylene - Pv;
- the third letter - the features of the outer shell of the cores: A - aluminum, C - lead, P - polyethylene, B - polyvinyl chloride;
- the fourth letter indicates the type of armor, if any: K – round galvanized wire, P – flat galvanized wire, BbG – profiled steel strip, B – steel strips, Bn – steel strips with a non-flammable coating;
- the fifth letter is the material used for the outer cover, for example, a polyethylene hose (Шп), or a non-flammable compound (Н). If there is no outer cover, the marking is marked with G;
- the sixth letter indicates various additional characteristics. For example, there is a cable that does not light up (ng).
The cable may be without armor, then the marking will not have the corresponding symbol. Above are the most common designs of key elements, but in the marking you can also see other letters, the meaning of which is presented in the table. Marking is applied to the cable in 1 m increments.
The marking also contains digital symbols that indicate the number of cores and cross-sectional area, as well as the presence of a zero core and its cross-section. For example, a cable with three cores with a cross-section of 1.5 square meters. mm are marked as 3 * 1.5, and if there is a zero core, you will see a plus sign, after which the number and cross-section for the zero core are indicated in exactly the same form as for a current-carrying cable.
Foreign-made power cables are marked differently. So, for example, the letter Y denotes PVC insulation, C – copper screen, HX – cross-linked polyethylene insulation, RG – the presence of armor.
Let's say we have a VVG power cable in front of us. This means that it is copper, since the first letter A is missing. The cores in it are insulated with polyvinyl chloride, the general insulation is also made from it, but there is no outer covering.
Input of electricity into the building
As mentioned above, laying the input cable is the prerogative of the employees of the energy sales organization.
Connecting a house to a power line can be done in three ways:
- Overhead line from pole to building. Aluminum wires without insulation are used. The method is unsafe; in recent years, they have been trying not to use it.
- Input from the overhead line using SIP. Due to the reliability of the line and operational safety, this method of delivering electricity is considered a priority.
- Armored underground cable. The method is considered the safest (especially for wooden buildings), but its disadvantage is its high cost. Rarely used.
Despite the advantages of SIP described above, there are many opponents of this technology when it comes to residential buildings (even if they are houses made of brick or stone). Many experts consider the SIP insulation layer to be not reliable enough for residential buildings.
To prevent undesirable consequences in the event of an insulation rupture, cables must be positioned at a certain distance from building structures.
The fact is that overhead lines are protected from short circuits by an automatic device that operates under conditions of high currents, and shutdown, if necessary, occurs with some delay. Even in a short period of time, the resulting electric arc can ignite building structures, especially if they are wooden.
However, most specialists prefer SIP. The numerous advantages of this type of cable cancel out the disadvantages, especially since safety can be ensured using a special thick-walled metal pipe into which the cable is laid.
The pipe allows you to neutralize the effects of an electric arc. It is recommended to pay close attention to the inlet and outlet holes of the pipe: they should be covered with corrugated material to prevent the wire from rubbing against the metal.
One of the ways to organize the input is to switch from aluminum SIP cores to an internal cable, which is used for wiring throughout the building. The main requirement for such a cable is fire resistance. In addition, the area up to the switchboard must be additionally protected with a circuit breaker. An automatic device is all the more necessary if wires without insulation are used, connected to a piece of cable.
Note! The rating of the machine must be one value higher than the value of the input panel.
DIY wiring
Modern construction trends provide for hidden wiring. It can be laid in specially made grooves in the walls - grooves. After laying and securing the cables, they are covered with putty, comparing them with the surface of the rest of the wall. If the erected walls will then be lined with sheet materials - plasterboard, gypsum plasterboard, etc., then grooves are not needed. The cables are laid in the gap between the wall and the finish, but in this case - only in corrugated sleeves. The shell with laid cables is attached with clamps to the structural elements.
How should internal wiring be laid? In a private home, when installing it yourself, you must follow all the rules
When installing, you need to remember that the internal electrical wiring of a private house is done according to all the rules and recommendations. This is the only way to guarantee safety. The basic rules are:
- laying wiring only vertically and horizontally, no rounded corners or beveled routes;
- all connections must be made in installation junction boxes;
- horizontal transitions must be at a height of at least 2.5 meters, from which the cable runs down to the socket or switch.
A detailed route plan, similar to the one in the photo above, must be saved. It will come in handy during repairs or wiring upgrades. You will need to check with him if somewhere nearby you need to ditch or make a hole or hammer a nail. The main task is not to get caught in the cable.
Wire connection methods
A large percentage of electrical wiring problems come from poor wire connections. They can be done in several ways:
- Twisting. Only metals that are homogeneous or do not enter into a chemical reaction can combine in this way. It is strictly forbidden to twist copper and aluminum. In other cases, the length of bare conductors must be at least 40 mm. The two wires are connected to each other as tightly as possible, the turns are laid one next to the other. The connection is wrapped on top with electrical tape and/or packed with heat-shrink tubing. If you want the contact to be 100% and losses to be minimal, do not be too lazy to solder the twist. In general, according to modern standards, this type of wire connection is considered unreliable. The rules for installing electrical wiring in a private building prohibit making twists in the walls (bricking them up)
- Connection via terminal box with screw terminals. The housing is made of heat-resistant plastic and contains metal terminals that are tightened with screws. The conductor, stripped of insulation, is inserted into the socket and secured with a screw or a screwdriver. This type of connection is the most reliable. Connecting electrical wiring using terminal boxes is fast, convenient, reliable, and safe
- Connecting blocks with springs. In these devices, contact is provided by a spring. A bare conductor is inserted into the socket and clamped by a spring.
Still, the most reliable connection methods are welding and soldering. If it is possible to make the connection like this, you can assume that you will not have problems. At least with connections.
Installing electrical wiring in a house with your own hands requires careful fulfillment of all requirements. This is a guarantee of your privacy and the safety of your private property.
After the wires from the machine to the connection point of the socket or switch are laid, they are checked for integrity with a tester - the wires are connected to each other, checking the integrity of the conductors, and each individually to the ground - checking that the insulation is not damaged anywhere. If the cable is not damaged, proceed with the installation of the socket or switch. Once connected, everything is checked again with a tester. Then they can be started on the appropriate machine. Moreover, it is advisable to sign the machine immediately: it will be easier to navigate.
After finishing the electrical wiring throughout the house and checking everything yourself, they call electrical laboratory specialists. They check the condition of the conductors and insulation, measure grounding and zero, and based on the results they give you a test report (protocol). Without it you will not be given permission to put into operation.
Pole connection
Next, we will consider ways to route the cable from the pole to the home electrical network. The least financially expensive option is to supply electricity by air. According to the requirements of technical regulations, the height at which the cable is inserted into the building should not be lower than 2 meters 75 centimeters.
If this standard is feasible, an RCD (residual current device) is mounted on the wall. A cable is supplied to the RCD from the pole.
If the above height cannot be achieved, a stand made of a metal pipe is installed. The stand can be straight or in the form of a “gander” (curved). Each of the outlets has its own methods of fixation on the wall.
The distance from the pole to the entry point cannot be less than 10 meters. However, if this distance exceeds 11 meters, additional support will be required. In this case, the distance from the support to the power line should be no more than 15 meters.
For lines up to 10 meters long, copper wire with a 4 mm cross-section is used. If the distance is between 10 and 15 meters, a 6 mm section will be needed. For aluminum SIP wires, the diameter must be at least 16 millimeters.
Advice! If you use a regular SIP rather than a fire-resistant one, it is recommended to choose a copper cable of the VVGng brand.
Prices for copper wires are much higher compared to aluminum wires. Usually, in order to save money, aluminum wires are connected from the pole to the house.
The eyeliner procedure can be carried out in two ways. The first option involves tensioning a cable or support wire, to which a conductive cable is then attached. The cable is fixed using clamps.
Advice! If you plan to lay the SIP along the wall, you will need clamps (SA50, SFW50), since the minimum permitted distance from the cable to the wall is 6 centimeters.
In the second case, additional supports and fastenings are not used. Protective functions are assigned to insulators made of porcelain, glass or polymers, and to special fittings.
Thanks to the safety margin, the fittings provide reliable cable protection in case of accidents. Under powerful mechanical influences, the reinforcement may be destroyed, but the cable will retain its integrity and continue to perform its function - transporting electricity.
From the building entrance area to the electrical panel, the cable is placed in a metal pipe for safety reasons.
Advice! Before entering the house, it is recommended to bend the cable downwards - this will prevent water from penetrating through the protective pipe. Moreover, it is advisable to do this regardless of the presence of a sealant, since it will still dry out over time and lose its functionality. This simple measure will reduce the risk of a short circuit in the future.
The main disadvantage of the air liner method is its open location, which is associated with the risk of damage. Overhanging wires create difficulties for the access of large vehicles.
Whoever carries out the electrical installation work to insert the SIP cable into the building, the process must be agreed upon with the energy supply organization.
Each location may have different technical requirements (location of installation of the meter, a solid section of self-supporting insulated wire or the possibility of connecting via cable, etc.).
If the wiring is done technically correctly, the input cable will be safe and will last for many years.
A modern dacha is a full-fledged home in which the owners create comfort and equip it with various household appliances. And work on the land plot is mechanized as much as possible, purchasing electric lawn mowers, pumps for watering, cultivators and much other equipment. Most of these mechanisms and numerous devices operate using electrical power. Therefore, energy supply becomes the most important component of the entire engineering of a house and requires competent wiring directly in the residential building, connection to an overhead power line from a pole and, if necessary, installation of an additional support.
Why do you need a wiring diagram?
It turns out that installing modern electrical wiring in an apartment is a real art, which only a professional electrician can handle.
If you do not want to constantly change the decoration of the walls in order to mask cables that appear here and there, we recommend that before renovating an apartment or building a house, draw up a drawing indicating all significant objects related to electricity: sockets, switches, an electrical panel with an RCD, lighting fixtures.
A sample diagram that a homeowner can sketch
Attention is paid to marking the locations of all electrical points, from the electrical panel to the sockets. Focusing on the requirements or wishes of the home owner, the electrician draws up a schematic diagram of the electrical wiring in the apartment
His task is to divide the cables into groups in order to correctly distribute the load, think through the control and protection system, and ultimately do everything to guarantee safety and comfort.
Based on the requirements or wishes of the home owner, the electrician draws up a schematic diagram of the electrical wiring in the apartment. His task is to divide the cables into groups in order to properly distribute the load, think through the control and protection system, and ultimately do everything to guarantee safety and comfort.
What must be taken into account when drawing up a diagram, drawing, work plan necessary for proper installation of electrical wiring?
Let's consider the electrical network from the point of view of its component parts:
- Automatic protection devices installed in the electrical panel. The functioning of all home equipment and the safety of users depend on their quality and proper installation.
- Cables and wires with the correct cross-section and good insulation.
- Sockets and switches with high-quality contacts and safe housings.
In private houses, a mandatory element is an input circuit breaker and a power cable from it to the switchboard. Using a circuit breaker, the power consumption is regulated and, if necessary, all electricity in the house is turned off.
Approximate wiring diagram in a private house
The main attention should be paid to the distribution of power across circuit breakers and the protection of each dedicated line. The electricity meter is usually installed at the entrance, after the input circuit breaker
The electricity meter is usually installed at the entrance, after the input circuit breaker.
Permits
The first and important step towards electrifying your dacha is obtaining permits for the use of electricity from the energy supply organization. When contacting the company that services the electrical networks to which the owner of the dacha plans to connect, he receives technical conditions, which necessarily stipulate the following points:
- the ability to connect the house to electricity from a pole;
- attachment point;
- voltage;
In addition, the energy company puts forward requirements for the user regarding surge protection devices, automation devices, insulation, and electricity consumption metering.
According to current laws, the energy transmission company does not have the right to refuse the applicant to connect the building to electricity. However, there are pitfalls when obtaining permission is delayed for serious reasons. For example, there is no technological possibility of connection due to the fact that the old line is working at the limit and an increase in load can lead to an emergency. Then the applicant is informed of the timing of the modernization of the line and the issue of electrification of the dacha is postponed.
But happy holders of permits can safely begin work on wiring electricity from the pole to the house, but at the same time strictly adhere to each point of the technical conditions. If the owners plan to use electricity for heating the house, additional permission will be required from the organization that carries out energy supervision.
Performing a branch from the overhead line of the pole
Electric wires connected to the poles are divided into transit wires, which extend directly from the transformer or substation, and wires that supply electricity to the end consumer. In order to bring the electric cable to the house, a branch line is made from the pole. Two versions are possible:
- air;
- underground.
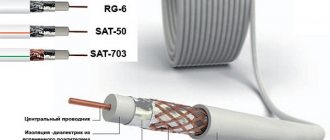
Depending on the chosen installation method, different cables and wires are used. For the air installation method, it is recommended to use SIP-4 wire or AVK cable. These materials are the most popular for making overhead lines. Based on the number of connected phases, choose a SIP wire with two or four cores and a cross-section of at least 16 square meters. millimeters. AVK coaxial cable has a more complex design. It consists of inner and outer conductors, insulated from each other with PVC plastic. Such an electrical cable costs much more than a self-supporting insulated cable.
Specifications require:
- So that the cable connection point on the house structure is not lower than 2.75 m from the ground. Therefore, if the height of the building is sufficient, then the distribution panel with an RCD is attached to the wall. At a lower height, the wire is mounted to a specially fixed pipe stand equipped with insulators.
- When installing an additional pole, the cable between the supports must run at a height of at least 6 meters.
It is prohibited to introduce aluminum electrical wires into the house through wall structures. Therefore, when using SIP cables made of aluminum, a transition to copper is provided. The VVG ng cable (in non-flammable insulation) is suitable for this purpose. Connect aluminum and copper electrical wires using terminal boxes. Connection by twisting is unacceptable! The fact is that upon direct contact, both metals enter into a chemical reaction and oxidize, worsening the contact. As a result, even with a small load, a spark may appear in the connection area. The consequences could be dire.
To protect against mechanical damage, installation through the thickness of the walls is carried out in a special metal sleeve. And the sealing of the entry and exit points is done with plastic or rubber plugs. Entry into the house is carried out from the side of the house where there is no roof slope, otherwise when the snow melts from the roof there is a risk of the electrical wire breaking.
How to conduct electricity from a pole to a house underground? The trench method of laying electrical cables is a modern approach to organizing the power supply of a country house. The absence of sagging wires increases the reliability and safety of the power line. For underground installation, the best option is the VBShv cable, consisting of copper conductors and reliable insulation. The VVG brand is cheaper, but due to the fact that this cable does not have armor, it requires additional protection. A practical solution is to install it in a HDPE pipe. However, installing a cable underground is much more expensive and more labor-intensive than the overhead method, since it requires excavation work.
The regulated laying depth should not be less than one meter when using a cable without protection and 0.6 - 0.8 m when laying in a pipe. At the inlet and outlet, the cable is placed in a metal pipe of an L-shaped configuration. The total value of its height from the bend to the edge is 2.5 meters, and the part protruding above the ground is 1.8 - 2 meters. Entry into the house is carried out as with overhead wiring.
The nuances of laying current-carrying conductors
Do-it-yourself cable laying at the dacha is carried out in a certain sequence, taking into account important nuances for open and closed types of installation. At the initial stage, it is necessary to mark the installed channels. To do this, you can use a regular pencil. Further actions vary depending on the type of installation chosen.
Open laying
This type of wiring involves the use of remote switches, sockets and junction boxes. The cores are laid in special channels, which are mounted on top of the finishing material. In this case, fasteners are used for a specific type of wall surface. Subsequently, the channels are closed with a protective cover. The convenience of this method lies in the speed of installation and high maintainability.
To create an aesthetic appearance, the boxes should be laid under the ceiling. You can also use special floor skirting boards.
Hidden gasket option
To form hidden wiring in a suburban area, you will need to ditch the walls. To do this, use a grinder with diamond discs, a hammer drill or a wall chaser. Holes for distribution boxes, switches and sockets are made with appropriate crowns. Subsequently, the cables are laid in channels and fixed with putty or special staples. At the final stage, the walls are finished.
Installation of hidden wiring in foam concrete walls
Every person can carry out wiring in a summer cottage, even without special skills. The main thing is to follow electrical safety rules. At the final stage, you must make sure that the generated electrical wiring is working properly.