Good day to all dear readers of the blog LEARN
Have you ever had the following situation: The light bulb in the chandelier does not light , do you think that the light bulb has burned out? You change the light bulb, but it doesn’t light up, and strangely enough, the light bulb you unscrewed turned out to be intact. You twisted it into another chandelier and it burned there. Then why don’t the old light bulb and the new one want to burn in this chandelier? Let's figure it out, it's a household matter, and everyone needs light.
Finding the problem
First, they look for the source of the problem that caused the chandelier to become faulty.
Switch
If the lamps are working, but the lighting is not working, the first thing to check is the switch. Most often, the cause of failure is burnt out contacts, which prevents electricity from reaching the lamp sockets. After disassembling the switch, the conductors are inspected at both the input and output. The status of the contacts is also checked. During the repair, the contacts are cleaned to a metallic shine and the housing is reassembled in the reverse order.
Note! If some of the light bulbs in a chandelier with several lighting groups stop turning on, the problem usually lies in burnt-out contacts.
In addition to the external inspection, you should check the presence of current supplied to the housing. They also check whether there is voltage further along the chain - directly to the chandelier. The check is carried out using an indicator screwdriver. The lamp works normally when, after touching the terminal with a screwdriver, the light diode of the handle lights up.
Note! If the light does not light up after the first press, but turns on again, the problem is usually in the switch.
It happens that only one socket does not work. In this case, checking the switch shows its serviceability. The problem is the sockets or the quality of the wiring.
Light bulbs
First, the physical integrity of the tungsten filament is checked (we are talking about an incandescent light bulb). Take the lamp out of the socket and check it in the light for broken filaments. A whole thread indicates serviceability.
The continuity of the circuit should also be tested. For this you will need a multimeter. One of the probes of the device is installed on the thread, and the second - on the end of the light source. The movement of the arrow of the device indicates the serviceability of the lamp. An arrow that remains motionless indicates the need to replace the light bulb.
In the case of an LED lamp, a test is also carried out using a multimeter. It happens that one of the diodes in the series circuit has failed, which is why the entire chandelier does not work.
Wiring
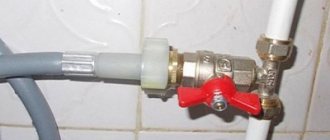
The reason for the chandelier not glowing may be a wiring fault. Check for voltage. To do this, dismantle the lamp to gain access to the conductors removed from the junction box. The voltage is checked using an indicator screwdriver.
In the case of old aluminum wiring, a violation of the integrity of the wires often occurs. When the wire is broken, the contact breaks. Correct the situation by extending the old wire to connect it to the chandelier body. However, a more reliable option is to replace the wiring with a modern one.
Note! If the voltage from the junction box is confirmed, but after pressing the key on the switch the light bulbs still do not light up, the problem is in the lamp itself.
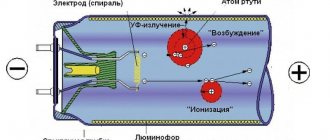
How to repair a fluorescent lamp
The best way to repair is to replace the faulty element.
In most cases, the simplest solution is to replace the faulty elements. You can check by installing a known-good element. Complete repair of a fluorescent lamp involves a number of difficulties and requires certain qualifications and experience. Before disassembling the fluorescent lamp, you need to make sure that it is disconnected from the network and that electricity is not supplied to it.
The easiest way is to find a replacement for a faulty starter. You can force the lamp to turn on by installing a button instead. This method is dangerous because holding the button for more than the required time can cause the filaments of the electrodes to burn out.
It is more difficult to use lamps without a choke. Several workable options for such inclusion have been developed. Most circuits use the principle of multiplying the mains voltage for stable starting. These circuits use rectifier diodes and capacitor banks, which causes an increase in the size of homemade ballasts. A powerful resistor or an incandescent lamp of 25-40 W is used as a choke to limit the current, depending on the power of the fluorescent lamp.
The advantage of resistors is their small size, but the problem is the high heat generation on it during operation. Incandescent lamps provide additional light output, but because they operate at a reduced voltage, their lifespan is virtually unlimited.
Separate circuit solutions for electronic ballasts or multiplication circuits allow the use of light bulbs with burnt-out filaments. However, due to the fact that high voltage is used during startup, and the current after ignition is slightly limited, the operating time of such fluorescent lamps is rather short.
Chandelier repair
To repair a chandelier, disassemble its body and check the joints between the wires. Also pay special attention to the condition of the insulating layer. A common cause of a malfunction is a short circuit, after which one of the conductors burns out.
In addition, lamp sockets are subject to mandatory inspection. Elements made in China especially often fail. If the reason is in the cartridge, it cannot be repaired, this part is replaced with a new one.
If the ballast capacitor fails, strip the wire coming from it and connect a multimeter. A normal voltage level indicates failure of the series lamp chain. If the voltage deviates from the norm, replace the capacitor.
Advice! If replacing the lamp does not give a positive result, it is recommended to treat the board with a degreasing solution.
If the chandelier does not turn on, the control relay may be the cause of the problem. The functionality of the device is checked with a multimeter with a conductor from the relay connected to it. If a fault is found, replace the relay with a new one.
Other problems
The most common faults are described above. However, those who decide to repair the chandelier themselves are faced with others:
- Incompatibility of new lamps with old chandelier models.
- Poor quality twisting of conductors. Insufficiently twisted conductors prevent normal contact, which leads to lighting problems.
- The power of the screw-in lamps does not match the needs. For example, a chandelier is designed for four 60-watt light bulbs, and four 100-watt light sources are installed. For this reason, not only power supplies fail, but also transformers.
- Fuses blown. In the housings of modern chandeliers, fuses are used to break the circuit in the event of a short circuit. Repair work in this case consists of finding the blown fuse, dismantling it and installing a new component.
- Broken chandelier. A break occurs due to mechanical impact on the device or in case of poor-quality hanging (weak fastening).
Extending service life
The service life of fluorescent lamps can be increased if you know the reasons for their burnout:
- Operating at low temperatures leads to an increase in the duration of heating of the filaments before a stable gas discharge occurs; as a result, the lighting device may burn out faster than the declared service life.
- Frequent switching on can also cause premature aging and burnout of the electrodes, since the inrush current is much higher than in steady state.
- Low-quality ballasts use simplified circuitry and, apart from low cost, do not provide any advantages.
Recommendations for increasing service life:
- Do not use fluorescent lamps in rooms with low temperatures.
- Avoid frequent switching on. The light sources in question consume a small amount of electricity compared to incandescent lamps, so in some cases it makes sense to leave them on all the time.
- Use electronic ballasts with soft start. Such devices are somewhat more expensive and cause a delay in switching on (about 1-2 seconds), but they reduce the rate of aging of the electrodes and allow for frequent switching on.
- Purchase fluorescent lamps from reliable manufacturers. The high cost is justified by the duration of trouble-free operation.
The lamp bulb contains highly toxic mercury. Disposal of faulty lamps must comply with legal requirements.
Chandeliers with remote control
Lighting devices with remote controls often break down. The main signs of failure of such chandeliers:
- despite transmitting a signal from the remote control, the lamps do not light up;
- Some modes do not function, the chandelier switches off spontaneously;
- the same modes do not work when controlled from the remote control, but function when switched manually;
- flickering occurs that is not caused by any human action, and spontaneous switching between modes occurs.
The listed problems are the most common, but a combination of several of them is rare. Typically 1 or 2 components of a remote control chandelier need to be replaced.
The search for a problem in a lamp with a remote control begins with checking the batteries. If new ones are installed, but the chandelier still does not work, the next possible cause of the malfunction is the controller.
Different groups of lamps are most often connected in separate blocks. These elements are connected using a controller. A common situation is that it launches only some modules of the device. In this case, it will need to be replaced.
It happens that the light does not turn on either using the remote control or when pressing the switch. In this case, you should pay attention to the number of non-working components. One lamp may burn out. However, when all the bulbs do not work, the likely problem is in the electronic transformer. This element is replaced with a new one, while working with clean gloves.
Why doesn't the low beam light come on?
Owners of LADA cars often contact service centers with a complaint that even on practically new cars that have recently rolled off the assembly line, the above-described breakdown of the right headlight occurs, while the left one lights up with both low and high beams in normal mode. However, you should not think that such a nuisance can only affect cars from a domestic manufacturer. Naturally, any breakdown can easily occur on foreign cars.
The fact is that over time, the parts of any used machine wear out, regardless of the brand and country of the manufacturer. If it happens that the low beam on one headlight on your car does not light up, of course, the easiest way is to contact a car repair shop, where an electrician will quickly fix any malfunction. But in this article we will tell you that having minimal skills in working with electrical equipment, as well as free time, it is quite possible to carry out repairs yourself.
Why does it happen that the high beam is on, but you can’t turn on the low beam? Let's look at the main reasons:
- the low beam lamp has burned out;
- the fuse is broken;
- wiring is damaged;
- non-standard reasons.
In each of these cases, you can correct the situation on your own.
If you drive a car, you just need to know how to fix broken headlights yourself, because a situation may arise when you won’t be able to go to a workshop or the lights go out in the middle of the road at night. Therefore, we will consider all the main problems with car headlights and ways to solve them.
Crystal chandelier repair
The most common problem with a crystal chandelier is the breaking off of structural elements due to mechanical stress. Ordinary glue in this case is not a solution to the problem, since the seam will be noticeable after gluing. Therefore, it is recommended to use a special silicate glue.
Before gluing the crystal fragment, prepare the surface to give it better adhesion. To do this, the crystal is washed with soapy water, and then dried and degreased. Another result of proper surface preparation is that the seam will be less noticeable.
Glue is applied to the crystal, after which the elements are connected and held for a while so that they set. Then, using a piece of cloth, remove excess glue from the surface of the lighting fixture. After a few hours, the parts will be completely glued together and the chandelier will be ready for use as usual.
Material of manufacture
Heat-resistant plastic or ceramics are used to produce cartridges. Each option has its own characteristics, for the polymer type they are as follows:
- Plastic products are inexpensive. But at the same time, due to constant heating, the material becomes brittle over time and begins to collapse. It can also become deformed, especially if the quality of the raw materials is not very good.
- The elements are easy to disassemble and replace. White options inevitably turn yellow over time, which means it’s time to change them.
Ceramic cartridges are less common, but are in demand due to the following features:
- A metal fastening nut is always used inside, since the ceramic sticks when heated for a long time and is difficult to remove.
- If the base still sticks to the threaded part due to heating, it is unscrewed along with the sleeve. This allows you to disassemble the light bulb socket quickly.
- The heat resistance of this option is an order of magnitude higher than that of plastic, but the price is also higher.
Ceramic cartridges are much more durable than plastic ones.
Connecting the electric socket
To understand how to connect a light bulb socket, you need to have a good understanding of its structure. The central contact is made of brass. It presses against the ceramic liner. For this purpose, there is a threaded steel plate on the reverse side. A screw is screwed into it and passes through ceramic and brass.
The screw is tightened with good force, because an electric current passes through the part to the contact. A side brass plate is placed nearby, which is attached according to the same principle.
When connecting the wires, rings are formed on them for fastening. They pass through its central hole in the body and are fixed on steel plates. The phase from the network is supplied to the central contact.
After this, a bushing with a thread for the light bulb is screwed on top. Then the lamp is selected.
The simplest way
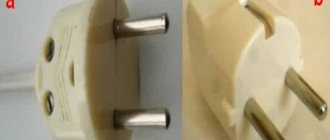
The simplest diagnostic method is suitable for both incandescent light bulbs and fluorescent and LED lamps. He suggests screwing the suspicious light bulb into another lamp and turning it on. Unfortunately, this is not always possible. Sometimes the threaded part of the base is made with a deviation from the standard size and, when screwed into the socket, does not close both electrical contacts. Or there are no more lamps with the exact same socket in the house.
When buying a light bulb in an electrical goods store, many people paid attention to how the seller checked it using a tester. The tester body has several connectors designed for diagnosing different types of light bulbs: incandescent, fluorescent and halogen
Its task is to check the integrity of the conductors inside the lamp, as evidenced by the sound signal. This same operation can be done at home using a multimeter or a multifunctional indicator screwdriver.
Preliminary advice
Before replacing the cartridge, here are some tips to keep in mind:
- Make sure the wiring is de-energized.
- You should know that the phase is connected to the central contact. Screwing in a light bulb under voltage eliminates the risk of electric shock.
- If the system wiring is damaged, it needs to be replaced.
- In the case of connecting wires made of different materials, for example, copper and aluminum, they must be well insulated.
- Work is carried out only if there is complete confidence in a positive result.
Product fastening
Typically, the socket in chandeliers or lamps is mounted at the bottom of the housing. It is unacceptable to place any weight on the wires. For fixation, the chandelier has a hole at the bottom into which a plastic sleeve is inserted. The wiring runs into it and is fixed with a bolt. A more reliable fastening is a metal tube. Wires are passed through it. The nuts located on it allow the installation of shades and chandelier caps.
Special sockets are available for installing lamp shades or wall lamps. They have a thread on the outside. The attachments are pressed using plastic bushings that are screwed onto the threaded part of the cartridge.
It should be remembered that you cannot install a high-intensity light bulb, because the plastic washers begin to melt.
Setting the device to the desired mode for testing
A multimeter (tester) is a compact device that allows you to perform various electrical measurements. It is useful for identifying faults in electrical networks and power tools.
The dialing procedure involves checking the integrity of the electrical circuit and the presence of direct contact. In most tester models, this mode is built-in initially. To activate it, you need to turn the switch in the center of the device to the appropriate position (towards the buzzer or diode icon).
In addition, it is necessary to connect the measuring probes correctly. The black probe should be inserted into the holes marked “COM” and the ground symbol. The red meter must be inserted into the connector marked “VΩmA”. Testing can begin immediately after placing the controls in the required position.
The metal tips must be closed, after which a beeping sound should be heard from the buzzer. The display will show zero values, which means there is no resistance or discontinuity. If the 220 Volt circuit is open, the number “1” will be displayed on the screen.
Preparing the multimeter for work
We take the device out of the case or case.
First of all, we carry out a visual inspection. The case must be intact, the battery compartment cover must be installed without distortion. Visually assess the integrity of the wires and probes. The lack of insulation, which can simply crumble from time to time, is restored with electrical tape. Heat-shrink tubing, if available, will also help. The probes should also be inspected, and chips should be wrapped if necessary. Set the multimeter selector to ohm measurement mode, at 200 ohms. We plug the black cable with the probe into the Com socket. Red - into the socket with symbols of measured quantities named after Alessandro Volta, Andre-Marie Ampere and Georg Ohm - V, A and Omega.
The indicator should show one. If this is not the case, the device needs repair. We short-circuit the probes. The display should show zero. If this happens, the device is working properly. If the numbers change and are displayed dimly, try replacing the device’s battery with one that is known to be fresh and working. It didn’t help - the multimeter needs to be repaired. To check the light bulb, set the multimeter selector to the open circuit search symbol. A diode is shown schematically on the case in this place.