We decided to save you a couple of clicks and host the latest versions of the Arduino IDE, because sometimes the devil can’t help but find the right link on the official website. Where to download the Arduino IDE is your choice: the distribution files are absolutely identical. The stable version of Arduino IDE 1.8.19 (release dated 12/20/2021) and release candidate 2.0 RC (2.0.0-rc3 dated 12/22/2021) are now available.
Download for Linux
- Linux x86 64 bit
- Linux x86 32 bit
- Linux ARM 64 bit
- Linux ARM 32 bit
To install from an archive, in general, you need to run the following commands.
# Unpack the archive and go to the directory $ tar xvf arduino-latest-*.tar.xz $ cd arduino-1.* # Install (only for the current user) $ ./install.sh # Add rights to use USB ports $ sudo usermod -a -G dialout $USER
On some Linux distributions, it is easier to use the install command from the packages.
# Arch Linux $ sudo pacman -S arduino # Fedora Linux $ sudo dnf install arduino # Debian, Ubuntu, Mint Linux $ sudo apt-get install arduino
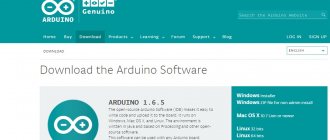
Download Arduino IDE from the official website
To download the program from the official website Arduino.cc, you need to find the Software – Downloads item in the site navigation. Find links on the page to the latest versions of the program (for Windows, Linux, Mac OS X). Clicking on the link will take you to the download page where you can select your download option:
- With project support (indicate how much you are willing to donate)
- No support. Just click on the "Download" button.
Regardless of the option you choose, you will still download the same version, there are no restrictions for the "free" version. But if you have the opportunity, try to donate to the team that has done so much to develop the project.
Version 1.8.7
| Windows Installer, 1.8.7 | https://www.arduino.cc/download_handler.php?f=/arduino-1.8.7-windows.exe |
| Windows – ZIP file, 1.8.7 | https://www.arduino.cc/download_handler.php?f=/arduino-1.8.7-windows.zip |
| MAC OS X, 1.8.7 | https://www.arduino.cc/download_handler.php?f=/arduino-1.8.7-macosx.zip |
| Linux 32-bit 1.8.7 | https://www.arduino.cc/download_handler.php?f=/arduino-1.8.7-linux32.tar.xz |
| Linux 64-bit 1.8.7 | https://www.arduino.cc/download_handler.php?f=/arduino-1.8.7-linux64.tar.xz |
Version 1.8.6
| Windows Installer, 1.8.6 | https://www.arduino.cc/download_handler.php?f=/arduino-1.8.6-windows.exe |
| Windows – ZIP file, 1.8.6 | https://www.arduino.cc/download_handler.php?f=/arduino-1.8.6-windows.zip |
Version 1.6.13
| Windows Installer 1.6.13 | https://www.arduino.cc/download_handler.php?f=/arduino-1.6.13-windows.exe |
| Windows – ZIP file 1.6.13 | https://www.arduino.cc/download_handler.php?f=/arduino-1.6.13-windows.zip |
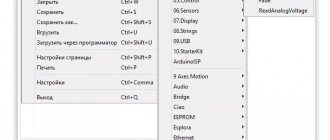
How to switch language
Arduino IDE selects the default system language during installation. If you need to switch the interface to another language, this can be done in the general program settings.
- Go to the main menu and select “File → Settings”.
- Select the desired language in the “Editor language” drop-down list.
- We restart the environment.
Arduino IDE
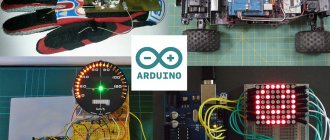
The very first, and often the only program for beginners to work with the Arduino controller is Arduino IDE - an integrated development environment from the creators of the platform.
You can download the main versions of this program for free on our website, just below are the download links. For your convenience, we have selected the most recent and popular versions of programs. In other materials on ArduinoMaster.ru you can learn more about installing and configuring the Arduino IDE. Let's first briefly find out what an IDE is and get answers to the most frequently asked questions. If you are an experienced developer, then you can safely fly to the next section of the article with download links.
What is Arduino IDE
The abbreviation IDE stands for Integrated Development Environment, which means integrated development environment. Using this program, programmers write programs, and do it much faster and more conveniently than using conventional text editors.
Within the Arduino platform, the Arduino IDE program does the same thing - it helps programmers write programs. With its help, a sketch written in the Arduino language is checked, turned into C++, compiled, and loaded into Arduino. Theoretically, you can do without this program, but in reality there are practically no other options for a beginner to start working with Arduino. Therefore, the first thing you must do is find and install this programming environment for yourself. It's not difficult at all and absolutely free.
How to download and install Arduino IDE
The download and installation procedure is absolutely traditional. You download the file, start the installation. Versions with an installer (exe) and regular zip archives are available on the official website. You can find versions of the Arduino IDE for all major operating systems.
The installation procedure is quite simple; you will need to answer a few questions. An important step in this process is installing the COM port driver. For most "Chinese" Arduino boards you will need to install additional drivers.
After installation, you will need to slightly configure the environment - we will talk about this in a separate article about installing and configuring the Arduino IDE.
Which version of Arduino IDE should I choose?
The first version of the Arduino development environment officially appeared in August 2005. Much water has passed under the bridge since then, and the program has undergone revolutionary changes several times. Until 2011, version numbers consisted of one digit (the last one was 0023 - version dated 11/09/2011). Then came the more familiar entry with “minor” and “major” updates. So, Arduino 1.0.0 appeared on November 30, 2011, and version 1.0.1 – in May 2012.
The key ones in terms of the number of updates and associated compatibility problems were the transitions from versions 1.0.7 and 1.5. Many libraries written for “old versions” of the program could not be compiled in new ones due to changes in system libraries and other internal project assembly mechanisms. This became especially noticeable during the transition to version 1.6. If your project has ancient libraries that do not work correctly with modern versions of the IDE, you will have to change them yourself, wait for the authors to do it, or submit to circumstances and install the version with which the library will work.
The latest stable version of the Arduino IDE at the time of writing is 1.8.7 (August 2018).
Arduino in Russian
Another important issue is the Russification of the development environment. Let's immediately figure out how to translate the Arduino IDE into Russian. In fact, you don’t need to search for or download special versions for this. You download and install the regular version, just select your language from the list of available languages in the corresponding settings item.
Supported boards
Arduino IDE works out of the box with all original AVR architecture boards and their direct analogues.
- Original Arduino controllers
- Iskra Uno (similar to Uno)
- Iskra Neo (similar to Leonardo)
- Iskra Mega (similar to Mega 2560)
- Iskra Mini (analogue of Mini)
- Uno Slot (a hybrid of Uno with the Troyka Slot platform)
- Strela (analogous to Leonardo with motor drivers)
Third-party boards and controllers on other architectures are also supported: SAM, SAMD, Cortex-M. They are added to the environment in separate packages. Below are examples of installation of some of these boards.
- Aduino Due
- Arduino M0 Pro
- Arduino MKR GSM 1400
- Arduino MKR Vidor 4000
- Wi-Fi Slot
- Troyka Wi-Fi module
- ESP32 DevKit v1
- ESP8266 (ESP-01)
- STM32 controllers
- Teensy controllers
Download Arduino 1.8.7
Version 1.8.x of the Arduino IDE was released on September 11, 2022 and is the latest stable version at the time of writing. Compared to 1.8.6, you will not find significant improvements in the interface - all the changes mainly concerned bug fixes and increased stability.
Windows version
- Download Arduino IDE 1.8.7 as ZIP
Linux and Mac version
- 32-bit Linux
- 64-bit Linux
- Arduino IDE version for MacOS X
COM port driver for “unofficial” boards
Changes in version 1.8.7
The most important changes in this version include the following:
- Fixed problem with port selection when first used.
- Fixed startup errors with an incorrect library_index.json file or incorrect library versions.
- Fixed problems with low rendering speed of the File and Tools menus on the Mac OS X version.
- Improved work with dialog boxes in MAC OS.
- The stability of the system as a whole has been improved (kernel errors have been fixed).
AutoCAD 123D
Go to Autodesk website
Autodesk's role in electrical circuit design over the years cannot be overstated. The 123D is another one of Autodesk's Arduino-compatible offerings. First, it is important to note that 123D is a CAD application that has a special feature for circuit design. So when you download the free app, you will get both a CAD app and an Arduino simulator.
Like the other simulators mentioned above, 123D is a really great tool for learning the basics of Arduino programming and circuit design. The application runs on Windows and Android ecosystem. It also has a very large base of resources and support (like most Autodesk products) for designing circuits or learning from scratch. This application is highly recommended for most users.
ArduinoSim
This is a cross-platform Arduino simulator that delivers what it promises, providing an excellent platform for learning programming and circuit design. Although the program is not open source, this simulator is free and gives you the opportunity to work on Windows and Linux operating systems. ArduinoSim was created in Python to integrate with the Arduino environment.
ArduinoSim was built specifically for a scientific and engineering audience. And its user base has provided enough material to support usage. But we must understand that the project relates to the field of electrical engineering. Don't forget also that this is a completely free solution.
Arduino Simulator by PaulWare
PaulWare's Arduino Simulator
As the name suggests, this Arduino simulator was created by a developer named Paul. The simulator is open source and has gathered its own share of fans who are both adding their ideas and creating tutorials on how to use the simulator. This free product was made primarily for the Windows ecosystem and provides sufficient support for beginners.
The main components it provides to support your project are LED momentary switch, 4 by 4 matrix keyboard, 4 by 4 matrix keyboard with LCD display, rotary switch, etc. The YouTube video will give you enough information to get started using this Arduino simulator.
It also has a dedicated section on the Arduino manufacturer's forum where you can become a member to learn more about updates and design patterns.
PSpice
Every electrical and electronics engineering student must have encountered PSpice during the months spent learning the basics of circuit design and programming. But for those who don't know what PSpice is, it is an intuitive simulator that can be used to simulate Arduino because of the many features integrated into the application. PSpice is supported by Windows and Linux operating systems and comes in different modules or types.
Students can use PSpice Lite, which is completely free, to learn the basics of Arduino programming, while companies, teachers and other experts can use paid PSpice. PSpice is currently used in various industries - automotive, education, energy supply, etc.
First program
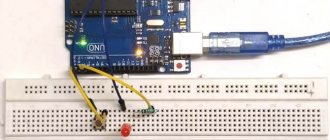
In order to better understand the operating principle of the platform, let's write the first program. We will execute this simplest program (Blink) in two versions. The only difference between them is the assembly.
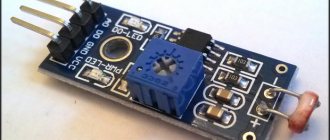
int Led = 13; // declare the Led variable for pin 13 (output) void setup(){ pinMode(Led, OUTPUT); // define a variable } void loop(){ digitalWrite(Led, HIGH); // apply voltage to pin 13 delay(1000); // wait 1 second digitalWrite(Led, LOW); // do not apply voltage to pin 13 delay(1000); // wait 1 second }
The operating principle of this program is quite simple: the LED lights up for 1 second and goes out for 1 second. For the first option, we do not need to assemble a layout. Since the Arduino platform has a built-in LED connected to pin 13.
Yenka
Yenka is a great simulator that students and advanced users can use to learn and teach programming and circuit fundamentals. Like most Arduino simulators on our list, it is equipped with all the necessary features to test sketches/ideas, debug your projects and develop complex projects without commissioning hardware.
Yenka is widely used by teachers teaching basic electronics, but the cost may make it unaffordable for students. This is a cross-platform simulator that runs on both Linux and Windows operating systems. Despite the cost, the program may be the ideal Arduino simulator for your personal use.
Setting up the environment
Installing the Arduino software environment is a fairly simple process. After you have selected and downloaded the desired version, you need to start the installation through the arduino.exe .
As always, you must first agree to the License Agreement, despite the fact that the environment itself is distributed free of charge.
The next step is to select the actions that the installer must take. You can check all the boxes.
Next, select the installation folder.
If the installer prompts you to install a USB-to-serial driver, click Install .
How the system works
The Arduino device works as follows. Information collected from various sensors in the home is sent wirelessly to a tablet or PC. Next, using special software, the data is processed and a specific command is executed.
The main function is performed by a central sensor, which you can purchase or assemble yourself. The connectors on the boards are standard, which greatly simplifies the selection of components.
Nutrition
The Arduino is powered via a USB connector or from an external power supply. The voltage source is determined automatically.
If you select the option with external power supply not via USB, you can connect a battery or power supply (voltage converter). In the latter case, the connection is made using a 2.1 mm connector with a “+” on the main contact.
The wires from the battery are connected to various terminals of the power connector - Vin and Gnd.
For normal operation, the platform requires a voltage of 6 to 20 Volts. If the parameter drops below 7 volts, the 5V pin may have less voltage and risk a failure.
If you supply 12 V, the voltage regulator may overheat and damage the board. For this reason, the optimal level is power supply using 7 - 12 V.
Unlike previous types of boards, the Arduino Mega 2560 works without the use of a USB FTDI microcontroller. To ensure information exchange via USB, a USB-to-serial converter programmed for the converter is used.
POPULAR WITH READERS: What is a CLAP smart home.
The Arduino has the following power pins:
- 5V - used to supply voltage to the microcontroller, as well as other elements of the printed circuit board. The power supply is adjustable. Voltage is supplied via a USB connector or from the VIN pin, as well as from another 5 Volt power source with the ability to regulate.
- VIN - used to supply voltage from an external source. The output is necessary when it is not possible to supply voltage via a USB connector or other external source. When voltage is applied to the 2.1mm jack, this input is used.
- 3V3 is a pin whose voltage is a consequence of the operation of the FTDI chip itself. The maximum current consumption level for this element is 50 mA.
- GND - grounding terminals.
The circuit diagram of the board in pdf format can be viewed HERE.
Connection
Arduino capabilities allow you to connect a group of devices that provide stable communication with a PC, as well as other system elements - microcontrollers or the same Arduino boards.
The ATmega 2560 model is distinguished by the presence of 4 ports through which data can be transferred for TTL and UART. A special ATmega 8U2 chip on the board transmits the interface (one of them) via a USB connector. In turn, programs on the PC receive virtual COM.
There are nuances here that depend on the type of operating system:
- If Linux is installed on the PC, recognition occurs automatically.
- If you are using Windows, you will need an additional .inf file.
Using the monitoring utility, you can send and receive information in text format after connecting to the system.
Flashing TX and RX LEDs indicate data transmission. A special Software Serial library is used to send information sequentially.
Features of the ATmega 2560 include the presence of SPI and I2C interfaces. In addition, Arduino includes the Wire library.
Circuit Lab
Go to Circuit Lab Arduino Simulator website
Circuit Lab Arduino Simulator is a simple schematic and powerful simulation tool. This simulator was developed after PSpice, and it was built primarily for use by electricians and electronics engineers. Its functions allow the user to explore the internal workings of Arduino, implement debugging of projects and design circuits.
The Circuit Lab app is not free, and this may be a limiting factor for students looking for an affordable Arduino simulator to work with. The application works on both Windows and Linux operating systems. The development of the program is supported by a large community and has a sufficient number of supporting materials, case studies and examples that talk about its capabilities and use.
Simduino for iPad
This is a paid product designed for use on the Apple smart device ecosystem. This is a comprehensive simulator that allows you to learn about programming and electronics on the Arduino platform. It provides sufficient support for most Arduino C programming languages and can be used to run multiple projects according to the user's needs.
This program has an excellent rating on iTunes. Good support helps its users understand the details and descriptions available to users on the official website. For about $2, you'll get a great Arduino simulator that's compatible with your iPad.
XLoader
The simplest and most concise program that is suitable for anyone who just needs to load hex onto the popular Arduino.
Xloader
Loading the firmware is intuitive:
- Select... firmware file
- arduino board
- COM port
- Data transfer rate
The latest version is 1.0.
.
Cannot boot EEPROM.
Project development
There are many Arduino devices on the market today, with different configurations. But there is no universal solution “for all occasions”. Depending on the task at hand, each kit is selected individually. To avoid mistakes, project development is required.
What projects can be created on Arduino?
Arduino allows you to create many unique projects. Here are just a few of them:
- Solving a Rubik's cube (the system solves it in 0.887 s);
- Controlling humidity in the basement;
- Creation of unique paintings;
- Sending messages;
- Balancing robot on two wheels;
- Sound spectrum analyzer;
- Origami lamp with capacitive sensor;
- Robotic arm controlled by Arduino;
- Writing letters in the air;
- Flash control and much more.