When assembling, installing and operating an RGB lighting system or monochrome LED strip, you have to deal with its complete or partial inoperability. The reason may be either errors made when connecting system elements, or caused by a malfunction of one of them. How to find the cause and eliminate the malfunction will be discussed in this article.
Please note that the article contains instructions for repairing controllers designed for LED strips with a supply voltage of 12 V or 24 V. The article “Design, circuit and repair of duralight controllers” is devoted to the repair of controllers for duralight cords and food garlands with an output voltage of 220 V. .
What is a dimmer for 220V LED lamps: general information
To be precise in its definitions, an LED dimmer is a device that allows the user to reduce or increase power by adjusting the voltage supplied to the lighting fixture. The simplest dimmers for “Ilyich bulbs” were rheostats - regulators that limit voltage by converting it into thermal energy. With modern light sources, for example, light diodes, this number will no longer work. More complex schemes are needed here. The question arises: is it possible to install a dimmer on LED lamps? As it turned out, it is possible. Moreover, it is not difficult if you know some of the nuances, which we will consider today.
The appearance of such devices can be quite varied.
Video
The video shows an interesting example of how a light controller works with an audio input. Implemented color music from RGB LED strip. The tape changes colors and light levels to the beat of the music.
By the way: in both of the above cases, dimmers with controllers (microcontrollers) are used. The dimmer itself is not capable of working according to a specific program - it only serves to change the brightness of the diodes. To “force” the dimmer to change brightness in accordance with a given scheme, rgb and audio controllers are used.
What is the difference between regular and dimmable LED lamps
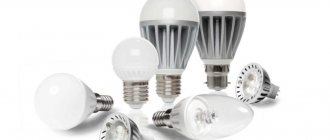
LED lamps can be divided into 2 categories - dimmable and non-dimmable (regular). The latter, of course, are cheaper, but their use does not involve connecting via a dimmer - you still won’t be able to dim the light. Dimmable light bulbs can be distinguished by the inscription “dimmable” and markings on the body and packaging. In the picture below you can see what it looks like.
A light bulb with the ability to reduce the luminous flux using a dimmer and corresponding markings
A dimmable lamp differs from a regular lamp in the presence of a special PWM (pulse width modulation) block in the circuit. It is this that allows you to adjust the light intensity in the range from 10% to 100%.
Doctors say that watching TV in complete darkness has a very strong effect on the eyes and spoils vision. With all the lights on, viewing cannot be called comfortable either. For such cases, the ideal solution would be dimming - dimmed, unobtrusive light will protect the eyesight of household members.
Pros and cons of dimming: what you should know about dimmers
Dimming 220V LED lamps has quite a few advantages:
- a lamp with a dimmer consumes less electricity;
- the service life of lighting devices increases;
- it becomes possible to zone the room using the difference in luminous flux;
- absence of radio interference during operation;
- you can purchase devices with additional functions (switch off/on timer, control via Wi-Fi or remote control);
- The dimmer is easy to connect - this work does not require special knowledge or skills.
But there is only one negative side - the rather high cost, especially for complex electronic models with many additional functions.
Quite an expensive device - Wi-Fi dimmer
Before purchasing a dimmer, you should weigh the pros and cons. If you plan to use it frequently, then over time it will pay for itself in the energy saved. If the dimmer is rarely used, then such a purchase can hardly be called rational - although you should not save on your health.
Rules for choosing the optimal option
Buyers can purchase two types of LED strips, the so-called monochrome, that is, one-color, or three-color RGB. In the latter case, all colors can be connected separately, mixed, and obtained different effects.
Dimmers can be of different sizes and power, which allows the interested person to choose the right product for any LED strip
And the future owner should know that to control a multicolor ribbon you will need to purchase a special RGB controller. Since the controller’s capabilities are not enough to fully control such a light source.
In addition, you need to carefully consider the technical parameters of the device. Since the power of any control device must exceed that of the LED strip itself, it is necessary to take this feature into account before purchasing.
Moreover, the options may be as follows:
- If the owner of the premises does not plan to further increase the length of the LED strip, and, consequently, its power, then this characteristic of the dimmer should be higher by 20-30% and this is at least, and best of all, half. This will help extend the life of the regulator, eliminating the possibility of rapid wear and subsequent breakdown.
- If you plan to increase the power of the LED strip, then the device must be purchased with this in mind. Or later you will have to spend money on purchasing a new regulator again. Moreover, the power reserve should be calculated taking into account the required 20-50% for the reserve.
When a potential buyer incorrectly calculates the power, the device will not be able to perform its functions, so it simply will not turn on. And this is with the most favorable outcome, since it often happens that overload leads to instant failure.
Installation of any type of regulator is simple, so in some cases the user will be able to perform this procedure independently
In addition, it is important to decide on the type of control. Any of them (mechanical, electronic, remote) is reliable and will allow a person to effectively manipulate the brightness of the LED strip.
Therefore, everything will depend on how much a person is willing to pay. If he decides to save money, then the most affordable model with a mechanical control type will be the optimal solution.
When the future user has more funds at his disposal, then preference should be given to a device with an attached remote control. Because it increases comfort, which is a significant advantage.
In addition, when choosing, you should not skimp on the quality of the dimmer; it should only be from a well-known manufacturer. Which are the companies Osram, Gauss, Philips, and a number of others.
If you still want to reduce costs and purchase a Chinese product, then it is worth remembering that such a purchase can result in headaches, loss of some ability to work, and a number of other health problems. The remaining features when choosing are not so important and everything depends only on personal preferences.
Those who want to assemble a dimmer with their own hands will receive detailed instructions on our website. We recommend that you read this very useful article.
Dimmer for 220V LED lamps: device and principle of operation
The dimmer circuit for 220V LED lamps includes a thyristor or triac, which is responsible for controlling the intensity of the luminous flux. In essence, this is the same rheostat that changes the voltage supplied to the lighting device. However, thanks to modern electronics, it does not consume electricity to generate heat, which means its efficiency factor is much higher.
Please understand that the light sources and dimmer must be compatible for proper operation. A conventional device that works with incandescent light bulbs will not work here. The fact is that LED light sources are low-power, which means that a conventional dimmer for lamps with an incandescent filament will constantly be under heavy load, which will lead to its failure. In the best case scenario, after this it will only work as a regular switch.
A dimming device suitable for incandescent bulbs will not work with LEDs
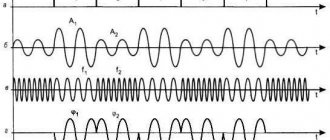
Principle of pole width modulation (PWM)
Changes in the power of the supply voltage when using a PWM controller are ensured by supplying signals with varying duty cycle to the switching element (in the case of LEDs - a field-effect transistor, triac or dinistor).
Duty factor (S) is the ratio between the duration of the pulses and the pause between them.
S=T/T1 , where T is the pulse period, T1 is the period of the positive front.
In a PWM controller, pulses follow at a constant frequency, only the duration of the pauses changes.
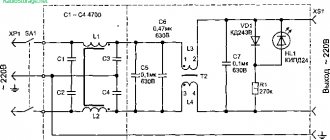
Below is a schematic diagram of a PWM controller:
Increasing the pulse width increases the time it takes for the current to flow through the transistor to the load, and therefore the current passed through. The pulse repetition rate is much higher than what the eye can detect, usually 100-200Hz, so we don’t feel the flickering of the LEDs. The advantage of load regulators based on PWM controllers is a significantly higher efficiency compared to resistive ones, since the excess load is extinguished rather than consumed.
Connecting a dimmer to the power supply circuit of an LED lamp
There are two connection options:
- Connection diagram in front of the power driver when the AC voltage is dimmed;
- Connection after the power driver, with PWM constant voltage regulation.
Types of devices for dimming 220V LED lamps
Lighting devices using light diodes are dimmable by various devices, which can be divided:
- according to the control principle;
- according to the location and method of installation.
Separation by location and method of installation is not important, because there is no difference in the design of the devices: everyone will choose the option that is convenient in a given situation. If the ceiling in an apartment or private house is suspended, then it makes sense to purchase a dimmer that will be located directly next to the lamp on the ceiling panel. If the ceiling is ordinary, you will have to make a niche next to the distribution box or switch, where a hidden dimmer will subsequently be installed. Today they also produce devices that are mounted in plain sight without spoiling the interior.
The control unit must fit into the interior and not spoil it
Based on the control principle, the following devices can be distinguished:
- with mechanical control (rotary knob or keys);
- touch switches with dimmer;
- controlled by remote control;
- with Wi-Fi control.
It is certainly clear that the former are a budget option, while dimmers controlled via Wi-Fi are the most expensive. Mechanical devices most often perform only on/off and dimming functions. Additional options, such as a timer, are already present on some touch models. More expensive devices provide the ability to connect to the Smart Home system.
The touch control panel is quite easy to use, but does not tolerate dirt and greasy hands
Push-button
Designs for regulating light using buttons resemble conventional switches in appearance. To adjust the brightness with such a device, you only need to press the key; a quick press turns the device on and off, and a long press adjusts the brightness itself.
Panel SR-EN9001-RF-UP White
The panel is designed to control and monitor LED strips; all actions are performed using a radio channel. The power elements in this device are batteries, installation is carried out in an overhead manner, and the control itself occurs using a special remote control.
Panel SR-EN9001-RF-UP White
Advantages:
- small dimensions
- ease of installation and use.
Flaws:
- the price is quite high.
LN-MINI-DIM (12-24v, 1x6A)
A compact device equipped with control buttons located on the surface of the body. It is of the overhead type, the voltage can reach 12, 24 V. LED strips and also PWM modules are connected.
LN-MINI-DIM (12-24v, 1x6A)
Advantages:
- The dimensions of the device are small;
- easy to install;
- has low cost;
- reliable design.
Flaws:
- the model is not suitable for complex lighting systems;
- operating the device is not very convenient.
Knob SR-2853K4-RF-UP White
According to customer reviews, this model is of very high quality. The two-zone switch operates using radio waves; a short press turns the lighting on or off, and a long press activates the dimming mode. In order for the regulator to work, controllers from the SR-1009x series are used, which are capable of simultaneously regulating the operation of several diode panels, and the power source is a battery (CR2430). The model is suitable for controlling strips of the same color, as well as other LED-powered lamps.
Knob SR-2853K4-RF-UP White
Advantages:
- works without connecting wires (standalone);
- easy to install;
- has additional control from a remote control or using a phone if Wi-Fi is available;
- On and off mode is carried out smoothly;
- There is a command transmission indicator.
Flaws:
- the price is high;
- After the time has elapsed, it is necessary to replace the batteries, or rather the batteries.
The best manufacturers and models of LED dimmers
It is a pity that a concern such as Schneider Electric does not produce dimmers for LED lamps - they limited themselves to devices for LED strips. However, there are many other manufacturers on the Russian market whose product quality is high. Let's try to choose the best of them. We will consider, which is not very widely known, but produces very high-quality and relatively inexpensive dimmers.
Quite a miniature device controlled by a key fob
A large manufacturer with an excellent reputation - “Arlight” with model LN014
This manufacturer specializes mainly in the manufacture of dimmers and controllers for LED equipment. The quality of the products is always at its best, and therefore we could not ignore it.
| brand, model | Max. Power, W | Dimensions, mm | Remote/control connection | Availability of remote control | Load current |
| LN014 | 220 | 104×68×30 | RF radio | Included | 1A |
Arlight LN014
Dimmers are among those products that are practically not counterfeited. Thanks to this, you can be sure that if the manufacturer has a good reputation, you don’t have to worry about quality. This does not apply to Chinese products.
Current dimmer SRP-1009-50W (220V, 200-1500mA)
Quite an interesting device. Although the dimmer supports remote control function, a remote control is not included. However, the device itself is made with high quality. Of course, the price is a little high, but the durability in operation justifies it. Let's look at the characteristics of the product.
This is what the Arlight SRP-1009-50W dimming device looks like
| brand, model | Max. Power, W | Dimensions, mm | Remote/control connection | Availability of remote control | Load current |
| SRP-1009-50W | 50 | 210×50×32 | RF radio | No | 0.2-1.5 |
Current dimmer SRP-1009-50W
This model is suitable for those who use 2-3 LED lamps for lighting. Considering that the average power of one is 11-15 W, this power is quite enough.
Another dimmer - CT20-DIM
This is the cheapest and weakest of the dimmers considered today. It makes sense to install this only in very small rooms with one light bulb. However, the quality of the products is at the highest level. That is why the device is included in our top three.
| brand, model | Max. Power, W | Dimensions, mm | Remote/control connection | Availability of remote control | Load current |
| CT20-DIM | 20 | 102×60×30 | RF radio | No | 0.35-0.7 |
dimmer CT20-DIM
Considering various manufacturers and the cost of their products, we came to the conclusion that if there is a desire to install a dimmer at home, then with the assortment that is offered to the buyer, choosing the appropriate model is not difficult. Moreover, this applies to all segments of the population, regardless of income level.
Remote control control is very convenient, but some people refuse it in favor of Wi-Fi
Digital
Digital devices that regulate the brightness of LED strips are very convenient for controlling the brightness of all LED strips. Digital regulators provide more stable current operation and reduce power loss to a minimum. Also, the use of such switches does not allow the LEDs to overheat, thus their service life is significantly increased.
04-10 Mini dimmer 12 V, 72 W, RF
A miniature radio-controlled device that is in demand among consumers, thanks to it it is possible to switch the SMD (monochrome) tape to several operating modes, there can be up to 25 of them. The kit includes a remote control that allows you to configure the controller from a distance. The device operates at a distance of about 50 meters, which is very convenient; it also differs from others in that it does not require direct pointing at the distributor itself to control the functions. Allows the user to independently set the required brightness, turn the power on and off.
04-10 Mini dimmer 12 V, 72 W, RF
Advantages:
- belongs to the budget category;
- has small dimensions;
- A good remote control is included in the set;
- The remote control works without direction to the unit itself and at a long distance.
Flaws:
- signal failures occur when receiving from the remote control;
- maximum power 4/8 W/m.
ARLIGHT SR-2839DIM WHITE
A single-zone device for adjusting the brightness of diode strips, which is accompanied by a control panel with a sensor, and also has a built-in controller with a power of 1-10A. The brightness control comes from a circuit whose voltage can be 12 or 24V.
ARLIGHT SR-2839DIM WHITE
Advantages:
- adjustment is carried out remotely;
- easy to install;
- there is a sensor installed on the remote control;
- excellent package.
Flaws:
- high price;
- sizes.
Schneider Electric Blanca BLNSS040011
The dimmer of this model is produced by a French company engaged in the production of lighting equipment. The device has a hidden installation type and a mechanism equipped with a special cover. Equipped with a rotary and push button, has a glossy surface made of thermoplastic. The power can reach 400 V and the voltage up to 220 W. Can be used in conjunction with motion sensors. There is a built-in memory function that remembers the last lighting level.
Schneider Electric Blanca BLNSS040011
Advantages:
- functional;
- can be installed hidden;
- easy to install;
- high-quality material from which it is made;
- small dimensions;
- due to its qualities it has a reasonable price.
Flaws:
- quickly dirty surface;
- It's hard to set the minimum brightness level, first you need to set it to the middle level and slowly lower it.
How to determine compatibility of LED lamps and dimmers
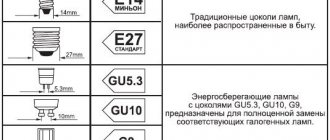
First, you should understand that an LED lamp and an LED strip are completely different lighting devices. This means that the dimmers for them will be different. If additional electronics are required for the operation of the strip, then the light bulb is screwed into a regular E14 or E27 type socket. Also, the lamp base can have a different shape - G or MR. It is designed to operate on a 220V/50Hz network and does not require additional components.
When purchasing a dimmer, you should take into account the total load from all light sources that will be connected to the dimmer. If the light bulbs have already been purchased (don’t forget about the dimming markings), the ideal option would be for the buyer to come to the store with the lamp. In this case, you can check the compatibility of the lighting fixture and the dimming device on site.
When purchasing a dimming device in a store, it is better to immediately check it for compatibility with your lamp
However, the main thing in the matter of compatibility is the dimming protocol of both devices.
Repair of LN-IR24B RGB LED strip controller
If checking the remote control, power supply and RGB LED strip confirms their serviceability, then the controller is faulty and should be replaced or repaired.
Repairing the controller begins with inspecting the printed circuit board. To do this, you need to remove the bottom cover by pressing the side wall to the side with a knife blade.
On the sides of the cover there are two square holes, into which the clamps of the base of the case cling, and the cover is securely fastened.
The printed circuit board in the case is fixed only on the side where the conductors are soldered with a few drops of silicone. To release the printed circuit board, you need to use a knife blade to trim the silicone along the walls of the case. You need to work carefully so as not to cut the wires.
After removing the printed circuit board, you need to carefully check it externally for defects - cold soldering of the leads of the parts, traces of overheating in the form of darkening of the markings or soot on the case, overheating of the conductors or their destruction.
If no defects are found, then the radio elements are faulty. Microcircuits rarely fail; the bottleneck in controllers is usually power switches, which fail, as a rule, due to violation of operating rules, namely, current overload. All three switches fail very rarely, most often one, the middle one (green control), since it is heated by neighboring transistors and, as a result, operates under more severe temperature conditions.
If the maximum load current is specified as 2 A, then for reliable operation of the controller, the outputs must be loaded with a current of no more than 1.8 A, and preferably 1.5 A. Then the controller will last a long time.
The switches in the LN-IR24B controller are made of three mosfet P3055LD field-effect transistors in a DPAK (TO-252) package for SMD mounting that can withstand a load current of up to 12 A. But in the controller the transistors are not installed on heat sinks and therefore the permissible load current is limited to 2 A .
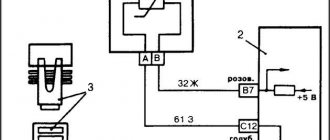
Below is a structural and installation diagram of the LED RGB lighting system. The paths of digital signals from the microcircuit to the gates of field-effect transistors are shown with lines of corresponding colors.
It is best to check the operation of the controller using an oscilloscope. Then it will be possible to check both the operation of microcircuits and transistors. To check, just apply supply voltage to the controller. It is not necessary to connect an RGB strip. Next, using the remote control pointed at the sensor, press first the ON button (turn on) and then W (white). Thus, the controller will be switched on to the LED strip glowing mode with white light (all three colors will glow).
The common wire of the oscilloscope is connected to +12 V, and the probe is touched sequentially to the gates of each of the transistors. Rectangular pulses with a swing of about 5 V should be observed on the oscilloscope screen. If there are no pulses, then the end of the probe is touched from the other end of the current-limiting resistor. If in this case the pulses do not appear, then the microcircuit may have failed or it is not receiving a digital signal from the sensor chip. If the microcircuits malfunction, repairing the controller is not economically feasible.
If there are signals from the microcircuit, you need to sequentially touch the drains of the transistors (soldering points of the output RGB conductors) with the probe. If the transistors are working properly, then rectangular pulses with a swing of about 12 V should appear on the oscilloscope screen, as in the photograph. If there are no pulses, then the source-drain junction of the transistor is broken; if the pulses are only 5 V in swing, then there is a breakdown between the gate and drain, and the source terminal is broken. The faulty transistor must be replaced.
If one or two colors do not light up in the LED lighting, then you can check the key transistors of the idle channels without an oscilloscope. To do this, you need to swap the output wire of the missing color, and the one on which the color is present, by re-soldering it on the board. For example, the tape does not shine in red, but there are green and blue colors. Unsolder the red and green wires from the board. Solder the red one in place of the green one, and the green one in place of the red one. Turn on the system, if the red color appears but the green color does not, it means that the key transistor is definitely not working and needs to be replaced.
The P3055LD field-effect transistor in the DPAK (TO-252) package and its analogues are often used in computer motherboards. To replace controllers when repairing them, I used an analogue of the P3055LD transistor, transistors like P3055LDG and PHD3355L soldered from faulty computer motherboards.
Main compatibility parameter: LED lamp dimming protocols
There are 4 dimming protocols that differ from each other:
- TRIAC;
- 1-10V;
- DALI;
- Push DIM.
Let's try to understand in general terms what each of them is and what the differences between them are.
Interesting design of the control panel - if you wish, you can make your own photo to order
TRIAC is a triac dimmer. The main advantages of the protocol include low cost and ease of connection. It does not require additional equipment; it is included in the circuit like a regular switch. The dimmer can be installed on the wire directly next to the lamp. However, when purchasing, you should check the compatibility with the lighting device - incompatibility will lead to humming and flickering.
1-10V - such protocols were used when dimming fluorescent lighting devices. The essence of the work: a signal from 1 to 10V is sent over a separate pair. But, despite the fact that the protocol is completely insensitive to load, it is used extremely rarely for two reasons - control is possible only from one point, and manufacturers of LED equipment practically do not support it. The chances that you will come across a lamp or dimmer with a 1-10V protocol are almost zero.
DALI - most manufacturers of professional lighting fixtures and equipment support this digital protocol. All dimmable lighting devices are united by a single bus, which controls them. The big plus is that you can reassign the “switch/light” message at any time by switching from one to the other. Dali allows you to program certain preset parameters that can be saved. The disadvantages include the high cost and the need for initial setup, which cannot be completed without the help of a specialist.
Dim light helps your eyes rest after a hard day at work.
Push DIM is a rather rare protocol. Its implementation is quite interesting: it is connected by two contacts, which are normally open. Control is carried out as follows: the user presses the key, closing the contact, and immediately releases it, opening the circuit. A short press signals the dimmer a command to turn on or off. If you press it for a long time, the dimmer responds to the command to dim the light or make it brighter.
Which dimmer is better to buy for 220V LED lamps
So how do you choose a dimmer? To ensure that your purchase does not disappoint you, you should adhere to some rules:
- Preference should be given to well-known brands with a good reputation. Even though the dimmer will cost a little more, you will have peace of mind and confidence in its performance. One of these, in addition to what we mentioned above, is “Legrand”.
- Pay attention to the appearance (if you plan to install it in a visible place). The device must be in harmony with the interior and not spoil it.
- Check protocols for compatibility.
- Check with your sales consultant for the availability of documentation and product certificates.
- Inspect the product carefully. The soldering seams must be smooth, the logo and technical information, if printed on the case, must be clear, unblurred, and easy to read.
Such a control panel will be perfectly visible in the dark
By following these simple rules, you will purchase a high-quality device that will serve you for many years.
Before purchasing a dimmer, calculate what load will be placed on it by electricity consumers during operation. To do this, add up the power of all consumers that you plan to connect through a dimmer, and add 20% for possible overloads. The resulting number will be the minimum power limit of the dimmer.
Sensory
Devices of this type have a special touch panel that allows you to adjust the brightness of the light by lightly touching it. Such models, as a rule, have a modern design, but as far as functionality is concerned, they are no different from other types.
Switch – touch dimmer 12/24V 48W
A budget controller of small size, designed to control LED strips, is easy to use and has a simple touch panel. It operates at a constant voltage of 12 or 24 V and is one of the best budget representatives of dimmers of this type. Often used for decorative lighting in aluminum profiles. The maximum current during operation should not exceed 4A. The sensitive sensor makes it easy to set the required brightness. Suitable for LED lamps.
Switch – touch dimmer 12/24V 48W
Advantages:
- the price is affordable for everyone;
- high-quality assembly.
Flaws:
- small maximum current is only 4A.
Uniel ULC-R22-DIM
A good model of a touch controller; on the remote control there is a touch ring for performing all the necessary manipulations. The dimmer has a built-in memory function that saves all settings in the event of a sudden shutdown of the device. To ensure that the device operates without interruption, special protection against radio frequency interference is built into its board. High-quality parts increase service life up to 50,000 hours. Uniel ULC-R22-DIM provides a combined voltage supply, that is, it can be either 12 or 24 V.
Uniel ULC-R22-DIM
Advantages:
- there is a memory function;
- quality parts;
- long service life;
- affordable price.
Flaws:
- not detected.
Dimmer LN – 200 (12-24V, 72-144W, Touch)
Compact dimmer that allows you to control the lighting with just one touch. A quick touch of the knob turns the light on or off, and a long press turns on the dimming function. The highest operating voltages are 12-24 V, and the powers reach 77-144 W. A lightweight device that is placed on the wall will create comfort when controlling light in any home.
Dimmer LN – 200 (12-24V, 72-144W, Touch)
Advantages:
- compact dimensions;
- touch control;
- has an overhead mounting method.
Flaws:
- the price is too high for such a simple device;
- limited range of functions.
Connecting a dimmer for lighting: main steps
How to connect a dimmer to LED lamps? Even a novice home handyman can cope with such work. The main task here is extreme care, accuracy and adherence to certain rules. Dimmer connection diagrams for 220V LED lamps are shown in the figures below.
The dimmer is connected in the following order. First of all, we determine the phase, mark it, and then remove the voltage by turning off the input circuit breaker. Further according to the diagram - zero for the dimmer, phase for control. We connect the output contacts to the lamp.
Remember that to avoid heating and ignition of the wiring, all contacts must be tight. You should not joke with electricity; it does not tolerate being taken lightly. Therefore, if a home master doubts his own abilities, it is better to turn to professionals for help.
{code 74037}
Do-it-yourself dimmer - is it possible?
It is quite possible to make such a device with your own hands. However, this will require some skills and knowledge of radio engineering and electronics. If a home craftsman doesn’t have them, then it’s unlikely that anything worthwhile will come out. If there are any, we suggest that you familiarize yourself with some diagrams that will help you complete this work.
Dimmer circuit for an LED lamp: the simplest option
The simplest dimmer using triacs is not difficult to make
Dimmer on the N555 chip - there shouldn’t be any problems here either
And this is a dimmer on thyristors and dinistors - there is no need to explain to a knowledgeable person what and how
If a person knows how to read schematics, making such a dimmer will not be difficult for him.
Handmade dimmer for LED strips
To make a dimmer for an LED strip, we need an integral stabilizer of the KREN series. The classic connection diagram for a stabilizer implies that a resistor connected to the control input sets the stabilization value. By adding capacitor C2 and a variable resistor, we get something like a comparator. It will look like this:
DIY LED strip dimmer circuit
Let's sum it up
A dimmer is indeed a very convenient and useful, and sometimes even necessary, device. Its installation will undoubtedly bring a bit of comfort to the lives of household members. Considering the considerable cost, the main thing is to choose the right dimmer and LED lamps in terms of compatibility, protocols, power and other parameters. Only in this case will the device serve reliably, helping you relax when necessary, or vice versa, illuminating the room with bright light.
Unusual LED lamps with built-in dimmer and various possibilities
We hope that today's article was useful to our dear reader. If anyone has any questions after reading, we will be happy to answer them. You can ask them in the discussion below. There you can also share your personal experience of installing or making dimmers - this information will be useful for beginning home craftsmen. Write, ask, communicate. And finally, we suggest watching a short video on today’s topic, which will be very interesting to you.