Rheostat as a simple dimmer
In simple words, a dimmer is an AC rheostat, but with a more complex design. The variable resistor was first invented by J. Poggendorff in the 19th century to change voltage (U, V) and current (I, A) by increasing / decreasing resistance (R, Ohm).
Depending on the type of rheostat, the value of R changes smoothly or stepwise.
To reduce the brightness of a light source, you need to reduce the voltage using a rheostat, and for this, resistance is added.
Due to the increase in R and I, the device becomes very hot and releases heat to the surrounding air. As a result, such a regulator has low efficiency and, as a result, is not used.
What is a dimmer for 220V LED lamps: general information
To be precise in its definitions, an LED dimmer is a device that allows the user to reduce or increase power by adjusting the voltage supplied to the lighting fixture. The simplest dimmers for “Ilyich bulbs” were rheostats - regulators that limit voltage by converting it into thermal energy. With modern light sources, for example, light diodes, this number will no longer work. More complex schemes are needed here. The question arises: is it possible to install a dimmer on LED lamps? As it turned out, it is possible. Moreover, it is not difficult if you know some of the nuances, which we will consider today.
The appearance of such devices can be quite varied.
Application
Due to their simplicity of design and functionality, modern dimmers are widely used.
Main directions:
- Creation of different lighting modes in one and/or several rooms.
- Reducing electricity costs by switching lighting to standby mode.
- In a power tool to reduce and increase the speed of a commutator electric motor.
- Zoning a room into several conventional areas.
- Illumination of art objects, for example, sculptures or paintings. Different degrees of lighting allow you to draw more attention to the exhibit.
- Creating the illusion of a person being in an apartment/house by changing the lighting level.
- In electric heaters to regulate their power.
- Change brightness for birds/animals that have special requirements for this parameter.
- Warming chicks immediately after birth. Depending on the degree of brightness, the degree of heating also changes.
- Carrying out home parties when brighter lighting is required at the table, and dim lighting in the dance area.
- Creating an intimate atmosphere in the bedroom.
The scope of application of dimmers is huge, and everyone can come up with a new option, taking into account the capabilities of the electronic device.
The dimmer is equipped with a microcontroller and has a wide range of options:
- changing the brightness level;
- automatic shutdown;
- creating the effect of the presence of people thanks to automatic on/off;
- flashing/dimming modes;
- smooth switching on/off of lighting;
- remote control via IR channel, radio channel, acoustic noise (for example, cotton), etc.
What is an adjustable switch
A dimmer is a setting that is made like a rheostat to smoothly change the voltage from 0 to 220 W. This switch also became the closing link in the chain.
Brightness adjustment occurs by changing the voltage
The dimmer design includes a measured adjustment of the switch resistance, which is activated by a rotary cam, an electronic device in the form of a remote control or motion sensor, or a touch mechanism.
Dimmer design and components
In fact, a dimmer is considered a switch that regulates lighting by eliminating “excess electricity.” It is very similar to a rheostat, only more comfortable to use.
Classic rheostat
However, such products cannot be used for all types of light bulbs. Energy-saving and halogen lamps are, in principle, not suitable for them, since such lamps most often require 220 volts. But switches with a brightness control for LED lamps are quite common.
Adjusting the brightness of the LED lamp
Principle of operation
The schemes for adjusting the brightness of light bulbs are identical for most dimmers. The only difference is the presence of any additional parts to create smoothness and stability of the lower limits.
Purpose of terminal blocks on a dimmer
The capacitor is charged through a variable resistor, and when it reaches a certain point, the triac opens and the lamp begins to light. The triac closes. The same process occurs on the negative half-wave.
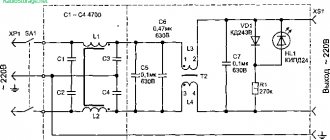
Electrical diagram of the lighting controller
Dimmer Variations
All adjustable devices are divided into types depending on the design and scope of application.
Modular
Most often they are installed in distribution panels and controlled using a key or button. Such specimens are used to illuminate corridors and staircases.
Modular dimmer
Monoblock
This type is installed in a simple socket box and connected like ordinary switches. They in turn are divided into:
Push dimmer
Rotary control device
Key brightness control
Touch devices
Dimmer with remote control
Dimmers for installation in a mounting box are most often designed for halogen and incandescent lamps. They can be controlled using a specialized remote button.
Light level control
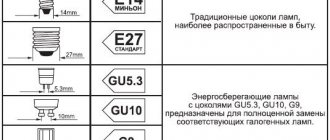
There is a division of switches according to the types of lamps for which they are used to adjust the light:
- For halogen and incandescent lamps;
- For halogen low-voltage lamps;
- For fluorescent light bulbs;
- For LEDs.
Controlling LED strip using a dimmer
Related article:
Advantages and disadvantages
Among the advantages of dimmers, the following aspects can be noted:
- Ability to adjust lamp brightness;
- You can set a timer with which the brightness will change automatically;
- Remote control;
- Longer lamp life;
- Use as a regular switch;
- You can create blinking and pictures with beautiful lighting;
- Energy saving.
Using the regulator, you can set the timer and set the desired brightness at different times of the day
However, there are also some disadvantages here. For example:
- Not all types of dimmers can save electricity;
- Interference is created for devices that receive radio signals;
- Small loads lead to damage to dimmers;
- Various interferences can interfere with the operation of regulators;
- When dimmers are operating, lamps may flicker and blink.
Lamps may flicker due to improper installation or interference.
Related article:
Electronic dimmers
For those who want to go deeper into the topic.
These are small in size and economical devices, the operation of which is based on a control switch: transistor or triac.
Most of these dimmers have a non-sinusoidal output signal, and the sinusoid sections are “cut off” by the existing switch.
Such dimmers are not intended for connecting devices powered by currents with low harmonic distortion.
The category of such devices includes electric motors, induction type transformers for halogen lamps, etc. This is due to the risk of device failure due to overheating.
In addition, budget electronic dimmers without special filters are sources of strong interference.
Dimmer characteristics
First of all, pay attention to the power: for example, the number 350 W on a dimmer is an indicator of how much total load it can withstand. A 350 W dimmer is enough to change the lighting of 5 bulbs of 60 W and 1 of 40 W
The permissible power in real life is often less than specified; this also depends on the channel load factor
It is best to distribute 30-40% less load per channel than is written in the data sheet
Pay attention to the minimum power: not all devices are capable of controlling low-power lighting fixtures. The permissible power in real life is often less than specified; this also depends on the channel load factor
It is best to distribute 30-40% less load per channel than is written in the data sheet
The permissible power in real life is often less than specified; this also depends on the channel load factor. It is best to distribute 30-40% less load per channel than is written in the data sheet
Pay attention to the minimum power: not all devices are capable of controlling low-power lighting fixtures
If you plan to use the regulator in a room with high temperatures, take a device with a built-in ventilation system. The dimmer must have an automatic switch (AB) - in case of overload or overheating, it turns off the emergency channel.
When purchasing, carefully inspect the device, listen to how it works: if you notice that when the brightness level changes, the intensity of the unit’s hum also changes, then it means it has a throttle, this is not bad. Power wires cannot be less than 1.5 square meters. The boards are usually covered with blue or green paint, the wires must be neatly tied into bundles. The fan must have bearings - such units work better. Radiator - at least 100 sq/cm for one power element, the voltage stabilization function is also good.
The most popular manufacturers of dimmers are LeGrand (France), Viko (Turkey), Merten (Germany), Gira (Germany), Schneider Electric (Germany), Anya (France) and others.
How to connect a dimmer?
- Choose dimmers that match the type of light bulbs used in the room, otherwise they will quickly fail;
- Do not install the dimmer in rooms with high temperatures (above 26 degrees), it will constantly overheat and quickly fail;
- The phase conductor goes to the break (it is connected to the connector marked L), the neutral cannot be connected;
- Inductive and capacitive loads must not be connected to the dimmer;
- Choose the power of the unit with a reserve: for example, for 3 bulbs of 100 W each, a dimmer needs at least 500 W, a 300-watt one will not cope with this, you will need an amplifier.
Design and principle of operation
Externally, dimmers resemble ordinary switches, but they allow you to adjust the brightness level. Let's look at different execution schemes and their features.
On a thyristor
In most cases, a thyristor is used as the main element.
The general operating algorithm is as follows:
- While the SCR thyristor is closed, the capacitor (C) gains charge through the resistance.
- The voltage of the input half-wave increases.
- At a certain moment (when the voltage increases above 32 Volts), the ZD dinistor opens, and after it the SCR thyristor opens.
- A current passes between the terminals and flows until the value drops to the level required to close the ZD.
- The capacitor is discharged through D1 (diode) and SCR.
- The thyristor closes and the process repeats again.
By opening the thyristor at certain intervals when passing through “0,” it is possible to “cut off” the sinusoid and thereby change the voltage parameter and load current.
With throttle
Many dimmers use switches that, when added to the circuit, produce electromagnetic (EM) oscillations in a wide frequency range.
Such waves cause current to appear in the wires connecting the dimmer, power supply and load, thereby creating interference.
To combat the problem, inductance chokes or LC filters are used. They are installed near the load or power source.
The higher the frequency, the more compact the inductor. By choosing the right filter, you can reduce the level of interference to a minimum.
On a resistor
Dimmers with resistance R are used to change the brightness of incandescent lamps.
Structurally, the device consists of a rheostat / variable resistance, and operates on the basis of Ohm's law.
As the resistance increases, the current in the bulb decreases, which reduces the activity of the filament.
The design is very simple, but it has a big disadvantage - constant power consumption, regardless of the adjustment position.
So, as the resistance increases, the current decreases, but the total load remains unchanged. Excess energy is converted into heat and goes into the air.
Therefore, it will not be possible to save electricity using such devices.
Resistor dimmers are rare, but are used to change the brightness of semiconductor lamps.
We are talking about an analog control method, which is almost never used due to low efficiency and high sensitivity.
On a triac
This circuit is a little more complicated than the resistor version. A triac is used here, playing the role of a key and changing the current parameters.
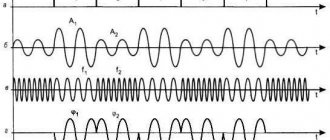
During operation, the voltage represents pieces of negative / positive half-waves, and when the brightness decreases, the light bulb is powered by “stumps”.
A 200 Hz signal arrives at the PWM generator. In this case, the brightness changes taking into account the time interval and pulse length. The current/frequency parameters remain unchanged.
Despite the great complexity of execution, the triac circuit has a number of advantages.
Thus, increasing the brightness does not increase the current load. In addition, such devices can be controlled/switched on remotely or near the light source itself.
How it works - DIMMER
Operating principle
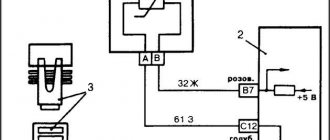
All dimmer models have similar lighting brightness control schemes. The differences lie in the presence of additional elements to give a smooth glow and stability of the lower limits.
The figure below shows the purpose of the terminal posts in the dimmer.
The capacitor is charged through a variable resistor. As soon as the charging becomes sufficient, the triac opens and the light comes on. After this, the triac closes. A similar process is observed on the negative half-wave.
The figure below shows the operation diagram of a switch with adjustable light intensity.
By selecting the values of resistors and capacitors, the initial and final periods of lamp ignition are replaced, as well as the stability of its glow.
Types of devices
Depending on the scope of application and tasks assigned to the dimmer, it may differ in appearance, cost and functionality.
Below we will consider the main types of dimmers, which differ in installation, control and type of lamps.
By installation method
Based on installation features, all dimmers can be divided into several types:
- Wall. It is screwed to the wall in an overhead way or mounted in a mounting box with a diameter of 6.8 cm. With this installation, you do not need to disassemble anything, and the main requirement is the presence of wiring laid along the walls.
- Portable. Structurally similar to a tee or relay, it has connectors for connection and a plug. The device connects like a regular device with the ability to change the brightness of the lighting. You can connect a lamp, floor lamp or lamp to such dimmers. Can be used as a heating source in the presence of an IR lamp.
- Hidden (modular). This type of installation is relevant for modular structures that are mounted on a DIN rail in a panel with automatic machines. The power first goes to the dimmer, from which the wires branch out to the light sources. The advantage of this design is that you can replace several individual devices with one device with multi-channel control. To adjust the light, you need to open the flap and make settings.
- Built-in. Combines the advantages of hidden and wall dimmers discussed above. Such equipment is mounted in partitions, and a control panel is mounted at the top. Externally, the device has much in common with a switch. The difference is that there are elements of smooth control here.
- Suspension. It is small in size and is mounted in the section of the light bulb's power wire. The use of such a dimmer allows you to adjust the light even in the absence of an option.
By management
All dimmers differ in the way they are controlled:
- Rotary. Structurally, they consist of a casing and a wheel, the movement of which changes the brightness. Changing the position of the regulator allows you to turn the lighting to maximum or turn off the light altogether. This version of the dimmer has no memory, so after turning off all settings are reset and you have to set them from scratch.
- Push-button. They have much in common with conventional switches. They consist of a pair of buttons responsible for turning on and brightening the lighting. To select a parameter, you must press, hold it pressed, or release the control element.
- Turn-push. Structurally, they have much in common with a switch, in the center of which a round control element is installed. To adjust the brightness you need to press on it, and to turn it off you need to press the button. After switching off, the device retains its settings, making it easier to use.
Schneider Electric Blanca - Sensory. The principle has much in common with the push-button version. The difference is that to change the brightness, you just need to touch a specific button (up/down arrow), hold it, or release it. To enable/disable a separate button or a combination of them is used. There is a mode saving function.
By type of signal transmission
Most modern dimmers have remote control capabilities.
The following options are possible here:
- Infrared. Such devices have an IR sensor directed towards the receiving device. Dimmers with such control are inexpensive and only work in direct line of sight of the signal. Even with a thin barrier, control becomes impossible.
- Radio signal. Unlike the option discussed above, the waves easily bypass obstacles, which allows you to adjust the light even from another room.
- Wi-Fi. The remote control is a phone or tablet PC with software installed on it from the dimmer manufacturer. To issue a command, you can remotely adjust the lighting parameters. The main thing is that both devices are connected to the Wi-Fi network. Regulation is available simultaneously to several people who have a smartphone with the desired program. For example, all family members.
- Acoustic. These dimmers are controlled by voice command. The memory of the dimmer contains control elements (clap, words), to which the dimmer reacts and executes the command. At this stage, such devices are still being improved to increase efficiency.
By type of lamps used
Each lamp type uses a compatible dimmer model. If the manufacturer claims to support several types of light sources, a “smart” controller is mounted inside the equipment, and this affects the cost.
There are two types of devices here:
- For voltages up to 230 V. They are suitable for simple / halogen lamps. There is a special regulator inside that allows you to work both with a 220 V strip and with diode lamps.
- For 12/24 V. For such devices, a step-down transformer is used.
In terms of supported bulbs, incandescent dimmers generally work for halogen bulbs and some LED bulbs.
Main compatibility parameter: LED lamp dimming protocols
There are 4 dimming protocols that differ from each other:
- TRIAC;
- 1-10V;
- DALI;
- Push DIM.
Let's try to understand in general terms what each of them is and what the differences between them are.
Interesting design of the control panel - if you wish, you can make your own photo to order
TRIAC is a triac dimmer. The main advantages of the protocol include low cost and ease of connection. It does not require additional equipment; it is included in the circuit like a regular switch. The dimmer can be installed on the wire directly next to the lamp. However, when purchasing, you should check the compatibility with the lighting device - incompatibility will lead to humming and flickering.
1-10V - such protocols were used when dimming fluorescent lighting devices. The essence of the work: a signal from 1 to 10V is sent over a separate pair. But, despite the fact that the protocol is completely insensitive to load, it is used extremely rarely for two reasons - control is possible only from one point, and manufacturers of LED equipment practically do not support it. The chances that you will come across a lamp or dimmer with a 1-10V protocol are almost zero.
DALI - most manufacturers of professional lighting fixtures and equipment support this digital protocol. All dimmable lighting devices are united by a single bus, which controls them. The big plus is that you can reassign the “switch/light” message at any time by switching from one to the other. Dali allows you to program certain preset parameters that can be saved. The disadvantages include the high cost and the need for initial setup, which cannot be completed without the help of a specialist.
Dim light helps your eyes rest after a hard day at work.
Push DIM is a rather rare protocol. Its implementation is quite interesting: it is connected by two contacts, which are normally open. Control is carried out as follows: the user presses the key, closing the contact, and immediately releases it, opening the circuit. A short press signals the dimmer a command to turn on or off. If you press it for a long time, the dimmer responds to the command to dim the light or make it brighter.
Advantages and disadvantages
When considering dimmers, it is important to understand their strengths and weaknesses.
Pros:
- Automatic on/off.
- Possibility of remote control by voice, clap, via radio or IR channel, as well as via Wi-Fi network.
- Simulating the presence of a person, which allows you to scare away intruders from a house/apartment when the owner is in another place. To do this, a specific program is set, which at a certain moment turns on / turns on the lights in different rooms.
- Smooth switching on/off of the lamp, which eliminates current surges and reduces the risk of burnout.
- The opportunity to radically change the design of the room and create the necessary atmosphere.
- Increased service life of light sources
- Save electricity by 10-15%.
- Saving on the purchase of complex lamps and chandeliers. Brightness adjustment occurs using a dimmer without using a large number of lamps.
- Possibility of connecting to the “smart home” system and setting modes by time/command.
Minuses:
- Narrow scope of application and the ability to use the dimmer for those sources that it supports.
- High risk when working with moving tools/machinery. The appearance of a stroboscopic effect can lead to distortion of the real picture.
- Risk of electromagnetic interference, including at radio frequencies.
- Low efficiency when used with incandescent lamps. It is often easier to use less powerful incandescent bulbs, dimmer circuits, or dimmers for LED bulbs.
- The relationship between output voltage regulation and load resistance is nonlinear.
- The power of the dimmer should be equal to, or preferably 20-50% greater than, the total load of the light sources.
- It is impossible to use dimmers with fluorescent lamps and light sources with additional devices: driver, transformer, electronic ballasts, etc. The exception is models that are specifically designed for use with dimmers. Some companies are already developing such devices.
- Non-sinusoidal output voltage, which makes it impossible to connect step-down transformers.
- For normal operation, it may be necessary to update the wiring and carry out cosmetic repairs.
- Sensitivity to temperature changes. Dimmer is afraid of both heat and cold.
Let's sum it up
A dimmer is indeed a very convenient and useful, and sometimes even necessary, device. Its installation will undoubtedly bring a bit of comfort to the lives of household members. Considering the considerable cost, the main thing is to choose the right dimmer and LED lamps in terms of compatibility, protocols, power and other parameters. Only in this case will the device serve reliably, helping you relax when necessary, or vice versa, illuminating the room with bright light.
Unusual LED lamps with built-in dimmer and various possibilities
We hope that today's article was useful to our dear reader. If anyone has any questions after reading, we will be happy to answer them. You can ask them in the discussion below. There you can also share your personal experience of installing or making dimmers - this information will be useful for beginning home craftsmen. Write, ask, communicate. And finally, we suggest watching a short video on today’s topic, which will be very interesting to you.
Installation Features
Installing a dimmer in a house or apartment does not cause problems. Thanks to its simple design, the dimmer can be easily installed instead of conventional switches and connected in a similar way.
When purchasing semiconductor devices, pay attention to compatibility. If available, the box should have the inscription “dimmable”.
It is also necessary to look at the installation method, because some models have an overhead design or are built into a break in the supply wires. We talked about this in more detail above.
Connection diagrams
Installation is carried out in a certain sequence. After turning off the power, make sure that the switch is de-energized. Then the cover of the device is removed from the body, the fastenings are loosened and the device is removed from the niche in the wall. If the insulating layer of the wires is damaged, the open areas must be covered with several layers of electrical tape. The wires are connected to the dimmer terminals, making sure that their bare ends are up to 3 mm long. The dimmer with connected wires is placed in place of the switch and securely fixed. All that remains is to connect the power and check that the device is working properly.
Installing a switch with a dimmer is no different from the standard sequence of work when installing a conventional model. If you need to connect a switch and a dimmer at the same time, it is better to place the latter closer to your usual resting place. If the kit includes additional remote buttons, they can be mounted at a distance of up to 50 m from the dimmer.
The phase wire is connected to the corresponding terminal of the light controller and the first terminals of each button. The second terminals of the buttons are connected to terminal B on the regulator. The load is connected to the second terminal of the dimmer and to the neutral wire.
Features of operation
When purchasing and using dimmers, it is important to consider a number of features of their use.
Let's highlight the basic nuances:
- The use of dimmers near radios and other highly sensitive devices is not recommended. This is due to the appearance of interference during the operation of such devices. For example, when you turn on a soldering iron with a regulator, the oscilloscope will show extraneous signals, and you won’t be able to listen to the receiver on long/medium waves.
- Connecting a dimmer to an incandescent lamp allows you to avoid a current surge and, accordingly, protect it from burning out ahead of schedule. In reality, such protection does not always work, and when turned on, the lamps still light up (although the likelihood of such a situation occurring is lower). By the way, the starting voltage at the minimum regulator level depends on the type of dimmer.
- The efficiency of an incandescent light bulb decreases noticeably along with a decrease in the potential difference at the input. Therefore, instead of reducing the brightness, it is better to connect a lamp of lower power and without a dimmer.
- The dimmer may cause interference when recording audio using a pickup or microphone. This feature must be taken into account in special rooms where sound is recorded or in radio stations. In such places, incandescent lamps should be connected directly or special circuits should be used.
- When adjusting the lamp power using a dimmer, not only the brightness changes, but also the color temperature. In particular, as brightness decreases, the light becomes redder.
- A powerful incandescent lamp, when dimmed using a dimmer, can produce high-frequency noise that can be heard in complete silence. This occurs due to mechanical vibrations of the filament, which burns with the participation of currents with HF harmonics (appear at the moment the triac switches). If you power the light bulb directly, there will be no such effect.
What are the differences between dimmers?
If you are going to use a switch with brightness control, you first need to find out what they are.
And in general, can all LED lamps be dimmed? Dimmers differ according to the following criteria:
- By type of installation;
- on execution and method of management;
- according to the method of regulation.
Let's take a closer look at each of them.
By installation type
For outdoor installation – surface-mounted switch with dimmer for LED lamps. To install such a device, you do not need to drill a niche in the wall; it is simply mounted on top of the wall. It is very convenient to use in cases where the interior is not a priority or external wiring is installed.
For indoor installation - they will fit perfectly into any interior, such as this one.
For DIN rail mounting they are very specific and at first it may seem that they are not practical. However, this dimmer for LED lamps works with a remote control, and is hidden from prying eyes in the electrical panel.
By execution
According to the design, the light controller for LED and incandescent lamps can be:
- Rotary;
- rotary-push type;
- push-button;
- sensory;
Rotary is one of the simplest options for dimming an LED lamp; it looks unpretentious and has the simplest functionality.
The turn-and-push one looks almost the same as the rotary one. Thanks to its design, when you press it, the light turns on with the same brightness as it was set the last time you turned it on.
A push-button controller for LED lighting looks more technologically advanced and will fit seamlessly into a modern apartment. Like this switch with a dimmer for LED lamps.
Touch models can be completely different - from luminous circles to smooth single-color panels for adjusting the voltage of LED lamps.
According to the adjustment method
Dimmers vary not only in their design, but also in their operating principle. This applies specifically to AC dimmers.
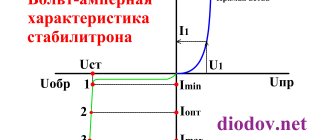
The first type of dimmer is more common and cheaper, due to the simplicity of its circuit - a leading edge cutoff dimmer. A little further on, its operating principle and circuit will be discussed in detail; for comparison, take a look at the type of voltage at the output of such a regulator.
The graph shows that the remainder of the half-wave is supplied to the load, and its beginning is cut off. Due to the nature of the load switching on, interference is generated in the electrical networks, which interferes with the operation of televisions and other devices. A voltage of the set amplitude is applied to the lamp, and then it fades out when the sine wave passes through zero.
Can a leading edge dimmer be used for LED lamps? Can. LED lamps with a dimmer of this type will only be well adjustable if they were originally designed for this. This is evidenced by the symbols on its packaging. They are also called “dimmable”.
The second type works differently, creates less interference and works better with different light bulbs - this is a falling edge dimmer.
LED lamps with this type of dimmer adjust better, and its design better supports non-dimmable light sources. The only drawback is that these lamps can adjust their brightness not from “zero”, but within a certain range. At the same time, dimmable LED lamps are simply superbly adjustable.
A special word can be said about ready-made LED lamps with adjustable brightness. This is a separate class of lighting devices that do not require the installation of additional regulators, but have them in their design. Their adjustments are made using buttons on the case or from the remote control.
Turning
Correct selection and installation of the regulator will significantly increase its service life. The rotary version has a rotating knob, which, when installed in the extreme left position, turns off the lighting. Gradually turning the knob to the right increases the brightness of the lamp.
Key
The main components of the variator: triac, pulse formation unit, diac (dinistor). The key version is very similar in appearance to conventional two-key switches. Using the keys, you can turn the lighting device on and off, and also adjust the lighting power.
Turn-push
Additional parts of the variator: resistors and capacitors. The rotary-push version has a principle of operation similar to a rotary device, but to turn on the lighting system you need to “retract” the handle a little.
Example of popular models and their characteristics
The modern market delights buyers with a huge number of dimmers, differing in design features, mounting method, manufacturer and other parameters.
Below we highlight some of the most popular options.
Touch dimmer RF6-18, 12/24 V, 3*6A/18A, 216/432 W, IP20
Dimmer with touch control, designed for illumination of LED lamps for 12 and 24 Volts. Control is carried out using the remote control.
Dimmer capabilities allow you to turn the strip on/off and change the brightness.
Characteristics:
- voltage - DC;
- power - 432 W;
- degree of protection—IP20;
- output voltage - up to 18 V;
- dimensions - 17.8x6.5x5 cm;
- case material - plastic;
- number of colors - 3;
- Possibility of use with a “smart home” - yes.
Dimmer EKF Minsk ERD06-101-10
Dimmer in a frame, designed for vertical/horizontal concealed installation.
Works with incandescent and halogen lamps for voltages up to 230 V. Mounted with a spacer or with screws. Supplied complete with frame.
Switching on is carried out by turning or by turning with pressure.
Characteristics:
- voltage - AC;
- voltage - 230 V;
- degree of protection—IP20;
- power - from 40 to 600 W;
- rated current - 3 A;
- dimensions - 8.4x8.4x4.7 cm;
- White color;
- Case material: plastic.
Mini dimmer WI-FI 12-24 V, 8A, 96/192 W, IP20
A small dimmer designed to control a 12 or 24-volt LED strip from Android or iOS phones. Works via radio channel.
With it you can turn on/off the device, change the brightness. The dimmer is programmable.
Characteristics:
- voltage - DC;
- power - 192 W;
- degree of protection—IP20;
- output voltage - up to 8 V;
- dimensions - 17.8x6.5x5 cm;
- case material - plastic;
- number of color channels - 3;
- Possibility of use with a “smart home” - yes.
Useful tips on how to choose a brightness control
In addition to appearance and type of installation, you should pay attention to the following characteristics:
- maximum permissible load - indicated on the device body and in the attached instructions (calculated - the total expected load plus 20% of the operating reserve);
- Rated voltage;
- possible type of connection, for example, an icon in the form of a circle with lines diverging to the sides means that the device can be used to adjust the power of the electric motor;
- class of housing protection from dust and humidity - must be at least IP20
- the presence or absence of its own protection, for example fuses that protect the device from burnout;
- price - in itself is not a guarantee of quality, but it is still better to choose devices in the average price range
- segment from well-known manufacturers;
- case material – heat-resistant plastic is usually used, additional options include protection from burnout and mechanical damage (you need to be especially careful when choosing devices with touch controls).
When installing it yourself, be sure to observe safety precautions and strictly follow the manufacturer's instructions.
Recommendations for selection
When purchasing dimmers for LED lamps, including those used in a radio/luminaire, you need to choose wisely. When looking for a suitable option, pay attention to the following points.
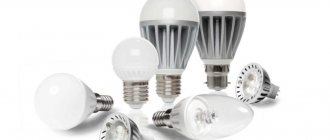
Lamp type
Dimmers are capable of working with certain types of light bulbs, because there are no universal devices.
Dimmers can support incandescent lamps, halogen lamps, LED devices, LED modules and other light sources.
Let's consider the subtleties of choice for different types of lamps:
- Incandescent. Finding a dimmer for such lamps is the least problematic. Dimmers for incandescent lamps have a simpler design and are easy to connect.
- Luminescent. There are almost no dimmers for such light bulbs due to the complexity of the circuit implementation. Here you have to use a controller and a ballast, and this requires additional costs.
- Energy saving. If there are ballasts (ballasts), the brightness changes using a special regulator. If it is not there, difficulties arise with dimming.
- Halogen. For such lamps, separate dimmers or devices are sold that can simultaneously be used for incandescent lamps.
- LED LED lamps. For 220 V light bulbs there is no difficulty in finding. In this case, pay attention to the label and the presence of an inscription indicating the possibility of using such a device.
- 12 volt LED lamps. Dimmers for LED lamps of this type require the use of a step-down transformer and a special controller. A special control panel may be required.
Power
When choosing a dimmer based on power, you need to calculate the total load. If the calculations are made incorrectly, the device may not work or may fail prematurely.
To calculate the total power of the light bulbs, add up the parameters indicated on the packaging.
When choosing a dimmer, be sure to add 20-50% to the design power. For example, if the resulting parameter is 200 W, it is better to take a 300 W dimmer.
Features of execution
When choosing, pay attention to the type of dimmer, because the possibility of its installation and combination with the design of the room depends on this.
As noted, you can find keyboard, rotary-push, touch and other models on the market.
Connecting a dimmer for lighting: main steps
How to connect a dimmer to LED lamps? Even a novice home handyman can cope with such work. The main task here is extreme care, accuracy and adherence to certain rules. Dimmer connection diagrams for 220V LED lamps are shown in the figures below.
The dimmer is connected in the following order. First of all, we determine the phase, mark it, and then remove the voltage by turning off the input circuit breaker. Further according to the diagram - zero for the dimmer, phase for control. We connect the output contacts to the lamp.
Remember that to avoid heating and ignition of the wiring, all contacts must be tight. You should not joke with electricity; it does not tolerate being taken lightly. Therefore, if a home master doubts his own abilities, it is better to turn to professionals for help.
{code 74037}