With a variety of lighting devices on the country's shelves, LEDs remain unrivaled due to their efficiency and durability. However, a quality product is not always purchased, because in a store you cannot take the product apart for inspection. And even in this case, it is not a fact that everyone will determine from what parts it is assembled. The lamps burn out, and buying new ones becomes expensive. The solution is to repair LED lamps yourself. Even a novice home craftsman can do this work, and the parts are inexpensive. Today we will figure out how to check a lighting device, in what cases the product is repaired and how to do it.
How 220 V LED lamps work
It is known that LEDs cannot operate directly from a 220 V network. To do this, they need additional equipment, which, most often, fails. We'll talk about it today. Let's consider the LED driver circuit, without which the lighting device cannot operate. At the same time, we will conduct an educational program for those who do not understand anything about radio electronics.
The driver in the LED lamp does the main job
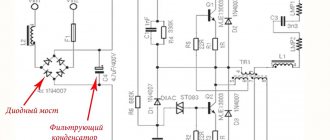
The 220 V LED lamp driver circuit consists of:
- diode bridge;
- resistance;
- resistors.
The diode bridge serves to rectify the current (converts it from alternating to direct). On the graph it looks like cutting off a half-wave of a sine wave. Resistors limit the current, and capacitors store energy, increasing the frequency. Let's look at the operating principle of a 220 V LED lamp.
Another way to deal with blinking
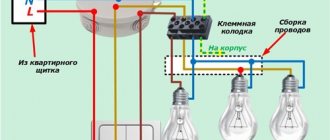
Sometimes it is enough to swap incandescent light bulbs from one room with “housekeeper” lamps from another. As they say, “cheap and cheerful.” Screwing at least one regular incandescent lamp into a multi-arm chandelier along with energy-saving light bulbs can also help. It is important to place it in a cartridge that can be turned off using a backlit key.
The principle of operation of the driver in an LED lamp
| View on the diagram | Operating procedure |
| A voltage of 220 V is supplied to the driver and passes through a smoothing capacitor and a current-limiting resistor. This is necessary in order to protect the diode bridge. | |
| Voltage is supplied to a diode bridge, consisting of four differently directed diodes, which cut off the half-wave of the sine wave. The output current is constant. | |
| Now, by means of a resistance and a capacitor, the current is again limited and the desired frequency is set. | |
| Voltage with the necessary parameters is supplied to unidirectional light diodes, which also serve as a current limiter. Those. when one of them burns out, the voltage increases, which leads to failure of the capacitor if it is not powerful enough. This happens in Chinese products. High-quality devices are protected from this. |
Having understood the principle of operation and the driver circuit, the decision on how to repair a 220V LED lamp will no longer seem difficult. If we talk about high-quality lighting devices, then you shouldn’t expect any troubles from them. They work for the entire prescribed period and do not fade, although there are “diseases” to which they are also susceptible. Let's talk about how to deal with them now.
Why does the energy-saving light bulb blink? Is it harmful?
First, determine whether you are a nervous person. For many people, a flashing energy-saving light bulb gets on their nerves. In the dark, such blinking can scare not only younger family members, but also adults. Many users, when faced with this problem for the first time, are seriously scared, thinking that the problem is faulty wiring. Some are afraid of a short circuit and, as a result, a fire.
Reasons for failure of LED lighting devices
To make it easier to understand the reasons, let’s summarize all the data in one common table.
| Cause of failure | Description | Solution |
| Voltage drops | Such lamps are less susceptible to breakdowns due to voltage surges, however, sensitive surges can “break through” the diode bridge. As a result, the LED elements burn out. | If surges are sensitive, you need to install a voltage stabilizer, which will significantly extend the life of the lighting equipment, but also other household appliances. |
| Incorrectly selected lamp | Lack of proper ventilation affects the driver. The heat it generates is not removed. The result is overheating. | Choose a lamp with good ventilation that will provide the necessary heat exchange. |
| Installation errors | Incorrectly selected lighting system and its connection. Incorrectly calculated electrical wiring cross-section. | Here the solution would be to unload the lighting line or replace lighting fixtures with devices that consume less power. |
| External factor | Increased humidity, vibration, shock or dust if the IP is incorrectly selected. | Correct selection of the degree of protection or elimination of negative factors. |
Good to know! Repair of LED lamps cannot be carried out indefinitely. It is much easier to eliminate negative factors that affect durability and not purchase cheap products. Savings today will result in costs tomorrow. As economist Adam Smith said, “I am not rich enough to buy cheap things.”
Repairing a 220 V LED lamp with your own hands: nuances of the work
Before you repair an LED lamp with your own hands, pay attention to some details that require less labor. Checking the cartridge and the voltage in it is the first thing to do.
Important! Repairing LED lamps requires a multimeter - without it you will not be able to ring the driver elements. You will also need a soldering station.
A soldering station is necessary for repairing LED chandeliers and lamps. After all, overheating of their elements leads to failure. The heating temperature when soldering should be no higher than 2600, while the soldering iron heats up more. But there is a way out. We use a piece of copper wire with a cross-section of 4 mm, which is wound onto the soldering iron tip in a tight spiral. The more you lengthen the tip, the lower its temperature. It is convenient if the multimeter has a thermometer function. In this case, it can be adjusted more accurately.
This is what a soldering station looks like. Its cost is quite high
But before you repair LED spotlights, chandeliers or lamps, you need to determine the cause of the failure.
How to disassemble an LED light bulb
One of the problems that a novice home DIYer faces is how to disassemble an LED light bulb. To do this you will need an awl, solvent and a syringe with a needle. The LED lamp diffuser is glued to the body with sealant, which needs to be removed. Carefully running an awl along the edge of the diffuser, inject the solvent with a syringe. After 2-3 minutes, easily twisting, the diffuser is removed.
Some lighting fixtures are made without sealant. In this case, it is enough to rotate the diffuser and remove it from the body.
Determining the cause of failure of an LED light bulb
After disassembling the lighting fixture, pay attention to the LED elements. Burnt is often identified visually: it has scorch marks or black dots. Then we replace the faulty part and check its functionality. We will tell you in detail about the replacement in step-by-step instructions.
If the LED elements are in order, move on to the driver. To check the functionality of its parts, you need to remove them from the printed circuit board. The value of resistors (resistance) is indicated on the board, and the parameters of the capacitor are indicated on the case. When testing with a multimeter in the appropriate modes, there should be no deviations. However, often failed capacitors are identified visually - they swell or burst. The solution is to replace it with suitable technical parameters.
The LED can be measured with a multimeter without desoldering it from the printed circuit board
Replacing capacitors and resistances, unlike LEDs, is often done with a regular soldering iron. In this case, care should be taken not to overheat nearby contacts and elements.
Read also: Drawing of a roller on bearings
Replacing light bulb LEDs: how difficult is it?
If you have a soldering station or hair dryer, this work is simple. It is more difficult to work with a soldering iron, but it is also possible.
Good to know! If you don’t have working LED elements at hand, you can install a jumper instead of the burnt one. Such a lamp will not work for a long time, but it will be possible to gain some time. However, such repairs are carried out only if the number of elements is more than six. Otherwise, a day is the maximum work of the repair product.
Modern lamps operate on SMD LED elements, which can be desoldered from the LED strip. But it is worth choosing the ones that are suitable according to technical characteristics. If there are none, it is better to change everything.
Related article:
To choose the right LED devices, you need to know not only the general characteristics of LEDs . Information about modern models and electrical diagrams of working devices will be useful. In this article you will find answers to these and other practical questions.
Repairing an LED lamp driver if you have an electrical diagram of the device
If the driver consists of SMD components that are smaller in size, we will use a soldering iron with copper wire on the tip. A visual inspection revealed a burnt element - unsolder it and select the appropriate one according to the markings. There are no visible damages - this is more difficult. You will have to solder all the parts and ring them separately. Having found a burnt one, we replace it with a functional one and install the elements in place. It is convenient to use tweezers for this.
Helpful advice! You should not remove all elements from the printed circuit board at the same time. They are similar in appearance, you can later confuse the location. It is better to unsolder the elements one by one and, after checking, mount them in place.
How to check and replace the power supply of LED lamps
When installing lighting in rooms with high humidity (bathroom or kitchen), stabilizing power supplies are used, which reduce the voltage to a safe one (12 or 24 volts). The stabilizer can fail for several reasons. The main ones are excessive load (power consumption of luminaires) or incorrect selection of the unit’s degree of protection. Such devices are repaired in specialized services. At home, this is unrealistic without equipment and knowledge in the field of radio electronics. In this case, the power supply will have to be replaced.
The power supply for the LEDs looks like this
Very important! All work to replace the stabilizing LED power supply is carried out with the voltage removed. Don't rely on the switch - it may not be connected correctly. The voltage is turned off in the apartment's distribution panel. Remember that touching live parts with your hand is dangerous.
You need to pay attention to the technical characteristics of the device - the power must exceed the parameters of the lamps that are powered from it. Having disconnected the failed unit, we connect a new one according to the diagram. It is located in the technical documentation of the device. This does not present any difficulties - all wires are color-coded, and the contacts are labeled with letters.
Decoding IP protection levels for electrical appliances
The degree of protection of the device (IP) also plays a role. For a bathroom, the device must be marked at least IP45.
Related article:
In order for the lighting to be stable and the installed products to last as long as possible, you should choose the right 12 V power supply for the LED strip . In this publication we will look at the types of devices, how to calculate them correctly, how to make them yourself, how to connect, popular models.
Causes of blinking LED lamps: methods of elimination
If the reason for the flickering of the LED lamp is the failure of the capacitor (it needs to be replaced), then periodic blinking when the light is off is easier to solve. The reason for this “behavior” of the lamp is the indicator light on the switch key.
A capacitor located in the driver circuit accumulates voltage, and when the limit is reached, it discharges. The key backlight transmits a small amount of electricity, which has no effect on incandescent or halogen light bulbs, but this voltage is enough for the capacitor to begin to accumulate it. At a certain point, it discharges a discharge to the LEDs, after which it again switches to accumulation. There are two ways to solve this problem:
- We remove the key from the switch and turn off the backlight. The method is simple, but the indication that increases the cost of the switch is now useless.
- We disassemble the chandelier and change the phase wire with zero points on each socket. The method is more complicated, but it retains the functionality of the switch. It can be seen well in the dark, which is a plus.
Such a switch may cause the light diodes in the device to blink.
Not only LED lamps, but also CFLs are susceptible to flickering. The device of their PRU (start-regulatory device) works on a similar principle, which allows the capacitor to accumulate energy.
DIY LED lamp repair: step-by-step instructions
Let's look at a simple LED lamp repair as an example:
| Illustration | Action to be performed |
| After removing the diffuser cover, carefully inspect the LEDs. If such a black dot is noticed, the element has burned out. | |
| LED elements can be soldered from the strip, but it is more convenient to purchase them separately. This is how they are sold. The size of the light diode may vary, but the characteristics should be suitable. | |
| We unsolder the burnt element, clean the contacts and apply a special paste. The element is glued to it, making soldering easier. | |
| The ground corner of the element shows where the negative terminal is located. If the polarity is reversed, the light bulb will not work. | |
| We warm up the light diode with a soldering (or industrial) hair dryer and press it a little with tweezers. | |
| All that remains is to check the light device. In our case, the test is carried out without a diffuser. You shouldn't do this with him, because... dangerous. |
As you can understand, repairing a 220 V LED lamp with your own hands is not so difficult. If there are no new parts, you can use burnt out light bulbs by removing the elements from them. One working light device is assembled from 2-3 old ones.
Checking all wiring
The reason why the light bulb blinks may be simply trivial. But at the same time it is quite serious and dangerous. Large current leaks may be to blame. This happens when contacts are broken. And the problem is easily solved.
Sometimes it is necessary to clean the oxidized contact pad. Sometimes tightening a loose bolt is enough. You may have to resolder the entire connection.
But if the problem is damaged insulation, then it is difficult to cope without a professional electrician. You will need special equipment. And if a beginner can handle a multimeter, then working with a megohmmeter will require certain knowledge and experience.
It is easy to determine a break (breakdown) in a wire using the first device. One of the multimeter probes is connected to the bare end of the cable. The second is to grounding. And if a beep sounds, it means the insulation is damaged.
You can check whether the exposed parts of the wire in the cable are touching each other. To do this, the probes are placed on the protected ends. But knowledge about defective wiring will not correct the situation. And the problem with the blinking lamp will only be solved by completely replacing the faulty part of the wiring.
Design and principle of operation of an LED lamp
Before considering the causes of malfunctions, you should be familiar with the design of the LED lamp in general terms. It is quite simple and consists of a base, a metal base, and a platform on which the LEDs are installed. They are covered with a plastic protective hemisphere. The design also includes a driver that is directly involved in the operation and conversion of current.
The operating principle of such devices is based on the emission of light as a result of the connection between the cathode and anode. Both electrodes are separated by a semiconductor made of special materials. It is these materials that directly affect the quality of light, its color range and other indicators.
Why does the light blink when connected correctly?
If all connections are correct, check that the electrical wiring is installed correctly. The switch must open the phase wire. When your zero opens, the ESL may blink. In this case, you need to reconnect the lamp in the distribution box, connect the zero directly to it, and connect the phase to the switch; in some cases, you may need to re-lay the cable.
Incorrect wiring may cause lamp problems
It's another matter if the light bulb is located at a great distance from the switch and junction box. EMF can be induced on the supply wires. It often causes flickering. The source of interference can be nearby cables and various gadgets that use radio transmission and wireless technologies, as well as any other sources of alternating magnetic field.
LED lamp blinks when turned on
Immediately after switching on, the lamp lights up for a short time and then goes out. In most such cases, the cause is a faulty trigger mechanism, which is unable to fully convert and supply current and cannot accelerate the entire system. This problem can be solved by simply replacing the starter.
Read also: How to raise a sagging corner of a wooden house
The switched on lamp does not turn off, but begins to blink periodically. This can happen due to low voltage in the supply network, malfunctions in the starting system, or sudden surges and drops in voltage. In such cases, the resources required to regulate stable operation of the lamp are reduced. A decrease in the supply current is allowed within 5%. It is necessary to measure the current strength in the supply network and in case of any deviations, contact the service organization. Such power surges have a negative impact not only on the operation of the LED lamp, but also on all existing household appliances. The service life of lighting fixtures in this mode can be reduced by more than 20%.
Flickering often occurs due to a malfunction of the trigger system installed in the lamp housing. It is very difficult to replace, and in some cases it is impossible to replace. This condition most often occurs at the end of its service life, which indicates that the lamp is unsuitable for further use. Voltage surges and surges in the network often occur as a result of the use of high-power equipment. As a rule, these are welding machines that consume large amounts of electricity.
What problems does induced voltage create?
The term induced voltage is used to define the potential of electrical energy transferred by electromagnetic conversion from operating power equipment to a closed circuit.
A discharge current begins to flow in it. I drew a simplified picture of these processes, showing electromagnetic transformation with the symbol of a transformer.
A walk on a bike helped me feel what it was like. In wet weather I returned along a well-tested route. On it, the highway intersects with the existing 330 kV overhead power line.
Up to this point, I had driven many times in dry weather without any sensations, and the humidity played a cruel joke: I had to feel a small but quite noticeable discharge with my whole body.
Likewise, power wires running parallel or adjacent to lighting circuits can introduce additional voltage to the LEDs.
Under the influence of the applied potential, they will flicker. In this situation, shielding can help, as a special case.
However, it is better to exclude interference in advance at the project stage, to avoid close installation of high-voltage circuits, and the operation of powerful loads such as welding machines and similar devices.
LED lamp blinks when turned off
Quite often there is a phenomenon when the LED lamp continues to blink even when the power is turned off. This usually occurs due to faulty wiring or when using an illuminated switch. Both of these factors lead to the same consequences. As a result of the passage of a small impulse that recharges the starter, the LED light begins to blink. Full startup does not occur due to the small amount of current, so the light turns on for a split second and then goes off.
The simplest solution to the problem is to replace the backlit switch with a regular device. If for some reason this is not possible, you need to install an additional resistor with a power of 2 W and a resistance of 50 kOhm. Due to it, the necessary resistance will be added, preventing random impulses. The resistor is connected directly near the switch or directly to the lamp. A special heat-shrinkable tube is used to insulate and secure the resistor.
One option would be to replace the single LED bulb located near the voltage entry point with a regular incandescent bulb. It absorbs all impulses and thus prevents blinking. In another case, the backlight is installed independently of the switch, that is, the backlight diode is connected directly to the network. Its glow will be constant, even when the switch is off. The problem may arise due to poor-quality wiring, so it is recommended to check all connections and, if necessary, properly insulate all identified areas.
Sometimes the cause of blinking is the incorrect installation of the switch, when the break is set to zero instead of phase. The off state does not interrupt the operation of the lamp, and it will constantly blink under the influence of constant recharging. High humidity also contributes to the appearance of parasitic current pulses in the network, under the influence of which the LED lamp blinks. When choosing a lighting device, you should purchase products only from well-known and trusted manufacturers.
Reading time: 4 minutes No time?
Just a decade ago, such a rapid growth in the popularity of LED lighting for apartments and private houses was not expected. Today you will not meet a person who would not use these economical and bright lamps. The only problem remains is the cost of lighting devices - such lamps cannot be called cheap. What to do if the lamp fails? Buy a new one? Not necessary. You can try to repair the lighting fixture. It is a “device”, because it is a complex technical device, unlike the “Ilyich light bulb”. Today we’ll figure out how to repair LED lamps with your own hands and how difficult it is.
Read in the article
The second way to deal with blinking
If you have exactly this situation, there is a need to reconnect the zero and phase on the lighting group in the panel if such phenomena occur throughout the house or apartment. The situation may turn out to be simpler - sometimes it is enough to restart the circuit, only in a certain junction box.
Before performing any actions, you need to make sure that your switch actually opens not the phase wire, but the neutral one. To carry out such manipulations, it is enough to use the indicator. You just need to touch each of the wires connected to the switch.
When your indicator does not show the presence of voltage (while the indicator itself is working), then in this case the real reason is a broken neutral wire. It is necessary to reconnect it in the distribution box or switchboard. Now you already know exactly what to do if the energy-saving light bulb blinks after being turned off.
Operating principle of LED lamp
LEDs are the most economical type of lighting – it’s hard to argue with that. Such elements are used both in everyday life and in production. Street lighting is gradually moving towards similar energy savings. Light diodes, in addition to being economical, have another undeniable advantage over other types of lighting devices - they have no competitors in terms of durability. But they cannot work directly from a 220 V AC network. This requires special devices called a driver.
The circuit of a 220 V LED lamp includes a device that is quite compact and fits in the base. There is nothing else complicated about the lighting device, but the driver, while doing the job of stabilizing the voltage, more often fails. It’s not difficult to replace burnt-out LEDs; it’s enough to use a soldering iron at the “just learned” level. But today we will figure out how to repair drivers.
Components of an LED lamp: schematic illustration
The general principle of operation of LED lamps is as follows. The alternating current of the network enters an electronic device - a driver, which stabilizes voltage drops. Direct current is sent to the LEDs, which produce the light we see.
Related article:
How to choose LED lamps for your home. In this material we will look at the design of light semiconductors, their varieties, average prices, manufacturers, selection criteria, indoor lighting standards, expert advice, and find out why the lamps blink.
Safety precautions
This is not so important for you in everyday life, so you need to adhere to the following rules:
- Turn off the voltage completely - open the circuit breaker at the entrance to the apartment.
- Do not work if the environment is humid, this means both water on the floor and wet walls.
- Use tools with handles insulated with dielectric material.
By following these three simple tips, you will save your health and life.
In the modern world, users are increasingly using their energy-saving “sisters” instead of conventional incandescent lamps. However, along with convenience and savings, unexpected problems arise during the operation of such electrical appliances. Among such “surprises”, the blinking of a lighting device after being turned off is often mentioned. Why do energy-saving light bulbs blink? Let's figure it out.
The simplest diagram of a 220 V LED lamp
If we simplify such a system, we get a driver circuit for a 220 V LED lamp, which includes two quenching resistors that stabilize the voltage. The LEDs are connected in different directions, which protects against reverse voltage. The flicker frequency increases by 2 times - from 50 to 100 Hz.
Power in such a circuit is supplied through a limiting capacitor to the rectifier (diode bridge), and only then to the elements. We simplify the system. We replace one light diode with a rectifier. The lamp works, but the frequency of the current, instead of increasing, decreases by 2 times and becomes equal to 25 Hz, which leads to sensitive flickering of the lighting device. This is harmful to vision, worsens health, increases fatigue and causes headaches.
Average cost of LED lamps on Russian shelves
| Brand | Power, W | Color temperature, K | Cost, rub. |
| DEWATT | 6 | 2700 | 80 |
| DEWATT | 9 | 4200 | 90 |
| SPACE | 9 | 4200 | 100 |
| ONLITE | 10 | 2700 | 90 |
| REV | 3 | 4000 | 120 |
| GENILED | 5 | 2700 | 500 |
However, there are LED lamps at a completely different cost. For example, GENILED SDL-KS 80W 07077, power 80 W and color temperature 4700K. Its cost may surprise you. It is equal to 10,200 rubles.
The largest of the series is GENILED SDL-KS 80W 07077
Common causes of LED lamp failures
Often the cause of failure of an LED lamp is improper operation or sudden changes in voltage in the network. Let's look at the most common ones:
- Sudden voltage surge. In such a situation, the LEDs will remain intact, but the driver may fail;
- Wrong choice of lamp. If normal ventilation is not provided, the driver overheats, which negatively affects its operation;
- Factory defects or falsification of products. If you come across a lamp of this type that is too cheap on the counter, you should think about how the low price was achieved;
- Vibrations and shocks. They are not dangerous for LEDs, but for the driver they can be disastrous.
Most often, the capacitor fails (the lamp stops burning) and the current-limiting resistor (sensitive flickering, even blinking). In order not to buy new equipment, you need to understand how to repair an LED lamp with your own hands.
Do-it-yourself 220 V LED lamp repair: step-by-step instructions
The driver that causes failure in 80% of cases is not necessarily built into the light bulb. The light source can consist only of LEDs, and the stabilizing device will be built into the lamp or chandelier. However, the remaining 20% should not be discounted. It is necessary to check all parts before starting to repair the ice lamps.
Read also: Geometric parameters of an end mill
In the case of a separate driver, everything is simpler. We change the lamp, and if it lights up, then the problem is there; if not, the stabilizer is to blame. With the built-in driver the situation is more complicated.
| Photo example | Action to be performed |
| The first question is how to disassemble an LED light bulb. This is easy to do. The radiator should be turned counterclockwise. | |
| We extract the driver. We won’t dwell on checking the LEDs - it’s simple, but it’s worth “tinkering” with the electronics. | |
| Problem areas are visible here even visually, but it’s worth ringing the diode bridge and the microcircuit. It is clear that the driver has experienced a sharp voltage surge. | |
| You cannot work with SMD components with a soldering iron - there is a danger of overheating the printed circuit board and the element itself, which means you will have to use a hair dryer and a soldering station. Not every master has such devices, and therefore below the step-by-step instructions we will reveal one secret on how to get around this problem using improvised means. | |
| Having soldered the diode bridge and the microcircuit, we coat the contacts with a special paste and warm them up. This will help you later put small parts in place and solder them neatly. | |
| We start with the microcircuit. Such parts can be purchased for 50÷70 rubles/10 pcs in a Chinese online store. Having glued the microcircuit onto the paste, hold it and solder it. | |
| Now the diode bridge. It looks like this and can be purchased on the same sites. | |
| We carefully solder the finished driver to the base first. The wiring in it is very short, and in order not to dismantle the base rolled onto the plastic case, they need to be extended. | |
| The other side of the driver is soldered to a printed circuit board with LEDs. It is important not to confuse the polarity here. The poles are marked on the printed circuit board and driver. | |
| It remains to check the functionality. We supplied power with the lamp disassembled. If you have no experience in electrical work, you should not do this - there is a danger of electric shock or short circuit. |
DIY LED lamp repair: we work without a soldering station
Now the promised secret. To repair LED lamps with a conventional soldering iron, you need a piece of single-core copper wire, with a cross-section of 4 mm², and a length of 10÷15 cm. We wind it around the soldering iron tip in a tight spiral so that the tip lengthens by 4÷5 cm, and sharpen the end of the copper wire under an “awl” or "spatula". The temperature will depend on the length. It is convenient if the multimeter has a thermometer function. For LED SMD components that are used in LED lamps, a temperature of 240÷260°C is required.
You can put a jumper here - quickly, but not for long
How to disassemble an LED lamp sealed with sealant
Some devices are not so easy to disassemble. When you try to turn the top, nothing happens? Then a solvent will come in handy. We draw it into a syringe and carefully pass it through the needle along the seam. Leave for 5 minutes, then repeat the operation. Usually 2–3 procedures are enough. Gently swing the upper part by turning left and right. After removing the cover, clean off the old sealant and degrease the surfaces. If you plan to use the lamp in a dry room, there is no need to apply new sealant.
Repair of LED lamps: structure and electrical circuits of various devices
Having figured out how to repair a 220V LED lamp, it makes sense to understand more complex devices, such as spotlights or chandeliers. Although there is not much difference in work. Experts say that repairing LED spotlights is even easier, because the drivers and their parts are larger. We join this opinion. It just seems that such devices are more high-tech and more complex. In fact, having the diagrams at hand (they are always contained in the technical documentation of the lighting device), for example, repairing an LED chandelier is quite simple. The same continuity of LEDs and driver parts. Afterwards - selection of suitable ones to replace the burnt ones.
Important information! If an LED burns out and there is no suitable replacement at hand, you can slightly extend the life of the lighting device. The contacts of the burnt element bridge each other, and the light comes on again. But you should be prepared for the fact that after a short time it will go out again. The LED next to the bridged one will burn out. If you continue to install jumpers, the time between repairs will be reduced exponentially.
Several LED lamps will transform the interior beyond recognition, but for the better
All the lights in the bathroom went out: causes and solutions
If all the LED lights in your bathroom go out at the same time, you might want to start small. Remove the switch cover and check the voltage supply. If everything is fine, then the problem is in the power supply.
The bathroom is a room with high humidity, in which the use of 220-volt lighting fixtures is prohibited. For this reason, a 12 volt power supply is installed. The reason that all the lighting stopped lighting at once could be a failure of this device or a breakdown of the wiring, which is unlikely to happen. You will have to buy such a block. Having dismantled the old unit, we look at the technical parameters, purchase a stabilizer with similar characteristics and install it in place.
When working with electrical wiring you need to be extremely careful. Defeat is dangerous
Important! All work on dismantling and installing the stabilizing power supply is carried out only when the voltage is removed. It is better to turn off the opening machine. This is the only way to protect yourself from electric shock.
Eliminating the causes of blinking LED lamps
This is a common problem. It happens that people refuse to replace conventional lighting in their apartment with LED lighting because when the lights are turned off, the LEDs blink, like a strobe light. There is only one reason for this - the backlight of the switch.
If the indicator is lit, it transmits a certain amount of electricity through itself, which has no effect on ordinary lamps. But the LED lighting driver contains a capacitor, which tends to accumulate electricity and then release it. It then collects this energy “bit by bit”, and upon reaching a certain volume, it issues it in the form of a pulse to the LEDs.
This indicator causes the LEDs to blink
The problem can be solved very simply - turn off the backlight on the switch. However, blinking due to the indication on the key is a consequence. And what's the reason? There are no difficulties here either. The reason is the incorrect connection of the chandelier sockets. It is known that when installing incandescent lamps, a zero goes to the base thread, and a phase goes to the center. The LEDs begin to blink if this order is violated and the wiring is done incorrectly.
Filament lamps are new on the market. They cannot be repaired
How to deal with blinking? Method one
We previously wrote about why a switched off energy-saving light bulb blinks. At the same time, the incandescent lamps screwed in instead of the housekeepers do not blink. Therefore, the simplest solution would be to replace energy-saving lamps with their “sisters” with filament. However, with this option you will have to forget about economical consumption of electricity.
Read also: Marking of O-rings
Of course, you can pick up several low-power lamps. However, in some cases, such a solution is not very rational (for example, there is only one lamp horn in the lampshade, but you don’t want to use a lamp that is too powerful). Now that you understand why energy-saving light bulbs blink, you can add one more touch to them: solder a 10-20 kOhm resistor in parallel with the socket. This element will “pull back” the small current that caused the blinking.
Summing up
LED lighting is not slowing down in its popularity. But even with the prices for lighting devices based on them falling, they remain expensive. Why overpay if you can repair a light bulb or lamp yourself. You don't even need to purchase parts for this. You just don't need to throw away the ones that are broken. Then from two or three it will be possible to assemble one working one.
We hope the information presented in our article will help the reader save on purchasing lighting equipment. If you have any questions, you can ask them in the discussion below. And finally, we suggest watching a useful video on the topic:
