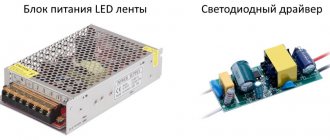
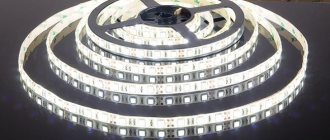
Decorative lighting using LED strips has come into fashion relatively recently. Many users have not yet had time to understand the specifics of operation and the features of connecting lamps. In particular, not everyone can choose the right cable for an LED strip. This is an important issue, since an incorrect connection can cause the backlight to fail.
Supply voltage
Often people buy a tape without thinking too much about its voltage. What the seller advised is what they take. And they are not always competent.
The most optimal option is to choose a 12 volt LED backlight. It has a number of advantages:
- a large assortment that is always available in many stores
You can easily find a replacement piece for a burnt-out backlight or a failed 12V power supply. However, there are also limitations here.
This tape is supplied in reels of 5 meters. They cannot be connected in series with each other.
At 12 volts, over a long distance (over 5m), there are significant voltage losses. The current in the circuit increases and eventually the LEDs fail.
Another advantage:
- this brand can be cut into small pieces of 5 cm
Thus, it is very easy to choose the optimal size according to the dimensions of the structure.
In addition, such small pieces are easy to power directly from the battery, without any bulky voltage sources.
Due to large voltage losses, the power source should be placed as close as possible to the beginning of the tape. If you do not have this opportunity, then choose 24 or 36 volt models.
The 220V LED strip also has a number of advantages and disadvantages. The advantages include the fact that it is supplied in a construction length of up to 100 m.
This is very convenient when you need to highlight areas of the facade of a house, or some metal structures.
On top of that, it initially comes in a sealed version. But its thickness in this silicone is also a disadvantage.
It is not convenient to use such a tape indoors, as it will take up a lot of space.
In addition, a significant drawback is the fact that it can only be cut every half a meter. Well, the cost of high-quality copies will differ significantly from low-voltage models.
Frequent connection errors
Despite the simplicity of the above work, mistakes are often made during connection that can ruin all your efforts. Therefore, it is worth paying attention to them:
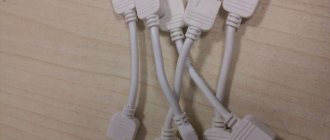
- The connection is made in strict sequence - power supply - connector - RGB strip - (amplifier) - RGB strip.
- When peeling off the film on budget models, factory soldered contacts are often exposed, which, when mounted on a conductive surface, can burn out from load currents;
- When combining several sections of tape, their connection should be made using special connectors or soldering, but never by twisting;
- The cross-section of the wires for connection should be selected in accordance with the load, otherwise they may burn out;
- The power of the power supply cannot be chosen back to back; it is necessary to provide a reserve;
- High power LED strips must be installed with a heat sink;
- Serial connection of more than 5 m of RGB strip should be made only through an amplifier or from a separate power supply and controller.
Cheap LED strip
The most common mistake and problem is buying inexpensive lighting. Such copies will work properly for a maximum of 1 year.
After which, you will have to re-arrange it and additionally pay for both the product itself and the cost of the work.
Therefore, you won’t be able to save money here.
Selecting power supply power
When buying a power supply, many choose it with exactly the same power as the LED strip itself. This is fundamentally wrong.
If all your LED lighting has a power of 60W, then you cannot buy a power supply that is also 60W. You need to take it with a 30% reserve. That is, if the tape is 60-70W, feel free to take a 100-watt one.
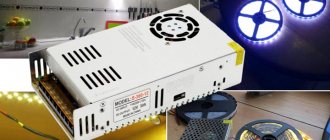
If you have a very powerful tape, or the backlight consists of many parallel sections, then you need to choose the appropriate power source.
However, not many people know that units from 250W and more are often equipped with cooling fans.
Order such products on AliExpress and only after unpacking the package will you discover a surprise.
Imagine installing it in the bedroom. For the first month it may work relatively silently, but in the future, such lighting will cause nothing but irritation due to the constant hum.
Therefore, always pay attention to this seemingly insignificant moment. It is better to order 2 smaller pieces than one large one.
This will be a worthy alternative to a powerful unit with a fan. Connect half of the section from one, half from the other.
RGB tape 15-20 meters long
If you need to connect 15, 20 meters or more, this option with only one controller will no longer work. There are two options:
- use two controllers
- use RGB amplifier
The first option is inconvenient due to higher costs. And secondly, you will have two control panels, each of which is responsible for different sections of the tape. And how you synchronize them is another question.
Therefore, the best option is when everything is controlled from one controller and one remote control. This can be easily achieved using an rgb amplifier.
From the name it is clear that its purpose is to amplify the signal from the controller. True, some are mistaken in believing that it is needed for a brighter glow of the tape. And it can be used for this purpose even for 5-meter sections. This is wrong.
It is selected based on the power not of the entire length of the LED strip, but only of the section that is connected to it, in addition to the first 5 or 10 meters.
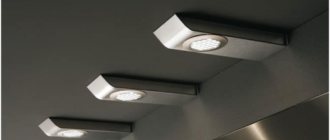
Installation location
There is no need to hide power supplies in places where there will be no access after the repair is completed.
We are talking about plasterboard-covered and suspended ceilings. The fact is that the power supply is the same consumable material as a lamp for any lamp.
And sooner or later it will have to be changed. In fact, the power supply is one of the weakest links in the entire backlight. Therefore, make sure you have access to it in advance.
Connection principle
To mount a working system with RGB tape, you must perform the following steps:
- Draw up a diagram of the arrangement of devices - this will help to pre-calculate the required length of wires, locations for installing blocks, etc.;
- Glue the RGB tape - for this, a clean, grease-free surface is used, and if necessary, an additional aluminum strip is installed for better heat dissipation;
- Connect the RGB strip pins, observing the color marking (R – red, G – green, B – blue) to the controller;
Rice. 4: connect the tape to the controller - Connect the controller to the power supply, to the +12V and – 12V terminals;
Rice. 5: Connect the power supply to the controller - If necessary, connect an amplifier to the power supply, note that the RGB LED strip is connected via a serial connection into the open circuit of the amplifier;
Rice. 6: amplifier connection - Connect the finished lighting circuit to a 220V network.
Wires for connection
You can choose the ideal unit and buy a high-quality tape, but if you connect it with too thin a wire, you will not get a good result. How to correctly select and calculate the cross-section of power wires?
To do this, you can use two methods.
Selection by belt load
First, they must be copper. Secondly, in order not to study the table of correspondence between rated currents and suitable wire cross-sections (and it will not always be at hand), apply the universal formula.
For every 10A load, a copper wire with a cross section of 1mm2 is required.
This section will be enough for you with a reserve, and everything will work properly. How to find out how much current the entire backlight consumes?
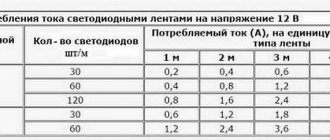
By simple calculation. Let's say you have an SMD 5050 with a voltage of 12V and a power of 14.4 W/meter. The total length of the entire LED backlight is 15 meters (3 pieces of 5 m each are connected in parallel to the block).
For one 5 meter segment the power will be equal to: P=14.4W/m*5m=72W
We divide this power by voltage and get current: I=P/U=72W/12V=6A
It remains to divide the calculated current value of 6A by 10A, according to the universal formula, and we obtain the required wire cross-section for installation: 6A/10A=0.6mm2
The closest standard value would be a wire with a cross section of 0.75mm2.
However, please note that this calculation is only acceptable if the tape is in close proximity to the power source.
If the block is hidden 5 m or more from the backlight itself, then it is advisable to use wires ranging from 1.5 mm2 or more.
Even though the calculation will give smaller values.
When you have RGB backlighting, the total current that is obtained by calculating using the formula I=P/U must be divided into three channels (RGB). After all, you will connect each color with a separate conductor.
Selection by block power
The second method does not rely on the power of the tape, but on the power of the power supply.
According to it, the wires must be of such a cross-section that they can easily withstand 135% of the rated current that the power source is capable of delivering.
In addition to the normal operation of the backlight, no one has canceled possible short circuits. The unit's protection usually trips when there is an overload of 105% to 135%.
If the power supply has “Hiccup” protection, it will periodically turn off and try to turn on again. In this case, you will not burn the wires. The block will click and click until the short circuit is cleared.
There is another protection – “Constant current limiting”. Thanks to it, the output voltage will decrease until the current reaches an acceptable value.
But this value will be acceptable for the block, and not for thin wires!
And if your wire is too weak, it could cause a fire.
Wire brands
Recommended brands of wires for connection are ShVVP, KSPV, PuGV, acoustic wires. Just do not confuse connecting the tape and connecting the power supply.
The power supply already requires a full-fledged electrical cable VVGng-Ls or NYM, through which 220V can be safely transmitted.
The use of acoustic or fire alarm wires here would be a gross mistake and violation.
Choosing a cable for diode strip
It is often necessary to place the driver at a great distance from the tape itself. This occurs when creating illumination for advertising structures, interiors and other three-dimensional objects. Sometimes the voltage supplied to the input does not match the output of the power supply. This is due to the fact that the cross-section of the wire is too small; due to the long length, a voltage drop occurs. Therefore, it is necessary to first calculate the cross-section of the wire and select the most suitable sample.
LED strips that are directly connected to a 220 V network require installation of protection. At the same time, you need to understand that the main indicator is the current strength. The easiest way is to follow the generally accepted relationships:
| Current strength | Cable cross-section |
| 6 A | 0.5 mm2 |
| 10 A | 0.75 mm2 |
| 14 A | 1 mm2 |
| 15 A | 1.5 mm2 |
| 19 A | 2 mm2 |
| 21 A | 2.5 mm2 |
Sealing tape
According to the degree of moisture protection, tapes are divided into 4 types:
- IP-20
They do not have a protective coating and can only be used indoors in dry rooms.
- IP-33
It has a double layer of varnish that protects from dust, but not from water. Can be distinguished by its characteristic shine.
- IP-65
With protection against dust and jets of water.
- IP-68
Completely immersed in a silicone shell and have double insulation of wires.
They can be used in water to illuminate pools and aquariums.
For indoor installation (furniture lighting, ceiling lighting in a bedroom, living room), some choose a sealed LED strip with IP65 protection. It is not completely in the silicone hose, but is simply spilled with sealant on top.
This gives it protection from splashing water. People think it will be cool and convenient to dust it.
However, using such a model in a dry room will never justify itself. You will get more cons than pros.
In such rooms, especially during the winter heating period, low humidity is observed. And the sealant applied over the tape under such conditions tends to dry out quickly.
In some cases, silicone will simply crumble like glass and crumble. And this silicone begins to “lead” when it dries.
It pulls the substrate along with it and the connections to the board break. The contact begins to disappear and the backlight goes out in places and does not burn evenly.
No amount of repairs will help here. The whole thing will have to be changed.
And many people are unable to properly seal the sealing tape. It has its own nuances and features.
The same silicone begins to turn yellow over time, which ultimately changes (contaminates) the color of the backlight. Checking the quality of silicone in a store is problematic.
This effect (yellowing) will only appear after a few months. Don't forget about the smell that will invariably emanate from the sealant when the tape heats up.
Therefore, use sealing tape where it belongs - in wet areas of bathrooms, in the kitchen under the apron, near the sink.
Polarity connection errors
Many people wonder what will happen if the LED strip is connected incorrectly? That is, reverse the polarity, plus and minus.
Will it explode, catch fire, fail? No, nothing like that should happen.
Led strip consists of LEDs. And the LED, in turn, although light-emitting, is still a DIODE.
A diode is a semiconductor that passes current in one direction, but not in the other direction if the polarity is changed. That is, in this case, your LED product simply will not light up.
Connected incorrectly - no light. Reverse the polarity and it will definitely light up.
However, remember that this only applies to the LED strip.
If you reverse the polarity when connecting a controller or amplifier, then these electronic devices can easily fail.
Main conclusions
Selecting a cable for an LED strip is an important and necessary procedure. It allows you to improve the glow mode of the tape and extend the service life of the backlight. The correct choice of cable is made according to the following criteria:
- current consumption;
- voltage drop;
- installation and connection conditions.
Calculating the cable cross-section is not difficult, but there is an easier way. You need to find one of the online calculators on the Internet and use it for quick and accurate calculations.
Explain your methods for determining the cable parameters for an LED strip in the comments.
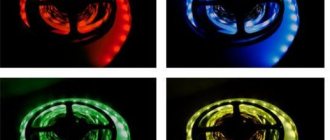
Selecting the glow color
For some reason, few people pay attention to such an important point as the accuracy of color reproduction. The colors themselves are divided into:
- warm white
- neutral white
- cold white
For residential premises, warm white is best - 2700 Kelvin. Mount neutral (4000K) and cold (6000K) where you work most often.
The color accuracy parameter is indicated as CRI (Color Redering Index). If you choose a tape with a CRI<70 for a living or work area, then some items and objects will appear bluish or greenish.
Imagine a blue lemon on the kitchen counter. Here, inadvertently, your appetite may disappear. Therefore, it is best to use brands with a CRI of 80 to 90 for such places.