For a person not familiar with the basics of electrical engineering, even a simple operation can cause serious difficulties. Quite often, people are faced with the need to connect a chandelier to a double switch using different options. In such cases, you need to be well oriented in a large number of multi-colored wires. Otherwise, the chandelier will not work properly and will not provide the necessary coziness and comfort. However, this is not such a difficult task if you know and follow certain rules and procedures.
How to connect a chandelier to a two-key switch
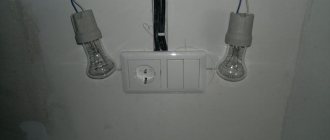
Having the desire or if necessary, owners are faced with replacing lighting fixtures. However, when changing the lamp, the switch is left the same. There is a connection problem. There are varying numbers of wires sticking out of the ceiling that need to be connected to the lighting fixture. Before you figure out how to connect a chandelier to a two-key switch, you need to decide how many light bulbs it will have.
Design Features
Switches are classified according to several characteristics.
Wiring type
Open or hidden wiring may be used, which affects the type of housing and the method of installing the fittings.
If we are talking about internal installation, then a mechanism is used that includes sliding strips that secure the device inside the wall hole.
The nest is made using perforators with crowns made of pobedite or industrial diamonds. First, a plastic or metal socket box is installed, and then the main structure.
By turning the screws of the spacer mechanism, the strips are set in motion and directed to opposite sides of the mounting hole, as a result of which the housing is securely attached to the wall.
Open type models are recommended for use in buildings with wooden coverings, where fastenings can be installed using self-tapping screws.
Type of contacts
The two-gang switch can be equipped with a screw or clamp type contact. In screw contacts, the exposed wire is fixed with a screw and a pair of metal plates, which is very reliable, but if the wire is not tightened or the cross-section is chosen incorrectly, the contacts will overheat greatly.
As a result of overheating, the clamp weakens, which requires regular tightening, since without this the contact will completely open or the elements of the device (wires, plastic) will catch fire.
In clamping models, the end of the wire is secured with a plate held by a spring, which allows you to create reliable, and most importantly, stable contact.
Housing material
The structural elements of the switches are made of plastic or ceramics. The permitted current and power must be indicated on each case.
Ceramic products cope well with thermal influences and are best suited for systems with high loads (10 Amps, 220 Volts, up to 2300 Watts).
Plastic modifications are designed for lower currents (3 - 6 Amperes).
Operating principle of a two-button switch
A switch with 2 keys is an element for adjusting room lighting. It can be used to turn on one lamp or a group.
The two-key device consists of:
- keys – activated by simultaneous pressing or one at a time;
- frame - removed during installation;
- terminal blocks – connection points.
Some products have a built-in backlight located on each key or at the bottom of the frame.
If there is no backlight, a phase cable goes into it, but two phases come out, the switch is placed in a gap. Operating principle of the built-in switch:
- The first key is on – one lamp is on (first group).
- Key 2 is on – the lighting will change. The second group, another lamp or all connected lighting fixtures will light up.
There are two-key models called modular.
They are isolated, the operating principle is a single-key model. The model with 2 keys plays the role of energy saving and changing the general background.
Switch connection diagram:
Device
Two-key switches are three-pin mechanical devices. One of the contacts is common (fixed), and the other two are independent of each other. When pressure is applied to the key, the brass plates are brought to a common contact, resulting in the circuit being closed.
Two-key switches can be in six positions:
- two positions for one key (on/off);
- two positions for another key (on/off);
- two positions for both keys (on/off).
Using the above keys and their switching, lighting groups that are connected to the switch are controlled.
Is it possible to connect a chandelier to a double switch yourself?
Yes. But, before you start working with electrical devices, you need to familiarize yourself with safety precautions, distinguish cables by color (PE, L, N), study the connection diagram of the lamp, have tools and insulation on hand.
In order for the chandelier to decorate the ceiling of the room and to work correctly, connect to the switch in strict sequence.
Before connecting, you should familiarize yourself with the safety precautions:
- The tools used must have insulated handles.
- Before work related to electricity, turn off the power to the panel. That is, this is a meter (private house), electrical panel of the apartment. Disconnect the plugs (if there are no buttons, they are unscrewed).
Do not work with live electrical appliances in wet areas. Water is a conductor of electric current.
How to recognize wires
All cables of private houses and apartments have differences in color. This is a kind of hint for inexperienced people.
Standards:
Yellow cable - grounding, PE designation. Designed to ensure that during operation of the electrical appliance there is no current “small trembling”.
Zero – blue or cyan color, symbol N.
Phase – all other colors indicate L.
In old houses and apartments, all electrical wiring is the same color. Grounding is extremely rare. Therefore, equipment and tools are used to determine the phase.
Wiring diagram for a chandelier with 2 lamps
There are 3 or 4 cables coming out of the ceiling. These are two phase cables from each key, one “zero” from the distribution box, grounding. Check with an indicator screwdriver. When checking, turn on the voltage, the keys are alternately in the “on” position. A wire without voltage is zero. It is designated. The remaining cables are phase cables.
In the lamp, all wiring is connected according to the accessory. That is, a modern lighting device contains phase leads for each horn, 1 zero, 1 ground.
In a lighting fixture with 2 arms, the phases are not connected. This means that you can make a connection so that either one light bulb or all of them will light up.
Grounding is connected immediately. After this you need to connect the zero. Chandelier-ceiling. The phases are removed from the device and connected to the corresponding keys.
Both lamps will light up simultaneously when 2 keys are pressed at once.
Connections should be insulated. Only after this turn on the power supply from the panel or meter.
Connecting light to three lamps with three wires
The three-arm chandelier contains 3 lamp sockets.
They have 2 contacts: N, L. The connection is carried out according to the same algorithm as a lamp with 2 horns, only one switch key will turn on 1 lamp, and the second - 2 light bulbs. If you press both keys at the same time, all the horns will light up.
The neutral cables from each horn are combined, the grounding is connected immediately.
The phases are divided into 2 groups.
Connection diagram for 4 bulbs
There are 2 phases coming out of the 2-key model, and zero, grounding, and phase cables are visible from the ceiling.
The connection can be made in 2 ways:
- 1+3=alternately turning on 1 lamp - 1 key and 3 lamps - the second key.
- 2+2 = 2 light bulbs turn on alternately. Moreover, you can make it so that 2 lamps located next to each other or crosswise are lit.
If you turn on both keys at the same time, 4 horns will light up.
The connection principle is as follows:
- The cables coming out of the lighting fixture are different colors or all the same. Then they make a call and mark the value (N, L).
- Grounding - it can be immediately connected to the ceiling.
- The blue ones are connected with one terminal - 1 blue wire comes out of the ceiling.
- The phases are divided into groups: the first - 3 wires, one separately or 2 groups of 2 pieces.
- Next, use terminals to connect the twists on the light fixture and the ceiling.
The twists are insulated so that they do not come into contact with each other.
When dividing into groups, so that the phase does not fall into the “zero” twist.
5-bar chandelier
A common “zero” comes out of the five-arm chandelier.
It must be marked (maybe with electrical tape). Sometimes there are several blue wires, they are combined with one twist. Attention. The distinction can be made using an indicator - whether there is voltage or not. If there is voltage - L, otherwise - N.
Phase wires are divided into 2 groups:
- The first twist will consist of 3 phases - one key will turn on 3 lamps.
- The second group - 2 phase twists - 2 horns, the other with a power key.
When the keys are turned on at once, 5 lamps light up.
After the groups have been created, the chandelier is connected to the wiring. After checking, if the wrong groups of lamps are lit (randomly), you can re-twist 2x3 (groups) by changing the phases.
Double connection diagram for 6 bulbs
Connecting a device with 6 lamps requires good wiring. Further, the two-key model for turning on the light provides operation in three modes: turning on the lamps in groups (2 modes) and turning on the lights in general. In this case, at least 3 wires should come out of the ceiling.
Let’s say group 1 – 2 lamps, 2nd – 4 lamps, third mode – all lamps are in working condition.
There are 12 wires coming out of the chandelier, 2 for each horn.
You need to select all the blue wires or those marked when ringing, connect them with one terminal (1 twist). The remaining cables are connected in groups (these are phase). 4 wires one terminal and 2 the other.
Before connecting the wires of the lamp to the ceiling, using an indicator screwdriver, determine the line L, zero N, as well as the assignment of L1, L2 to the keys. They do this with an indicator at constant current, with the keys turned on alternately. The found wires are marked with a marker or electrical tape. After this, you need to de-energize the network, connect the finished chandelier (connect zero to zero, and phase to phase). Grounding is connected immediately.
Scheme for double connection of a chandelier for 8 bulbs with 4 wires
4 wiring are visible from the ceiling: 2 phases (from the keys), 1 neutral, grounding.
Sometimes wires of the same color come out of the lamp. To determine phase and zero, it is necessary to ring with a multimeter and mark them in the same way as on the ceiling (so as not to confuse them).
“Zero” comes in one twist, because there is 1 neutral cable on the ceiling. Phase wiring is divided into 2 groups: 8 lamps are 3 lamps and 5 or 4x4, 2x7 and so on. Afterwards, the created groups of insulated wires or placed in terminals are connected accordingly to those marked on the ceiling.
Compliance with safety rules when connecting a chandelier
Working with live parts always involves a certain amount of risk. Connecting a chandelier to a home is no exception, and the work is done at height. To protect yourself and others during electrical installation work, you must follow the following safety rules:
- Carefully study the instructions for connecting the chandelier.
- The power tools used in the work must be in good working order, especially with regard to the insulating parts of the tools.
- Equipment for climbing to heights - stepladders and other devices - check for reliability and stability of the structure.
- Before starting work, stop the power supply by turning off the circuit breakers in the electrical panel.
Sources
- https://600doneba.ru/kak-podklyuchit-lyustru/
- https://LampaGid.ru/osveshchenie/kvartira-i-ofis/podklyuchenie-lyustry
- https://svetilnik.info/lyustry/podklyuchenie-lyustry-k-dvojnomu-vyklyuchatelyu.html
- https://kak-sdelano.ru/elektrica/podklyuchenie-lyustryi
- https://otlichnyjremont.ru/elektrika/sekrety-i-tonkosti-raboty-po-podklyucheniyu-lyustry-k-vyklyuchatelyu.html
[collapse]
Important Tips
To connect a lighting device to 2 keys, you need to follow some advice from electricians. This will help avoid mistakes.
- Power tools only with insulated handles. You cannot work with “naked” pliers under tension.
- When dividing into groups, you need to be careful and ensure that a zero does not get into the twist with the phase.
- The twists are insulated. When exposed strands come into contact, there will be a short circuit.
- To ensure accurate operation of the lighting fixture, check that the switch is installed correctly. Zero does not enter, and the phase wire enters one - goes out to the ceiling 2 - from each key.
- To be sure, the same wires ring.
If you follow the advice, the work will be completed without errors. The lighting fixture will work properly.
Connecting a chandelier to a two-key switch will not take much time, even for a person doing the job for the first time. The main factor is the correct division into groups, as well as the designation of phase and zero on the ceiling. You must strictly follow safety precautions. Insulate the exposed strands and make the connection step by step.
Features of installation on walls
For buildings made of reinforced concrete and brick, it is recommended to install a hidden type of wiring, and install distribution boxes and switches in pre-made grooves. It is recommended to choose plastic socket boxes. Such socket boxes are secured with screws and then covered with plaster solution.
A two-key switch can have two fixation options:
- A sliding mechanism in which the slats rest on opposite walls. It is important here not to overdo it when tightening the bolts, as the ceramic may crack.
- Galvanized plate located around the perimeter of the body. It has holes for bolts that secure the part to the socket box and the wall. Self-tapping screws and dowels are used for fixation.
Two-key switches (when it comes to external wiring) are often fixed with screws, just like distribution boxes. The wires are laid in plastic cable channels.
Connection options
Connecting a chandelier and other lighting devices is done by crimping, soldering or using terminal adapters.
The first option involves connecting the conductor cores by crimping them with a fixing sleeve. The entire procedure is carried out with a special tool - press tongs. This method complies with all regulatory documents.
The second method is considered one of the most reliable, but difficult to reproduce. It is practically not used due to the inconvenience of working at height.
When choosing one of the methods for contacting conductors, you must remember that aluminum under constant load acquires plasticity. Connections of this type require regular inspection. You also need to periodically tighten the fixing bolts.
You cannot twist aluminum and copper wires together - a galvanic pair is formed, which, even with a slight increase in the level of humidity in the apartment, can reproduce an electrochemical reaction in the form of oxidation.
This process breaks the contacts, and the junction begins to heat up. It is for this reason that fires occur.
If you use terminals to connect, you will need to remove 9-11 mm of insulating material from the conductors. For this purpose, there are special marks on the clamps that determine the required level of stripping.
The use of terminal blocks is considered relevant. At the moment, the model range of this connecting element is quite wide - from the classic screw version to the spring modification.
Decoding the markings of electrical wires
For ease of identification and to avoid confusion, the insulation of the cable cores is different colors. According to the standards, the ground wire is yellow with a green stripe.
Such a conductor is found in new buildings, where a high level of protection against electric shock is provided.
In houses with old wiring, deciphering the purpose of the cable is difficult, because... Previously, the color of the insulating material was the same. To begin electrical installation work, you will need to ring the cable (+)
The marking of the neutral conductor is carried out by an insulating sheath of blue or light blue color, in which the core is enclosed. Any other shade variations other than those indicated can be used for the phase.