Quite often there are cases when LED lights blink when the switch is off. What is the reason? There are two possible reasons:
- Using an illuminated switch.
- Incorrect lamp switch wiring diagram.
To identify the cause and correct it, it is necessary to consider in detail the principle of operation of the backlit switch, possible causes of blinking and methods for eliminating breakdowns of these lighting elements. This is exactly what we will try to do in this article.
Bonus: also in the second part of the article you will find the reasons and methods for eliminating lamp flickering when the light is on.
What is an LED lamp
Unlike incandescent lamps, which use alternating current at industrial frequency (220 V, 50 Hz), LED devices create a luminous flux thanks to special semiconductor crystals that operate when converted direct current passes through them. The main feature of LED lamps is their significant energy efficiency. An LED lamp with a power of only 10 W is equivalent in luminous flux to a 100 W incandescent lamp.
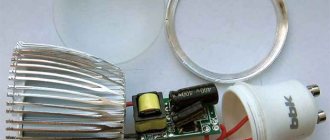
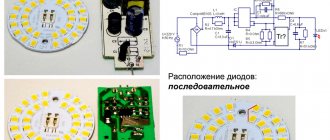
However, to convert the current, specially designed circuits (drivers) are required, consisting of microcircuits, capacitors, and other radio components, which precisely create the flickering of LED lamps when they are off.
However, this is not the only possible reason why the LED lamp is blinking: another problem may be the backlit switch. Let's consider each reason separately and methods for eliminating them.
Connecting a simple light bulb
And when the chandelier has several horns, instead of one energy-saving light bulb, you can place an incandescent lamp in parallel. The flashing should also stop. The method only works if there are several cartridges in one lamp and is probably the least expensive.
There are pros and cons here. The downside is that you lose the benefits of energy savings, for which you most likely switched to energy-saving devices. Plus, the lighting becomes more pleasing to the eye. Some jewelry workshops use just this kind of light.
Illuminated switch
Most modern switches often feature a neon or LED light with a resistor, which serves as an indicator to indicate that the switch is off at night. Of course, they help to find the switch in the dark, but in combination they negatively affect the startup of a light bulb with LEDs, thereby reducing its service life by 20–30%.
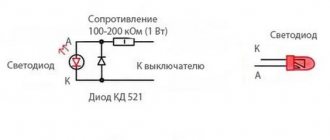
The fact is that when using a backlit switch, in fact, the result is an electrical circuit as shown in the figure below. Due to the fact that the LED lamp has a diode bridge with a capacitor at the input, a current will flow through the backlight circuit, gradually charging this input capacitor. Having charged sufficiently to start the driver, the capacitor transfers the accumulated energy further to the lamp driver, starting it to glow. Almost immediately the glow stops, since the charge accumulates is small, due to the insignificance of the backlight current of the switch. Then the process of charging the input capacitor is repeated again. Visually, this repeating process looks like blinking.
In addition to flickering, this negative factor significantly reduces the life of the light bulb, since neither the electrolytic capacitor nor the driver is designed for such operation (except when using light sources specially designed for this purpose).
How to fix
You can cope with the problem in 4 different ways:
- Use an anti-flicker LED lamp;
- Install additional protection on the lamp, the so-called protection device against spontaneous activation;
- Remove (disable) the switch LED indicator;
- Install a shunt resistor (this can be an incandescent lamp).
If the 1st and 2nd methods do not require additional comments, then the 3rd and 4th need to be considered in more detail.
Removing the LED (neon) indicator
Depending on the design, to get rid of blinking LED bulbs you need to:
- Turn off the circuit breaker that powers the lighting circuits;
- Check that there is no voltage;
- Remove the switch mechanism;
- Remove the indicator by disconnecting its ends from the lighting circuits;
- Reinstall it and check the operation of the LED lamp when it is on.
There are also situations in which the design of the switch does not allow the indicator to be removed. In such cases, the following method will help you.
Installing additional resistance (shunt resistor)
If the lamp blinks even after you have removed the indicator, then you need to solder in a shunt resistor.
A shunt (shunt resistance) is a powerful resistor that dampens the resulting potential difference (voltage) at the terminals of the LED lamp. When the switch is off.
In most cases, its characteristics are as follows: power - 2 W, resistance - 50 Ohms.
The most significant disadvantages of this method are that it is sometimes very difficult to select the correct shunt value, and also that its installation requires a specialist with appropriate qualifications and clearance.
Also, the disadvantages of this method include the release of more heat at the resistance, resulting in the possibility of fire when the switch is turned off. To do this, the shunt must either be additionally protected with heat shrink and installed in a distribution box made of fire-resistant material, or mounted parallel to the LED lamp in a lamp socket.
Using an incandescent lamp as a shunt
If the lamp blinks after being turned off, then another easiest way to fix this problem is to install the most ordinary incandescent lamp in an empty socket of a lamp or chandelier.
In this case, the filament of the incandescent lamp serves as a shunt, as a result of which the lamp stops blinking. A low-power incandescent lamp of 25–40 W is ideal for these purposes.
However, this option is quite rare, since when the lighting is turned on, such lamps consume quite a lot of electricity, which is in no way compatible with the LED lamps used.
LED flickering during operation
There are problems when the lamps start flashing when turned on. Here you need to pay attention to their behavior. If, when turned on, the LEDs light up and instantly turn off, then the reason should be sought in the starting device. With some skills, you can replace it yourself. But if the lamp is under warranty, it is better to contact specialists.
If after turning on the LEDs light up, but constantly blink when turned on, then the problem may be the following:
- Low voltage causes a malfunction of the circuit that regulates the stable glow of the LEDs. To find out, you need to periodically measure the network voltage. If the figure is below 5%, you must contact the appropriate authority. In addition to unpleasant flickering, low mains voltage reduces the service life of the LED light source by more than 20%.
- A malfunction of the starting system causes the LEDs to blink when turned on. This often happens in older lamps after prolonged use. If you cannot replace the starting system yourself, you will have to purchase a new lamp.
- Sudden voltage changes cause LEDs to flicker. If, after switching on, the lamp is left to work in such conditions, its service life will sharply decrease. Voltage surges are caused by the operation of the welding machine or poor-quality power supply. If these problems are identified, you must contact the appropriate authorities or temporarily turn off the lighting until the voltage normalizes.
By identifying and eliminating the cause in time, in addition to saving your vision, you will extend the life of a rather expensive light source.
In contact with
What other reasons exist for an LED lamp to blink?
Due to little experience, or due to inattention, when performing electrical installation work, electricians may confuse the phase and neutral wires.
In this case, the phase from the distribution box goes directly to the LED lamp (and not through the switch), as a result the lamp will also blink.
Subsequently, the operating time of the light bulb in this mode is reduced by almost 2–3 times.
To diagnose this problem, you need to take a regular indicator screwdriver and, with the switch off, touch the tip of the indicator alternately to the 2 ends of the LED lamp (while touching the back of the indicator screwdriver with your thumb).
If the indicator lights up as a result, then the phase wire is coming to the lamp!
In this case, it is necessary to ensure that the phase wire is switched, and not the neutral wire.
Attention! If you have backlit switches installed for LED or other lamps, then the indicator will show you the presence of a phase in any case. In such cases, to check the correct phasing, it is necessary to completely turn off the switch (or remove the backlight from it), and only then check the phasing.
So, we have looked at the main reasons why an LED light bulb blinks (everything described will also be true for an energy-saving CFL lamp) when the light is turned off, but quite often situations arise when these devices flicker after being turned on or when turned on. What is the reason for this? Let's figure it out.
Turning off the indicator light
People who do not have a lot of time to diagnose electrical wiring and purchase new elements for soldering on the network can use a more radical and simpler method. It involves completely turning off the backlight in the switch. It is enough to have a screwdriver and wire cutters on hand to block the process.
As a rule, this is already enough for the flickering to be permanent. But, we repeat, if we are talking about low-quality products or violation of installation rules, the flickering will continue, although not so intensely.
The main reasons why an LED lamp or lamp blinks when the light is on
There are only a few options for this problem:
- Low voltage in the network;
- Faulty starting equipment;
- Power surges.
Low voltage in the network
In order to identify this problem, you need to check the voltage level in the network.
To do this you need a regular multimeter or voltmeter.
At a normal voltage level, the indicator should read from 215 to 225 V. These are permissible errors in a stationary electrical network.
If this indicator is below 200 V or above 250 V, you will need to contact the housing office or energy supply organization so that they carry out all the necessary measurements and, in cases of discrepancy, adjust the operation of the power transformer at the substation.
Often in practice, specialists from the power supply organization will not be able (or will not want) to adjust the voltage level in accordance with the PUE, in which case you will not be able to do without installing a voltage limiter or stabilizer.
Faulty starting equipment
This problem most often occurs with old LED lamps. It can be caused either by drying out of the electrolytic capacitor or by partial failure of the rectifier bridge.
In such cases, it is necessary to either repair the starting equipment (change the electrolyte) or buy a new LED lamp.
Power surges
Quite often, in houses or apartments with old wiring, short-term power surges occur, during which the voltage level can reach 280–320 V. In such cases, to protect all household electrical appliances and LED lighting, it is necessary to install voltage stabilizers that smooth out voltage drops and surges to the nominal value (220 V).
Resistor resistance and power
The above resistor parameters correspond to a 220 V network voltage. It happens that the LED lamp is powered from a line of a different rating. Then you will have to calculate the resistance and power of the resistor yourself.
We calculate the resistance using the formula R=∆U/I, in which ∆U is the difference between the actual voltage in the device’s power supply line and the lamp voltage, I is the LED current.
The light bulb will work normally if the resistor value is in the range of 150 - 510 kOhm.
We calculate power using the formula P=∆U×I, where the letter values are similar to the above explanations.
Knowing these formulas, it is easy to make the necessary calculations of the resistor value.


