The Mercury 200 meter is a single-phase and multi-tariff device that takes into account the active type and power characteristics of the consumed alternating current electrical energy. The device can be used in the private sector, MKD apartments, public institutions and other individual consumers.
Meter type – Mercury 200
Design and principle of operation
The product includes the following components:
- frame;
- contact block with shunt;
- electronic board with an amplifier chip, power supply, backup battery, microcontroller, internal memory, control circuit for connecting a third-party device, modem and optocoupler;
Block diagram of the meter - Mercury 200 - liquid crystal display.
The parameters of the electricity passing through the device are processed by an electronic board, from where the data is sent to the liquid crystal display, interface and modem (for individual modifications).
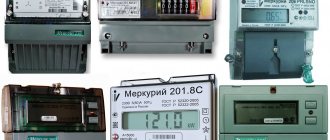
Varieties
The manufacturer offers two types of household metering devices. The Mercury 200 electricity meter has a modification and some features. The functioning of the devices is similar for both models.
Mercury 200.02
Single-phase metering device "Mercury" 200 02. During installation, it is fixed to a DIN rail. The interface provides the ability to set several tariffs for servicing networks. The device operates autonomously and as part of the ASKUE.
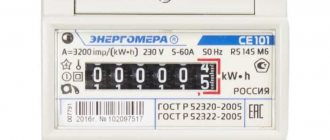
Mercury 200.04
Electric meter "Mercury" 200 04 multi-tariff. It is installed to analyze energy consumption. The device has a certificate of conformity. Mounts on a DIN rail and comes with a mounting plate. It will be useful when installing equipment in place of an induction device. The interface involves entering four tariffs for commercial calculation.
The meter operating manual can be downloaded here
Specifications
| Characteristics | Magnitude |
| Rated voltage (Unom), V | 230 |
| Set operating voltage range in relation to Unom | 0,9 — 1,1 |
| Extended operating range in relation to Unom | 0,8 — 1,15 |
| Limit operating range in relation to Unom | 0 — 1,15 |
| Basic current value (Ib), A | 5 |
| Maximum current value (Imax), A | 60 |
| Accuracy class | 1 or 2 (indicated on the scale) |
| Rated frequency value, Hz | 50 |
| Starting current (sensitivity), mA: | |
| for accuracy class 1 for accuracy class 2 | 20 25 |
| Constant (gear ratio) of meters, imp/kWh: | |
| in telemetry mode in verification mode | 5000 10000 |
| Pulse output parameters: | |
| maximum voltage, V maximum current, mA | 24 30 |
| Total power consumed by the voltage circuit, no more than, V*A *for meters with a PLC modem, W | 10 *30 |
| Total power consumed by the current circuit, no more, V*A | 2,5 |
| Active power consumed by the voltage circuit, no more, W *for meters with a PLC modem, W | 2,0 *3,0 |
| Operating temperature range, °C | -40… +45 |
| Overall dimensions, mm | 156 x 138 x 58 |
| Meter weight, kg | 0,6 |
| Average time to failure, hour | 150000 |
| Standard service life, years | 30 |
| Calibration interval, years | 16 |
| Price, increased rub. | from 1500 |
Overall dimensions of the meter - Mercury 200
Briefly about self-diagnosis
Some modifications of the 200 model series have an automatic fault finding function. When detected, the display shows a message in the format E-XX, where “XX” is the error code. For example, if the message “E-18” appears on the screen, this indicates a power limit checksum error and to correct the situation it is necessary to rewrite this data.
A complete list of codes and their descriptions can be found on the manufacturer’s official website or in the instructions for the 200 series models.
Some errors can be resolved on your own, while others require calling a specialist or even returning the device to the manufacturer. For example, error E-01 indicates that the built-in battery charge has dropped to a critical threshold. It would seem nothing complicated, but in most modifications of devices for such a replacement it is necessary to disassemble the electric meter, since the device is sealed, only employees of the electric company providing the services can open it.
Battery in the Mercury 230 ART electric meter
In the described situation, the exception is modifications of the 234 series; instructions for this procedure are available in the passport for the electric meter.
Advantages of the device
The model has the following advantages:
- presence of protection against magnetic influence;
- possibility of operation in conjunction with a centralized control system;
- the presence of an indication notifying about problems and failures;
- greater functionality in information output and a wide range of measured data;
- compactness and ease of installation on a standard rail;
- long service life and reliability;
- electricity metering according to four tariff plans;
- storing information in built-in memory.
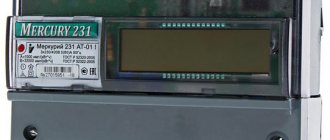
Example of a typical design
Devices of this brand are manufactured in a rectangular plastic case. On the front side (closer to the left edge) there is an LCD display or a mechanical wheel-type indicator. On the right side there may be a menu navigation button or the main parameters of the device may be indicated. Below is a drawing that shows the main structural elements.
Example of a typical design
Designations:
- A – information display on which the electric meter readings are displayed.
- B – buttons for switching display modes, for example, displaying information on various tariffs.
- C – sticker indicating the main technical and operational characteristics.
- D - removable panel covering the switching contacts of the device.
Photo of contacts not covered by a removable panel.
The standard dimensions of the electric meter housing (the model shown in the figure) are as follows:
- length – 258.0 mm;
- width – 170.0 mm;
- height – 74.0 mm.
The dimensions of different models of electricity meters may differ from those indicated above.
As for the weight of the device, it depends on the design, in particular, the weight of modifications of the 230 model does not exceed one and a half kilograms.
The metering device is mounted on a standard DIN rail.
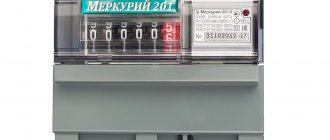
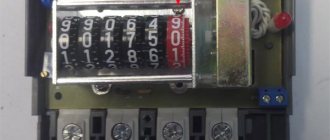
Taking readings
The readings are taken in the following order:
Taking readings from the meter - Mercury 200
- Briefly press the button (shown by a red arrow) located below the indicator until the data for the tariff T1 is displayed on the screen (red arrow = T2) - integer values are written out, they are located up to the comma or point (blue rectangle), numbers in the red rectangle for accounting are not recorded.
- The operation is repeated in a similar way for other tariff plans (the value T1=xxx; T2=xxx should be obtained).
- The number of kilowatt-hours is calculated separately for each tariff by subtracting the previous value taken a month earlier.
- The payment amount for each tariff is calculated separately by multiplying by the price of one kilowatt-hour, the total values are summed up.
An alternative way is to wait until the required data is displayed, regularly changing on the display automatically, without pressing the button. Additionally, the meter represents the current date, time and total consumption for all rates.
How the tariff schedule is set
In the software of the Mercury 200 meter, it is possible to register up to eight tariff change points. The mode is characterized by designation (T1, T2, T3, T4) and start time. Working days, holidays and weekends are set for each month. The maximum allowed number of holidays per year is 16 for any meter model. Follow the instructions during setup.
- Select the month for which tariffs are set. Go to "Working days".
- Press the button twice, call up the menu to set the start time zone. Enter the letter and number of the tariff and click “Install”.
- To turn off an existing work zone, you can click the “Delete” button.
All control is carried out from a computer using a special installer.
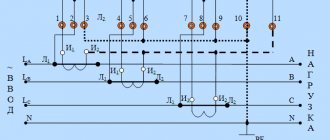
Connection diagrams
There is nothing complicated in connecting a metering device, if you follow the instructions this procedure does not take much time. The connection diagram is available in the technical documentation that comes with each device. Using model 200 as an example, we will show how to connect a single-phase multi-tariff device.
Connecting an electricity meter Mercury 200
Contact assignment:
- 1-5 – connection of the RS-485 or CAN interface for transmitting pulses;
- 6 – phase input;
- 7 – phase output;
- 8 and 9 – connection of the neutral core.
- 10 and 11 – telemetric output.
That is, the input to the apartment is connected to contacts 6 and 8, and the load (internal network) is connected to terminals 9 and 11.
Connecting three-phase devices.
Depending on the modification of the device, it can be connected via direct connection or through a current transformer (hereinafter referred to as CT). Let's use both options for the 230 AR as an example.
Direct connection of the Mercury 230 AR meter
If you plan to connect the device via a CT with the appropriate transformation ratio, you must first remove the jumpers between contacts: 9 and 10, 11 and 12, as well as 13 and 14. After this, you must make the connection according to the diagram shown.
Connection via three CTs
Since the purpose of pins 17-26 remains unchanged (the same as in Fig. 7), it is not given.
Before installing the protective panel covering the contacts, we recommend that you double check that the connection is correct.
Functional features of Mercury-200 (multi-tariff)
- Recording of readings is carried out in four tariff zones. There is a way to create an individual schedule from Monday to Sunday, as well as for 11 months, during the calendar year. If necessary, it can switch to summer/winter time (automatically);
- Recording, accounting and storage in the device’s memory, as well as the ability to visualize the following readings on the display:
- The amount of total energy calculated according to four available tariffs and a separate value (from zeroing the readings, or from the onset of a new month within one calendar year);
- Values of current readings in the circuit, voltage, power at a given time.
- Adjustable control over load power readings. The ability to set a maximum load limit in this electrical energy meter and subsequently control this parameter. If the limit is exceeded, the electric meter will signal this by turning on the LED light;
- The load mode can be changed using external switching circuits.
Installation recommendations
- First of all, you need to choose the right place in the closet for the device; you can read how to do this on our website.
- Carefully read the description, which provides a connection diagram, and only then start working.
- Before connecting, you must de-energize the input; to do this, you must turn off the input circuit breaker.
- If after connection the electric meter blinks, then everything is in order; this indication indicates energy consumption. If the interval between LED flashes has increased, it means that consumption has decreased.
Multi-tariff electricity meters: what are the benefits?
We will primarily talk about energy companies. It would seem - why would they reduce the cost of one kW by more than half? Optimization of electricity consumption among the population - they will say. This is partly true. But, in fact, the answer to this question contains certain nuances.
After a little reflection, the leadership of the Ministry of Energy of the Russian Federation is introducing multi-tariff meters into circulation. The most popular of them are two-tariff. This approach encourages the population to save personal funds, which makes it possible to reduce the load on nuclear power plants in the evening by more than 20%.
Now about the nuance announced above, this is a change in the daily routine. Yes, when using a two-tariff meter, the user saves money. But you will have to pay for this with the convenience of your time: for example, not everyone can wait until 11:00 pm to iron clothes and finally heat the water using a boiler.