Most often, you may encounter the question of why an LED lamp is blinking after repairing or replacing conventional light bulbs with energy-saving ones.
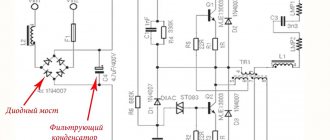
There are 6 different ways to solve this problem. But to find out the reason for this strange behavior of the lamps, let’s first delve into the theory. Here is one of the typical diagrams of an energy-saving lamp.
A voltage of 220V is supplied to the diode bridge. The result is a constant voltage of a certain ripple. To level out these ripples, capacitor C4 is used. It is this capacitor that is the culprit.
Switch backlight
The most important reason for blinking of switched-off LED and energy-saving light bulbs is the presence of backlight in the switch. When the switch is turned off, a small current still continues to flow through the backlight circuit, charging the filter capacitor. Having charged, the capacitor tries to start the lamp power circuit, but there is not enough “power” and it immediately discharges, and the light flashes briefly. Then it all repeats itself over and over again.
There are 6 common methods for eliminating the flickering of switched off energy-saving lamps:
- shunting with a resistor
- capacitor bypass
- connecting the backlight with a separate wire
- using a pass-through switch
- dismantling the backlight inside the switch
- connecting a conventional LED light bulb in parallel
Types and causes of LED element flickering
Conventionally, two types of flickering of an LED source can be distinguished:
- up to 50 Hz – low-frequency;
- more than 50 Hz – high-frequency.
The causes of flickering can be divided into three categories:
- constant drop in mains voltage;
- low mains voltage, which does not allow the power supply circuit of the LED source to function fully;
- malfunction, design features of the LED source power supply circuit.
Shunting with a resistor
You can combat blinking by shunting the circuit with a certain resistance. To do this, take a resistor with a resistance of 1 mOhm and a power of 0.5 to 2 W.
For safety, it is better to insulate it with heat shrink.
The best connection location for the resistor is at the junction box. Connect it between the neutral and phase wires of the light bulb (in parallel with the energy-saving wire). It is especially convenient to connect this resistor through Wago clamps.
After this, your lamp will stop blinking.
If your junction box is hidden and there is no access to it (although this is already a violation), or there is no free space in it, then the resistor can be soldered directly to the phase and neutral wires of the chandelier. Then hide the ends in the terminal block.
The method has a big disadvantage.
The resistance will heat up, and if the power is selected incorrectly, it can even lead to a fire.
In addition, modern electronic meters in the apartment will take into account the energy consumption for heating the resistance, and you will end up paying not only for lighting, but also for this “modernization”.
What to do if the lamp is humming
Sometimes owners of lamps with fluorescent lamps notice that it not only blinks, but also hums. However, the LDS itself cannot produce such a sound, the reason is the throttle, which starts it and keeps it running. The ballast may produce a hum if you purchased a low-quality device.
To avoid problems with fluorescent lamps, you need to know how to choose the right ballasts.
The starter is used to create an arc in a gas-discharge light source. This device heats the electrodes, provoking ignition, and after breaking the circuit, an increased voltage pulse is formed, due to which a breakdown of the gaseous medium of the flask occurs.
After turning on the starter, the current in the fluorescent lamp increases. To prevent its breakdown, a choke is used that limits the current.
This is interesting! Each LDS requires 1 starter, and the ballast can be used for several light sources at once.
To connect fluorescent lamps, the following types of ballasts are used: electromagnetic or electronic choke. The first option costs less and is easy to install and manage. However, such a device is noisy and does not last long. In addition, electromagnetic ballast reduces efficiency, since approximately 25% of the power is spent on it.
Electronic ballasts (EPG) are a better option. Such equipment increases efficiency by 95% and reduces energy consumption by 30% compared to electromagnetic ballast.
Electronic ballasts do not make noise, protect against flickering of lamps, and extend the life of fluorescent lamps. It can be used for several light sources at once. However, such a device costs more than the previous one.
To prevent the lights from blinking or humming, experts recommend including electronic ballasts from trusted manufacturers in the circuit. Such devices not only start, but also power light sources and extend their service life.
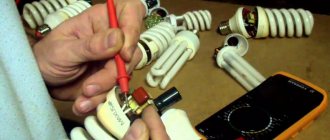
Eliminate blinking LED lamp using a capacitor
If you don’t have a resistor, then instead you can use a capacitor with a capacity of 0.01 to 1 µF and a voltage with a double surge noise margin of 2*220=440V. But it is most reliable to take at least 630V.
When there is no capacitor for 630V, but there is one for 400V, then using a soldering iron you can assemble a circuit like this.
Here, one resistor serves to protect the capacitor from impulse noise, and the second to discharge the capacitor.
In an alternating current circuit, a capacitor is essentially a reactance, which is not taken into account by the electric meter and, unlike a resistor, the capacitor does not heat up.
Therefore, installing a capacitor is more preferable and safer. Install it in the same places as described above using resistance (distribution box, chandelier terminal block).
Where can I find such a capacitor? In order not to run around radio stores, you can simply disassemble the already burnt-out energy-saving lamp and pull it out or take it from a regular starter for fluorescent lamps.
True, there is one BUT. It is better to use paper or ceramic, because... Electrolytic may explode unsafely during power surges. So if you take it as a shunt, be sure to take it with a large voltage margin.
Reasons for flickering of branded lighting devices
At low mains voltage, even if the light source is equipped with a capacitor of sufficient capacity, blinking may occur, since as a result of a decrease in amplitude, the capacitor will not have time to recharge. Such power surges occur periodically, but if they cause discomfort, you can additionally use a voltage stabilizer.
If the problems are completely corrected, but the LED elements continue to flicker when the lighting equipment is turned on, it is worth checking the quality of the contact connections on the switch or socket. Perhaps the contacts have oxidized.
Quite rarely, not the entire source blinks, but only several LED elements. Why does an individual LED of an LED ceiling lamp flicker when it is on when the neighboring ones are working normally? This can happen if different types of crystals with different power ratings were used during the assembly process of the matrix. Unfortunately, it is useless to deal with such a problem, and, most likely, some LED elements will fail very quickly.
It is important to understand! The blinking of LED lighting fixtures with a low frequency, which can be detected visually, is detected instantly. It is enough just to determine why this is happening.
Pass-through switch
You can also use a pass-through switch instead of a regular one. In this case, the light will be on in one position, and the backlight in the second. The light will also not blink.
This is achieved by direct supply of only neutral conductors to the lamp in the off position.
And no amount of interference will make it light up.
True, here you also need to connect the neutral conductor to the switch. But this method allows you to get rid of blinking, even when the backlight is not the cause! (discussed below). If you are not too bothered by the additional costs associated with purchasing a pass-through switch, and you do not want to go into the weeds of choosing suitable resistors and capacitors, then this method is the most optimal.
Why the fluorescent lamp blinks: finding the cause and solutions
First, experts advise inspecting the contacts of the LDS and starter. If there is no tension in them, then the situation needs to be corrected.
But it often happens that the voltage is normal, but the fluorescent lamp blinks.
To understand what to do in this case, you need to consider the most common reasons for the incorrect operation of the LDS:
| Problem with LDS | Reason for flickering | Diagnostic method | Repair |
| The fluorescent lamp blinks but does not light up | Possible break in the electrical circuit | To check the presence or magnitude of voltage, you need to test the circuit using a multimeter or voltmeter | You need to connect a weak contact (for example, from a choke or socket) or repair a broken plug of a lighting device |
| The fluorescent lamp blinks, does not glow strongly enough on one side, crackles | Unintended connection of two points in an electrical circuit, causing a short circuit | Check the integrity of the cartridges and their contacts | There are two ways to solve the problem. The first is to turn the lamp over, change the working and non-working ends. If this does not help, then the light source should be replaced. The second is to check the integrity of the conductors and inspect the cartridge. |
| LDS blink or their light gradually fades and acquires a yellowish tint | Penetration of air into the bulb bulbs | Inspect the light source for integrity of the base | Replace the light bulb |
| Blinking or darkening has appeared inside the bulb | Increasing ballast currents | Check the device for operating and starting current | Replace the throttle |
| The appearance of dark spots, electrical discharges skipping in the presence of a glow | Problems with the electromagnetic starter, possible increase in operating current | Take current readings | If the current level is increased, replace the starter. If the voltage is normal, turn the light bulb several times to restore the glow. If it does not light up or blinks, replace the light source. |
| The LDS turns on, but the brightness of the lighting gradually decreases | Ballast failure or mercury deficiency | Take operating current readings | If the current level in the network is increased, replace the inductor. If the indicators are normal, then install a new fluorescent light bulb. |
| The lights are blinking | The light source is affected by electromagnetic waves | Look for household appliances or radios near the lamp, cell towers near electrical lines on the street | It is necessary to eliminate the root cause in order to improve the operation of the lamp |
| Flashing light source | Old electrical wiring | The wiring needs to be checked | Replace the wires with new ones |
| Frequent flickering of the LDS | Incorrectly constructed lamp circuit | Inspect all contacts | Connect the wires correctly, strengthen the contacts |
| Doesn't blink, doesn't turn on, but lights up around the edges of the bulb | Errors in the circuit, breakdown of the starting device after switching on (damage to the capacitor insulation, starter contacts sticking) | Inspect the circuit and starter | Correct errors or replace the starter |
| Blinking in daylight sources | Bulb filaments have broken or burned out | Inspect the filaments | Replace the faulty lamp |
Connecting a simple light bulb
And when the chandelier has several horns, instead of one energy-saving light bulb, you can place an incandescent lamp in parallel. The flashing should also stop. The method only works if there are several cartridges in one lamp and is probably the least expensive.
There are pros and cons here. The downside is that you lose the benefits of energy savings, for which you most likely switched to energy-saving devices. Plus, the lighting becomes more pleasing to the eye. Some jewelry workshops use just this kind of light.
Flashing when off
Ripple when the switch is inactive can be detected due to electric current entering the smoothing capacitor. There is an accumulation of current in it, which, when filled, enters the circuits and tries to activate the LED lamp. This supply is not enough for full operation, so the lamp will light up for a short period of time. The flashing will continue until the problem is resolved or the light bulb breaks.
The following components can affect the blinking of lamps:
- switch illumination;
- induced voltage;
- leakage currents.
You need to know these reasons in order to be able to quickly eliminate them.
Effect of switch illumination
Illuminated Key Switches
Many manufacturers equip their switches with backlighting. It increases the comfort of use, as the switch starts to light up and becomes easier to find in the dark.
But additional lighting can cause flickering, especially with cheap light bulbs. This is due to parallel connection. When turned off, the current goes to power the backlight, and when turned on, it goes to the lamp.
This reason is one of the most common, so it is the switch illumination that you need to pay attention to when the lamp flickers.
Induced voltage
Changing the wiring section is the optimal solution to eliminate induced voltage.
It occurs when several devices are connected to one multi-core cable. It can also be observed when laying several independent lines in one groove.
You can fix the problem by replacing one LED bulb with a device of lower power. You can temporarily install an incandescent lamp, but you must remember that it will also be affected by the induced voltage. The optimal solution would be to change the electrical wiring section and allocate a separate line for the lighting group.
Leakage currents
Leakage current is the most dangerous reason why a light bulb blinks. It appears due to poor quality and incorrect installation, damage to insulation, and poor contact. As a result, a circuit break occurs, which can lead to a fire. Even in a non-operating state, currents will flow to electrical appliances.
Does low voltage in the network affect the flickering of LEDs?
Do you know what happens to a battery that runs out? She won't be able to work for a long time, and the same principle applies here. The power driver, regardless of its type, is created to operate at a certain operating voltage, and it has a certain reserve. Obviously, budget models have a limited supply or it is underestimated, while expensive ones will have more. This point cannot be ignored. Low-quality power supply, when amplitude drops occur, often occurs in rural areas where overhead power lines are used. But it is absolutely possible to solve this problem. In a separate article, I described in detail how you can increase the low voltage of the network to 220 volts in a private house. For an LED lamp to work properly, it needs high-quality and uninterrupted power supply. Therefore, simultaneously with checking its value, you can begin to search for the place where the malfunction occurred and begin repairs. The level should be in the range of 207-253 volts. It should be noted that unstable operation of drivers may begin already at lower values if their quality is low.