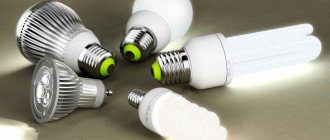
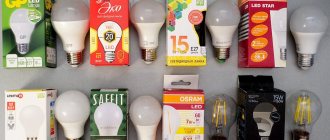
Budget LED lamps cause interference and degrade the quality of the 220V power supply. Interference also occurs during the operation of “energy-saving” lamps—compact fluorescent lamps. The reason for their occurrence will be described below, but first, check how high-quality the lamp you purchased is and what kind of interference it produces.
To hear interference from LED lamps and CFLs, you need a regular FM radio. To do this, turn on the lamp, radio and bring its antenna to the network wires. You will hear a whole aria of crackling, rustling and hissing - this is the interference created by LED lamps, or rather their power supplies.
To understand how to eliminate interference from LED lamps, you need to learn more about interference.
What is interference?
As you know, the outlet contains alternating voltage. This voltage has a sinusoidal shape, if you look at it with an oscilloscope we will see the following picture.
In the figure above you see voltages with and without interference. Ideally, the voltage should be like the one in the right diagram.
Switching power supplies are used in almost all modern technology: LED lamps, chargers, computer power supplies, etc. They are the ones who give interference to the network, and to get rid of it, an electromagnetic interference filter is installed at the high voltage input, consisting of:
- Varistors;
- electromagnetic choke;
- capacitors.
A filter is needed both to protect your device and to ensure that interference does not return to the network during its operation. Interference can arise not only from switching power supplies, but also during the operation of commutator motors, from sparking of their brushes and switching processes of armature windings.
Brief information about the operating principle of LED lamps.
Imperfections in operation are explained by the complexity of the physical processes that cause the glow. The LED, the main element of the light source, consists of two semiconductors. The first of them is dominated by negative electrons, and the second by positive ions. Current can only flow through them in one direction. And when it passes through the contact boundary of semiconductors, the electrons move to a new energy level. Energy is released in the form of photons - the eye sees light.
Diagram of the appearance of optical radiation in an LED element
When the lamp is operating, the electric current to the LEDs passes through the base and driver. The driver is a structural element that ensures stable operation of the light source during fluctuations in the electrical network. Stabilization of electrical parameters depends on the quality of the driver. An ideal converter should stabilize any surge voltage and frequency interference.
The continuity of the luminous flux is also affected by the cooling of the luminaire. After all, LEDs heat up during operation. And the warmer the LED element, the worse it shines. Therefore, a good radiator at the LED light source and natural ventilation of the lamp help stabilize the glow.
You can read more about the design in the article: “LED lamps: device, principle of operation, circuit diagram, types, characteristics.”
How does the filter work?
Varistors limit surges and surges in voltage and protect devices from failure. You can see their effect in the middle diagram. The first diagram shows how strong the jumps can be. Such bursts will instantly kill your equipment.- Choke – smoothes the current. These are inductor coils, in essence - a copper wire wound into a coil may have a ferrite core. Installed in series with the circuit.
- Capacitors smooth out the voltage waveform, like an inductor, but are installed in parallel.
To understand why this happens, you need to remember the laws of commutation:
“The current in the inductance cannot change instantly. The voltage across the capacitor also cannot change abruptly.”
We've sorted out the filters. A logical question arises: if filters need to be installed from the production line, why then are lamps and switching power supplies “noisy”? The answer is very simple, because an unscrupulous manufacturer simply solders jumpers instead of a filter.
Main reasons
There can be many reasons why an LED lighting fixture sometimes makes noise. This includes resonance from supporting structures, sounds from additional devices, and other reasons. The appearance of a hum greatly interferes with work or rest, distracts and irritates a person.
If the hum moves into the ultra-low frequency region, serious health problems, mental disorders, anxiety and panic conditions are possible. Therefore, the causes of unwanted sounds must be identified and eliminated. Let's look at some possible and common situations .
Dimmer noise
A dimmer is a device that allows you to smoothly change the brightness of a lamp. A very convenient device, but it is often the source of noise. There are two dimmer designs, designed for traditional incandescent lamps and for LED fixtures.
If, unknowingly, a dimmer for an incandescent lamp is connected to an LED lamp, the device begins to hum, the intensity of the sound will depend on the power and the degree of inconsistency between the LED and the regulator. The way out of the situation is to replace it with a suitable dimmer.
Poor quality assembly
Poor manufacturing quality of the LED lamp is also a common cause of noise. The lamp begins to hum due to a leak in the seal (sometimes this does not happen immediately, but over time).
Interesting! In addition, a low-quality transformer may be used in the design of an LED lamp (this is typical for lamps with built-in PWM). Then the device also noticeably hums or begins to whistle. The solution to the problem is to replace the lamp with a more reliable one from a well-known manufacturer.
Other
Without exception, all dimmers hum during operation. However, with high-quality assembly of the device, the operating noise level is low and is not noticeable by humans. When installed in plasterboard boxes or other structures capable of resonating in the broadband range, the lamps begin to hum much louder. Possible causes of resonance:
- tight contact of the lamp with the walls of the box;
- the block with the power wire comes into contact with the ceiling slab, transmitting vibration to it;
- the devices are installed too close to the metal guides that form the frame of the box;
- the walls of the box are not tightly assembled and begin to rattle or hum when the lights are turned on.
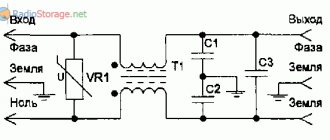
Making your own filter
To eliminate interference from an LED spotlight or lamp, you can assemble or remove a filter from a used piece of equipment. Thus, you will improve the characteristics of your lamp and get rid of unnecessary noise from the radio and TV. A typical filter circuit was shown in the previous section of the article.
Let's consider a filter circuit for self-assembled LED lamps against interference.
In the picture you see the values of all parts and components. You must calculate the diameter of the wire for the filter using the formula, depending on the current consumption of the device.
Wind in one layer without crossing the wires until the core is full. It is advisable to leave a gap between the turns.
To avoid winding the filter, you can use a ready-made inductor from the power supply. It can be found in a computer power supply, laptop charger, DVD player, music center, they are located on the power supply board. Pay attention to energy-saving fluorescent lamps - this is a source of parts for many radio amateurs.
In powerful power supplies, it may look like a toroidal choke, or a coil wound on a ferrite ring. Such filters usually withstand currents of 2 or more Amps.
Having soldered the choke, you need to add capacitors to it according to the diagram and the filter will be ready.
An even simpler option is to cut a piece of the board from a good power supply. This area looks like this.
Cut the board with a hacksaw and solder the wires.
Next you need to install this filter in the body of your lamp, thus:
LED lamps flicker when the lights are on.
The flickering of a chandelier.
Sometimes the LED lamp flickers under electrical load. The source of blinking lies in low voltage, poor assembly of lamps, incorrectly selected dimmer or poor-quality light source.
Voltage sag in the electrical network.
Mains voltage is not a constant parameter. Often it does not correspond to the nominal 220 V. The LED light source subtly responds to any deviations from the nominal. Only a high-quality driver can cope with power surges. In addition, in the store you should give preference to the light bulb that has a wider range of operating voltages. This parameter is indicated on the packaging.
The power supply parameters are checked with a simple multimeter. Low (below 200V) or high (over 230V) voltage must be reported to the DUK or regional power grids. Specialists must regulate their communications. If this does not happen, and the voltage level in the network is constantly below the nominal level, then you can install a home stabilizer. It will help extend the life of all household appliances, not just light bulbs.
This factor interferes with the operation of twelve-volt LED lamps. They are mounted into the network via a step-down power supply. If its power is not enough, the light bulbs will begin to flicker. The solution is simple - replace the power supply with a more powerful one.
Poor quality installation of elements.
For a high-quality luminous flux, it is important to reliably connect all elements of the electrical circuit to each other. If the contacts are not held firmly in place, flickering appears. Also, when connecting, it is important to maintain the polarity of the elements.
Incorrect use of dimmer.
Correctly connecting an LED light source through a dimmer is quite difficult. Not all LED lamps are dimmable. This again has to do with the quality of the built-in driver. If the dimming function is not built-in, there will be flickering when turned on. When the power is increased to maximum, the flashing will disappear.
Read more about this in the article: “Dimmer for LED lamps: what it is, which one to choose, why it doesn’t work.”
LED degradation
Poor quality LED lamps.
The LED lamp may flicker unnoticed. A low-quality driver does not stabilize electricity well. As a result, the lamp blinks with a small amplitude - it pulsates. This harms the eyes and psyche of a person.
It is safe for the eyes to use LED light sources with a pulsation (flicker) coefficient of no higher than 35%. The optimal option is from 5 to 20%. The manufacturer writes this data on the packaging.
However, flickering can be reduced with an already purchased lamp. To do this, you need to disassemble it and replace the capacitor in the driver with a more powerful analogue.
Other reasons for LED lamp humming
It is worth noting that a low level of hum is characteristic of almost all dimmable lamps, but usually this sound is not audible. But in some situations, the hum of the light source can be amplified by parts of the ceiling structure. For example, a case was described when a lamp built into a plasterboard ceiling was closely adjacent to a metal profile, and already along the profile a weak humming sound resonated throughout the entire room. The solution was to replace the lamp model with another one with a smaller height.
When a buzzing sound appears from a working LED lamp, you should carefully check all the conditions for its correct operation - a suitable dimmer model, correct installation and the quality of the light source itself. Our online store offers high-quality LED lamps, including dimmable ones, which do not create extraneous sounds when operating.
LED lamp repair: how to disassemble and check it
Disassembled light source.
From the above, it is clear how important quality is when purchasing an LED light source. If you are not sure about the quality of your lamp or it is already broken, then try to disassemble it, check it and repair it.
LED lamp design.
For disassembly you will need an awl, a syringe with a needle and a solvent. Solvent is needed to remove the sealant that secures the diffuser to the housing. Carefully run an awl along the edge of the diffuser. And slowly pour the solvent into it from the syringe. Wait 3-5 minutes. Then you should twist the diffuser and remove it. If the diffuser is not glued, then it is enough to carefully turn it and remove it.
After disassembly, carefully inspect the LED. If you see black dots on any of them, it means it is burnt. It can be unsoldered and replaced with a working one. We'll look at how to do this below.
If everything is in order with the diodes, then we turn our attention to the driver. Often damaged capacitors can be seen visually - they burst or swell. Otherwise, to check the operability of the circuit elements, you need to unsolder them. You should not solder all the elements at once. It is more convenient to do this one at a time to avoid confusion. In this case, the nominal value of the resistance is indicated on the board itself, and the capacitance of the capacitors is indicated on the body of the part.
The soldered elements must be tested with a multimeter. If there are deviations from the ratings, then the part must be replaced. Radio elements also need to be replaced - new parts are carefully soldered in place of the burnt ones.
How to solder LEDs.
It is most convenient to do this if you have a soldering station or hair dryer. But you can do it with a soldering iron, it just requires more surface-mounting skills.
So, the burnt element can be heated and removed with the double tip of the soldering station. Or heat it with a hairdryer and remove it with tweezers. If you use a simple soldering iron, you need to slightly improve it. Wind a copper wire with a diameter of 1-2 mm onto the tip. Sharpen the ends of the wire and tin.
Upgraded soldering iron for soldering diodes.
After this, clean the contacts from any remnants of old solder. Then apply special solder paste. After this, a new LED is placed in this place. The main thing is to mount an LED element with similar characteristics and maintain the polarity. Warm up the new diode with a hairdryer and press it with tweezers.
When using a soldering iron, after cleaning the contacts, you should apply flux to them and solder a new element. That's it - the element is soldered! All that remains is to check the functionality of the light source and continue to use it.