The tip of a conventional resistive soldering iron is heated by an electric current that flows through a nichrome spiral wound around the rod capsule. Disadvantages of this process: low efficiency, local heating, and as a result, high energy consumption.
Ceramic soldering irons are more advanced, but they are susceptible to sudden temperature changes. An induction soldering station works on a completely different principle. The tip heats up quickly, and heating adjustment is as simple as possible.
Advantages and disadvantages
The main advantages of this type of device compared to similar equipment with ceramic heating elements are:
- High heating rate. The working part of the unit heats up to the required temperature in less than 30 seconds.
- Reliability and durability. This class of equipment, when used correctly, has a service life of more than 10 years.
- Ability to adjust heating settings. The soldering iron has a large number of adjustments, allowing you to set the heating temperature of the tip with high accuracy.
- High temperature SMD radio components. They are especially important for sensitive operating mode settings.
- Safety. Unlike similar soldering irons, such devices are less prone to failure and do not damage the power cord connected to the device body.
- Convenience. The soldering iron has a convenient shape and small size, which makes it ideal for soldering small parts, especially where they are difficult to reach.
- Moreover, such a soldering device has very high efficiency, since the ferromagnetic layer of the tip is used as a heating element. The device does not actually lose heat.
- Soldering iron design
The disadvantages of this type of soldering devices include:
- It is necessary to purchase replacement tips separately if you need to change the soldering mode.
- The cost relative to other soldering irons is quite high.
Quick 203H induction soldering iron from China (Tests, comparison with conventional soldering irons)
Hello! I’ll immediately explain the price: the seller raised the price, apparently after my angry review. The station came to me without a soldering iron! I do not recommend buying from this seller at any price. But there will be a review! The cheapest offer I've found on Ali now
aliexpress.com/item/QUICK-203H-203H-high-frequency-digital-soldering-station-iron-90W-Intelligent-Lead-free-high-frequency-welding/32566448156.html,searchweb201602_3_505_506_503_504_10020_502_10001_ 10002_10017_10005_10006_10003_10021_10012_10004_10022_10007_10018_10019,searchweb201603_1&btsid=b5b98ff3-a335- 4068-8ae7-e69c67e5f90f There are options on Tao, but there you need to know the tricks of combining parcels and working as intermediaries. I'm not hanging around there yet.
In this review, I will try to introduce you to an induction soldering iron from China. To begin with, let me give a little explanation regarding the principles of operation of this device!
In induction soldering irons, the tip is heated by supplying energy to it in the form of a high-frequency electromagnetic field created by an inductor coil.
Inside the tip there is a ferromagnetic core, which is heated due to hysteresis losses and, to a lesser extent, due to eddy currents. In such soldering irons, only the tip is heated, which makes the soldering iron extremely light and miniature. Thermal stabilization of such soldering irons can be carried out either in the traditional way (using a thermocouple or thermistor in contact with the tip), or by selecting a ferromagnetic core material with a Curie temperature equal to the required tip temperature. When this temperature is reached, the core loses its ferromagnetic properties and the energy supply due to magnetization reversal stops. More details here:electrik.info/main/praktika/871-indukcionnaye-payalnye-stancii.html
This product of the Chinese industry is an analogue of the branded soldering iron Quick 203. Here they (originals www.quick-global.ru/1-lead-free-soldering-2b.html) are sold in the Russian Federation (office representative Qucik technica-m.ru/katalog .html/fol_242).
The principle of operation is as follows: a high-frequency generator causes the metal tip to heat up to a predetermined temperature, which is regulated using a thermocouple pressed to the tip from the inside. Advantages of this thermal stabilization option: +Low heat capacity (inertness) of the heating device. + Absence of an air gap between the heater and the tip (the tip is the heater) + Relatively high speed of response to changes in the temperature of the tip due to touching parts, a board, etc. +High heating rate (well, this follows from the first point) Cons: -Complexity of the circuit -Price (compared to conventional soldering irons) -You need good tips. With the default it's just sad. -Possible effect of high frequency on the body (but not really proven, I have not conducted any research on this particular thing and have not seen it on the Internet) -Bulky (compared to conventional soldering irons)
Characteristics: Temperature range 100℃-600℃ Temperature stability ±2℃ Input voltage/frequency 220V 50Hz/60Hz Output voltage/frequency 24V AC 400K Hz (found measurements on the Internet ~280 KHz) Max. power 90W Microprocessor control Heating High power current Sleep mode Automatic Temperature lock Password Weight (without power cord) Approximately 2.8 kg
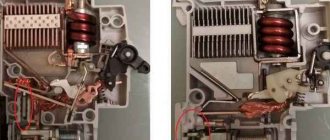
Photos of the insides:
So my delivery kit:
Let me remind you that there is no soldering iron in the kit, but there are some 4 screws (legs) that have nowhere to screw. Front panel:
Box weight:
Weight of the device with the kit:
Working with a soldering iron: Adjusting the temperature using keys ▲ and ▼. When turned on, the station turns on at the temperature set when turned off. Go to the settings menu by holding * for 2 seconds. 0- 1-Maximum temperature that can be set with arrows (max. 600!!). 2-Minimum temperature (100-150-200C) 3-Temperature of the soldering iron in sleep mode (100-300C) 4-Time in minutes to switch to sleep mode (when the soldering iron does not move) 5-Time in minutes before the soldering station turns off (time in point 4 + time in mode 5) 6-Lock mode 7- 8-not available 9-password for access to settings mode (to disable, set the password to 000) Enter calibration mode: hold down * and press ▲ without releasing. Set the temperature on the tip (real). Testing: I took 2 boards (from a UPS and a computer motherboard (noPb)) to solder various components with 4 soldering irons: -Quick 203h -CT-96 -Usb 8w 5V -EPSN-40/220
Please watch the video for details. I'll get straight to the results!
●Quick 203h solders at 370C worse than ST-96, but better than the other 3 tested. Very long heating of massive parts. Without problems, you can only work with SMD, small conductors, and boards with lead-containing solders. (or dilute the solder). ●ST-96 copes poorly with all tasks (including desoldering transistors of the processor power supply circuits and capacitors from the same place). If you turn it up to maximum. The question is how long the tip and the heater will last. ●Usb 8w 5V takes only SMD components. I'm not capable of anything else. I didn’t unsolder anything from the UPS board! Well, maybe you can solder some wires that aren’t too thick somewhere in a children’s toy. Toy soldering iron. ●EPSN-40/220 cannot cope with soldering capacitors from motherboards (it would be worth having 60 W for this). Otherwise, an excellent soldering iron if used with lead-containing solders. I unsoldered the UPS board, which was required. If you buy it, buy it with a wooden handle. Very reliable thing.
CONCLUSIONS:
You shouldn’t buy from the sales I mentioned above (via the link “
go to the store ○With the default sting it shows very disastrous results for this price. ○If you have something like the ST-96, you probably shouldn’t bother with it. The overpayment does not correspond to the additional benefits. ○You definitely need to buy additional tips (original Hakko or Quick), and this increases the already considerable price.
Here I bought an additional soldering iron: ebay.com/itm/141811643244 (eBay item number: 141811643244)
Soldering iron photo
If I buy an additional tip and it radically changes my understanding of this soldering iron, I’ll correct the review! Thank you for attention!!!
Design
The induction soldering station consists of the following components:
- electronic unit with step-down transformer and generator
- a heating sensor that connects to the device using a long flexible cable and a special connector.
- The working part of such a device is a tip, in which copper wire is wound around a socket where the shank is inserted.
You might be interested Features of press jaws
Device structure
Design and principle of operation
Soldering station - operating principle and types
The induction soldering station consists of the following elements:
- Electronic unit with step-down transformer and generator;
- A soldering iron with an inductor heater connected to the block using a long flexible cable and a special connector.
The working part of such equipment is a soldering iron with an inductor installed inside it - a coil of copper wire wound around a socket into which the shank of a replaceable tip with ferromagnetic coating is inserted.
The design of the heating element of an induction station for soldering
The process of heating the tip with an inductor occurs as follows:
- The generator supplies a high-frequency current with a voltage of 36 Volts through the power cable to the inductor coil;
- The current passing through the turns of the inductor generates an alternating magnetic field, the lines of force of which intersect the tip shank located inside the inductor with ferromagnetic coating on the surface;
- The magnetic field, when interacting with the ferromagnetic coating on the tip shank, leads to its magnetization reversal and the formation of eddy currents. This process is accompanied by the release of a large amount of heat and very rapid heating of the shank, the trace and the entire tip to a high temperature.
The current (its frequency, and therefore the temperature of the tip) is adjusted using adjusting encoders on the electronic unit.
How does it work
The main difference between an induction soldering iron and a conventional soldering iron is whether there is a heating element or no heating element at all. The tool heats up due to the presence of eddy currents under the influence of an alternating magnetic field.
An induction soldering iron has a coil into which the rod of the device is inserted.
The process of heating the inductor is as follows:
- The generator supplies 36V high frequency current to the inductor via the power line.
- The current flowing through the inductor turns into an alternating magnetic field, the line of force of which intersects the axis of the tip located inside the inductor.
- The magnetic field that interacts with the ferromagnetic spray on the tip causes its magnetization to rotate and form a vortex electric field. This process is accompanied by a large release of heat and very rapid heating of the shank, after which the entire surface is at a high temperature.
- Current regulation (the frequency of which determines the temperature of the tip) is carried out using an adjustment sensor on the electronic unit. An induction soldering station uses two methods to control the heating temperature of the soldering iron: using a temperature sensor built into the soldering iron tip and replaceable cartridges. In the first method, the thermocouple in the head of the soldering iron sends a signal to the electronic unit, and the electronic unit adjusts the temperature in accordance with the received data. For the second adjustment method, it is necessary to have additional replaceable tips.
Important! Not all models come with replacement tips. Therefore, you should take care in advance to purchase them if necessary.
Operating principle
Heating control principle
You can control the heating process in two ways:
- By installing a temperature sensor on the tip and connecting it to the digital control unit. This method of temperature stabilization is used in almost all inexpensive induction soldering stations, for example: Quick 203H or Yihua 900H (shown in Figure 2).
Digital station Yihua 900H - By changing the composition of the ferromagnetic alloy covering the tip. This principle is based on the fact that at a certain temperature (Curie point), ferromagnets lose their properties, as a result of which the soldering iron stops heating. This method of temperature stabilization was patented by Metcal under the name SmartHeat®, which literally translates as “smart heating”. Used in Metcal, OKI, ERSA, Weller, etc. models.
Figure 3. Model PS 900, can be used for both lead-free and conventional soldering
Each of the methods presented above has its own advantages and disadvantages. Stations with a temperature sensor are significantly cheaper, which makes them accessible not only to professionals, but also to amateurs. The accuracy and reliability of such equipment directly depend on the digital control unit.
The second method of temperature stabilization is carried out by installing cartridge tips with a certain Curie point - it is more reliable. But SmartHeat® stations have two significant drawbacks:
- High cost; not every professional can afford to buy such equipment. But the new generation of budget models is more affordable.
- When changing the soldering mode, it is necessary to install the appropriate cartridge-tip, which, as a rule, is not included in the package and is not cheap.
Cartridge tips
DIY induction soldering station
Making an induction soldering iron with your own hands is not particularly difficult or expensive. But it has several disadvantages. Firstly, the power and efficiency of this device will be low. Secondly, the device will not have a large number of additional functions and adjustments, as it might have been with the factory version. Therefore, the most acceptable option is to buy a cheap Chinese analogue.
Copper rod
If you still want to make a soldering iron yourself, then you need to follow this algorithm:
- select a suitable tube that will serve as the housing.
- install a metal tube of smaller diameter into it. An improvised reel will be wound on it.
You may be interested in Description of the DT9205A multimeter
Rod and body
- Make approximately 12 turns using copper wire with a diameter of about 1 mm.
Important: The turns should not touch.
- the rod and coil are covered with a layer of insulation.
- A copper rod is built into the tube, which will serve as a sting.
- Any transformer that reduces the voltage is used for power supply.
Homemade soldering iron option
DIY assembly
The question of whether it is possible to make an induction soldering iron with your own hands is mainly theoretical. From a practical point of view, this is unjustified even from a purely price point of view.
It’s just that any Chinese soldering station will cost the same as a DIY one. And the conversation about a homemade design will mainly concern the control unit. Why do you need to buy an induction soldering iron?
As for the actual manufacture of the tool itself, it can be made from scrap materials. True, such an induction soldering iron will be low-power.
You will need a 5-10 Ohm resistor, copper wire and a ferrite bead to make the coil, as well as wires to supply electric current.
First of all, use a multimeter to check the resistance of the resistor. Then remove the cover from one side. Now you need steel wire.
For example, you can use a paper clip for this. It is unrolled and one end is tinned. The other end is wrapped around the resistor in the place where the cover was removed.
Next, you need a piece of PCB, which is also tinned on both sides. Its size is selected so that it fits freely into the future reel body. Now the textolite plate is soldered to a wire from a paper clip and a wire from a resistor.
Next, a coil is assembled - a copper wire is wound onto a bead, and wires with a plug are connected to the ends of the bead. A tinned textolite plate is inserted into the prepared coil. All connections are soldered.
All that remains is to wrap electrical tape around the coil, insert a thick copper wire into the open resistor, and insert the coil itself into the prepared housing. For example, it could be an aluminum tube.
Please note that the copper wire must fit into the resistor with interference so that the tip of the induction soldering iron does not move in its body.
And the last thing is to wrap the entire body of the device with insulating tape. Here is a simple diagram for assembling a homemade induction soldering iron. Of course, they cannot solder large workpieces, but for a small microcircuit it is just right.
How to use
When soldering various small radio components, according to the requirements of regulatory documents and recommendations of manufacturers of electronic components, the temperature at the tip of the working surface should not exceed 2700C. When using new device models, this parameter can be set using the adjustment knob on the electronic unit of the device. The correctness of this setting is checked by touching the tip of the device with the tip of a thermocouple connected to the multimeter. The main criteria for choosing such welding equipment are:
- power - the most convenient and practical model of a soldering station, the power of which can be adjusted from 5 to 60 W.
- frequency of the current in the inductor - for radio amateurs and semi-professionals, a current with a frequency of 400 to 700 kHz will be sufficient. Models used by professionals and workers have frequencies up to 13.5 MHz.
- Heat Control Types - Most modern devices can use smart heating technology to adjust the heating temperature of the tip.
- number of independent channels - for the ability to connect hot tweezers to a soldering iron. The device must also be equipped with 2 independent channels.
- size and weight - for ease of operation and carrying, the device should be small in size and weight (no more than 1 kg)
- When choosing, you also need to take into account the warranty period, the possibility of repair and the presence of additional components that make the soldering process more convenient.
An induction soldering iron is an effective tool for soldering. Making such a device with your own hands is not entirely advisable. It is much easier to buy a cheap Chinese analogue, which will last longer and have a large number of settings and additional functions.
Choosing the right model
The main criterion when choosing the required model can only be the scope of application of the soldering station. If you intend to use it in production or for professional purposes, then it is recommended to choose devices with “smart heating” , although they cost more than 1 thousand.
For amateurs, it is preferable to use systems with a digital keypad. They are quite enough for high-quality and convenient work. True, such options will not have a hairdryer, but you can buy it separately. This option is also convenient because there is no need to select a tip with a given Curie point each time, and this greatly simplifies the work.