Lighting is necessary exclusively in the dark, and with the onset of dusk you have to turn on the lantern at the porch or the lamps in the store window. But why do it manually when there are automatic devices, right?
Street sensors are sensitive to the level of natural light: they turn on independently when it gets dark and turn off when the first rays of the sun appear. There is no need to control the operation of the photo relay.
We propose to consider modern models and find out which light sensor for turning on street lights meets our purely individual requirements. The rating included popular devices that have a high sales percentage and received many positive reviews.
What it is
The essence of the operation of such a sensor is to turn on the light when it gets dark outside and turn it off when it gets brighter. The principle of operation is the properties of electrical elements to change characteristics under the influence of solar radiation.
Most often, a semiconductor photocell or photoresistor is used as a basis. When the illumination decreases, the resistance of these elements changes and, at the required value, closes the relay contacts. The latter supplies power to the lamp. In the morning, when there is enough light, it turns off in a similar way.
Design features
There are several types of sensors, which are divided according to their purpose. The sensor can function normally only if it is selected correctly. Therefore, it is worth paying attention to the types of devices:
- Relay on a microcontroller with a photocell and other additions.
- With photodiode in housing for outdoor use. Most often, such sensors are protected from external factors.
- With remote photocell. Allows it to be placed separately, maximum range 150 m.
- With adjustable response threshold.
Sensors from the budget price range make it possible to automate lighting at a basic level. But to keep the light on until the morning, some manufacturers offer devices with more advanced capabilities. The following varieties are distinguished:
- A device with a motion sensor. The light turns on only if you start moving in a given area at night. The device is low cost, compact, and reliable. But if pets or plant branches come into its range of vision, then there is a high probability that it will turn on when it is not needed.
- With motion sensor and timer. It is configured so that it fires at the right time.
- Relay with timer. Turns off the device when lighting is not needed, for example, late at night.
- Programmable relay. Expensive types of devices are significantly superior to others in terms of functionality. They set the on/off switch depending on many factors, including the day of the week.
For a small budget, it is recommended to focus on a device with a timer and a movement sensor. In this case it is considered optimal.
Direct connection diagram
A three-wire circuit is used to connect the light sensor. It means that you need to supply the device with full 220V (phase + zero), and not just phase.
Almost the same scheme is used for motion sensors. True, there are options for a two-wire connection without a zero.
Where to connect the phase and where to connect the zero? In this matter, you can be guided by colors.
Usually one of the wires should be blue or green - this is zero.
The other two conductors also differ in color. For example, one will be brown (black), the other will be red.
Brown is the input phase from the power supply. The third wire (red) is the output to the load. The phase appears on it only at the moment the photo relay is activated.
It just needs to be brought into the lamp.
The factory wires on the sensor are short, so they have to be lengthened. Prepare terminals or sleeves for pressing in advance.
The extension is made using a cable with a cross-section of 1.5 mm2. The general connection of all conductors must be carried out in a protective junction box.
This is what such a connection diagram will look like directly from the switch located in the switchboard.
Areas of application
Light-sensitive sensors are quite in demand. They are mainly used for lighting:
- areas around the house;
- paths in the yard;
- street stairs;
- gazebos with barbecue facilities and terraces;
- gates and parts of the street near them (the lights turn on when someone comes).
In organizations, light sensors are installed when necessary to illuminate the entrances of houses, shopping centers, various areas of high-rise buildings, and illuminate advertising stands. The purpose of such an event is to save energy and extend the life of lamps and consumables.
Connection diagram via switch
If you want to install another intermediate single-key switch, so as not to run to the switchboard every time to turn off the light, then the connection diagram of the photo relay wires will change slightly:
There will be 4 cables going into the junction box. The power phase will be supplied through the following chain:
- machine in the switchboard
- light switch
- light sensor
- flashlight
Important Features
When purchasing, the following parameters are considered fundamental:
- Voltage (measured in volts). Devices are available with supply voltages of 12, 24, 220 V. It is recommended to choose the latter type, since they can be connected to the home network. For the rest you will have to buy special power supplies.
- Switching current. If it is selected incorrectly, the operating life of the sensor will be reduced. Therefore, you need to decide on the number and type of lamps before purchasing a sensor. To obtain the most permissible switching current, you should sum up the power consumption of the light bulb and divide by the voltage. It is necessary that the nominal value be higher.
- Switching threshold (measured in lumens). Increasing this indicator makes the sensor more sensitive. A slightly sensitive sensor turns on the lighting very early, a very sensitive sensor does not allow it to turn on when there is snow outside. Different models do not have the same range of settings for this parameter.
- Response delay (in seconds). The range is one of the basic characteristics and is indicated in the instructions. It is optimal to set a delay of 5-7 seconds so that the lighting does not turn on at any rustle.
- Power (measured in watts). With a low value, the device will be more economical. Usually two types of power are indicated: how much the device consumes while the lamp is operating, and in standby mode.
Degree of protection. The sensors are mounted outdoors, so the housing must be dust and moisture resistant and not deteriorate under the influence of ultraviolet radiation. Resistance must be at least ip44. This figure may be lower if the sensor is in a housing that is protected from moisture.
You should also consider the temperature limits at which the sensor can operate, especially if it is installed in a region with severe winters.
Operating principle and installation
The sensor functions quite simply, it can be easily installed and used, provided you follow the instructions and have a minimum set of electrician skills.
How does it work
The sensor is based on a photo relay. It reacts to the brightness of natural or art light. When dusk sets in, the photosensor turns on the relay, causing the lamps to start working.
If the sun begins to shine stronger, the photo relay breaks the circuit and turns off the lamp. Thus, the relay controls the lighting device connected to it, which significantly reduces energy consumption.
There are several varieties of such sensors, but they have approximately the same operating principle.
Selecting a location
If the sensor is connected incorrectly, you will almost certainly not expect adequate operation. Therefore the location is selected:
- far from large buildings and objects;
- in an area of exclusively natural light;
- away from flammable substances;
- outside areas that are subject to mechanical or chemical irritants.
Connection diagram
Usually the control device is mounted near the lamp; the model instructions have its own connection diagram. The latter must be studied before installation.
Installation does not require special skills; it is enough to calculate the current so that the lamps do not cause an overload of the line. However, the photo sensor is selected taking into account the number of lamps and their power. It must not exceed the maximum possible, otherwise the device will quickly fail.
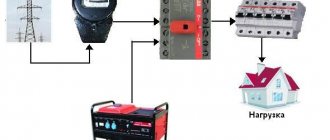
During installation, it is necessary to take into account some standards:
- It is recommended to connect the switch and lamps to a separate line from the electric meter with an automatic machine.
- Do not install the sensor upside down. The light of the sun falls on it from above, and a lamp is located below.
- The device must not be installed near flammable materials.
- If there are several lamps, then it is important to install a starter.
How to set it up correctly
After installation, the sensor is configured. A rotary switch is provided at the bottom for engraving the operating limit. A little higher on the body there is an arrow that indicates which direction to turn to adjust the sensitivity.
First of all, the sensitivity is set to minimum. To do this, unscrew the handle to its extreme position, according to the instructions. In the evening, when it is dark enough to turn on the lights, you can start setting up. Slowly turn the regulator until it turns on and leave it there. This is enough, you can install the device.
Conclusions and useful video on the topic
Clear, detailed and accessible information about the design and connection of sensors:
As you already understood from the rating and a brief overview of the characteristics, outdoor twilight sensors may differ in both appearance and technical nuances. The quality of devices can to some extent be judged by their cost: expensive ones are usually more reliable and last much longer.
An inexpensive “smart” device will help you make your home or garden area more comfortable, and it will automatically turn off when morning comes, that is, save energy.
We have selected five popular models, but in fact there are a huge number of them. If you have another device installed, write in the comments: why is it better or worse, what should you take into account when installing and connecting? Which manufacturers do you prefer and why? We are waiting for useful recommendations!
Installation and connection features
Mostly on the device there is a diagram with color coding of the wires that are used to connect it. Most likely used: brown for the phase from the shield, blue for zero, red or black for the lamp.
It is enough to strip the ends of the cables and connect them in accordance with the proposed diagram. With two contacts, only the phase is connected.
When connecting a lamp using a starter, it is connected to a photosensor instead of a light bulb. The relay then closes the starter, which minimizes the current passing through the sensor. Therefore, you can purchase a cheaper and more powerful soap device.
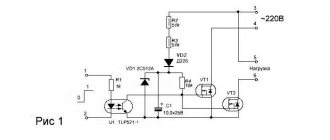
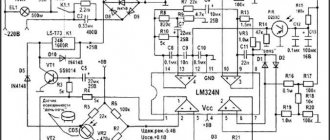
How to make it yourself
If you have the skills to use a soldering iron, you can make such a sensor yourself. To get started, you can use a simple diagram.
Designation:
- PR1 - photoresistor;
- R1 - 10 kOhm variable resistor;
- vd1-protective electrical diode;
- vt1,2 - npn transistors;
- K1 - 10 millifarad capacitor;
- k11 - switch.
In the diagram, the transistors are connected as an emitter follower, which amplifies the signal enough to drive the relay. The diode prevents reverse current flow.
You can connect the legs of radio components in a certain order or make a printed circuit board. To ensure the functionality of the device, test it with one lamp. The resistor adjusts the sensitivity. After calibrating it, you can solder a permanent one, which will be more reliable.
Astro timer
An astronomical timer is another way to control the lighting in your yard. The operating principle is not the same as that of a photosensitive relay. But the result is similar - turning on/off the light.
The device contains data about sunset/sunrise in each region. Location data, date, time are entered into the device and the device starts working according to the built-in program. Its advantages are as follows:
- there is no dependence on the weather, when it is cloudy outside the photo relay can often trigger falsely;
- The installation location is not important.
- It is permissible to postpone the start time by several hours.
The downside is the significant cost.
Choosing a Suitable Place to Set the Light Timer
When installing the sensor, it is necessary to take into account the light from the windows, which can also change the reaction of the photo relay to the proposed environment.
For uninterrupted and correct operation of the photo sensor, you need to choose the right place for its installation. The following factors are taken into account:
- The device must be exposed to sunlight. The structure should be in the open air or canopy, but not at the very top.
- Lamps, lanterns and windows should be located as far away as possible, as they can cause frequent false alarms.
- It is not recommended that the day-night sensor be regularly exposed to light from car headlights.
- Do not mount the sensors too high. This will cause difficulties in maintenance and preventive measures.
There are common cases when sensors are installed directly on poles, but this is not always practical or convenient. It is preferable to attach it to the wall of the house and run the power cable.