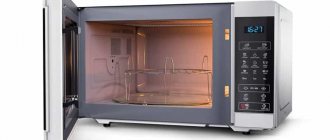
The most progressive development in the field of kitchen stoves can be considered a unit with an induction hob. This technology attracts buyers because it does not require the use of gas, as well as its novelty. But, despite high technology, malfunctions with induction cookers occur no less often than with other household appliances.
Operating principle of an induction cooker
An induction heating plate operates on a fairly simple principle of generating eddy currents in a magnetically and electrically conductive material. We are talking, first of all, about metals and their alloys with certain physical characteristics. In order for the induction heating element to work properly, the following conditions must be met.
- Use dishes made of special materials. Most often it is steel. It is this material that not only has good ferrimagnetic characteristics, but also the ability to generate eddy currents and actively absorb the energy generated during their passage.
- The heater power control system must ensure the creation of an alternating magnetic field. It is this that generates eddy currents in the cookware material. The field frequency ranges from 20 to 60 Hz and must be stable.
- The magnetic field of an induction heater is quite highly localized. This means that the item being heated must be placed as close as possible to achieve maximum efficiency of the process.
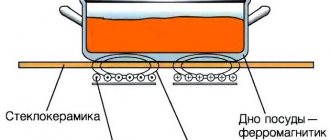
If we consider the induction cooker and the cookware installed on it from the point of view of physical processes, this system is a transformer. In this case, the heater coil acts as the primary winding. The magnetic field it generates causes eddy currents to appear in the dishes. It is the bottom of this object that acts as the secondary winding. There is no removal of electrical energy from it, so all of it is converted into heat. As a result, the pot or pan heats up.
Important! For normal and efficient operation of the induction panel, it is necessary that the area of the coil be as close as possible to that of the object installed on it. In this case, the energy is transferred almost completely.
If this condition is not met, the following unpleasant things happen:
- eddy currents do not form above an empty place on the stove that is not covered with dishes;
- the coil generated by energy in uncovered, empty places is not disposed of;
- As a result of incomplete energy removal, the coil overheats.
To neutralize this phenomenon, cooling radiators are installed in each induction panel. If they fail, the coil will have to be replaced. And in the most difficult cases, the output stages of the high-frequency power generation circuit will also require repairs.
Removing the heating elements
In most cases, repairing an electric hob involves replacing faulty heating elements. It will not be difficult to purchase such a spare part in a store, especially if the part in the surface of a well-known brand is changed.
For example, repairing an Ariston hob can be done without even visiting a service center in person. A new heating element can be ordered in the online store, and the purchase will be delivered to your door by a transport company.
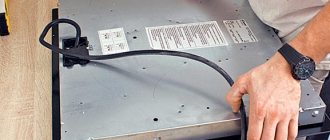
The heating element can be accessed after the bottom cover of the surface is removed. This can be done using a slotted or Phillips screwdriver.
The location of fasteners differs significantly depending on the model. For example, repair of an Electrolux hob is carried out after dismantling the cover, which is held on by screws located at the corners of the product.
If an electric stove is being repaired, in which heating is carried out due to installed heating elements, then the malfunction of such an element can be determined using a multimeter. To do this, just switch the device to resistance measurement mode, and then connect the probes to the leads of the heating element.
A burnt-out element will have an “infinity” resistance, so further repairs of the electric hob must be carried out with the obligatory removal of the faulty part. As a rule, such elements are held on 3 or 4 clamps, which are a bracket that presses the heater as a result of tightening the threaded connection.
Repairing an Electrolux hob may differ significantly, but the principle of restoring such a hob remains the same. That is, you will need to remove the old heating element to install a new element in its place.
Error codes
Modern induction cookers are equipped with information displays and self-diagnosis systems. If some problems are detected, the device itself will inform the user about what happened. Error codes for some manufacturers' slabs look like this:
| Manufacturer | Coil overheating | Overheating of the internal elements of the device | Incorrect supply voltage |
| Gorenye | F15 | F85 | F16 |
| Oursonn | E0, E10, EA, E3 | E6, E3 | E7 (E:07), E8 (E:08) |
| Electrolx | E4 | E1 | E5 |
| Miele | E | EF35 | ER |
| Bosch | E-22 | E-25 | ER-26 |
For users with repair skills and a sufficient level of knowledge, the error code will show exactly where to look for the problem. For others, this is an indication that they need to seek qualified help.
Disassembling the stove and diagnosing faults
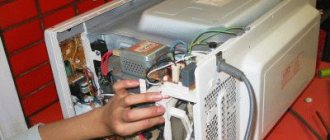
If simple checks in the form of testing the supply voltage and examining possible places where contacts have broken have been passed and have not yielded results, there is only one thing left. The stove needs to be disassembled for a complete repair. It is recommended to do this only if you have appropriate knowledge in the field of electrical circuits.
Advice! Disassembly is done carefully and carefully. It is recommended to take a photo after each stage to make it easier to assemble the slab.
After removing the top decorative panel, the user will see the coils adjacent to it and their cooling system. At this stage you need to look around carefully. The locations of possible problems will be indicated by soot, changes in the color of the windings or individual components of the electrical circuit. Traces of melting are also important. It is from the points where such shortcomings are discovered that further research must begin.
If visually everything is in order, you will have to check everything without exception. Here it would be a good idea to have a schematic diagram of your stove on hand. It can usually be downloaded from the manufacturer’s website or found on thematic forums.
A typical check scheme looks like this.
- Power circuits are being examined. This is a fuse block; if they are found to be broken, they are replaced. Cables and wires are tested to ensure their integrity.
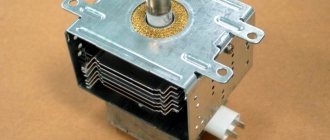
- The coils are inspected. Their spirals must have a uniform winding structure, without damaged conductors or traces of carbon deposits on the varnish.
- Temperature sensors are tested. This is done with a multimeter. When heated, the element changes conductivity. Therefore, a local heat source, such as a soldering iron, will come in handy.
- The connections from the coils to the high-frequency generator are being examined. Cables are connected, contact groups are inspected.
- In conditions of limited space inside the stove, the control board is subject to heating. It needs to be examined for possible cracks. Be sure to check the paths. If there are cracks on them, including due to corrosion processes after damage to the protective coating, they are eliminated.
- The non-functional burner is removed. It is removed together with the generator module. The board is being inspected. Parts that have failed are usually immediately visible by changes in the color of the housing or contact groups. This is where the schematic diagram of the stove comes in handy. Often it is simply impossible to read the markings on small parts due to the body being burned. They will learn what exactly to install from the circuit diagram.
Professional help from Remontano
Remontano employees know first-hand all the shortcomings and defects of household appliances. Daily received applications and positive feedback from clients show the result of the productive work of the entire team of the company.
Our services are used by individuals, individual entrepreneurs and large companies. Increased attention is paid to the quality of service. Equipment repairs are carried out at home at a time convenient for clients. The hours for the master’s visit are discussed in advance.
You can order repairs of induction equipment via or on the website. The center’s specialists are ready to repair any model of stove, regardless of the year of manufacture and type of assembly. We are waiting for your calls from 7:00 to 23:00 seven days a week!
Insufficient heating power
This malfunction of the stove can be caused by the incorrect placement of the pan on the stove: not in the center of the burner, but on the side, or the fact that the cookware itself is smaller in diameter than the cooking area itself. If everything is in order with the diameter of the cookware, then you should check the fit of the induction burner to the glass-ceramic panel. If it is not in tight contact with the panel, achieve a good fit using special pressing springs.
When the indicator flashes between the set power indicator and the reduced value, we can say that the control unit has automatically reduced the power of the cooking area due to overheating of the induction coil. In such a situation, the condition of the coil is checked.
Taking care of every user
By purchasing SMEG combination boards from the Portofino and Victoria design collections, the user receives a truly premium product. The models are made in a variety of colors and are equipped with the latest technology. The user has access to 5 induction heating zones of varying power, which are equipped with a Booster function, which allows you to temporarily increase the power by almost doubling. This innovation allows you to start cooking almost instantly. In addition to the Booster function, the user has access to the functions of protective shutdown during heating, as well as automatic detection of the diameter of the cookware.
One of the burners is not working
At the very beginning, turning on the panel, the desired burner is selected using sensors. Only after selecting it can you set the power level. If the correct sequence has been followed, but it does not turn on, check what the cookware is made of. It must be either metal or cast iron, that is, it must have the property of being magnetized. Aluminum and copper cookware are not suitable for induction cookers. It is also impossible to cook on such a hob in glass containers.
If the cookware meets the required standards, but the problem remains, it is necessary to run test programs to check the burner temperature sensor. If it fails, it must be replaced. If the sensor is working properly, the tightness of the induction module to the glass-ceramic panel is checked. If necessary, the fit is adjusted using pressure springs.
How to repair?
To repair an induction cooker yourself, you must immediately prepare diagnostic tools, a soldering iron and soldering devices. As a rule, the cause is either improper operation, a manufacturing defect, or liquid getting inside the housing.
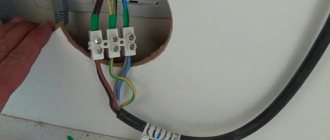
If the stove does not turn on, the culprit may be a faulty power cord or a problem with the plug. Repair in these situations is carried out as follows: the stove is disassembled, the wire is cut at the entrance to the household appliance, after which the copper strands are stripped. Having assessed the condition of the conductor using a multimeter, it is necessary to remove that part of the wiring that is still in the housing. Finally, the power cord is installed and the pair of main conductors is correctly connected to the grounding conductor. The plug is also cut off and replaced with a collapsible three-pin product.
When the cause of the breakdown is a damaged fuse, it will be enough to disassemble the device, replace the failed part and return the induction system to its original state. To return the control module or touch panel to operation, you will also have to purchase a working element and replace it. Loose pressure springs are even easier to repair - they just need to be tightened to the level required, according to the instructions.
A break in the wires connecting the coil and the electrical network can be eliminated if their ends are professionally soldered. It will be enough to replace a burnt out coil with a new one, but it is better to entrust this process to a specialist.
It is also worth mentioning that if used incorrectly, cracks may appear on the glass-ceramic surface. In this case, independent repair is impossible, so the only solution is to replace the glass by professionals.
In general, basic equipment repairs are easier to carry out using a specific algorithm. First, the electrical wire is inspected for kinks, breaks and abrasions. If they are present, the cable is simply replaced with a new one. If the wire is in order, then the hob is dismantled. After unscrewing the mounting strips, you will have to lift the panel and disconnect the wires, after which it can be finally removed. A multimeter is used to evaluate the condition of the fuses and transformer. If necessary, parts are replaced with new ones. Next, all the wires are checked - first visually, and then again with a multimeter. Torn or damaged components are replaced with new ones.
Experts recommend contacting a workshop if serious malfunctions of the control unit are identified.
Alternatively, it could be faulty electronic components, microcracks on the printed circuit board, or problems with the fan. Without sufficient skills, you should contact a specialist who can cope with the task.
From the video below you will learn a lot of information about the structure of the stove and its repair.
The left pair of burners does not work
To find the reason why the block of hobs located on the left does not turn on, you need to check all the connections going from the coils to the control unit and to the power board. If you find that there are no connection problems, then you need to replace the control unit. If there are no positive results, the burner block must be replaced.
Error codes on the display can signal bad contacts in the wiring between the modules of the unit. In this case, the code “E8” appears.
The right pair of burners does not work
When looking for a malfunction in a Bosch induction hob or the same stove from another company, you should check the contacts located in the terminal box, as well as the condition of the coil block fuse. If a fuse blows, it must be replaced with a new one with the same marking. If there are no changes in a positive direction, check as described above for the left pair of cooking stations.
Also, the error code “E6” may appear on the LCD display. This error means that the induction hob is faulty. It is recommended to unplug the unit for 30 seconds and then turn it on again. If error codes reappear, the control panel will need to be replaced.
Types of breakdowns and ways to fix them
Due to the high reliability of electronic components, control elements rarely fail. Most often, the consumer encounters minor minor faults, which are represented by the following list:
- insufficient heating power;
- one of the burners does not turn on;
- a couple of burners do not work;
- the stove does not turn on or turns off by itself;
- the panel hums during operation, etc.
These malfunctions can sometimes occur due to improper operation of the electric stove.
Incorrect operation
Insufficient heating power of the burners can occur when the cookware is placed incorrectly on the hob, or when its diameter is less than 70% of the heating zone. The problem can also be caused by a loose fit of the bottom of the pan (frying pan or kettle) to the surface of the stove.
One or more burners do not heat due to incorrect activation sequence. According to the operating instructions, to turn on the panel, you first need to select the desired burner using sensors, and then set the required power level. In addition, cookware placed on the heating element must have ferromagnetic properties.
An induction surface or stove may make noise when the heater power is set too high, if the cookware is installed with a thin bottom or vice versa - made of several layers of metal, as well as due to the small dimensions of the kitchen utensils, which are placed on a large burner.
Heaters turn off spontaneously for the following reasons:
- if within 10 sec. from the moment of switching on, the user has not performed a single action on the control panel (selecting a cooking place, setting power, etc.);
- when the burners operate continuously for more than 2 hours;
- as a result of the operation of the timer on which the shutdown time was set.
Overheating of the hob can be caused by contamination or moisture.
Technical breakdowns
First you need to make sure that the occurrence of malfunctions is not the result of a gross user error that can be eliminated without resorting to repairs. And only then should you begin to search for the reasons that caused this or that malfunction. It must be remembered that before starting repairs of induction cookers and hobs, you need to unplug the power cord from the power outlet.
In many cases, malfunctions occur due to damage to the power cable. Therefore, any repair begins with checking its integrity. Initially, the condition of the cord should be checked visually, and then using a multimeter (tester). After making sure that the cable is in good condition, you can move on - check the functionality of the fuses and the condition of the contacts in the terminal boxes.
Identified defects must be eliminated (replace fuses, clean contacts, replace parts that are broken, etc.). And the decision to further continue independent repairs should be made only after launching a self-testing (self-diagnosis) program for the electric stove or hob.
Advice! When an error code appears on the control panel display indicating that the stove (hob) is out of order, experts recommend waiting for 30 seconds. Disconnect the product from the power supply and then connect it again. If the error code appears again, the fault message is true.
The stove does not turn on and there is no indication
First of all, you need to check the fuse, and then the mains switch. The next step is to check the connection between the control unit and the power board. Then between the control unit and the touch panel. If a failed module is detected, it must be replaced. If replacing the module does not help, the entire coil block is replaced.
Problems with the touch panel can be confirmed by the error code “E9” that appears on the LCD display of the device. Based on the list of error codes, it means that the touch control panel is faulty. It is recommended to disconnect the device from the network for 30 seconds. If the error reappears, the control panel changes.
Residual heat indicator does not work
You need to run a software test to check the temperature sensor. If it is working properly, the control unit is replaced. There are cases when the LCD display elements light up constantly or not all work. In the event of such a malfunction, the quality of the connections between the control unit and the touch panel is checked. You can try replacing the cable connecting the modules. If this does not help, the control unit must be replaced.
Cooling fan malfunction
The cooling fan may run continuously if you have set the heating power of the burners to maximum. It may also not turn off if the air temperature around it is more than 50°C. Otherwise, the malfunction may be caused by a faulty control unit that must be replaced.
In this case, the unit may also display error codes on the display. For a faulty fan, this will be error code “E7”.
The opposite situation also happens - the fan does not turn on. This behavior can be considered normal when the power level of the hob is minimal. It should turn on when the air temperature around it rises above 50°C. To check the fan, a test program is launched. If it shows that the mechanism is out of order, then it needs to be replaced.
Repair of internal panel wiring
If an electric stove is being repaired, then one of the common causes of breakdown is a break or burnout of the wire leading to the heater. This happens if the wire is not tightly screwed to the heating element.
In this case, it is enough to connect the burnt-out internal conductor connected to the heating element to fully restore the functionality of the hob. The charred insulation on the wire must be removed.
To do this job efficiently, it is recommended to completely replace the cable of wires that go from the switch or thermostat to the heating element. Repair of a built-in hob can also be carried out by replacing only one conductor.
In this case, you will need to select a conductor whose cross-section should be no smaller than the wire being replaced. Otherwise, such repairs will be temporary.
High power burner does not turn on
There are situations when you want to turn on the most powerful burner, with a maximum power of 3 kW, but nothing happens. This is considered normal if other cooking stations are working and the temperature near the induction coil unit exceeds 780 degrees. To prevent overheating of the unit when the most powerful burner is turned on, it is blocked. When the cooking zones have cooled down, the lock will be released and the coil will turn on. But, if the burner does not turn on, you will have to change the control unit.
The stove switches off automatically
An induction cooker can turn off automatically in the following cases:
- if you turned on the unit and did not perform any actions on the touch panel within 10 seconds, for example, did not select a cooking place, did not set the power, and so on;
- the burners operate for more than 2 hours;
- if the electronic timer was triggered, on which the time to turn off the stove was set.
In other cases, when the stove may turn off spontaneously, it is impossible to do without the help of a qualified specialist, since it will be necessary to replace the control unit or the entire induction coil unit.
The hob makes a humming sound when operating
An induction cooker can make various noises during operation, and they can occur for the following reasons:
- the device may hum if a pan with a thin bottom is placed on the cooking surface, or if the power is set to excessive;
- the stove often hums or whistles when placing a small saucepan on a large burner;
- vibrations can occur at the junction of different materials, when the bottom of the pan consists of several layers;
- The intensity of the noise depends on the amount of cookware on the hob.
If the sound signal is constantly sounding, it can be assumed that the reason that it does not turn off is in the control unit, which can only be repaired by replacing it with a new one.
Precautionary measures
In appliance hypermarkets, an induction cooker is presented as the safest and most reliable device for cooking. However, it is important to take precautions here too. Comfortable and uninterrupted operation of the device is guaranteed if a number of rules are observed:
- Install the device away from light sources and moisture.
- Place the device on a flat surface, preventing it from wobbling.
- Do not move the switched on stove with dishes.
- Clear space around the operating device.
- Make sure there are no foreign objects on the work surface (towels, rags, etc.).
- Avoid dropping various objects onto the panel.
- Disconnect the socket at the end of the cooking process.
The following guidelines will help maintain a safe kitchen environment and increase the life of your home helper.
Useful tips for the master
For faster repairs in conditions of inaccurate identification of the malfunction (and not only), we can give some useful tips. Firstly, the generators on the burners are designed as an independent module. They are being removed. By swapping generators (from one burner to another), you can quickly understand what is broken, the coil or its high-frequency voltage blog.
The second tip will sometimes help you save a lot on repairs. In slabs that are not cheap or are rarely found due to their lack of popularity on the market, the burnt part can be unique and very expensive. And its rarity further increases the cost of replacement. But it is not at all necessary to install the element indicated on the circuit diagram of the slab. There is a compliance database of electronic components. It can be easily found on the Internet by searching Datasheet or on thematic forums. In it you will find a more inexpensive or commercially available analogue of the part that is needed for replacement in an induction cooker.
If the cause of the breakdown has not been determined, or difficulties arise about how to purchase and install failed modules, then it is better to contact professionals to repair the induction cooker. You should also remember about warranty service, the right to which you may lose if you open the unit yourself. An induction cooker is a “smart” appliance and requires careful adherence to operating rules.
Rules
In order for the repair to take place in compliance with all norms and regulations, it is necessary to carefully prepare for it. The electric stove is disconnected from the electrical network. De-energizing induction equipment is necessary for work safety. Many tools may be required during inspection and subsequent repairs. You need to prepare them in advance. You will need:
- a set of screwdrivers of different diameters with the necessary attachments;
- insulating tape;
- multimeter for checking individual elements of the stove;
- indicator screwdriver, which is necessary to check the voltage.
Advice
During work, you must follow the operating instructions for the induction cooker model being repaired. Many parts are located by the manufacturer from different angles. To gain access to them, you need to be well versed in technology and have an idea of the design features.