The W1209 thermostat module is an electronic device for maintaining a set temperature with a certain accuracy. A very useful thermostat board for the construction of various temperature maintenance schemes (incubators, warm boxes, heated floors, greenhouses, etc.). It was purchased in a store to conduct experiments and gain experience with the intention of giving brains to an unsuccessfully purchased heater. But first, let's study it and refine it ourselves. The thing is inexpensive and provides freedom of action. Below is an overview of the W 1209 thermostat module, programming instructions are given, a diagram and an option for modifying the thermostat with your own hands are presented with photos and videos.
Choosing a programmable room thermostat for a gas boiler on Aliexpress
Why do you need a room thermostat?
Installing a room thermostat in the house and connecting it to a gas boiler solves two problems:
- Provides a comfortable air temperature in the house. Eliminates situations when you want to “turn up the heating” because the rooms are hot, or vice versa, “turn up the heat” because it’s cold.
- Significantly reduces gas consumption for heating , as it allows you to avoid “overheating” in the house - keeping many rooms at a lower temperature. A change in room temperature of just 1 °C leads to an increase or saving in the amount of gas for heating by approximately 4-5%.
In rarely visited areas of the house, it is beneficial to keep the temperature lower. Building regulations recommend maintaining the air temperature in different rooms of the house during the heating period in the range from +12 to +26 °C.
Standards for air temperature in residential areas of the house
In a private house or apartment, when setting up the heating system, it is recommended to focus on the indoor air temperature standards established by GOST 30494-2011. Interstate standard. Residential and public buildings. Indoor microclimate parameters":
| The name of a room | Temperature (оС), optimal / permissible |
| Living room | 20-22 / 18-24 |
| The same, but in areas where the outside air temperature of the coldest five-day period is -31 °C or lower | 21-23 / 20-24 |
| Kitchen, toilet | 19-21 / 18-26 |
| Bathroom, combined toilet | 24-26 / 18-26 |
| Staircase, lobby | 16-18 / 14-22 |
| Pantry | 16-18 / 12-22 |
A room regulator allows you to maintain a constant temperature in a heated room with high accuracy. With manual control, the range of temperature fluctuations is larger and deviations are more often towards higher temperatures. Every extra degree in the room leads to an increase in gas consumption for heating . In addition, using a thermostat, you can program an automatic decrease in the temperature in the house during certain periods (at night...).
In rich EU countries, the room temperature set at night usually does not exceed 16-17 degrees. This is evidenced by a report presented by the German thermostat manufacturer Tado for 2014.
Room thermostat saves energy
When the boiler operates without a room thermostat, the circulation pump runs constantly, consuming electricity. The circulation pump, controlled by a two-position room thermostat, operates intermittently, which saves energy and the life of the pump.
Methods for checking the health of the refrigerator temperature sensor
The first way is directly
Leave the thermostat inside the refrigerator. Finding the two wires that go into it, disconnect them carefully (so that later you can easily return them to their place) and connect them together. Be careful! The wires carry high voltage. All operations with wires should be done only with the engine turned off.
This method is good if the refrigerator does not turn on. It completely tests the thermostat, since all temperature restrictions are no longer relevant.
The second method is checking the bellows
This method allows you to check the regulator without removing and disassembling it. However, some basic knowledge of component design is required. Near the small axis on which the adjustment knob itself is attached, you should find a plate; you need to move it and click it.
If the plate is fixed “tightly” and cannot be moved (there are no clicks), then the regulator is out of order.
The third method is checking with a tester
To do this, you need to completely disconnect the refrigerator from the power supply, and then completely defrost it in accordance with the instructions. Of course, the contents will have to be removed.
After this, you need to turn on the device and move the thermostat knob to the position that will allow you to get the lowest possible temperature. If your refrigerator model has a freezing mode, it is recommended to use it.
To test the operation of the thermostat, you need to empty the refrigerator of all food, place a thermometer inside the chamber and check its readings after a few hours
In the refrigerator compartment, approximately in the middle, you need to place a thermometer designed to measure air temperature.
It is better to use a device that allows you to take measurements below zero. The refrigerator is left in this mode for about two hours. After this, you need to check the thermometer readings.
If the temperature in the refrigerator compartment has dropped to about six degrees by this time, there is no problem with the thermostat. But when the inside becomes noticeably warmer or colder than this level, the thermostat will have to be replaced.
The fourth method is visual inspection.
If, after defrosting, a so-called snow cap forms inside the chamber very quickly, the initial diagnosis of the health of the thermostat can be performed very simply.
The appearance of a snow coat in the refrigerator compartment almost always means that the thermostat is not working correctly; you need to diagnose its condition
To do this, when the compressor is operating, the adjustment knob begins to be turned in the direction of increasing the temperature inside the chamber.
If the relay is working properly, at a certain moment the sensors will record the desired temperature level, after which the compressor motor will turn off. If the engine continues to run, the thermostat needs to be changed.
After such diagnostics and if the thermal relay is working, it is recommended to remove all contents from the chamber and allow the device to run idle for about six hours. During this period, you need to pay attention to the duration of breaks in the operation of the compressor.
If it is about 40 minutes, everything is fine, you can use the refrigerator as usual.
When the compressor turns on too often or infrequently, you need to try to regulate this moment using the relay settings. If this fails, you will most likely have to install a new thermostat.
Video: how to check the thermostat (thermostat) on the refrigerator
How to check the thermostat (thermostat) on a refrigerator
Watch this video on YouTube
Which room thermostat should you choose?
We select a room thermostat based on the following basic and mandatory requirements for the thermostat:
- The boiler control principle is two-position with On/Off contacts. This thermostat is cheaper and fits any gas boiler.
- The temperature control algorithm is programmable , automatically changing the room temperature settings throughout the day, at least at night.
- Connection to the boiler is by wires. It's cheaper and easier. A gas boiler is installed in the kitchen of the house. Connecting a room thermostat to the boiler with wires does not cause problems, especially if it is done at the stage of finishing or repairing premises.
- With temperature control by hysteresis. The hysteresis value is no more than +/- 0.5 °C. Hysteresis is the amount of deviation of the thermostat response temperature for turning the boiler on and off from the set temperature. The room temperature will change by an amount greater than the hysteresis, approximately +/- 1 °C.
On-off thermostats for gas boilers have a relay output with “dry” contacts on which there is no electrical voltage . The power sources for such thermostats are usually galvanic batteries or accumulators.
Don't go wrong with your choice. Don't buy a powered thermostat. The relay contacts of such a thermostat will most likely be under mains voltage. They are intended for other purposes.
The thermostat relay contacts can be in one of two positions: closed or open. Connected to the boiler, closed thermostat contacts activate the boiler heating mode . When the contacts open, the heating mode is switched off. The boiler operates in cycles - on/off. There are no changes in the heating mode settings on the boiler itself.
Another important parameter to choose is the temperature control algorithm. Thermostats available:
- With temperature control by hysteresis (proportional control algorithm);
- With PI control (proportional - integral algorithm).
- With switching control algorithms. You can manually select the first or second.
Thermostats with PI control have advantages. They provide more accurate maintenance of indoor air temperature +/- 0.5 °C. The temperature of the heating water, and therefore the radiators, changes to a lesser extent during the regulation process.
Disadvantages of thermostats with PI regulation. More frequent switching on and off of boilers. The boiler, controlled by a thermostat with PI regulation, operates in cycles of 10 - 20 minutes. At the beginning of the cycle, the boiler turns on, after a few minutes of operation it turns off and waits for the next cycle to begin. Temperature regulation occurs by changing the duration of the boiler operation in the cycle.
The choice in favor of a room thermostat with hysteresis control was made due to their lower cost and availability on the AliExpress trading platform.
General information about the refrigerator temperature sensor
The thermostat is a mechanism with a lever and contacts. This is a small box with a handle. On one side it has a bellows tube, which is filled with refrigerant (freon), on the other there are contacts for connecting to the electrical circuit (from 2 to 6 pieces). The length of the sealed tube varies from 0.8 to 2.5 m. It is usually twisted into a spiral, which ensures a tight fit to the evaporator wall.
There are two types of thermostats:
- mechanical;
- electronic.
The electronic thermostat is an electronic plate on the display of which all data is displayed. This is the most advanced device; it records temperature changes with greater accuracy. But equipment with an electronic control module is expensive, so mechanical thermostats are more often used.
Reference. The mechanical thermostat can be replaced with an electronic one.
There are three main types of mechanical regulators on the market:
- Russian (Oryol plant) - TAM series;
- made in Denmark - Danfoss;
- Italian (Ranco company) - K-50, K-52, K-55, K-56, K-57, K-58, K-59.
They are used in refrigeration equipment "Minsk", "Orsk", Beko, Candy, Indesit, Bosch, Ardo, Samsung, etc.
The most common thermostats include:
- TAM-112, TAM-113 - used in single-chamber units, analogous to K-50;
- TAM-125 - installed in freezers of 2-chamber 2-compressor equipment, analogous to K-57;
- TAM-133 - used in refrigeration chambers of 2-chamber units, analogue of K-59, Danfoss 077B6;
- TAM-145 is a 3-pin freezer temperature controller with a defrost alarm (red light on the control panel).
And when the device stops functioning adequately, the signs may be the following:
- the motor runs continuously, the refrigeration unit does not turn off;
- a “snow coat” (deposits of ice and frost) is detected on the walls of the chamber, the injection is too active, the freon circulation is increased and the refrigerator freezes too much;
- It’s warm in the refrigerator compartment; the more items you load inside, the worse the space cools.
- after switching off, the motor does not start immediately (it holds the temperature for a long time and does not restart).
To correct the situation, you should turn off the device from the network and completely defrost it. The contents of the chambers should be removed, then turn on the refrigerator and switch the temperature regulator to full maximum (minimum temperature). You should place a thermometer inside the refrigerator (do not use liquid ones; electronic ones are best). If the thermostat is functioning, then as soon as the thermometer shows the readings you set, the refrigerator will turn off. If, after reaching the temperature, the motor continues to operate and cool the chambers, then the thermostat is faulty.
Under conditions of constant adjustments, the temperature inside the chamber is constantly changing, the rate of these changes depends on the level of sensitivity of the thermostat.
Temperature regulators for all refrigeration systems (including household appliances) are pressure gauge devices. They function due to changes in fill pressure. Pressure changes due to temperature differences. Some modern refrigerators contain an electronic thermostat - a much more advanced device that allows you to more accurately record temperature changes and turn the compressor relay off/on.
Thermostats are mechanisms containing a lever system and a set of contacts through which they are connected to the general electrical wiring of the device.
The temperature regulator is based on a so-called bellows - an element sensitive to temperature changes, which, with the help of a spring, acts on the general electrical circuit. Thus, when the temperature changes, the bellows transmits a signal to the spring, the spring to the lever, the lever to the main mechanism, and the mechanism to influence the overall electronic system. Of course, the regulator also contains a special gasket that acts as an insulator of the internal components of the thermostat from the external environment (primarily from humidity). Also, the regulator inside is filled with a special liquid (chloromethyl).
The most basic thing, and where you should start, is checking the thermostat. A sign of a malfunction or impending breakdown is excessive freezing of the refrigerator or, conversely, the device has stopped heating altogether. This means that the regulator “poorly understands” the temperature, i.e. it may work, but the range in which it detects temperature has changed. You set the refrigerator to 4 degrees, but it turns off at + 15? This means that the thermostat “thinks” that +15 is 4 degrees and therefore a false signal appears on the refrigerator.
Choosing a room thermostat on Aliexpress from China
At first glance, the AliExpress trading platform offers many models of room thermostats for a gas boiler. But, after careful study, you understand that most models are analogues under different brands.
I considered two options: a model with control buttons on the body and with touch buttons on the screen. The choice was made in favor of the buttons on the case. You won't have to use the buttons often. It's more convenient and cheaper.
Room thermostat from Aliexpress from China, model BGL02-5BB, is an electronic two-position programmable controller that allows you to adjust the temperature according to one weekly program with the possibility of combinations of six different time intervals.
The thermostat, model BGL02-5BB, supports the function of protecting the heating system from freezing when the room temperature drops to 5 °C.
The amount of hysteresis can be set in the settings. The minimum hysteresis value is +/- 0.5 °C.
The body of the device is made of high-quality plastic with a glossy surface. The printed circuit board looks neat, covered with protective transparent plastic on top.
The parcel was delivered by Chinese and Russian mail 18 days after payment for the order.
Cons, disadvantages of a thermostat with Aliexpress
There is no function for monitoring the discharge of the 1.5 V battery, AA 2 pcs. I didn’t pay attention to this when choosing the device. It's my own fault. Although the batteries last for more than a year of operation. I change them before the start of the heating season - no problem.
When you manipulate the buttons, the screen backlight turns on. If the screen is located above eye level, the image on the screen becomes difficult to see. Place the device on the wall as expected, at a height of 1.5 m. If you look at the illuminated screen from top to bottom, then everything is clearly visible.
The box with the thermostat contains one sheet of instructions in English. The instructions do not contain any indication of the model or brand of thermostat. The contents of the instructions in some points do not correspond to the thermostat model.
Complaints about the instructions not matching the device model are often found in customer reviews on AliExpress.
Household products
⇆
Setting heating by day and hour
Second, we need to configure activation by days of the week (including weekends), as well as by hour. Everything is simple here too. The settings are activated by pressing the “book” key (hold for five seconds).
Then we go to the main time interval settings, first goes for weekdays. The time also changes “up” “down”, selecting the “book” option, first the time goes, then the temperature. There's a whole cycle going on.
There are six settings in total:
You can also set the day of the weekend
Sorry if it’s a little unclear, be sure to watch the video at the end, everything is sorted out there.
Connecting a room thermostat to a Protherm gas boiler
The wires from the room thermostat - thermostat are connected to the terminal block marked as X17 (black in the figure on the left) in the 24 V compartment of the control panel of the Protherm Gepard (Panther) gas boiler.
The wires from the contacts of the on-off thermostat relay are connected on the block to the RT . The terminals will be shorted with a jumper wire that must be removed.
Terminal block for room thermostat from Aliexpress. The two-core wire from the gas boiler is connected to the terminals designated COM and NO. It does not matter which wire core is connected to which terminal.
Connecting a room thermostat to other models of gas boilers is done in the same way. You just need to find the location of the corresponding terminal block on the boiler.
Signs of a faulty refrigerator temperature sensor
The following ghosts indicate problems with the sensor.
The refrigerator works and does not turn off
In this case, the functionality of the thermostat is checked without removing it. To do this you need:
- Unplug the plug from the socket.
- Empty the chambers of food.
- Set the knob to the maximum cold position or start the fast freezing mode, if available.
- Place a thermometer on the middle shelf of the refrigerator (not the freezer!), preferably one that can measure sub-zero temperatures.
- Turn on the refrigerator with empty compartments.
- After a couple of hours, remove the thermometer. It should show 6 - 7C. If the readings are different, the thermostat will need to be replaced.
So that the check does not take a lot of time, you need to get to the thermal relay and move the plate located near the pin on which the handle is placed. If there are no clicks when it moves or it does not move, the thermostat is changing.
Refrigerator won't turn on
The cause of this malfunction may be not only the thermal relay, but also a burnt-out compressor motor or a breakdown of the start-protection relay. But before calling a technician, you should check that the thermostat is working properly. To do this, you need to remove the casing, having first disconnected the unit from the power supply, and understand the wires.
In older models, only a couple of wires fit to the thermal relay terminals. They are removed and connected to each other with a piece of wire or even a paper clip, bending it appropriately.
The wires were connected to each other and the compressor started working. This means the thermostat is faulty. And if the compressor does not start when it closes, it means the start-protection relay is faulty or the engine has burned out. Therefore, it is impossible to do without a master.
In modern units, 4 multi-colored wires are connected to the thermostat:
the wire from the compressor motor is orange, red or black;
- from the fork - brown;
- from the signal light - white, yellow or green;
- the ground wire is yellow with a green stripe.
You need to close the first 3 wires, and then as indicated above.
Professionals consider it more reliable to check with a multimeter, which can be done by a home craftsman. The thermostat will have to be removed. If the multimeter analog switch is set to the position of measuring low resistances, and the arrow with the probes closed is set to “0” with the wheel on the left side. On a digital device, the switch is set to “200”.
In order for the test to be carried out in conditions as close as possible to the workers, the end of the bellows tube is placed in water with ice for a couple of minutes. Then measure the resistance between the terminals. If the needle on an analog multimeter goes off scale, but “1” is displayed on a digital one, the thermostat is sent to the landfill.
The appearance of ice on the walls of the refrigerator
This phenomenon is also observed with other malfunctions, but the check should begin with the thermostat. To do this, you need to perform the actions indicated for a unit that does not turn off. When the thermometer readings are 5 - 7 C, the temperature setting knob is turned to the left until the compressor stops.
If the compressor stops, the thermostat is working properly. Otherwise it is changed. When turned off, the unit is left to work for 5 - 6 hours with empty shelves. At this time, the time between starting and stopping the unit is measured. During normal operation, the duration of the intervals is about 40 minutes. At lower values, turning the knob to the right adds cold. If this does not help, change the thermostat.
How does a gas boiler room thermostat work?
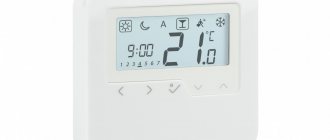
A protective film is visible on the thermostat display.
The current room temperature and the temperature set by the setting are displayed. Sun - work in a programmable mode in the “Sunday afternoon” interval. Snowflake - Frost protection function is enabled. At the bottom of the screen is the current time and day of the week - Sunday. installed in the room , with temperature control by hysteresis , measures the current air temperature and, if the temperature drops from the value set in the settings, turns the boiler on. For example, if the temperature is set to 22 °C in the thermostat setting, then the boiler will turn on, taking into account the hysteresis +/- 0.5 °C, when the air temperature drops to 21.5 °C. The heating water heated by the boiler will begin to flow into the radiators and heat them. The radiators, in turn, will heat the air in the room.
The problem is that the process of heat transfer from radiators to the room air is very slow. After turning on the boiler, the air temperature in the room, at the place where the thermostat is installed, will continue to decrease for some time, to 21 °C, and only after that will begin to increase. When the air temperature increases to 22.5 °C, the thermostat will turn off the boiler. But from the heated radiators, the air temperature in the room will continue to increase for some time, up to 23 ° C.
Due to the presence of a large time delay in the feedback loop, fluctuations in the air temperature in the room will be noticeably greater than the value of the thermostat hysteresis. Fluctuations in the air temperature in the room will be +/- 1 °C from the specified 22 °C.
Often the temperature of the heating water manages to increase to the maximum at which the boiler will disconnect from the boiler temperature sensor. Although the thermostat will still command the boiler to turn on.
Refrigerator temperature sensor location
The location of the regulator depends on the refrigerator model. Information about its structure and location is contained in the operating instructions for the household appliance. It is usually located next to the temperature control knob. In old household appliances, the thermostat is installed inside the chamber, under the light bulb, and covered with a protective housing. To remove the part, remove the handle by pulling it towards you. Then unscrew the screws and dismantle the housing.
In modern models, the thermostat is located outside, usually above the door. If it needs to be removed, first also remove the adjustment knob. Then unscrew the bolts and remove the panel with the light bulb, after which the regulator is removed.
Setting the boiler thermostat
Since the instructions for the thermostat purchased on Aliexpress are in English and do not correspond to the device, I had to find a video on setting up a room thermostat. The device in the video and its functions are exactly the same, although the model is called differently.
I recommend setting the hysteresis value in the settings , function dIF =0.5 .
Entering the service settings menu: with the device turned off, hold down the “down” button and press the “on” button. The designation of the first menu item, the dIF function, appears on the screen, and the numbers flashing, indicating its value. Using the “down” button we set a new value =0.5.
To save gas, I highly recommend setting the thermostat to weekly temperature programming.
The table shows the factory thermostat temperature settings for a weekly program with a combination of six different time periods. On working days: 1 - morning at home; 2 - went to work; 3 - came for lunch; 4 - left for work after lunch; 5 - came home from work, evening at home; 6 - night in a warm bed. Temperature and time can be changed in the settings at your discretion.
Taking into account the presence of pensioners in the house, I set the temperature in the program settings to 24 °C during the daytime, and 20 °C at night, on all days of the week. According to the control thermometer, the air temperature in the room where the thermostat is located is maintained with an accuracy of +/- 1 °C. Within 23-25 oC during the day, and 19-21 oC at night.
Previously, the gas boiler operated under the control of a room thermostat with PI control. Air temperature fluctuations were two times less.
Entering the programming settings menu: hold the “M” button until “LooP” appears on the screen.
Next, use the “up” and “down” buttons to select working days “1 2 3 4 5” or working days with Saturday “1 2 3 4 5 6” or all days of the week “1 2 3 4 5 6 7”. If not all days of the week are selected at this stage, then to select the remaining days of the week, press the “M” button repeatedly until the designations of the remaining days appear on the screen: “6 7” (if “1 2 3 4 5” were selected at the first stage ) or “7” (if “1 2 3 4 5 6” were selected at the first stage).
Then, using the “M” button, select the period of the day. In the selected period, the numbers indicating the temperature flash. Use the “up” and “down” buttons to set the temperature. Use the “clock”, “up”, “down” buttons to set the start time of the period. Use the “M” button to move to the next period.
Calibration of thermal relay W1209
What is remote control decoding
Thermal relay calibration is carried out in programming mode in menu item P4. For calibration you need to have a reference thermometer. Comparing the readings of the standard with the readings of the design, they are brought to the same values by manipulating the “+” or “-” buttons. After exiting the settings, W1209 automatically adjusts the measurement temperature over the entire range.
If you don’t have a thermometer, you can use the known values:
- Snow melting temperature – 0°C;
- The boiling point of water is 100°C.
Important! To reduce errors during the calibration process, it is necessary to use distilled water.
For domestic use, the error will be within acceptable limits when calibrated using boiled water instead of distilled water.
Setting up the heating system under the control of a room thermostat
On a gas boiler controlled by a two-position thermostat, the heating water temperature setting must be set to maximum. The same as it was installed in winter in the coldest weather (65 ° C).
It is advantageous to install a room thermostat that controls the operation of the boiler in the largest room of the house. Radiators in the room in which the thermostat is installed should not have automatic valves that regulate coolant flow.
In other rooms, I recommend installing a thermostatic valve on each radiator , which regulates the coolant flow through the radiator depending on the temperature in the room. This will avoid overheating and keep the air temperature in the house lower but comfortable.
Read more: How to reduce the high gas consumption of a boiler for heating a house.
More articles on this topic:
⇒ How to reduce the high gas consumption of a boiler for heating a house ⇒ Self-learning room thermostat for a gas boiler
More articles on this topic
- Choosing a foundation for a house on heaving soils
- Built-in dressing room in a house or apartment
- Installation of plastic windows at the dacha
- Installation of internal sewerage in a private house
- Reinforcement of masonry walls made of aerated concrete and gas silicate blocks
- Frost heaving of the soil at the base of the foundation of a private house
- Ventilation in a private house - natural or forced?
- Dew point, vapor barrier and ventilated wall gap
Optimal installation location
The thermostat is placed on the wall. You need to choose a place with easy access so that there are no difficulties when setting up and setting the temperature.
A number of rules that must be followed when determining the location for a heated floor thermostat:
If the thermostat is a built-in type, then you need to make a recess in the wall for it, where all the electrics will be placed. Make grooves for the wires from the socket to the floor.
The depth of the grooves should be equal to two diameters of corrugated pipes - 10 mm. There will be a power cable in one pipe, and from the temperature sensor in the second.
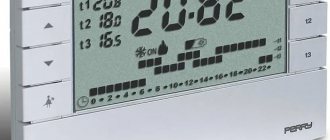
Thermostat interface E 51.716
Buttons and indicators
- Program mode
- Manual mode
- Indicator of one of six events
- Time/set temperature
- Current temperature
- Day of the week
- Heating on
- Key lock
- Menu
- Up/Plus Button
- Air temperature sensor
- Down/Minus button
- On/off button
Working with the Code in this Repository
Clone this repository, an run for dependency resolution. This will download an STM8 eForth binary, and add required folders, files, and symlinks.
The general workflow for set-up is this:
- clone the repository
- install stm8flash
- connect a ST-LINK-V2 dongle to a W1209
- run to wipe the stock firmware
- run to flash the STM8EF binary
- optionally install the development version of ucSim (or use the Docker image) to take advantage of off-line image creation
For programming the W1209 binary please follow the instructions in the (if is installed just run ).
Interactive scripting through the serial console is supported by the STM8 eForth base binary. Please refer to the .
Getting Started
Note: STM8 eForth only works on supported STM8 chips – W1209 boards with a Nuvoton chip will have to be modified before they can be used with the code in this repository!
512 of the 576 bytes logging buffer rely on an undocumented STM8S003F3P6 feature which might not work in some chips. Although there are no known cases of where the extended EEPROM didn't work, using an STM8S103F3P6 chip or reducing the logging buffer to 64 bytes will always work.
After programming the firmware binary to the W1209 board, it should work as normal thermostat. Parameters can be set using the board keys (, , ).
The following items are recommended for programming:
| W1209 | ST-Link programmer | TTL-Serial-Interface |
Please refer to the for instructions on programming the W1209 using an ST-Link compatible programmer.
After programming, the display should show the temperature value (in °C), or (default) if no sensor is connected).
Before using the thermostat, please reset the parameter values by holding the keys and until the text appears on the LED display (about 4s). Pressing the key leads to the parameter menu. The menu returns to the temperature display when no key is pressed for more than 10s.
The software currently supports the following parameters:
| Display | Range | Default | Unit | Description |
| 10.0 — 80.0 | 37.5 | °C | Heating thermostat set point (switch off above) | |
| 0.0 — 10.0 | 10.0 | h | Logger interval in hours | |
| 0.0 — 60.0 | 0.0 | s | thermostat heating trip delay | |
| -2.0 — 2.0 | 0.0 | °C | thermometer offset (for corrections around desired set-point) | |
| 0.1 — 2.0 | 0.5 | °C | thermostat hysteresis (difference between the lower and the upper trip points) |
Note that in most cases hanging the trip delay parameter should not be required.
Using the Data Log
The data logger feature uses the upper 576 bytes of the internal EEPROM as a 144 entry ring-buffe. The logger interval (time between samples) can be defined in the range from 6 minutes (0.1h) to 10h by the menu item .
The following items are recorded:
- Lowest temperature
- Highest temperature
- Heating duty cycle
- Number of relay cycles
The data log can be accessed through the Forth console with the command . The log can be wiped with the command . To use the Forth console, connect a serial interface adapter to the and key pins.
The following chart demonstrates the influence of insulation improvements, a hysteresis parameter change, and the effect of heating temperature setback overnight in my living room:
Such a chart can be created with the following steps:
- set the log interval according to the required observation time 0.1h for control optimization
- eg 3.5h for the 3 weeks that it takes to hatch a chicken egg
- for Linix eg e4thcom, minicom, picoterm, or miniterm.py
Features of the thermostat E 51.716
- The front panel of the E 51.716 thermostat contains an LCD display, control buttons and an air sensor.
- The thermostat is designed to maintain floor temperature within the range from +5 °C to +90 °C.
- The thermostat can operate in three modes: manual, programmable and comfortable. The thermostat can be programmed for every day and week using six time intervals.
- The thermostat has an independent power supply to save settings. After turning off and on the power supply, the thermostat will automatically switch to the heated floor heating operating mode, which was previously set by the user.
- To determine the temperature, an external temperature sensor (10 kOhm) is used, which is placed directly in the heated floor. The length of the temperature sensor wire is 3 meters.
- The thermostat E 51.716 is designed for standard concealed installation in a wall box with a diameter of 65 mm.
- The product is certified. Warranty period 3 years.
Technical characteristics of thermostat E 51.716
220 V, 50 Hz
| Voltage | |
| Maximum switching current | 16 A |
| Maximum power | 3520 W |
| Temperature range | +5 °С … +60 °С |
| Temperature range maximum | +5 °C … +90 °C |
| Temperature control step | 0.5 °C … 10 °C (factory setting 1 °C) |
| Thermostat power consumption | 2 W |
| Installation temperature | -5 °С … +50 °С |
| Housing protection level | IP 20 |
| Housing material | High quality self-extinguishing plastic polymer |
| Floor sensor | NTC, 3 m |
| Air sensor | NTC built-in |
| dimensions | 86 x 90 x 46 mm |
| Manufacturer country | China |
Connection diagram for thermostat E 51.716
Electrical diagram for connecting the thermostat E 51.716:
- Contact 1 - power wire 220 V, phase (L).
- Contact 2 - power wire 220 V, zero (N).
- Contacts 3 and 4 - load (warm floor).
- Pin 5 - not used.
- Contacts 6 and 7 - heated floor sensor.
The thermostat is powered from a 220 V network.
Attention! Incorrect connection can lead to failure of the thermostat, temperature sensor, or heating section.