The soldering hair dryer was “born” relatively recently. With the advent of very small sizes of microcircuits and their parts, desoldering with a conventional soldering iron has become almost impossible.
So the soldering gun replaced the usual tool of radio amateurs, called a soldering iron.
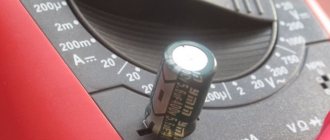
Tin can be heated with air
Today, this power tool is indispensable and enjoys enormous popularity and demand in the market.
What it is
A soldering gun is usually a device primarily designed for soldering microcircuits. The design of the device resembles construction tools in its appearance (drill, hammer drill, screwdriver, etc.) and in content - a construction hair dryer. The devices operate on the same principle.
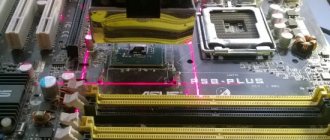
Working with processors has become difficult
The body of the hair dryer is made of heat-resistant plastic, which has a nozzle and a temperature regulator. When turned on, the device “grabs” air due to the built-in fan, it warms up and goes outside.
Note! The pricing policy for the devices is very high. Craftsmen have appeared who are able to assemble a hot air gun for soldering microcircuits with their own hands and share their achievements in this area.
There are not many functions, and the price is high
Main parts and materials
I've had this fan lying around idle for a while now. These 40mm fans used to be widely used in PC 486 and video cards.
This unit will require minimal modification. You will need to re-insert the wire into the attachment point.
I didn’t have a tube of a suitable diameter for the heater air duct, so I borrowed it from a ten-watt resistor type C-5-5. To free the tube from the insides, I sawed off one of its rolled edges with a file.
I do not recommend using ceramics or quartz glass for the heater air duct, as these materials can be destroyed if flux or wash accidentally gets on a heated surface. I’ll tell you a secret, I did my first experiments with a ceramic heater air duct, which collapsed at the first thermal shock. So, it is better to choose steel or, at worst, some non-ferrous metal.
In order not to bother with making a mica frame, I used a wire with a diameter of 1.2 mm from some kind of rheostat. I think a wire with a diameter of 0.5-1.5mm will do. If you choose a thinner wire, it will not be securely fixed in the housing, and if you choose a thicker one, you will have to increase the cross-section of the cable, which will make the latter too rigid.
Mica will be needed to make a gasket that insulates the coil from the heater tube. The fiberglass will serve as thermal insulation between the heater tube and the hair dryer body.
To make it more convenient to work with recalcitrant materials, you need to use “Rubber Glue”, “88H Glue” or “Moment” glue. Mica can be glued to fiberglass or even paper. The fiberglass can simply be glued and dried. As a result, the glue will burn out, but at the assembly stage it will provide indispensable help.
The heater spiral must be wound in such a way that it is inserted into the tube with a gap, which will subsequently have to be filled with a mica gasket. If you can find a tube of suitable diameter, you can insert the end of the wire into the tube and only then wind the spiral. I didn’t have such a tube, so I simply wound the wire around a metal rod, and then screwed the central wire inside the spiral. This technique is shown in the video>>>
I have used these wonderful products many times to solve completely atypical problems. In this case, electrical terminal blocks will transmit current from the cable to the spiral and fix the position of the spiral relative to the front edge of the tube (to prevent the spiral from shorting to the body).
To make the body of the hair dryer, we will use tin obtained from any non-corrugated tin can.
Often the cylindrical surface of the cans is hidden by a label. If you run your fingernail along the side of a jar in a store, you can easily recognize a jar with a smooth side wall.
From the cylinder of a five-gram syringe we will make a hair dryer handle.
Advantages and disadvantages of a hair dryer
The main advantage of a soldering gun is its ability to work with a variety of metals and materials that can be melted. The air jet allows the surfaces to be heated and soldered. Microcircuit, the main feature of a soldering hot air gun. It can also be used at home for various purposes. Allows you to issue a high temperature limit of 800 0C. The device is heat-resistant.
Tin processing device allows you to make balls for soldering
There are practically no disadvantages related to a soldering hair dryer. Except for its high cost, and as a result its inaccessibility.
Self-repair of industrial designs
Before repairing a soldering gun, first of all, you need to familiarize yourself with the connection diagram of the fan and heater to the electrical network (its other name is pinout).
Knowledge of this circuit allows you to check the correctness of the power supply to each of the main elements of the thermal module and make sure that they are in good condition.
Direct repair of a non-working soldering device comes down to replacing failed or damaged parts, which can be detected by the presence of characteristic burn marks.
When operating a soldering gun, sudden changes in operating modes (heater temperature jumps, in particular) should be avoided. In addition, it is strictly forbidden to touch the working thermal element, as well as the replaceable nozzles.
Otherwise, the operator risks serious skin burns from the hot air. Changing plastic attachments is allowed only after the soldering gun has been completely turned off and all its working parts have cooled down.
Specifications
A homemade hairdryer will have the design and principle of operation described above. The invention will, of course, require a certain amount of materials, which will not be difficult to find in home bins.
A homemade hair dryer has a slightly lower temperature of 600 0C. This temperature regime is sufficient to heat the base and solder the radio components. The device can be used for microscopic work at a power of 75 W. When soldering larger parts, higher power is needed (about 110 W). The current value is 4 A, while the voltage indicator is from 24-35 V.
You can assemble it yourself
Additional Information! All parameters must be precisely adjusted to avoid dangerous situations during operation. The material for assembly has been carefully selected. There is no need to rush, each subsequent step is pre-thought out.
Cooler based
The easiest way to make a hairdryer with your own hands at home is to use the turbine principle of air injection, implemented using any small-sized fan suitable for these purposes.
A soldering hair dryer can be made with your own hands using the cooler that comes with the power supply of any desktop computer.
In this case, the fan is built into the handle of a thermal element made of a fireproof tube with an electric spiral, passing through which the air will heat up and then enter the soldering zone.
The outer part of the soldering gun body must be made airtight, which eliminates the possibility of air being sucked into the surrounding space. To assemble the heater, you will need nichrome wire wound in a spiral on a ceramic tube.
The total length of the winding is selected so that the resistance of the entire wire segment is about 70-90 Ohms.
The individual turns of the spiral wound on a ceramic base should be located at some distance from one another. For safe operation of the heater, this removal should be about 1-2 mm.
What can you solder with this tool?
In domestic conditions its use is negligible. The device is aimed at high-quality and fast performance of a large volume of work. Often, men who repair household appliances and solder radio components at home do not even know about its existence. In addition to soldering microcircuits, you can perform a large number of other works.
You might be interested in this: Features of a pulse soldering iron
Can be processed linoleum
For example, this device is often used during repair work, namely:
- In the process of laying linoleum.
- Film-coated materials.
- Soldering plastics and other materials that are easily fusible at high temperatures.
You can seal bags
. Important! It is worth remembering the rules of personal safety.
Soldering gun design
A soldering gun is often used to melt or soften tin, small sheets of metal or plastic. This treatment occurs due to the blowing of the material with a highly heated spiral. The air becomes very hot and transfers thermal energy to the material being processed.
In order to make such a universal product with your own hands, you need to study its design features. It includes:
- tube-shaped body;
- an air blower, which can be a regular fan or pump;
- manual switch;
- comfortable handle.
Experts recommend additionally equipping a homemade soldering gun with a temperature sensor and several special attachments.
Device
The design of the hair dryer is quite simple. The hot air gun easily copes with heating and melting of various materials due to the supply air flow. In this regard, the design has a highly durable body that can withstand high temperatures.
The heating element is a copper coil
The air flow can warm up to 850 °C at a power of 2 kW and above. A production soldering hair dryer has a temperature regulator.
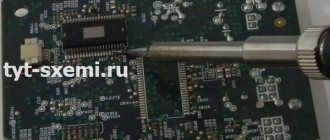
Printed circuit boards
After I found the case, I began to convert the printed circuit boards that were on the Soldering Iron website to fit this case. In particular, on the controller board (Main) I removed the rectifier from diodes and the diode assembly, since they were not necessary in my case, and I adjusted the size of the board to my case.
Main board. View from the parts.
Main board. back side
The indicator and control board (buttons and regulator) was also completely redesigned to fit my case.
Indicator board.
Indicator board, reverse side.
All stabilizers (317 and 7805) on the main board are installed on small radiators. A VT139 triac is also installed on the radiator, which controls the hair dryer heater. The radiator on it is slightly larger and it itself is located on a separate board.
Hot air gun heater control board
The power supply, as I already said, in my version is switching. Well, it was easier for me. It is assembled on a separate printed circuit board:
PSU board. View from the parts.
PSU board. Back side.
Principle of operation
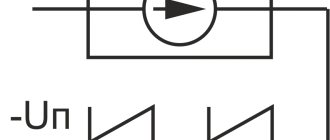
The hot air flow is concentrated in a chamber, which is wrapped around copper wire and foil paper. Air is pushed out of the compressor through an inserted steel tube. The homemade product does not provide the ability to regulate the temperature, and therefore the air flow can be controlled using the intensity of the blowing, pressing or releasing the tube through which the air passes.
There is an airflow regulator on the body
When the speed changes, the temperature also changes. By trial and error, you can select the required temperature for melting the solder and begin desoldering.
A homemade hot air gun, of course, will not replace a desoldering station, but it will help you easily cope with difficulties when soldering very small radio components.
Scheme
The controller circuit, as I said, is not mine. I found it on the Soldering Iron website, a diagram from Mikha-pskov, proposed by a participant in the Soldering Iron forum under the login KLARUS
.
ATmega8
microcontroller ; it uses a three-digit LED indicator as a temperature indicator. I installed the green one with a common anode.
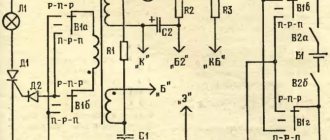
Hair dryer controller circuit.
The circuit allows you to maintain the set temperature of the hair dryer, regulate the speed of the hair dryer fan motor, when the hair dryer is turned off, it waits until the temperature of the hair dryer drops to 50 degrees, then removes power from the hair dryer. The circuit also turns off the hair dryer in the same sequence if it is installed in a hair dryer holder (on a stand) that has a built-in magnet, since the hair dryer has a built-in reed switch for this purpose.
Hair dryer holder
I would like to draw your attention to the diagram, in particular to the speed controller of the hair dryer motor. As you can see, the circuit uses a 12-volt motor in the hair dryer fan; in our case, a 24-volt motor is used. The changes that will need to be made in the circuit are as follows: in the lower part of the potentiometer R34 according to the circuit, we connect a 4.7k or 5.1k resistor in series (select the minimum motor speed so as not to blow off parts from the future board with smd you are assembling)). After such modification, the voltage at the output of the regulator will increase to the 24V we require. Yes, and also, if you use a hair dryer with a 12-volt fan, then there is no need to make the output voltage of the power supply 30 volts; in this case, 14 volts will be enough.
I assembled a switching power supply for this controller. The output voltages of the power supply in my version are +30 and +9 volts. The circuit is assembled on a UC3842 PWM controller.
Hairdryer controller power supply circuit.
Basically, all the necessary functions are available, and most importantly, it all works quite reliably. The circuit itself is powered by a stabilized voltage of 5 volts. The stabilizer is made according to the standard scheme on the LM7805; it is not shown on the diagram, but is on the seal on the main board.
How to make a soldering hair dryer with your own hands?
Self-assembly from materials lying around is an alternative option to a purchased soldering machine. When using high-quality components and following the technology of the assembly process, it will allow you to assemble an excellent model and use the homemade product for its intended purpose.
Safety precautions must be followed
First, you need to understand that the homemade device will be stationary. High temperature conditions will not affect the handle of the manufactured device. The heating element will be a nichrome wire carefully laid on the cylinder. A hair dryer that has served its purpose is used as a base. The air flow will be created using any fan of the smallest size. All that remains is to think about the start button and temperature regulator.
It’s better to find or draw up a diagram in advance
During the assembly process, it is necessary to wind the wire in a spiral around the cylinder, and wind it with insulation (you can use fiberglass), make a thermal tube and pull the winding on it. This procedure will allow you to avoid overheating of the device at very high air flow temperatures.
The Mypovos 858D model is comfortable
Next, install the injection element into the back of the soldering gun. The wire is passed through a rheostat to control the temperature. A nozzle for air flow output and a start button are installed in front of the heating element.
For your information. The hot air gun can additionally be equipped with lighting. The assembled version will also allow you to perform soldering accurately and quickly.
Hairdryer from a soldering iron
There are many cases where home craftsmen were able to make a soldering device from an ordinary hair dryer, a hair dryer, and even a soldering iron. But in the latter case, serious alterations have to be made. The fact is that a soldering iron initially does not have special air supply devices, and creating them is much more difficult than a heating element.
Regardless of which of the devices listed above you decide to use as the basis for making a do-it-yourself soldering device, you need to make sure that the finished hair dryer can maintain the set temperature.
If you find a good hair dryer with a thermostat, then be prepared to make certain changes to its design. And this will inevitably lead to the fact that the temperature scale on it will not display the real indicators created by the device on the printed circuit board.
Therefore, we advise you to first test your homemade soldering device using a contact digital thermometer. If, after numerous tests, the temperature remains in the range of 190-240 degrees, then this means that your hair dryer is ready for use. If you observe some deviations, then you will have to additionally work on its design and bring the temperature indicators to optimal levels.
The most difficult thing is to make a soldering device from a soldering iron. The fact is that here you will not only have to stabilize the temperature, but also somehow solve the problem of air supply, and for this you will have to do everything from scratch.
- To create such a device for soldering, you will need a heating element, which is placed in a glass tube, and air will be supplied through it from the other end.
- You will have to get rid of the soldering iron tip.
- For proper operation, air must enter the tube directly through the coil, which, in turn, will heat it.
- The second end of the tube should be slightly longer than the first. Subsequently, you will connect a hose to it to pump air. As suitable mechanisms for this task, you can choose a converted aquarium compressor, a home-made bellows from a plastic bottle, or you can completely abandon such devices and pump air through your mouth.
the most problems arise when creating such (setting the temperature, the inability to adjust the heating intensity), you will have to spend a lot of time and effort on making it, but even in this case you will not be sure that such a hairdryer will maintain the parameters you set . It is best to use a regular cheap hair dryer as a base, and you can use a soldering iron for other purposes.
Features of ready-made hair dryers
The main feature of a ready-made soldering gun is its practicality and reliability. Radio technicians have a wide choice. Tools for the job can be purchased both online and in stores. It is recommended to make a choice among the ratings of available hair dryers according to technical characteristics and price-quality. Choose a hair dryer + soldering station included in the segment:
- Mypovos 858D. I found my calling among buyers as completely safe. Its price starts from 1300 rubles*. High-quality assembly and flawless operation of the complete set are noted. The warm-up temperature corresponds to the declared one (from 100-480 °C). The kit includes suction, tweezers and solder. The device has a cooling system.
- Newacalox 8586. Features an interesting modern design. The hair dryer, together with the station, has acceptable dimensions (95x15x135 mm). Heating temperature 500 °C and power 700 W. But this model also has disadvantages. Warming up according to the specified temperature parameters differs from the real one. It does not have the ability to go into sleep mode. The pricing policy ranges from 4458 to 5639 rubles.
- Qsunrun 858D. Presented in the “The most interesting model and affordable price” segment. It has standard characteristics and small dimensions. There is practically no difference from other models. Its price does not exceed 1000 rubles. The downside is the slight overheating of the soldering iron handle.
- YOUYUE 8586. A very compact device, which is what customers like. In terms of technical characteristics, it is not inferior to the most expensive “monsters”. Slightly lower temperature. Approximate cost 3750 rubles.
- Yarboly. This brand of hair dryer has a large number of attachments and, perhaps, the lowest price - about 400 rubles. The heating temperature is quite low and does not even rise to 300 °C. The device is of excellent quality and has five replaceable attachments.
- Meterk Heat Gun. The hairdryer is high power and produces a temperature of 600 °C. Deviations from the set temperature regime are noted, but can be adjusted. The price does not even reach the limit of 2000 rubles.
- SmileMango 8018LCD. An excellent tool, small-sized, has a liquid crystal display. Mass market price from 2800 and above.
- Youyue 8858. It is considered one of the most accurate temperature devices. The price is 800 rubles lower than described above. It works practically without any noise and warms up quickly. Has a sleep mode. Small in size and easy to use.
You may be interested in How to check with an indicator screwdriver
Model “Element 858D” with “sleep mode”
ELEMENT 858D from inexpensive
The ELEMENT 858D is a portable hot air station with a digital modular design for use in desoldering and soldering applications involving multiple components. Due to the small dimensions of the device and convenient design, it allows comfortable use. In its arsenal, the device is equipped with a closed system of sensors, a microcontroller for digital display of data and adjustment of the required temperature, good power, the ability to immediately warm up within five seconds and stability. When the device is not in use, energy is saved.
The ELEMENT 858D model is convenient and comfortable
As soon as the soldering device is placed on the holder, the station is put into standby mode. After removal, everything returns to the operating parameters configured earlier. The device is equipped with a cooling system.
Main characteristics of a portable soldering station:
- supply voltage - 220 V;
- power - 650 W;
- temperature regime - 100-480 0C;
- resistance - 74 Ohm;
- air flow - 120 l/min;
- noise - <45 dB;
- dimensions: 150×100×138 mm;
- device weight - 1.50 kg.
In the general list of products offered, it is considered one of the inexpensive devices.
BAKU BK—8032A++ with microprocessor
BAKU BK-8032A++ is a compact, multifunctional heat gun with microprocessor control. Used for dismantling electronic components, soldering small parts made of plastic and other low-melting materials. A microprocessor is built in as a controller, temperature conditions and air flow are displayed in digital format.
The Baku model is high-tech
The base of the hot air gun also fits the nozzles of soldering stations.
Main characteristics:
- Supply voltage - 220 V;
- power - 450 W;
- temperature regime - 100-480 0C;
- resistance - 74 Ohm;
- air flow - 30 l/min;
- dimensions - 21x7.7x277 mm;
- device weight - 1.0 kg;
- heating element - metal;
- the pump is turbine. The hot air gun is equipped with nozzles of various diameters (8 and 10 mm).
The domestic model comes with a display
BISON 55350 inexpensive professional
BISON 55350 is a professional assistant for every amateur and radio technician. It is a hot air soldering station on a digital basis. Equipped with a liquid crystal display and equipped with modern, high-tech materials. Capable of providing reliable and high-quality work.
Main characteristics:
- Supply voltage - 220 V; power - 650 W;
- temperature regime - 100-500 0C;
- resistance - 74 Ohm;
- air flow - 120 l/min;
- dimensions - 26.5 × 16.5 × 15.5 mm;
- device weight - 1.72 kg;
- heating element - ceramic;
- pump - turbine.
The soldering station is equipped with a power disconnect button, a soldering iron stand and is equipped with three replaceable tips.
You may be interested in Wire crimping tool
Additional Information! The manufacturer provides a 12-month warranty from the date of purchase of the device.
YIHUA 8858 soldering air station wagon
YIHUA 8858 is a new generation device. Will please radio amateurs and will significantly speed up the work. This soldering gun is so versatile that it can be used both during the installation and dismantling of various components. It is very convenient to work with surface elements with this hairdryer.
The Yuhua 8858 model is quite versatile
Main characteristics:
- Supply voltage - 220 V; power - 650 W;
- temperature regime - 100-480 0C;
- air flow - 120 l/min;
- dimensions - 305x60x60 mm;
- device weight - 1.72 kg;
- heating element - ceramic;
- pump - turbine.
The device is equipped with three interchangeable nozzles (8 mm, 10 mm, 13 mm). Two of them are round and one is a square model. It is also equipped with a stand for a hair dryer, which can be mounted on any surface. Packed in a box with protective material to prevent damage. Instructions for use are included.
The Yuhua 8858 model comes with 3 nozzles
The Internet offers a huge range of products produced under different brands. The choice will remain with people who use such devices for domestic or industrial purposes. When using a soldering hotplate, it is still worth thinking about purchasing a thermal station in order to use the entire list of additional functionality and to create comfortable working conditions.
*Prices are current as of October 2022.
Soldering Basics
Before you start making a soldering hair dryer using a soldering iron or a regular hair dryer, it won’t hurt you to first find out how the soldering process works using this tool. Thanks to this information, you will avoid many errors during assembly and will be able to produce a properly functioning unit.
Principle of operation
- During soldering with a hairdryer, a stream of hot air or radiation generated by the soldering device acts on the surface to be processed.
- The printed circuit board, as well as the microcircuits located on it, are made of plastic, which absorb heat from the air with great difficulty.
- The soldering points, as well as the metal pins of the microcircuit, have a metal base. They conduct heat well and take most of it from the air supplied from the hair dryer nozzle to the PCB area.
Keep in mind that before work, all other metal elements on the board, including housings of electrolytic capacitors, heat sinks of microcircuits located in close proximity to the working area , must be protected from exposure to hot air or radiation using special PCB screens, which must first be fixed to board
Features of the desoldering and soldering process
Now it’s time to find out how desoldering or soldering of a specific microcircuit is carried out.
- The first step is to tin the contacts. An ordinary soldering iron can help you with this - just run it along the line of contacts.
- For soldering you will need PIC solder and soldering acid. You can do this job with a hairdryer, but you will still need to use a soldering iron to apply the solder.
- At the next stage, thoroughly clean all the tracks between the contacts with a needle. This is necessary so that during soldering you do not inadvertently solder the tracks together. At the same time, you need to make sure that there are no tracks soldered together on the board.
- Then you can proceed directly to installing the chip in place. To place it you will need tweezers, and its fastening is done using a soldering hair dryer, which needs to heat all the contacts evenly.
- During soldering, the hair dryer is moved around the microcircuit to uniformly heat all contacts. When you handle this, you need to carefully press the microcircuit onto the board with tweezers and blow on it. This will cool the contacts and help them solder faster.
- After that, we take a needle and find out whether all contacts have joined. If this does not happen with one of them, then you need to solder them and clean the paths between the contacts with a needle.
You shouldn't have any problems with soldering the microcircuit To do this, you need to move the hair dryer along the soldered contacts. After they all come off, you can remove the microcircuit. However, here you must make sure that all contacts have been heated evenly. Then they will come off easily. While performing this operation, it is important that the microcircuit does not overheat, otherwise it will no longer be suitable for further use.
Types of stations
All soldering stations can be divided into two large groups:
- hot air;
- infrared.
Each of them is tailored to its own tasks. In most cases, professional repairs require both types of soldering stations. The first is a small block that has one or two manipulators. A hot air soldering station can include only a hair dryer or a hair dryer with a soldering iron. There are soldering stations that only have a soldering iron as a manipulator. Usually these are the varieties that are called induction. In conventional hot-air stations, the soldering iron is heated by a ceramic or similar element to which voltage is applied. This element transmits temperature to the tip. In induction soldering stations, heating occurs due to the action of an electromagnetic field. The energy is immediately transferred to the sting.
Thanks to this approach, it was possible to reduce the inertia of the soldering station, increase the response time, and also increase power with smaller dimensions. In those products that contain heat-intensive elements, it is impossible to do without an induction station, since it is capable of heating large areas of tin in a short time. In some cases, this is difficult to achieve even with a hot-air hair dryer. Induction units are several times more expensive than conventional stations, but their efficiency guarantees pleasure and high precision when working.
Infrared soldering stations are a separate division. In appearance, they are practically different from the two previous types. They consist of two main modules:
- head or top heating;
- bottom heating.
Heating in them occurs due to infrared elements. Thanks to the bottom heating, the board is heated evenly, which avoids deformation when removing or sealing certain elements. Most often, infrared stations are used to replace chips with BGA soldering. They are chip-crystals that are fixed on the board using special solder balls. Some types of such chips can be replaced with a conventional hot air station, but the quality will suffer. The cost of a good infrared station starts from one thousand dollars.
Note! There is a separate subtype of infrared stations, in which the infrared element is placed in a manipulator that resembles a hair dryer. Such products are not widely used and are rarely used.
Basics of making a radio hair dryer
The main condition when assembling a soldering unit is its safe operation and compliance with the tasks of both the entire apparatus and its constituent components. You can mount such a device from all sorts of outdated or faulty soldering irons, hair dryers, and computer components.
Selection of heating component
You will have to make this important component yourself, because the heaters from home heating devices are rather weak in power. The only device is an electric stove with an open spiral, but this is difficult to find.
In order to make a spiral of the required power, you will need nichrome wire with a cross-section of up to 0.8 square millimeters. The size of its rings should be no more than 7-8 millimeters, which is required by the compact design of the device.
The electric spiral is wound on a tubular or cone-shaped core. It must be made to be heat resistant and provide electrical insulation. Porcelain or textolite tubes from broken hair dryers meet these requirements. But it would be ideal to find a halogen lamp for tubular lamps and borrow an insulator from there.
Fan options
Any small but powerful fan is suitable for use as a supercharger It will become, perhaps, the most expensive component in an improvised hair dryer. Primary requirements for its manufacture:
- Operating voltage 220 volts.
- The blowing flow force is from 20 liters per minute.
- Power from 400 watts.