Before you disassemble your hair straightener, you need to carefully weigh your options. Despite the apparent simplicity of the device, this operation can lead to the complete unsuitability of the curling iron for further use. To repair a straightener designed for hair styling , you must be able to use a screwdriver and side cutters, have your own soldering iron and tester. Knowledge of radio engineering and plumbing will be useful.
How the device works
Modern curling irons on the market are distinguished by a variety of shapes and a range of functions. But, regardless of the brand or model, they are all similar in design.
The basis of the device is a round body with a heating element inside and a triangular flexible leg-stand. A power cord with a plug is connected to the handle. A metal clamp is hinged.
Unfortunately, the simple design of the styler does not guarantee its reliability and trouble-free operation. Even the cheapest models of the most popular brands fail.
If you repair your hair curling iron yourself, you can save money and time that you would spend on visiting a specialist. The main thing is to correctly disassemble the device and determine the cause of the malfunction.
DIY repair
Repairing a hair curler does not take much time. To repair the styler, you will need two screwdrivers (Phillips and flat head for removing plugs), a piece of electrical wire, a multimeter, and insulating or adhesive tape.
When the moving contact oxidizes, the parts must be separated. Then carefully sand both elements with very fine sandpaper.
Just in case, check the cord with a multimeter. This way you will know if there are any breaks or pinches. If such damage is found, be sure to replace the wire.
When the curling iron begins to press the hair worse, it is necessary to straighten the spring. To do this, you need to remove the retractable stand and carefully unscrew the fasteners.
Sometimes it is enough to pry the spring with a flat screwdriver or your finger - and it easily falls into place. But it also happens that you have to remove it from the body and return it to the desired position separately from the device.
After carrying out these manipulations, put the clamp in place, secure it tightly with bolts and install the lower retractable bracket-stand.
As you can see, the design of this electrical appliance is so simple that repairing it at home is not at all difficult. However, before you start repairing, you need to learn how to properly disassemble the curling iron.
Disassembly
To understand what exactly caused the curling iron to fail, you need to disassemble the device. Models from different brands are designed approximately the same. Having learned how to repair one styler, you will successfully cope with the repair of any other device for styling curls.
All tongs consist of two halves. They need to be sorted in this order:
- Carefully pry off the plugs on both sides with a flat-head screwdriver.
- Unscrew the bolt that holds the two halves of the curling iron together.
- Examine the condition of the wiring for kinks, spring clamping force and contacts.
After establishing the exact cause of the malfunction, you can proceed directly to repairing the device. Don't forget to grab the tools mentioned above right away.
Fault options
There are many reasons for a curling iron to break. However, there are a few that are most common. Let's look at the most common types of faults.
It is recommended to watch a video on how to troubleshoot a curling iron. A visual example will help you navigate faster.
| What's happened | Cause | Troubleshooting method |
| There is no power to the temperature controller board. | Wire fault. | Disassemble and carefully inspect the curling iron. Check the soldering of the cord to the board. If it is torn off, you need to cut off the damaged part and solder the wire in place. A broken connector is quite difficult to repair. It is recommended to exclude it from the circuit by soldering the cord directly. |
| Of the two halves of the tongs, only one works. | Soldering errors or broken heating element. | Disassemble the heating element. These are 2 plates with a resistor between them. Be especially careful with the conductive layer. We must not allow it to be erased. The malfunction is eliminated by ensuring contact of the wire with the heater plate. |
| The device does not heat up when full power is supplied to the board. | Poor soldering or burnt part. | Inspect the board. If nothing suspicious is observed, “ring” all the elements in turn. Start with the fuse. Most often, diodes and a quenching resistor are responsible for blowout. Don't forget to pay attention to the capacitor and variable resistor (if you see the latter in the diagram). |
Have you completed all the manipulations, but the device still does not work? Then it’s better to contact a specialist. Repairs may require special skills or tools.
Repairing the swivel
The purpose of the swivel is to rotate the styler. If used improperly, the wire may become severely twisted. As a result, a break occurs at the point where it is attached to the body.
You can repair the cord by insulating the exposed part. However, such repairs will be short-term. Often he threatens with electric shock in the future.
To properly repair a swivel, you need to do the following:
- Disassemble the tongs.
- Strip the ends of the exposed wires with a knife.
- Prepare your guides.
- Solder the central core and wrap it with several layers of electrical tape. Then do the same with the second one.
- Tie the ends together and secure them with copper wire.
- After some time, remove the wire.
- Assemble the device.
If you did everything correctly, the styler will function as before. If suddenly it doesn’t work out, it’s okay. Take the curling iron to a workshop and let an experienced specialist handle it.
Replacing the heating element
If your styler suddenly stops working, immediately check to see if the wire is damaged. The curling iron turns on normally (the indicator light comes on), but does not heat? Apparently, the heating element is to blame, which most likely burned out.
Who can repair their hair curling iron themselves?
First, it should be noted that fixing a curling iron is quite a serious matter, requiring skills in repairing electrical appliances. If you basically understand electrical repairs, have experience in such repairs and have the necessary tools - an electrical tester and a soldering iron, at a minimum - then you can cope with this. You won't find anything super complicated or super specific here.
But if you do not have the necessary skills and do not have the necessary equipment, it is better not to get into the inside of the iron, because you may not only not achieve results, but also create new things, further complicating future repairs for those who will do it.
Rating of the best curling irons
Knowing how to disassemble your curling iron and repair it yourself will extend the life of the device. And this is certainly a positive thing. However, in order to avoid repair work or at least minimize it, you should initially try to choose a high-quality styler.
Today, the beauty device market is replete with a huge number of models that can give curls a wide variety of shapes. Small and large curls, Hollywood curls, corrugations - this is not a complete list of styling.
There are also curling irons on sale that do the gripping and twisting of the strands themselves. Technological progress does not stand still. Manufacturers are doing everything possible to improve the convenience and modernize the functionality of stylers.
When choosing a device, first of all you need to pay attention to the brand. This is the most important criterion. The more serious and well-known the company, the longer the purchased curling iron will last and the better the curl will be.
Among the leaders in the rating are the following brands:
Stylers from the listed manufacturers can probably be seen in any home appliance store. They cannot be considered cheap. And yet they are in high demand.
In addition to the brands mentioned above, there are also professional curling irons that are sold only in specialized outlets. If you believe the reviews, the best among them are:
Of course, the latest devices are more expensive. True, they compensate for the costs with their endurance and long service life.
Let's sum it up
To prevent suddenly broken curling irons from ruining your hairstyle and mood, you need to take the choice of this device very seriously. But since purchasing even the most expensive styler does not guarantee its eternal operation, it is better to immediately acquire the tools necessary for repairs.
Do not try to disassemble the iron after purchase. Firstly, it will still be under warranty. And secondly, there is a risk that you will not put it back together. And instead of a brand new device, you will receive a non-functional set of parts. It’s another matter if the styler is already broken - in this case, you definitely have nothing to lose.
If you cannot repair the tongs yourself, do not hesitate to seek help from a specialist. After all, the main thing is a functioning device, and not who repaired it.
It's no secret that every woman wants to be unique and attractive. There are many different ways to do this, for example, cosmetics, various skin treatments, manipulation of eyelashes and nails. Nothing makes a woman more special than her hair. And for this there are many devices and devices. One of these beauty tools is an electric curling iron.
It is mainly intended for straightening hair and also helps to cope with unruly curls when forming bangs.
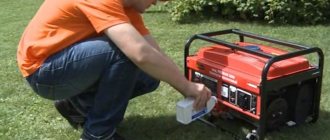
Rice. 1. Repairable hair curler
The working principle of a curling iron.
Slightly damp hair is clamped between two heating elements. When moving the elements along the entire length, the hair dries and becomes even. Thus, unruly “curls” can be turned into a perfectly even, straight hairstyle.
You can use a curling iron not only with wet hair; dry hair can also be straightened, but not as effectively as the former.
Hair curler malfunction
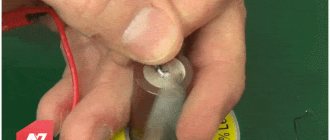
The problem appeared after the device fell from the cabinet onto the floor. It manifested itself in the fact that the hair straightening attachment did not press the strands, thus the desired effect was not achieved.
When you pressed the lever with your finger, the upper part of the electric forceps was lifted, but did not return to its original state. It was clear that something was wrong with the return spring.
But getting to the spring turned out to be not so easy. To do this, it was necessary to disassemble the entire structure. Here's how to do it. Remove the nozzle from the handle by turning the clamping ring.
Curling device
The design of the curling iron resembles a clamp. It consists of two parts fastened on one side. Ceramic heating elements are installed on each part, opposite each other.
In addition to the heaters, the design includes: a switch, a power indicator, a power cord and housing parts. The heating elements are electrically connected in parallel and have the same power. Thus, the hair is heated evenly on both sides at the same temperature.
The working surfaces are pressed against the hair by hand, and the reverse action is performed by a special spring. By default, the heating elements are moved to the side using this spring, but there are models of curling irons that have a special latch that keeps the two parts together.
This function simplifies the transportation and storage of this type of device. There are also models with temperature control, LCD display and anti-kink technology.
But as practice shows, the simpler the model, the less it breaks, since additional components only reduce the reliability of the device.
The simplest curling irons can also fail, either partially or completely.
Below in the article we will describe the repair of a mid-level curling iron. But the method for determining malfunctions and repairs may be applicable to other devices of this type. The photo (Figure 1) shows a curling iron with one heating element not working.
Of course, you can get by with it, but it’s unlikely to achieve the most effective styling result. Therefore, it makes sense to try to repair this malfunction, especially since today, curling irons are not so cheap, and damage can be easily repaired.
Differences between tourmaline and titanium coating
First of all, the difference lies in the degree of ionization - in tourmaline it is slightly higher. Tourmaline belongs to the category of semi-precious minerals with a high degree of ion formation, which carefully envelop the hair upon contact and protect it from harmful effects.
Titanium is a durable metal whose conductivity is several times lower than that of iron. This means that titanium curling irons do not heat up as much and dry out your hair. But the main advantage of titanium rods in styling devices is the inability to scratch or break the product.
If you take a curling iron with a ceramic working surface, treated with tourmaline coating, and compare it with titanium, then it:
- has a lower upper heating limit of up to 200 degrees - titanium can easily heat up to 230 degrees;
- releases more ions, so it is gentle on curls;
- does not have a smooth surface (enriched with mineral crystals), like devices with pure titanium coating;
- does not heat up so quickly;
- less durable;
- costs slightly less than titanium.
Which coating is best for your curls? All presented models deserve respect. If you are purchasing a device for home use, then opt for ceramic-tourmaline rods.
We recommend that professional hairdressers purchase titanium or titanium-tourmaline curling irons. It is the latter that have no equal in wear resistance and gentle effect on curls. In addition, a higher temperature limit even makes it possible to carry out a keratin restoration procedure using an iron.
The following articles will help you learn more about hair curling:
- how to curl curls on short hair, features of the procedure;
- how and with what to curl curls on long hair;
- root volume: what is it, how to make a voluminous hairstyle at home;
- hairstyles using a curling iron for short, long and medium hair;
- how to choose a ceramic hair curling iron;
- What is an automatic curling iron and how to use it.
Design and principle of operation of the device
A hair straightener is a heating clip-style device that allows you to straighten stubborn curls. Leveling is ensured by a temperature of 120º to 210ºC, which is formed between two tightly adjacent, smooth plates. They press strands of hair under the influence of a spring.
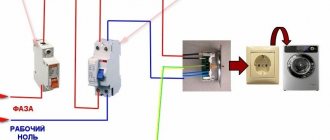
Despite the wide variety of brands and models of curling irons, they are all basically similar in layout. The hair straightener circuit includes:
- Case in the form of tongs with a power cord.
- Heating elements (heaters)
- Temperature regulator.
Unfortunately, the simplicity of the device design does not lead to its reliability. Even models from well-known manufacturers often fail. Repairing your hair straightener yourself can save you money and time spent going to a hair repair shop.
Advantages and disadvantages
The advantages of Bosch rectifiers have already been appreciated by many customers:
- Stylish and compact design . The brand's irons are pleasant to hold, they are easy to use and take their rightful place on the dressing table. In addition, any of the straighteners can be taken with you on trips; it will not take up much space in your bag and will add almost no weight to it.
- Possibility of temperature adjustment. You determine the level of heat required for your hair. For those with colored, thin or damaged strands, temperatures above 150° C are not recommended. Normal hair types can withstand temperatures up to 180° C. If you have coarse hair, you may need maximum heating to achieve the ideal effect. The required temperature also depends on how naturally curly the hair is.
- Ionization . A special layer covering the plates of the device releases negative ions when the temperature increases. They, in turn, restore the water balance of each hair, creating the visual effect of silky and well-groomed curls.
- Durability . Anodized plates are resistant to damage and retain their original appearance and properties for a long time.
- Variety of models. Among the brand's assortment you can find a small iron with a minimal set of functions and a universal device for smoothing and curling hair. With this device you can change your looks and always look amazing.
Some buyers can name only the expensive cost of the brand’s products as a negative nuance.
Do-it-yourself troubleshooting
Hair straightener failure may result in partial or complete loss of heat or mechanical failure. Before disassembling the iron, you should carefully inspect it for integrity.
The most common problem with these devices is a broken power cord. In models with a detachable wire, the fault lies in poor contact of the connector.
Disassembly begins with separating the halves of the iron. To do this, remove the decorative plugs on the sides of the device and unscrew the tightening screw.
Attention: This operation must be carried out carefully, since there is a spring on the axis connecting the parts of the curling iron. Before removing, you need to note its exact location so as not to waste time and nerves during assembly.
When the halves are separated, access will be made to the remaining screws securing the covers that cover the shadows and controls. Having gained access to the temperature regulator, you can begin to inspect and test the parts.
Possible breakdowns and solutions
- There is no power on the temperature controller board - the cord is faulty. It needs to be inspected and the soldering to the board checked. If a break is detected, the damaged part is cut off and the cable is soldered in place. A faulty connector is difficult to repair, so you can simply exclude it from the circuit and solder the cord directly.
- Only one half of the tongs works - the tenge is broken or the soldering is bad. Eliminated by disassembling the heating element. It represents two plates with a resistor between them. When disassembling, special attention must be paid to the conductive layer so that it is not accidentally erased. Troubleshooting comes down to ensuring contact between the wire and the tena plate.
- Power is supplied to the board, but the hair iron does not heat up - poor-quality soldering, burnout of one of the parts. The board is being inspected. If there are no visible defects, all elements are called sequentially, starting with the fuse. The most common failures are the quenching resistor and diodes. Particular attention should be paid to the capacitor and variable resistor (if provided schematically).
As you can see, it is quite possible to repair a hair straightener yourself. However, we should not forget about electrical safety rules and restore the device only when disconnected from the network.
«>
Hair curling iron. A look from the inside.
Study of the operating algorithm of the electronic thermostat of the Remington S-8660 hair curling iron
Household appliances break down, and “women’s” household appliances break down especially often
But why not use what is still suitable in your homemade screw crafts?
I got my hands on modern pliers (multi-styler) Remington S-8660, unfortunately, without “attachments” - only a handle with “stuffing”.
To carry out the work, you need to prepare the following devices and tools:
- Handle assembly or controller board for Remington S-8660 hair dryer
- tester or multimeter
- two-point screwdriver (fork)
- soldering iron
- variable resistor 27-33 kOm
- low-power incandescent lamp 220 volts
- installation wire
An autopsy showed that inside the handle there is a digital thermostat made on the HS153SN chip. Searches on the Internet gave the answer - that this is most likely a Chinese clone of the one-time programmable microcontroller EM78P152/3S.
The hair dryer accessories are connected to the handle via a 4-pin connector - 2 wires are used for the heater, two more for the temperature sensor.
To check the functionality of the thermostat, a test bench was assembled - a variable resistor with a nominal value of 33 kOm, simulating a thermistor, was connected to points T1 and T2; to points H1 and H2, a load in the form of a light bulb from a refrigerator (220 volts, 15 watts); to points AC1 and AC2 – mains voltage.
When you press the “on/off” button, the first green LED begins to blink, and the hair dryer begins to warm up to the minimum temperature - the load lamp lights up continuously.
When you press the “Up” button further, the next green, two yellow and the last, red LEDs light up in sequence. In temperature set mode, all LEDs blink.
As the temperature rises, the LEDs, one after another, sequentially switch to continuous glow mode.
When a certain temperature of the sensor is reached, the load lamp begins to blink, with a period of 4-5 seconds it turns on for 1-2 seconds, which achieves more accurate regulation of heat generation in the load. We will consider these points to be the thermostat setting points.
If the variable resistor—the “sensor”—is adjusted to a lower resistance, the lamp goes out, and if it is adjusted to a higher resistance, it lights up continuously. The results of measuring the sensor resistance, with rounding, are summarized in the table:
The last two lines may have an increased error, since a variable resistor may “produce” a not very stable resistance in this range; for more accurate measurements it is better to use a resistance magazine, or, in extreme cases, use a “variable” with a resistance of 3.6-5, 1 kOhm.
And yet, using the results obtained, you can use a digital thermostat to build, for example, a soldering station, a temperature controller for an aquarium, a boiler, an air heater, etc. The temperature sensor may consist of a thermistor and several resistors connected in parallel and in series with it to obtain the required control characteristic. The sensor must have good thermal contact with the controlled object.
It is impossible to change the microcontroller program, so the desired exact temperature can be obtained only in one mode, to choose from, and in the rest you can be content with what can be obtained by adjusting the characteristics of the temperature sensor.
Therefore, the use of such a thermostat can only be justified by the fact that it was obtained for free and by the fact that it is a ready-made, already assembled device.
To control a powerful load, it is necessary to use an additional thyristor cascade, the diagram of which can be obtained from the Internet.
Since the circuit has a galvanic connection with the electrical network, the sensor must be reliably isolated, and electrical safety must be observed during setup work and further operation !
Author – Manuilov V.P.