When it comes to battery conversion 18650 (for a screwdriver with Ni-Cd/Ni-MH or a household storage device like Tesla Powerwall), then many manuals and instructions are silent about the methods of connecting batteries: soldering, welding or something else?
Not all connection options are suitable for durability and even safety. 18650.
Updated 02/04/2021. We propose to consider the correct and acceptable 18650 connection options with an emphasis on real-world consequences and engineering understanding of the processes. Thank you for your feedback in the comments here and on Ya.Zen—we have updated the article to reflect your experiences.
Is it possible to solder 18650 batteries?
It is forbidden ! This is the wrong approach. “ But if you’re very careful, it’s possible ,” is the approach in DIY communities. What is the catch, what should you be wary of?
When connecting 18650 batteries into a large battery (from laptops to vehicles), the task is to ensure reliable contact without losses, resistant to external influences (shock, temperature, and so on - depending on the purpose of application). Many lovers of DIY crafts consider soldering as one of the options.
Lithium-ion batteries (18650 and any other Li-Ion) when heated from a soldering station (or even a low-power soldering iron) are destroyed in their structure and irreversibly lose capacity!
That is, solder 18650 batteries unless absolutely necessary. Or you will have to put up with a change in chemical composition and deterioration in performance.
In addition, the solder connection is unreliable if the battery overheats. The method is also impractical for compact assembly due to random solder shapes and vulnerability to external influences.
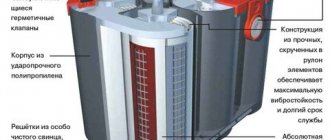
Features of connecting and charging lithium batteries
There are two options for connecting batteries, series and parallel. With a series connection, the voltage on all batteries is summed up, when a load is connected, a current flows from each battery equal to the total current in the circuit; in general, the load resistance sets the discharge current. You should remember this from school. Now comes the fun part, capacity. The capacity of the assembly with this connection is fairly equal to the capacity of the battery with the smallest capacity. Let's imagine that all batteries are 100% charged. Look, the discharge current is the same everywhere, and the battery with the smallest capacity will be discharged first, this is at least logical. And as soon as it is discharged, it will no longer be possible to load this assembly. Yes, the remaining batteries are still charged. But if we continue to remove current, our weak battery will begin to overdischarge and fail. That is, it is correct to assume that the capacity of a series-connected assembly is equal to the capacity of the smallest or most discharged battery. From here we conclude: to assemble a series battery, firstly, you need to use batteries of equal capacity, and secondly, before assembly, they all must be charged equally, in other words, 100%. There is this thing called BMS, battery monitoring systems, it can monitor each battery in the battery, and as soon as one of them is discharged, it disconnects the entire battery from the load. Now as for charging such a battery. It must be charged with a voltage equal to the sum of the maximum voltages on all batteries. For lithium it is 4.2 volts. That is, we charge a battery of three with a voltage of 12.6 V. See what happens if the batteries are not the same. The battery with the smallest capacity will charge the fastest. But the rest have not yet charged. And our poor battery will fry and recharge until the rest are charged. Let me remind you that lithium also does not like overdischarge and deteriorates. To avoid this, recall the previous conclusion. But there is also such a thing as cell balancing. A special charging controller roughly speaking has access to each cell and personally charges it 100% independently of the others. There are a lot of circuits on the Internet using zener diodes and other loose stuff, but that’s not what we’re here for, we don’t like soldering. For two and three batteries there is a charging and balancing protection module, but again, this is not why I have gathered you here today.
Let's move on to parallel connection. The capacity of such a battery is equal to the sum of the capacities of all batteries included in it. The discharge current for each cell is equal to the total load current divided by the number of cells. That is, the more Akum in such an assembly, the more current it can deliver. But an interesting thing happens with tension. If we collect batteries that have different voltages, that is, roughly speaking, charged to different percentages, then after connecting they will begin to exchange energy until the voltage on all cells becomes the same. We conclude: before assembly, the Akuma must again be charged equally. Otherwise, when connecting, large currents will flow, and the discharged battery will be damaged, and most likely may even catch fire. During the discharge process, the batteries also exchange energy, that is, if one of the cans has a lower capacity, the others will not allow it to discharge faster than themselves, that is, in a parallel assembly it is possible, but not very advisable, to use batteries with different capacities. And the same goes for charging. You can absolutely safely charge batteries of different capacities in parallel. That is, balancing is not needed, the assembly will balance itself. Doing this again is not very advisable, but it is possible.
Let's get down to business. Let's say we want to use batteries in series to increase the voltage. It’s good to use this assembly correctly, the batteries must be of the same capacity, preferably from the same batch in production, and before connecting they must be charged to the same voltage. Such an ideal assembly can be charged with a voltage equal to the sum of the maximum voltages for lithium, that is, 4.2V. Ready-made power supplies are suitable for this, plug it into the outlet and charge. Or a step-down module configured to the desired voltage? Or, for example, a laboratory nutrition unit. But nothing is perfect in the world, so it would be more correct to charge through a BMS, which will turn off the battery if one of the batteries is charged to 100%. And it would be even more correct to use a charger with cell balancing, which also costs money.
4.8 / 5 ( 25 votes)
RELATED POSTS
Wire heater calculation
Guide to addressable LED strip
Charging lithium batteries with Chinese modules
Soldering for beginners
Electrical engineering for dummies
What do professionals use to properly connect 18650?
You can achieve reliability and safety in assembling a battery from several batteries using professional methods. There are also unpopular approaches that have also proven to be practical and safe. Here's a complete list.
How to properly connect 18650 batteries:
- • resistance welding (spot);
- • using factory holders (holders - see below);
- • neodymium magnets (powerful eternal magnets);
- • gluing;
- • liquid plastic.
Professionals use the single most trouble-free method of 18650 spot welding - this method is recommended for industrial assembly of products, amateur DIY, and service repairs of consumer products. An example of budget spot welding for home use was discussed in detail on Geektimes.
Popular in the DIY community are rare earth neodymium magnets For long-term, compact projects, liquid plastic or even glue is best.
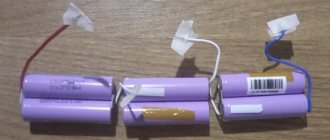
To quickly assemble a battery pack from several 18650 batteries, you can buy holders with a plastic case on Aliexpress . They cost only 60 rubles to connect a pair of 18650 , they are already equipped with factory pressure contacts that do not heat up in the connections. For manual soldering without fear of overheating, lithium-ion batteries are very convenient and compact for crafts.
How to charge series connected Li-ion 18650 batteries?
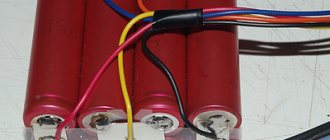
A 18650 lithium battery cannot simply be connected to a power supply. It is necessary to equalize the charge current on each cell. Balancing is carried out during recharging, when it is possible to use passive dissipation of “excess” electricity without significant energy losses.
If banks connected in series are powered through the terminals at the ends of the block, it will not be possible to monitor the charge of individual batteries. A link with a slightly higher resistance or lower capacitance will quickly reach the maximum voltage of 4.2 V and, while the voltage of the entire battery reaches this value, will have time to reach the exceeded value of 4.3 V or even higher parameters. With each subsequent charge cycle, the capacitance characteristics of such units will decrease, and in the worst case, the lithium-ion battery may explode due to overheating.
To avoid such problems, you need to use a balancer - a voltage limiter in the form of a comparator that compares the voltage on the lithium-ion element with a limit value of 4.2 V. When the voltage reaches the limit value, the switch-transistor installed in parallel with the element opens slightly.
It passes the lion's share of the charging current and converts the energy into heat. The charge of the can itself is practically suspended, while neighboring cells have the opportunity to finally charge. Voltage equalization is carried out at the end of the charging process, when the elements reach the limit value of 4.2 V.
Now let’s touch on the question of how to charge parallel-connected 18650 batteries. In a parallel connection, like poles are connected to each other: “+” with “+”, “-” with “-”. The voltage remains unchanged, and the capacitances are summed up. Balancing is not required for a purely parallel connection (without series connected parts).
“>
We calculate which elements should be used in sections:
We go to the website (repackr.com) in the left column, select Packer - then copy all the battery capacity values and paste them into the window + click Add cells - Number of cells in series = indicate the number of sections I have planned 14s - Capacity = indicate how many will be placed sequentially I will have 5 elements - Nominal Cell Voltage = indicate the nominal voltage of the battery, I have 3.7 volts - Choose between a fixed number or variable number of cells to achieve a target capacity = indicate a fixed number of elements, click generate packs.
After these steps, you receive a table that indicates with what milliamp indicator the elements should be used in one or another section so that the indicators in the cells are as similar as possible, this will allow the battery to last longer and work at its full power. The procedure is desirable, but not required.
This is the table I received, the accumulators are distributed so that in each section we get similar values
After entering my data, I received a distribution of elements into cells according to the mah of each element, for the battery the value is 51.8 volts, nominally in a charged state 14 * 4.2 = 58.8 volts, 13.768 ampere hours will be the battery or 713.1 watt hours is quite good . Let's start assembling.
Why connect batteries into batteries?
To power some devices, voltages and currents are required that cannot be provided by existing batteries. To provide the necessary conditions, several drives are combined.
When several batteries are connected in parallel, the total capacity increases. And this design can be used to power powerful devices that require large current values. This can be used when there are two small-capacity drives, but you need to power a powerful device or extend its battery life. Then, in order not to buy large-capacity drives, you can use an assembly of two existing drives.
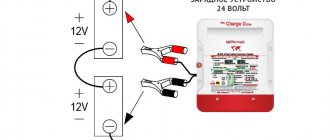
To increase the voltage, the batteries are connected in series. For example, two 12V batteries will produce 24V.
To simultaneously increase the potential difference and capacity, you need to use a combined connection.
Flux treatment
To prevent subsequent oxidation of the contact, the surface of the battery, cleared of plaque, should be immediately treated with a flux mixture made from ordinary rosin.
If, for example, there are no greasy stains from oils on the phone battery contacts, just wipe them with a soft flannel soaked in ammonia.
After this, you will need to warm up the soldering iron well and solder the contact area with a few quick touches. At this point, preparation for soldering can be considered complete.
Stripping terminals and wires
Both the alkaline or lithium battery itself and the connecting conductor soldered to it need preparation.
These procedures also include the preparation of the necessary consumables, including such important components as solder, rosin and flux mixture.
The most difficult and crucial moment of the upcoming work is stripping the battery terminal to which the connecting wire is supposed to be soldered. This procedure may seem simple only to those who have never tried to do this.
The problem in this case is that the aluminum contacts of power supplies (finger or other type - it doesn’t matter) are susceptible to oxidation and are constantly covered with a coating that interferes with soldering.
To clean them and subsequently isolate them from air you will need:
- sandpaper;
- medical scalpel or well-sharpened knife;
- low-melting solder and neutral flux additive;
- not a very “powerful” soldering iron (no more than 25 watts).
After all the specified components are prepared, the following operations must be performed. First, you need to carefully clean the area of the intended soldering, using first a scalpel or knife, and then fine emery cloth (this will ensure better removal of the oxide film from the contact area).
At the same time, the bare part of the soldered wire should undergo the same stripping.
Immediately after preparation, you should proceed to protective treatment of the terminals of a finger-type or any other battery.
Diagram of a device for balancing batteries
This is an analogue of a powerful zener diode loaded with a low-resistance load, the role of which is played here by diodes D2. D5. Microcircuit D1 measures the voltage at the plus and minus of the battery and if it rises above the threshold, it opens a powerful transistor, passing all the current from the charger through itself. How all this is connected together and to the power supply - see below.
The blocks turn out to be really small, and you can safely install them directly on the element. You just need to keep in mind that the potential of the negative pole of the battery arises on the transistor body, and you must be careful when installing common radiator systems - you must use insulation of the transistor bodies from each other.
Connection Precautions
- follow safety rules when working with electric current, wear rubber gloves;
- prevent the creation of a circuit of electric current passing through the human body;
- avoid short circuits;
- do not neglect polarity;
- do not touch the battery terminals with bare hands;
- do not collect batteries connected to loads (check each one separately before connecting it to the circuit);
- the charger must be disconnected before connecting the battery;
- use tools with insulated handles;
- do not neglect the battery current and load parameters before using the unit;
- connecting contacts must be reliable and insulated;
- protect the assembly with an insulating casing from moisture;
- use identical batteries in terms of parameters and degree of wear;
- Before using the assembly, test it for incorrect terminal connections.
When correcting errors, the load (charger) is initially disconnected, then only the unit is remade.