Regardless of the brand of water heater and its cost, breakdowns will occur sooner or later. Most of them have nothing to do with the operating features, but it would be stupid to exclude the possibility of a malfunction due to the fault of the user himself.
Each water heater, due to its design features, has certain breakdowns, but most of them can be prevented or corrected independently. The main thing is to follow clear instructions and maintain maximum safety.
How to troubleshoot
If the cause of the leak is a faulty valve, then it is replaced with a working part adjusted to the same operating pressure. When replacing, or better yet, while installing a water heater, try not to use cheap Chinese products. Remember that the safety of your family directly depends on the valve. Good Italian safety valves with the same non-separable design, although they cost several times more, are purchased once. As practice shows, there are no problems with them in the future. Connect a flexible transparent hose to the drain outlet of the device. This will help you visually evaluate the performance of the part. Lead the end of the hose into the sewer or a suitable container.
Ariston boiler analysis
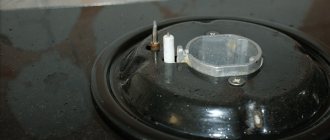
Disassembly of Ariston boilers must be carried out according to a special algorithm, taking into account some features of the device, primarily the oval flange. Thus, the preparatory stage includes the well-known power outage, as well as the draining of water necessary for further analysis. It is also possible to remove the check valve if dismantling requires it. (See also: How to make a boiler with your own hands)
The subsequent actions are similar to the established algorithm for disassembling water heaters. That is, you need to unscrew the bolts located below and remove the cover. The thermostatic device is released with a slight downward movement. Removing this equipment allows access to the flange. Ariston boilers secure the flange with a nut and a strip, so its removal will only be possible after removing these fasteners
It is important to remember that the removal of the heating element and flange is carried out by first turning the heating element down. The same algorithm of actions must be performed to assemble a disassembled boiler
The device is cleaned using all known methods, including chemical action of special agents, or mechanical action with a stiff brush.
It is very important to take into account the asymmetrical flange shape when reassembling the unit. In order to avoid problems with reassembly, it is best to remember the location of the flange in the neck
You can choose the terminal as a reference, since its position is much easier to remember. It often happens that after disassembling the unit begins to leak, in this case it is recommended to change the rubber gasket in advance.
Leaking when the boiler is off
Let's simulate the following situation: the water heater is disconnected from the network, the water supply from the water supply is turned on (the tap on the pressure line is open). Water is flowing from the boiler drain hole. The cause of this phenomenon may be either a malfunction of the safety valve or increased pressure in the line.
To find the cause of a leaking safety valve, you need to know the water pressure in the water supply
To determine the culprit of the leak, you need to measure the cold water pressure in the water supply. The fact is that if the main pressure exceeds the accepted SNiP, the valve will open and perform its functions of discharging excess water into the sewer. Most water heater safety valves that manufacturers equip their products with are set to a pressure of 6 to 8 atmospheres. The maximum pressure allowed by SNiP in main water pipelines should not exceed 6 atmospheres. In fact, it often happens that actual indicators exceed standard values by 1 - 2 atmospheres. Naturally, the safety mechanism will work.
The second cause of leaks may be the valve itself. Wear of its plate or seat, weakening of the spring - these are the factors that can lead to leaks. Cheap Chinese products are often susceptible to such malfunctions.
The possibility of particles of scale or debris getting under the locking mechanism plate, which can happen during an emergency pressure release or after draining water from the boiler during maintenance or repair work, cannot be discounted.
General tips and tricks for DIY repairs
In order for repair work to be successful and not pose a threat to life and health, you need to:
- Inspect and replace parts only with the device disconnected from the network, after draining the water in any convenient way.
- Do not attempt to independently repair faulty parts that should be replaced with new ones.
- Carry out work based on the boiler structure diagrams, which are different for each specific model.
If ultimately the water heater does not work or is working with some problems, then it is better to call a technician who has some experience and can identify all possible causes.
Why is the water heater not working?
First of all, you need to figure out the cause of the problem. Most often, owners of water heating equipment encounter the following malfunctions:
- The water pressure at the outlet of water heating equipment decreases.
- The boiler takes in water and heats it, but there is no water coming out.
- Water does not flow into the tank of the water heating unit.
A boiler is a complex system consisting of many pipes of various diameters, filters, valves and faucets. Failure of any node can lead to malfunction of the entire system.
Boiler design
Here are the main causes of malfunctions:
- Deposition of insoluble carbonate salts (scale) on pipe walls, valve parts or valves.
- Ingress of rust particles.
- Blocking the flow of water with an air bubble.
- Failure of the valve or valve (jamming of parts).
First of all, you need to find the problem node. To do this, sequentially disconnect the parts from the inlet and see after which unit water stops flowing into the system. Once the problem area is found, repairs can begin.
Disassembling the water heater
It is recommended to follow one simple rule: if the boiler shows the slightest signs of malfunction, it is better to perform a complete disassembly and a comprehensive inspection. To do this, you need to drain the water through the cold water supply pipe, opening the “hot” tap to suck in air. With proper hydraulic piping of the boiler, this possibility is always provided. Unpack the connection fittings and loosen the anchor nuts to lift the tank up and away from the wall.
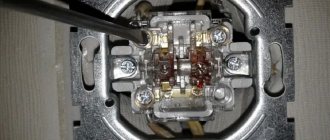
Classically shaped water heaters are serviced from the bottom. First you need to remove the protective cover of the control unit by unscrewing several screws and unfastening the latches. The task is quite delicate: not only can some fastening screws be hidden under stickers, a regulator knob or a nameplate, but also the fragile clips are located far from obvious places.
Inside the block there is electrical wiring: the red and blue wires, terminated with terminals, are removed from the contacts of the heating element, the yellow-green one is disconnected by twisting the grounding nut onto the housing. Next, we disconnect the wires of the thermostat and temperature controller, remove the thermal conductor, which is sometimes made in the form of an ordinary single-wire copper wire.
Having separated the tank and the electrical part, we tighten the nuts securing the technical flange. After removing them, you need to put some effort and tear the flange off the neck; it can become completely stuck. The tank must be in an inverted position to prevent any remaining water from leaking onto the floor.
When the flange, along with the devices attached to it, is removed, you will be able to clearly assess the quality of tap water. Scrape off the bulk of the dirt from the functional elements directly into the tank and set it aside for the time being; we’ll return to the heating element and anode a little later.
For stylish and modern tanks, the lower part of the body plays the role of a protective casing. Indication and control panels and a built-in thermometer are auxiliary equipment that is not directly related to operation; if they fail, they are replaced modularly.
Why does the boiler cool down quickly even though we recently bought it?
First, let's look at the simplest reason for a recent purchase. If you recently purchased a water heater and have not used it before, then we must warn you about some interesting points.
A good 80-liter water heater, fully heated (this can be understood by the indicator), should freely allow 3 adults to wash themselves in the shower, and at the same time the latter will no longer have hot water flowing. Why is that? We actually waste a lot of water when we bathe, so the system is designed in such a way that cold water is supplied from below, and hot water is taken from above (even if the supply visually comes from below). Therefore, when there is less and less hot water, some of it mixes with the lower layers of cold, and cool water comes out.
Even if you were told that now you can wash with almost five of you, you were deceived. Now many people are complaining about the insufficient power of their water heater, and it turns out that they were told fairy tales in stores.
Why does the boiler cool down quickly after moving or after reinstallation?
If you moved this water heater to a new apartment, or it was installed by “insufficiently qualified technicians,” there are some errors that may affect its operation.
- The most common reason why the boiler cools down quickly is incorrect connection of the water supply and outlet hoses. In this case, the water will heat up, but it will cool down much faster, since cold water will fill the system from above, and according to physics, will move down to the outlet. Therefore, after some time, you will no longer be able to wash normally, even though hot water will still be in the system.
- In addition, the concept of “water too cold” is often observed. In winter, the water entering the system is almost icy, and in summer it is slightly warmer. If before the three of you washed normally, but now the third one barely has enough time, know that this is the reason. If the three of us washed normally before, but now the first one doesn’t have enough, then most likely this is not the reason.
- It is also worth checking the pressure in the system. Often more cold water can be supplied, or rather the pressure can be much greater than necessary, and the drainage system can pump out warm and hot water to avoid rupture of the tank. This happens in extremely rare cases, especially if you installed the system using wizards. Although it is rare to find this, even if you installed it yourself.
- Sometimes, sudden cooling is possible due to the lack of shut-off valves at the hot water outlet. This is a common installation error, so if you did the installation yourself, you may want to take a look at this problem. In this case, hot water may partially go through the system to your neighbors if you live in an apartment building.
- The heating element is dirty inside. For the device to work properly, the tank must be opened and cleaned at least once a year. If it has not been cleaned for about 2-4 or more years (the period may be less due to the quality and type of water), the reason may be that a lot of sediment has accumulated on the water heating element, which interferes with normal operation. In this case, you just need to clean the water heater.
These are the main reasons why the boiler cools down quickly. Only a master can really try to solve the problem in this case, especially if the above methods did not help.
Boiler problems:
- the thermal insulation has burst or broken;
- the entire structure is installed on the roof (attic) of the house, so it easily cools down due to the external temperature;
- The water heater itself is defective.
But this happens extremely rarely. The reasons described above occur more often. You can solve it yourself if you understand the problem a little, but if not, then leave a request to the specialist.
Checking the circuit with a tester
If the light on the boiler is on, but the water does not heat up, then it is likely that the heater, which we discussed above, is not working. Checking it at home is quite simple; you need to install the tester probes on the contacts of the heating element and look at the resistance on the display. For a working heater, the resistance can vary between 0.4-0.7, as shown in the photo below. If you see “1” on the display, it means a break has occurred and you need to replace the part with a new one, because it is almost impossible to repair it.
By the way, if the boiler is electrocuted or when it is turned on the RCD turns off by itself, then the cause of the breakdown is, again, in the heater from which the leak occurs. You can check the malfunction by connecting one probe to the contact of the heating element, and the second to the tube itself. You will see “1” on the display, the part is in good working order and there is no need for repair, a negative value or too high means replacement is required. We described in more detail how to check the heating element with a multimeter in a separate article.
Another reason why the boiler does not heat the water or, on the contrary, heats up too much, is the failure of the thermostat. You can check it in two ways - with a tester or a lighter.
Everything is clear with the tester, you need to follow a similar method, but as for the lighter, everything is more interesting. To begin, remove the thermostat and press the button on it (circled in the photo below). After this, the copper contact of the thermostat must be heated. If after some time the button returns to its original position (it is knocked out), the thermostat is working. If the thermostat does not work, you can repair a boiler that does not turn off or turn on by replacing this part with a new one. I would also like to note that to replace the thermostat on a water heater there is no need to drain the water. It is enough just to disconnect the equipment from the network and disconnect all the connected wires.
Also, sometimes there is a breakdown - the water heater display does not show the temperature or the display does not work at all. In this case, check all the elements of the circuit and if you do not find a break, most likely the control unit is broken. You will not be able to repair electronics with your own hands if you lack experience and knowledge, so you will have to take the electric water heater for repair to a service center.
Why is the water heater not filling?
Filling the boiler is a simple matter at first glance
It is important to follow the correct sequence of this procedure:
- the hot water drain valve on the mixer to which the boiler is connected opens, then the cold valve of the general water supply;
- the liquid gradually fills the reservoir and displaces the air with a hiss;
- the water level in the tank rises, it begins to overflow into the pipe (level B in the figure);
- When a steady stream of water flows, you can turn off the mixer.
Diagram of water movement in the boiler
The water heater is full, only now you should turn it on. This is how it should be ideally. But it happens that the boiler suddenly does not draw cold water, although the water supply is working. What can affect this behavior of the heat exchanger?
Filter clogged
At the entrance to the boiler, the water is filtered to remove impurities. To do this, the design of the device has a mesh filter that traps debris and rust particles. The metal grate gasket becomes dirty and the garbage plug prevents the free flow of water. To resume normal filling of the boiler, you need to remove the plug from the flask and remove the mesh. Wash it in the same way as the mixer filter and return it to its place.
There are also replaceable filters with gel filler. Poor quality material can leak and clog the tubes through which water moves. If this is your case, then saving the situation will be very simple: you need to buy a normal filter. But you will have to try and thoroughly clean the water intake pipes with a brush.
Incorrect assembly
It happens that the cold water intake hose is connected to the heated water drainage point, and vice versa. Such a nuisance sometimes happens, especially if the installation was installed by a newbie. As a result, the functioning of the boiler is disrupted and water does not flow into it. The same can be said about an erroneous connection of a safety valve. A specialist will help solve the problem.
Boiler connection
Check valve faulty
To keep water in the boiler and prevent it from flowing back into the general water supply, a safety valve is built into the design of the device. It is located after the shut-off valve, at a short distance from the tank, and acts in one direction when drawing water. It is also designed to relieve excess pressure: when the water gets very hot, the valve locking device presses the spring. Excess fluid is released and the pressure stabilizes.
When worn out or when large particles get into the valve mechanism, it jams and does not allow water to flow into the boiler. It often happens that the chamber behind the disc spring becomes clogged with scale. You can return the unit to functionality by unscrewing the part, disassembling it into its components and thoroughly cleaning it. If the cleaning attempt is unsuccessful, the equipment should not be left without the valve.
We change the anode and temperature sensor
Anode replacement tools:
- Hose.
- Big basin.
- Cleaning agent.
- Knife.
- Screwdriver.
- New anode.
- Spanners.
Before carrying out work, you must disconnect the boiler from the network. The sequence of procedures is as follows:
- Remove the cover and disconnect the wiring or simply unplug it from the outlet. If the boiler has an automatic device, then it must be turned off.
In order to disconnect an electric boiler from the network, it is usually enough to remove its plug from the socket
- Shut off the water supply to the boiler inlet and pipeline. Disconnect the pipes from the tank.
- Open the cold water valve. Since cold water will come from below, and hot water is usually supplied from above under pressure, a vacuum will be created when the tap is opened. Therefore, it is necessary to supply air through the hot water supply fitting.
- Place a basin under the boiler and use a screwdriver to unscrew all the fastening screws. Remove the protective cover. We will have access to heating elements and temperature sensors.
When removing the heating element from the tank, dirt may fall out, so you must first place a wide basin under it
- Remove the flange and temperature sensors.
- Remove the heating element without damaging the rubber gasket.
- Remove the boiler from the wall, put it in the bathroom and direct the hose with water inside so that all remaining scale is washed out of the tank.
- To clean the heating element, take 50 g of citric acid and one and a half liters of water. Place a heating element in the solution and leave for 2 days.
The heating element should be left in a solution of citric acid for two days
- Remove the anode and look at its condition. If there is only one pin left, you will have to buy and install a new anode.
If the magnesium anode has exhausted its service life, you need to buy and install a new one
- After cleaning, install the heating element with the magnesium anode back.
- If necessary, you can also replace the temperature sensor if it fails. It will not affect the boiler itself, so the device will switch to normal operation. The boiler may have a scale with an arrow or a digital indicator.
When performing routine cleaning of the boiler, you can also replace the temperature sensor by installing a more modern model with a dial or digital indicator
- Reassemble the boiler in reverse order. Here you need to pay attention to the condition of the gaskets. If they are damaged, it is best to replace them with new ones to avoid water heater leaks after assembly.
Rubber gaskets are consumables, so it is best to replace them with new ones
- Connect the boiler to the network after it is completely filled with water. Pay attention to the presence of leaks and how quickly the device heats up. If water does not drip anywhere and the boiler works well, it means that the work of cleaning the heating element, replacing the anode and temperature sensor was carried out correctly.
The water in the boiler runs out quickly
Intensive use of water in the summer and a light degree of heating will lead to the boiler emptying faster. It is also possible that excess pressure is created in the tank and the safety valve releases it, releasing part of the hot water. Or, conversely, low pressure in the main water supply, which does not push cold water into the boiler; it is always half empty.
In addition, the heating element was probably recently changed to a less powerful one. The position of the temperature regulator remains at the same level, and the heating element cannot cope with heating. There are many reasons why a water heater empties quickly, below are a few of them.
Leak in the housing
Boilers are made of durable materials that can withstand high pressure and weight. With intense use and poor maintenance, corrosion forms on the inner surface of the tank - fistulas through which water leaves the tank. The development of corrosion is influenced by:
- salt deposits on the walls;
- scale;
- long idle time in an empty, undried state.
If the boiler is rotten, the holes cannot be sealed by welding. Such a housing cannot be used and should be in a landfill.
The boiler body is rusty
Leaky connections
The check valve, reducer and other elements of the plumbing structure must be connected firmly, without gaps. The nodes must be sealed with tow, fum tape or plumbing thread and filled with sealant. If this is not done, weakly secured places will definitely leak sooner or later. Imperceptibly or obviously, water will leave the boiler, and this will lead to breakdown: if the thermal protection does not work, the heater will burn out.
Causes of breakdowns
The most common causes of water heater malfunctions are the following:
- Sudden power surges in the network lead to burnout of contacts in the heating element, rendering it inoperable.
- Incorrect installation and connection, lack of grounding - the water heater is operated in conditions not intended for favorable operation, which significantly reduces its service life.
- Lack of maintenance - if the water heater is not cleaned of sediment that accumulates due to contaminated water, then sooner or later it will reduce efficiency, after which it will completely fail.
If we consider water heaters from the point of view of their design, then there are two types:
- Storage (boiler) - water from the general system is supplied to a storage tank, where it is heated to the required temperature and, on demand, discharged into a separate hot water supply pipeline. Heating is carried out using an electric heating element, and to prevent the development of corrosion, a magnesium anode is used, which needs periodic replacement.
- Flow-through - water is heated directly as the flow passes through the device. There are electric and gas ones, in which the heating power is much higher than that of storage ones.
Water heaters also differ in volume, power and brand. Cheaper models are made from the most affordable materials, but their service life is quite limited. A good and reliable option will cost the buyer a little more, but with timely cleaning it will last for many years.
DIY water heater repair Ariston 80 liters
Not every user knows how to drain water from a water heater. Almost everyone who owns an electric heating tank sooner or later faces the question of how to clean it from scale. Due to rising utility bills, including hot water supply, more and more residents are buying water heaters to constantly supply hot water to their apartment or house. The boiler is easy to use, does not take up much space and allows you to use it at any time.
A household appliance such as a water heater is very popular. Convenient and low maintenance, it has found its application both in private houses and apartments. However, not everything is as smooth as it may seem, and sometimes owners are faced with incorrect operation of the equipment. The reasons that, for example, hot water does not come from the boiler when you open the tap, may be different. If problems occur, do not panic and replace the device with a new one; in most cases, breakdowns can be repaired.
The inlet part of the water heater passes large volumes of water through itself. To protect the internal parts of the device from foreign elements and water debris, the design provides for the installation of a coarse filter
.
Due to the specific nature of its operation, the filter is subject to periodic contamination. Rusty pipes and dirty water form dense formations on the mesh gasket, interfering with the flow of liquid.
The malfunction is eliminated after thorough cleaning under running water. To do this you need:
- unscrew the cap of the flask using a special key;
- remove the mesh gasket and remove contamination;
If the clog is too dense, you can use dishwashing detergents.
Do not leave the mesh soaked in the solution with the product, just apply it to the sponge and wipe the part. After this, you need to install the filter in place, repeating all the steps in reverse order.
Coarse filter
Tools for disassembling and assembling water heaters
To disassemble the device, you will need a small number of tools; in most cases, every person has them at home, so no additional costs will be required.
Before you start disassembling the water heater, you need to prepare all the tools in advance and lay them out in front of you, so that if something happens you won’t be distracted by searching for a particular screwdriver.
List of required tools:
- Indicator screwdriver.
- Phillips and flat-head screwdrivers (depending on the screws with which the parts are fastened).
- Adjustable wrench.
- Set of spanners.
- Knife and scissors.
- Tow.
- Microfiber cloth to wipe down the insides and parts.
Required Tools
Mixer dirty
The liquid will flow in a weak stream if the mixer spout
a traffic jam has formed. The pressure will be equally bad for both cold and hot water. To fix the problem, it is necessary to carry out a number of procedures.
- Close the riser to turn off the water.
- Carefully remove the mixer.
- Unscrew the spout from the general body.
- Remove the mesh and rinse it under running water. If salt deposits or heavy dirt forms, let it soak in a special cleaning solution.
- Rinse the faucet spout thoroughly and clean the insides of dirt using a brush.
- Reassemble the mixer in reverse order and install it in place. Don't forget to open the riser.
This procedure may take some time; alternatively, you can simply replace the clogged faucet with a new one. Experts recommend replacing worn parts every few years to avoid serious damage in the future.
Trouble-shooting
Having discovered a problem unit, you need to begin restoring the boiler’s functionality. The procedure depends on the specific reason that is interfering with the normal operation of the device. Let's look at the most common situations.
Scale clogged
Water heater clogged with scale
Scale is deposits of insoluble carbonate salts on the walls of water heating devices. It is found in kettles, washing machines, and water heaters.
The amount of scale depends on the hardness of the water. In regions with hard water, even after a year of operation of the boiler, the amount of salts deposited on the walls may be sufficient to completely block the lumen of the heating element tubes or significantly narrow it.
If scale causes the water heater to fail, repairs must be carried out in the following order:
- Open and remove the protective cover from the water heater.
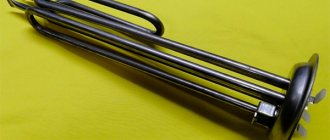
- Unscrew the nuts holding the heating element in place and remove it.
Dismantling the heating element
Wash the boiler walls and heating element coil from carbonate deposits. Organic acid - lemon or oxalic acid - will help dissolve the hard crust. You can also use industrial products - anti-scale agents. Soak the part in an acid solution to free it from accumulated deposits.
Cleaning the heating element from scale
- Using a tester, make sure that the heating element coil has not burned out due to a violation of heat removal by scale.
- If the spiral is intact, assemble the device in the reverse order of dismantling.
If the heating element fails, you will have to look for a new one or buy a new boiler - you need to choose the most economical solution. If repairs require large financial expenses, it is more profitable to immediately purchase new equipment.
Failure of the pressure reducer
The pressure drops of the incoming water in the system can range from 2.5 to 7 atm. To compensate for surges, a special unit is installed at the boiler inlet - a gearbox. Its task is to ensure equal pressure at the outlet of the boiler and from the tap. If it falls due to a gearbox failure, it is necessary to adjust its operation or replace the broken part.
Low pressure in the main water supply also leads to a drop in pressure at the outlet of the water heating boiler or instantaneous water heater. Unscrew the hose and check the pressure level: if water comes from the main water supply in a thin stream or does not flow at all, you should wait, as the problem may arise due to repair work. If the pressure has not been restored within several hours, you should contact Vodokanal.
Thermostat failure
If the water leaving the boiler does not heat up enough or does not heat up at all, the cause may be a failure of the thermostat - it is responsible for maintaining a constantly high temperature. To carry out diagnostics, turn off the power to the boiler and remove the thermostat from the housing.
- Press the thermostat button.
- Heat the copper tip of the thermostat. If the node is working properly, the button should turn off.
- Test the electrical circuits of the thermostat using a tester.
Typically, a thermostat malfunction is caused by the overheat protection tripping. As a result of the operations performed, the device should work, and the problems will disappear after it is installed in place. If the tester shows an open circuit, you will have to replace the burnt out thermostat.
Faucet clogged
If water comes out of the boiler with sufficient pressure, but flows out of the tap slowly, the reason lies in the faucet being clogged with scale or rust. You will need to turn off the water, disassemble the faucets and thoroughly clean the filter mesh. You also need to inspect all the rubber seals and make sure that the valves are working properly.
If water does not enter the boiler
If the described reasons have been eliminated, there is water pressure, but the boiler still cannot be filled, the cause may be an incorrect connection (the inlet and outlet pipes are mixed up) or a clogged mesh filter pad. It's easy to fix these problems: unscrew the hoses, rinse the filter and put everything back in the correct order.
Water heater operation diagram
Another cause of the malfunction is a broken check valve. It is installed at the entrance to the storage tank and does not allow water to return to the water supply. It can also release excess pressure when overheated. Over time, the valve spring becomes clogged with particles of scale and rust, causing the valve to jam. Disassembly and thorough cleaning will help resolve the problem. If it was not possible to clean the part and restore its functionality, you will have to look for a replacement.
Having figured out why the boiler may stop working normally and how to eliminate the most common malfunctions, it is worth focusing on preventive measures.
Most breakdowns can be avoided by following simple care recommendations:
- Do not overheat the water. Lower temperatures mean scale forms more slowly, leading to breakdowns.
- The design of many boilers includes the use of softening cartridges. Don't skimp on water softening, as this will help you avoid spending on repairs.
- When leaving for several days, turn off the device without draining the water. But turning it off at night to save energy is impractical due to the high wear and tear on the electrical part.
You can solve the problem yourself. Let's look at the most common malfunctions of water heaters.
Can I fix the problem myself?
Troubleshooting a water heater requires the user to have experience working with water heating equipment. This will help him not to confuse anything and actions to correct breakdowns will not cause even bigger problems.
If there is no such experience, then when dismantling various parts of the water heater, disassembling its parts and components, it is better to invite a specialist involved in the repair of devices of this class and brand. The measures are related to the fact that different models of devices from different manufacturers necessarily have significant design and functional features and their own specific functioning. This applies to both the appearance of the device and the features of the configuration, the layout of its internal parts and elements.
For example, one well-known company decided to equip its water heaters with connecting elements in the form of self-clamping clamps, while another uses nuts to connect pipes, and the use of anything else, in this case, will be useless.
In heating devices from other companies, the spiral of the water heating element is placed in a hole with a diameter of 65 mm. To attach it to the tank, special tools are needed, and the screwed-in bolts are so tightly connected to the nuts that it is simply impossible to unscrew them even if you try. As a result, when something in the device fails, it will not be possible to quickly open its case. In addition, all fastening parts, and there may be more than 12 of them, will have to be removed with a grinder, and the likelihood that by removing the bolts, you can also remove part of the body at the same time is very high. In addition, a boiler is an electrical device, and in order to work with it, you need to know which wire should be connected to which element. Not knowing and not following safety precautions when working with electrical devices can lead to dangerous consequences, the most harmless of which will be a short circuit in the electrical wiring.
If there are interruptions in the operation of the boiler, you cannot do without contacting specialists because difficulties are caused not only by the breakdown of parts of the device, but also by external factors that are in no way dependent on either the user or the device that he is trying to fix on his own.
However, it is necessary to carry out preventive maintenance of the device from time to time: change filters, inspect the internal tank for leaks and possible damage, check the integrity of the electrical wiring, at the slightest suspicion that the device is not working correctly. In the event of a breakdown, contact the service center to troubleshoot. Then the water heater will last a long time and it will be safe to use.
Cleaning and Maintenance
Following the manufacturer's recommendations can save the boiler owner from many problems. For example, the instructions usually recommend regular maintenance of the boiler, which boils down to an external inspection and cleaning procedure.
Typically, recommended maintenance periods vary depending on the type of heating element and the nature of its operation. For a “wet” heating element, it is recommended to clean it annually, and for a “dry” heating element - at least once every two years.
If the device is used under increased loads, for example, in production or in a public place, then maintenance should be carried out every six months, regardless of the type of heating element.
During operation, scale and debris accumulate inside the boiler; to remove these contaminants, the device should be cleaned regularly
The maintenance procedure may affect warranty service. Sometimes the manufacturer indicates in the documents that the procedure should be carried out not by the owner of the device, but by repairmen certified by the manufacturer. In this case, it is better to follow the manufacturer's instructions.
Carrying out maintenance yourself is not too difficult. To do this, you need to disconnect the boiler from the power supply and water supply, and then drain the water inside. After this, the housing is opened by unscrewing the fastening bolts and the heating element is removed. The heater and the inner surface of the tank are cleaned of scale and dirt.
The protective gasket and magnesium anode are replaced. Then the device is reassembled and connected to the electrical and water supply networks. One of the common causes of damage to the boiler tank is so-called electrical corrosion. It gradually destroys the surface of the drive, which leads to leakage.
To prevent this problem, many manufacturers install a magnesium anode next to the heating element. This element does not last forever; the task of the device owner is to promptly replace it with a new element. Unfortunately, some people forget about this, which can result in their boiler being completely damaged.
The magnesium anode gradually wears out, it is recommended to replace it with a new element every year or two, depending on the heating element model
Do not forget about such an important protective element as grounding. Its absence not only creates a risk of injury when operating the device, but can also intensify or provoke electrocorrosion.
Weakness of the non-return safety valve
Water leakage through the valve drain pipe can be considered normal if a liter jar is drawn drop by drop from it over the course of a day. This is the excess formed when pressure increases from heating. But sometimes it is impossible to determine the amount of liquid flowing out, since it goes down the drain hose into the sewer. If the boiler empties unusually quickly, you may suspect a weak valve. In this case, you will have to install a new part, and in general it is recommended to change this important unit annually.
Water drips from the valve - this is normal.
It is forbidden to empty the boiler through the safety valve opening! Scale and sediment can clog the drainage pores and the mechanism will stop functioning.
- No matter how well the water heater is thermally insulated, heat loss cannot be avoided. So you shouldn't set the temperature regulator to maximum. If the water consumption is moderate, it is better to heat it to a medium temperature so that dilution is not required. Strong heating is desirable at a time when you need to take a shower and you will need to draw a lot of water. Lower temperature means less scale.
- If no one will be home for several days, the water heater should be turned off, but left full. But night shutdowns will not help save energy and will even lead to accelerated wear and breakdown of electronics, which are often forced to experience overloads.
- After a long period of inactivity, the musty water must be drained, the boiler must be rinsed and refilled. Warm up at maximum mode for two hours, this will help get rid of unpleasant odors and bacteria. When there is no need to use the boiler for a long time, for example, in winter at the dacha, it is emptied, dried well and kept warm.
- A useful element such as a magnesium anode will help reduce the formation of scale on the walls of the boiler. It dissolves over time and should be replaced about once a year. But this is a general recommendation, and in each specific case you need to think about whether to interfere with the operation of the equipment. The level of hardness and impurities in the water is different everywhere, but if the unit begins to crackle and heats up more slowly, it would be a good idea to disassemble the structure and inspect it from the inside.
Anode for water heater
- To soften the water, you can install a filter at the inlet of the boiler, the cartridge of which is filled with a special resin. This substance displaces magnesium and calcium ions, and sodium ions appear in their place. Another way to reduce water hardness is to install a hydromagnetic system. The magnet crystallizes the salts, turning them into sludge, which are then retained by the filter.
A properly installed and properly operated boiler can last up to 15 years. Its performance is influenced by various factors: from water parameters to the quality level of parts and components. In diagnostics and repairs, the “random” method should not be used; the main rule is to follow the requirements of the instructions.
Storage tanks capable of heating water to a certain temperature (in common parlance - water heaters or boilers) are most often installed in those rooms where there is no centralized supply of hot water, or there is a high probability of its shutdown. This device has not lost its relevance from ancient times to the present day. Thus, the ancient Greek mechanic Heron of Alexandria (second half of the 1st century AD) is rightfully considered the inventor of the boiler. The unit he created heated cold water with steam. Then they forgot about it, and therefore at the end of the 17th - beginning of the 18th centuries they were forced to reinvent the device. But, like any other household electrical appliance, even an advanced water heater can break down as a result of exposure to internal or external factors, as well as due to simple wear and tear of parts. All the reasons why hot water does not come from the boiler, as well as ways to eliminate them, will be described in this material.
How to care for your water heater
The quality of main water allows for an increased content of hardness salts. A concentration of magnesium and calcium salts that is harmless to humans precipitates on the surface of the heating element. The same layer of salts on the inner surface of the tank is not dangerous. It increases the protective layer and becomes additional insulation. And the heating element must be cleaned annually, since the sediment does not conduct heat, the element overheats and fails. In an acidic solution of acetic or citric acid, the precipitate is destroyed and the element becomes pure.
As a preventive against scale, you can use preliminary softening of water before supplying it to the water heater. There are special water purification filters for this. Be sure to install a filter on the water supply line to remove suspended substances from the water and direct them into the sump.
Valve leakage during water heater operation
If the water heater is connected to the network and heats water for a long time without significant water intake, then the cause of the constant leakage is most likely a faulty safety valve. The fact is that during the initial heating of cold water, its volume in the boiler will increase by about 2-3%. This excess liquid will be discharged from the tank. In the future, the boiler simply maintains the temperature of the hot water, so there should be no leaks, so the cause should be sought either in a breakdown or in a clogged safety valve.
A completely different picture should be observed with increased water consumption, for example, while taking a shower: the constantly leaving volume of hot liquid will be continuously replaced by cold water. But when it heats up, the excesses indicated above will begin to appear. Therefore, the flow of a certain amount of water from the drainage hole in this case is quite logical.
Safety valve device for water heater
And the third option is for a small, extended water withdrawal. For example, washing dishes or cooking. With such a flow rate of hot water, there should not be a constant leak from the drainage tube, but the periodic leakage of liquid drops will indicate the correct operation of the water heater.
In what cases is it necessary to dismantle an indirect heating water heater?
Gas boiler piping diagram. The magnesium anode in the storage water heater, used for the catalyst in order to protect the tank walls from rust and aggressive influences on the heating device, needs to be changed sometimes.
The service life of the anode is determined by the quality properties of the water used in the storage water heater (it is recommended to place it on the cold supply
specialized water filter), operating temperature of the water, degree of intensity of operation of the water heater.
The usual period of use of a magnesium anode, indicated in the operating instructions for an electric storage water heater, will not exceed 6 months. When operating an electric storage water heater in light mode, the magnesium anode will most likely last 1-1.5 years without replacement.
Along with changing the anode, to prevent water heating, you should carefully clean the space inside the tank from scale and wash the walls.
The heating element also needs to be cleaned using special chemicals or an ordinary iron dish sponge.
An additional need to disassemble the water heater appears as a result of an accident, malfunction or reaction of the electric storage water heater to original operating conditions.
Basically, the heating element fails.
Diagram for connecting an electric storage water heater to the network. If the water from an electric storage water heater has a bad odor, a yellow or brownish tint, this indicates corrosion and clogging of the tank. The same is evidenced by the fact that the water takes too long to heat up and the occurrence of loud foreign sounds during the working period of TENA.
It is necessary to quickly disassemble the indirect heating water heater, identify the breakdown and eliminate it. In any case, it is necessary to very carefully wash the indirect heating water heater and make sure that both the walls of the storage tank and the tubular type heating element are clean.
If there is a leak in the storage water heater, you need to make sure that the rubber waterproofing gasket is reliable. If necessary, the gasket should be changed.
If the leak appears as a result of depressurization of the storage tank itself, it is impossible to eliminate this malfunction with your own hands. This may be a manufacturing defect - then the indirect heating water heater must be replaced due to warranty agreements.
Sometimes, as a result of poor operation of an electric storage water heater, the walls of the storage tank may rust. In this option, replacing the storage tank may cost more than a new water heater.
Device and principle of operation
In general, we can talk about three types of devices capable of storing and heating water:
- electric water heaters;
- indirect heating boilers;
- gas water storage tanks.
All of these devices have a similar design and operate on the same principle. They differ only in the heat sources used to heat the water. In this case, the role of a heater can be performed by: a heating element, a coil with a coolant supplied to it (for example, a boiler), or a gas burner. Structurally, all boilers have the form of a wall-mounted tank, the internal surfaces of which are covered with heat-insulating material. Cold water enters it through a pipe located in the lower part, and the heated liquid is taken from the upper part.
The heaters in all boilers are located in the lower part. The water in the tank is heated to the required temperature and then used by the owner for its intended purpose. To maintain and, if necessary, adjust the required temperature regime, a special thermostat is built
. In addition, the boiler is equipped with a temperature meter, with which the user can control the degree of water heating, and a safety valve that prevents the unnecessary leakage of liquid.
Disassembling the Termex boiler
Disassembling a Termex boiler is not difficult if you follow the established instructions. The same sequence of actions is typical for the procedure for dismantling similar devices. Of course, first the device is completely isolated from the flow of electricity. Next, you need to get rid of the presence of water in the tank using a special valve. When this work is completed, you need to unscrew the cap nut.
The following steps are aimed at dismantling the shields made of plastic, as well as removing the fastening screw, which should be located in the center. Sometimes a screw is hidden behind a sticker, so don’t be afraid of its absence; such security seals can also be found when you try to disassemble a Gorenje boiler.
After removing this screw, the bottom cover can be easily removed. Don't be afraid of the internal structure. It is really very complex due to the abundance of all kinds of electrical elements. It is recommended to photograph or otherwise record such a complex interior of the boiler. Do not neglect this advice, since disassembling a water heater is much easier than assembling it, and this close-up photograph or sketched diagram will help complete this time-consuming task.
The following steps involve disabling the control board and thermal protection element. This can be done by unscrewing the fastening screws. In addition, the bracket must be removed. Do not forget about the harmful factors of water, so it is recommended to put these elements in a safe, dry place. Be sure to disconnect the connector connecting the internal control board to the external one.
Both heating elements are attached to the flange using 6 nuts that must be unscrewed. It is recommended to handle electronic storage devices very carefully and dismantle them carefully and slowly. Often they are completely covered with scale. After the entire procedure has been completed, you can proceed to cleaning the device.
Many people try to dismantle the external control panel, but this process is not easy. The offending sticker is heated with a hair dryer and then peeled off. Under the sticker there is a protective strip secured with 5 screws.
By unscrewing these parts, you can remove the panel behind which the external control board is hidden. Assembling this device is not an easy procedure; disassembling it is much easier
It is important not to forget to use the recorded diagram of the assembled structure and carefully carry out installation work