For incandescent or halogen lamps, heating is normal and always accompanies the operation of the devices. Overheating is strictly contraindicated for LEDs, but within certain limits they also generate heat. If the LED strip heats up, owners have a lot of questions - how much is this permissible and to what extent such heating is considered normal. The concern is understandable and correct - timely corrections make it possible to keep the backlight in working condition. Let's consider this issue in detail.
Additional sources of unpleasant phenomena
Have you managed to work through all the options outlined above, but still haven’t figured out why the LED strip is blinking? Perhaps the root of the trouble lies in the following aspects:
- Lack of power. In this combination of circumstances, blinking does not occur immediately, but only after heating the microcircuits and the electrons of the system elements.
- After soldering the ends, traces of flux and acid remained on the tape. In this case, the lighting defect is caused by the corrosive action of the acid.
- The battery in the remote control is exhausted.
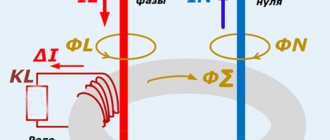
- Incorrect installation. Flickering will make itself felt if you confuse zero and phase.
Temperature of LED lamps
On many lamps intended for lighting, the manufacturer indicates a parameter such as color temperature. This is a key factor to consider before purchasing a lamp. Color temperature indicates what wavelength the light-emitting element emits. For domestic purposes, Kelvin (K) is used for spectrum gradation.
Our organ of vision is capable of perceiving light radiation in a huge range from 800K to 25000K. The most optimal and comfortable range for us is the one that is as close as possible to daylight - 4500K-5200K.
Advantages of a gentle temperature regime
Heating of LED lamps
The features of heat removal from LED lamps, which prevent its working parts from heating above 65-70 degrees, emphasize their advantages over other emitting products. The absence of mercury vapor harmful to apartment dwellers, as is observed in fluorescent devices, as well as a service life incomparable with other types of illuminants, make these lamps a real gift for the user.
The advantage of LED products is that despite internal heat losses, they still guarantee significant energy savings.
LED lamps perform best in well-ventilated areas with artificial (forced) ventilation. And installing such lamps in hot places with limited space, without free access and circulation of air masses, means exposing the products to danger.
Modern lighting devices, built on the basis of LED lamps, belong to the category of relatively new products that require constant monitoring and updating. As long as this process continues, each user has the opportunity to try out this original new product and experience it in various operating modes.
Checking the heating temperature of the LED lamp base
The light source is an LED; there can be one or many of them, depending on the desired power. Such LEDs in lamps are sometimes called chips.
Diffuser - serves to ensure that the light from the LEDs is diffused evenly and softly. Made from polycarbonate and other types of plastic.
A printed circuit board on which the LEDs are installed. It ensures efficient transfer of generated heat through thermal paste to the heat-removing metal (radiator).
The heatsink is the part of the lamp that is responsible for dissipating the heat generated by the LEDs. Often made of anodized aluminum, less often of regular aluminum. The radiator design has a ribbed shape to increase the heat transfer area.
Driver - required to convert AC to DC and rectify voltage ripples.
The polymer base of the plinth body serves to isolate the entire structure from electrical breakdown.
Base - serves to connect the conductive parts of the LED lamp with the socket.
The design and manufacturing process is described in detail in the video:
https://youtube.com/watch?v=MHezLYg-eMg
The importance and selection of the right light shade
It has been scientifically proven that the shade of light affects the psychological impact of space and can significantly change the perception of the appearance of illuminated objects. And it has also been proven that the correct choice of light temperature can have a beneficial effect on human behavior. For example, in a jewelry store, a well-chosen shade of display lighting emphasizes the beauty of the product and promotes sales.
The color temperature of LED lamps directly affects the comfort in the illuminated room. According to the Tc value, all LED lamps are usually divided into 3 groups:
- warm glow 2700–3500°K;
- neutral glow 3500–5300°K;
- cold glow 5300–6800°K.
Warm-colored LED lamps are ideal for home and living room lighting, as their light is less irritating to the eyes.
Warm tones give objects a yellowish tint and create an evening atmosphere. It is worth noting that LED lamps with a warm glow are indispensable for organizing lighting in recreation areas. Neutral light is used in lighting industrial premises and offices. LED lamps with Tс=4000-4500°K help improve performance, which has been proven by practical research. A further increase in color temperature with a transition to the cold region leads to sudden fatigue and nervous tension. Within an apartment, neutral light LED lamps can also be used:
- as the main lighting of the bathroom;
- in table lamps designed to illuminate students’ workplaces;
- in the kitchen where food is prepared.
LED lamps with a Tg of more than 5300°K can only be installed in non-residential premises and workplaces where high concentration of attention is required for a short time. In addition, they are effectively used in emergency lighting.
In conclusion, it is worth noting once again that the color temperature of LED lamps is an important characteristic, for the selection of which there are many tables. But you definitely shouldn’t choose an LED lamp based only on the light shade parameter. The correct choice is possible only taking into account all the technical features.
Source: ledjournal.info
How to identify a burnt-out block without instruments
How to understand that the power supply has failed and broken? How to quickly distinguish without measuring instruments that the breakdown is in it, and not in the tape itself?
If the entire LED backlight from start to finish works poorly or does not work at all (does not light), then this is the first reason for the failure of the unit.
But when the light is dim or part of the LED lighting has gone out, look for the problem in the failed LEDs. Most likely there was overheating or the contacts were unsoldered somewhere.
The second sign is a change in sound during operation. The faulty unit begins to squeak or whistle, although nothing like this has been observed before.
Moreover, the squeak may not be pronounced, which can be heard several meters away, but is quite audible up close.
The ice strip can still burn and glow as if nothing had happened. However, be aware that your power supply is reaching the end of its life.
If this device is under warranty and you did not buy it from a Chinese online store, then it’s time to send it for a replacement before the warranty period has expired.
The third sign of a burnt-out block failure is that the ENTIRE tape begins to blink or flicker like at a disco. Again - not in separate sections, but entirely and along the entire length.
Of course, there are several reasons for flickering, and you shouldn’t immediately blame just one unit for it.
Such blinking can often be seen not only on LED strips, but also on spotlights. But the main problem with these flickerings is the LED matrix and the burnout of its components.
Solutions to the problem
If you notice a heating cable, then you need to know how to solve this problem. There are several popular ways to determine the problem and fix it.
Appliances
Household appliances are the main cause of overheating of the electrical network. Excessive heating of conductors occurs due to the high power of the consumer and the cable not designed for such power. But if this is not the reason, then a simple sequence will help you quickly find and fix the problem.
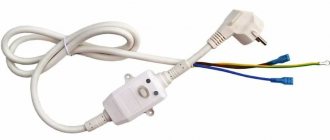
- Check whether the cable is equally heated along its entire length, or whether a high temperature is observed in one place. A common problem is poor electrical contact between the plug and the cable leading to the household appliance.
How to fix:
- It is necessary to unscrew the bolts securing the fork body and remove the top cover.
- Loosen the wire fastening contacts and remove the wires.
- Clean the wires and contact points - remove all obstacles to the passage of electric current. Then put the wires in their place and carefully tighten the bolts.
- The final stage is assembling the cover.
- Poor cable contact at the input of the household appliance. If the plug is intact, the quality of the contacts is at the proper level, and the wire is heating up on the other side, then you should check the distribution box (or, as it is called, the terminal box) of the household appliance.
How to fix:
- Unscrew the 4 bolts securing the upper cover of the terminal box and remove the cover itself. Below it there is a terminal block in which direct contact is made between the input wire and the wire of the household appliance.
- The block should be unscrewed, the wires should be taken out and stripped, as well as the places where the block is attached. For cleaning, it is convenient to use a small needle file or fine-grained sandpaper.
- After stripping, install the cables into the terminal block, tighten with bolts and replace the cover.
- If the cable heats up along its entire length, and the socket is designed for the permissible current of the household appliance, then there is only one reason - the poor quality of the cable. This conductor should be replaced.
Wiring
Excessive heating of wires in home electrical wiring is accompanied by the smell of burnt insulation and leads to improper operation of household appliances. In some cases, electrical appliances may even fail.
Fault detection sequence:
- The main problem may be the connection location of the power cables in the apartment panel. Usually the input cable is attached to a copper bus, from which the wires will go further into the apartment. A loose contact on the bus leads to gradual heating of the cable, and sparking is also possible. It is enough to strip the wire and tighten the contacts a little.
Important! Stranded copper wires must first be crimped with a sleeve, after which the tip is secured to the busbar using a bolted connection
- Another reason for an increase in conductor temperature is a weak contact on the circuit breaker or its malfunction. The high rating of the machine leads to gradual heating of the cables, melting of the insulation and its fire. It is enough to turn on several powerful household appliances, for example, a washing machine and a boiler, while the machine is not working, and the result will not take long to arrive. Poor contact between conductor and circuit breaker
- The junction box is one of the most unsafe places in electrical installations. One under-tightened twist leads to burnt insulation and a possible short circuit. Therefore, it is better to make all connections in distribution boxes using copper terminal blocks.
Why is the issue of thermal conditions so important?
Increased heating of the LED strip affects the performance of the product and light characteristics, and also negatively affects the parameters of the strip during the life cycle. During short-term overheating, reversible processes occur associated with a shift in color temperature or a decrease in light output.
The dependence of the brightness of the glow on temperature can be seen on elements of yellow and red colors; blue LEDs are the least sensitive to overheating. Tape manufacturers calibrate products on the RGB scale based on brightness and color measurements at a fixed temperature of 25°C. During testing, a short current pulse (25 ms) is applied, which does not affect the temperature background of the elements. During prolonged operation, the LED heats up, which reduces the brightness compared to the declared value.
Prolonged operation at elevated temperatures accelerates wear of the LED, which further reduces the brightness of the light. Laboratory tests have shown that an increase in operating temperature by 11°C leads to a reduction in the service life of the product by more than 2 times. There are LEDs designed for operation at elevated temperatures (up to 100°C). For example, products with white light have a service life of up to 50 thousand hours. But when the safety margin is developed, the brightness of the products drops by 70%.
Unit
From a physics point of view, color temperature (Tc) characterizes the radiation intensity of a light source in the operating frequency spectrum and functionally depends on the wavelength. It affects the color perception of illuminated objects by the human eye. It is measured in degrees Kelvin (°K).
In some cases, as a more convenient value, the value in mireds (M) is used. Mired, or inverse microdegree, is equal to one million divided by the Tc value in kelvins.
The temperature of the light tint of LEDs used in general and additional lighting fixtures is set using a phosphor layer. The method of applying the phosphor, the chemical composition and thickness of its layer are the determining factors for the future color and brightness characteristics of the LED lamp.
What happens if you connect like this?
The second tape will shine dimmer, and the last diodes will shine very dimly. If the tape is low-power (for example, SMD 3028, 60 diodes per meter), then the brightness of the glow along the entire length will be the same. But along the current-carrying paths, a current higher than the rated one will flow.
| Ready-made sets for ceiling lighting | |
| We will assemble the lighting personally for your ceiling. Qualitatively! We will deliver to your door in any city in Russia. |
The tracks will start to heat up, and heat is what LEDs fear most. As practice shows, such a connection scheme significantly reduces the service life of the LED strip. Therefore, a different (correct) connection scheme is used.
Connection diagram for LED strips from one power supply
This connection diagram uses one power supply. At the same time, its power must correspond to the total power of two (or more) tapes.
In order to supply 12 volt power to the second tape, you need to connect an extension wire to the output of the power supply. Connect the second end of the wire to the second tape. This way, the current will flow through the wire and not along the tracks of the first tape.
I recommend taking a larger cross-section of the extension wire so that there is less voltage loss. I use a 1.5mm section. The length of the wire is the same as that of the first tape, i.e. 5 meters. It is mounted in a niche, parallel to the first tape.
This LED strip connection scheme is used if it is possible to hide a powerful (and therefore large) power supply. If this is not possible, then another scheme is used. It's a little more complicated, but the cost is about the same
Connection diagram for LED strip with two power supplies
With this scheme, the extension wire is connected to a 220 volt network and extended to the power supply of the second tape. The wire cross-section is sufficiently 0.75 mm.
With this scheme, installation is a little more complicated (you need to secure and connect an additional power supply), but the power of the power supplies is 2 times less. Accordingly, their size is also smaller. Personally, I like this option better.
| Ready-made sets for ceiling lighting |
| We will assemble the lighting personally for your ceiling. Qualitatively! We will deliver to your door in any city in Russia. |
- Connection diagram for multicolor RGB LED strip
- How to choose an LED strip?
- How many years will an LED strip last?
- All articles >>
Why does the plug in the socket heat up: wiring faults, elimination of heating
The plug combined with the socket is a quick-release contact connection. In this way, almost any modern equipment can be connected to the network. This method is reliable, simple and convenient if all components of the system are in working order. Otherwise, the plug in the socket gets hot or other problems occur.
Load determination using wire cross-section
Table for selecting cable cross-section depending on the load
To check the wiring capabilities and determine the maximum load for a specific electrical network, you need to find out the cross-sectional area of the wire and perform calculations:
- First, you should determine the diameter of the core using a caliper. The actual cross-sectional area is found using the formula: Sф.=0.785*D2. Instead of “D”, substitute the measurement result.
- To calculate the specific current and power, you must find the difference between the maximum and minimum values in the interval in which the calculated cross-sectional area falls. The difference in specific current strength is divided by the difference in cross sections in the same interval, where the smaller value is index 1, and the larger value is index 2, namely Isp. = (I2-I1)/(S2/S1). The value is obtained in A/mm2. Specific power is found in a similar way: Nsp.=(N2-N1)/(S2/S1). The required current and power values are calculated using the formulas: Isq.=(Sph.-S1)*Isp.+I1 and Nsq.=(Sph.-S1)*Nsp.+N1.
If the values obtained in the calculations are less than those indicated in the instructions for electrical appliances, the cause of heating is weak electrical wiring.
Why does the wire in electrical appliances and extension cords get hot?
Heating of the wire in electrical appliances is caused by a disproportionate ratio of the cross-section of the wire and the strength of the current that flows through it. If the wire is thin and the appliance is powerful, for example an electric kettle or electric heater, the thin wires will heat up. The same thing happens if a device with a cable of sufficient diameter is connected to an outlet using a household extension cord.
The socket on the washing machine gets hot
If the socket is frequently removed and plugged in, the connectors quickly become damaged.
If the outlet into which the washing machine is connected heats up, this phenomenon may be caused by the following reasons:
- Disproportionate power of the machine connected to the outlet - on the body of the outlet it is indicated what power it is designed for. If the numbers don't match, it will inevitably cause overheating.
- Poor contact between the plug and the socket is observed when connecting a Soviet-style plug to a European socket. The electrodes of the Soviet plug are a millimeter thinner, and therefore the contact density is less.
- The socket itself is faulty. Visually it can be diagnosed by the presence of cracks and melted areas.
- Weak socket contact blades. Due to careless use, the clamps may become loose.
None of these reasons will go away on their own. Measures should be taken to eliminate it.
The water heater plug is getting hot
It is not advisable to use adapters
A water heater is a powerful device. A boiler, for example, has a power of 1.5 to 2.5 kW, and its amperage reaches 12 A. If the plug, socket or cable becomes so hot that it is impossible to touch it, the possible reasons are the following:
- the cable has a cross-section of less than 2.5 mm2;
- there is poor contact of the plug in the socket;
- the water heater is connected via an extension cord;
- A low-quality or old-style socket is installed.
Heating of the boiler plug is acceptable, but the temperature must be within normal limits.
A hot, but not scalding body without any traces of melting is not a cause for concern. No tags for this post.
LED strips and their heating
About 10 years have passed since the mass appearance of the first LED strips on chips such as SMD 3528 and SMD 5050. During this time, scientists managed to increase the luminous output of the crystal several times, while maintaining the miniature size of the LED. This is how highly efficient light-emitting diodes SMD 3014, SMD 2835, SMD 5730 and their derivatives appeared, which are today successfully used in the production of LED strips.
Below is the dissipation power of the most famous types of white SMD LEDs used in LED strips:
- SMD 3528 – up to 100 mW;
- SMD 5050 – 300 mW;
- SMD 3020 – 100 mW;
- SMD 3014 – 150 mW;
- SMD 2835 – 500 mW;
- SMD 5630 – 500 mW;
- SMD 5730-1 – 1000 mW.
It can be seen that the power of some LEDs has increased several times compared to the pioneer SMD 3528, which clearly proves the need for installation on a heat-conducting surface.
Sorting LEDs by bins*.
When manufacturing LEDs, just like any other products, their parameters have certain deviations from the nominal values, this also applies to color temperature. Permissible deviations are regulated by standards, for example, the color standard C78.377A, developed by the American National Standards Institute (ANSI) (Table 2), defines 8 nominal color temperatures. LEDs whose color matches the specified nominal TCV value and color range comply with the standard.
Table 2. ANSI C78.377A standard for TCV
ANSI Standard C78.377A for TCV
The difference in color for LEDs that comply with the standard is clearly visible, so in practice, manufacturers divide each range into several bins (subclasses).
One of the main tasks of lighting manufacturers is to divide LEDs into bins in a way that minimizes color differences between individual lighting fixtures or between batches of such products.
To understand how the bin is defined, let's look again at the CIE 1931 color space diagram and zoom in on the blackbody emission curve. Changes in color temperature are located on the blackbody emission curve, but changes in LED color are also located above and below the blackbody emission curve. LEDs whose color coordinates lie above the blackbody emission curve have a greenish tint, while those below them have a pinkish tint. In practice, this means that specifying a color temperature does not ensure consistent color.
Color temperature ranges according to ANSI C78.377A.
For example, the two diagrams below illustrate two hypothetical bins of LEDs, each with a color temperature of 5300 K, with a deviation of +/- 300 K. Bin 1 has some color deviation because its region lies above and below the blackbody emission curve. The color deviation of bin 2 is four times greater, although it also corresponds to the color temperature specified by the manufacturer.
Example of LED bins.
Each manufacturer offers its own division into bins, for example, OSRAM offers several bins of LEDs with the same color temperature. Each bin is within the region corresponding to the ANSI standard for that chromaticity. The diagram below shows an example of binning for OSRAM Golden DRAGON LEDs with a color temperature of 2700 K. Although all 16 bins offered by OSRAM comply with the ANSI C78.377A standard for a nominal TCV of 2700 K, they differ in TCV and color tone. Therefore, it is necessary to take into account the LED bin when installing lamps from different batches of the same manufacturer, or from different manufacturers.
An example of dividing a range into bins.
The LED strip is also made up of LEDs of one bin; each strip of the ARlight brand presented in our online store is controlled according to shade indicators, which is indicated by the BIN code on the packaging.
BIN marking on ARlight tape packaging
LED strips ARlight color temperature 4000K Day white in different BINs (top 39G, bottom 46).
In the image above you can see how the ribbons with different bins differ in color tone. In reality, the difference is noticeable only if you put two ribbons side by side; in the photo, the saturation and richness of the colors is specially increased. The human eye is able to notice two light sources that are not nearby by color at a temperature difference of 400-600K; the difference is felt better in warm shades, less in cold ones.
Before installing LED strips, lamps, rulers and other lighting products based on LEDs, check their BIN (shade, performance). The BINs must match on all adjacent LED strips. This rule must be applied to all color temperatures of white light, as well as to RGB or RGB-W LED strips. Two RGB strips installed next to each other with different bins (BIN) will differ in shade from each other!
* This section contains materials provided by Philips Color Kinetics.
FAQ
Instead of a conclusion, we will answer frequently asked questions about the use and connection of LED strips. Let's start analyzing them!
8.1. What wire size should I use for the connection?
To calculate the cross-section of the wire for connecting an LED strip, you need to calculate its current or power. These data are indicated on its packaging, usually in the form of specific power per 1 meter (Ampere per meter or Watt per meter). If you bought an LED strip, and only the power is indicated, for example, 14.4 W/m, then simply divide the Watts by the supply voltage, let’s say it is 12 Volts.
14.4W/12V=1.2A
Then count the footage of the backlight connected to one line, and you will find out the total current consumption. Using the following table, select the current cross-section of the conductors.
In most cases, a 2x0.75 mm wire is suitable for connecting a single-color tape, and 4x0.75 mm wire is suitable for an RGB tape. It is inconvenient to use a smaller cross-section and the mechanical strength of thin conductors is always lower (they will break at the slightest load or damage). For high backlight power (more than 15 meters of tape) or a long distance from the power supply to the backlight, wires with conductors with a cross-section of 1.5 mm? are used.
Wire grades can be used like ShVVP or PVS. It is prohibited to use PUGNP due to its non-compliance with modern standards of insulation thickness, and popular cables of the VVGng-LS type are inconvenient to install and solder, because it has monolithic hard cores.
8.2. What is serial and parallel connection of tapes?
In the classical sense, a series connection is the connection of loads with one terminal to each other, or the connection of power sources according to the “plus one to the minus of the other” circuit. In the context of connecting an LED strip, serial means connecting the next piece of strip to the end of the previous one.
The total length of all segments should not exceed 5 meters, since the conductive tracks of the tape are not designed for heavy loads. This means that you can connect “in series” 5 pieces of 1 meter of tape, 10 pieces of 0.5 meters each, and so on, but no more than 5 meters in total.
8.3. How to connect an LED strip without a power supply?
Without a power supply, only a 220-volt tape works, but due to the disadvantages listed above, it is only suitable for a limited range of tasks.
A low-voltage strip without power supplies can be connected using batteries or an accumulator, for example, for lighting in a car or motorcycle. By the way, this is why 12V LED strip is more common than options with a 24V supply voltage, although controllers and dimmers support 24V and in this case you can connect backlighting with 2 times more power.
8.4. Is the tape connected on one side or on both sides?
Another controversial point: at how many points should power be supplied to the LED strip? On one or both sides? There are no restrictions - you can connect power from both sides. Moreover, cheap tapes may have a reduced cross-section of the conductive paths, because of this, towards the end of the tape there will be voltage drops and the LEDs will shine weaker. In this case, feeding the tape from both sides compensates for the drawdown.
But with “premium” or “luxury” class belts, you can safely supply power only from one side.
8.5. How to simply extend the wires from the tape without soldering?
The easiest way to extend wires is to use WAGO type terminals. They come in disposable and reusable lever clamp types. All you need to do is strip the wire and insert it into the terminal block connector, then tighten the clamp
But pay attention to the minimum cross-section of wires that can be connected to a specific terminal block, as well as how well it is clamped after connection
Do not twist the wires - they will not provide reliable contact.
Why does the zero in the electrical wiring get hot?
Strong heating of the zero, as a rule, occurs in the distribution panel or at the cable entry into the house. Heating occurs on plugs with fuses (automatic circuit breakers), or on terminal blocks for connecting wires in the house.
To find out the reason for heating the electrical wiring in the house, you should go from simple to complex:
Wires heat up due to load - the most common reason is old electrical wiring in the house. Previously, when there were no 2 kW kettles, washing machines, water heaters, etc., no one thought ahead. Therefore, the cross-section of wires for electrical wiring was chosen to have a minimum diameter, not like now.
By the way, this problem is also typical in the case of poor voltage in the electrical network, since transformer substations and village power lines are simply not designed for “today’s” loads. In other words, having abandoned stove heating, everyone rushed to install electric boilers, which is why the electrical network cannot withstand the excessive loads that have arisen.
Therefore, if you are worried about very hot wires in your house, then you should think about how long ago they were replaced and what diameter they were installed. Perhaps, turning on a kettle, an electric oven and a water heater at the same time, the wiring simply cannot withstand the load, about 6 kW. In this case, it is enough to change the electrical wiring to a new one.
Electrical faults or poor contact
A very common reason why the zero in electrical wiring heats up is poor contact. It is possible that the fastening screws have become loose over time, or perhaps carbon deposits have formed on the wires. In any case, the problem will not go away on its own, and it is worth checking how good the contact is at the input, on the machines, terminals and in the distribution boxes.
Poor contact always means extra resistance, as when connecting aluminum to copper. And, as you know, any resistance tends to heat up. Over time, this leads to zero burnout and various other electrical wiring faults.
To eliminate a bad contact, you first need to find it, for which you should inspect all available wire connections. Once the weak point is found, it will be necessary to disassemble it, clean it, and reconnect it. To clean the contacts, you can use a fine file or sandpaper.
It goes without saying that during any work related to electrical wiring repairs, it is necessary to completely disconnect the power supply. You should always remember that if you disconnect just one wire (zero), current can still pass through the switch that is on, which will lead to a dangerous potential for life on the neutral conductor.
Reasons for heating the tape
If the installed tape overheats, the causes of the defect are:
- Errors made during installation or operation of the product. For example, poor-quality soldering increases the current, which leads to local heating of parts. To eliminate the malfunction, it is necessary to determine the problem area, and then use a soldering iron to ensure the required contact. In case of inaccurate installation, a short circuit of the LEDs may occur, leading to an increase in the load in the circuit.
- When using tape with increased power (more than 10 W per 1 linear meter of product), increased heat generation is the norm. When installing such products, it is necessary to use a gasket that promotes heat removal and dissipation.
- Low quality products get very hot due to excessive power consumption, which allows for high brightness when using cheap LED elements. Such designs quickly fail, since LEDs do not have a safety margin. Additional load is also applied to the power supply, reducing the service life of the device.
- Wrong choice of LED element type. For example, tapes coated with silicone material are not recommended for use in areas with low humidity. The additional protective layer impairs heat dissipation, which leads to overheating of the elements.
- Using twisted wires instead of soldering leads to poor contact and increased heating. When installing LEDs, the cables must be connected using lead-tin solder or special metal tubes that are crimped with pliers.
battery
In any case, the car owner should look for the reason for the high voltage consumption. That's what the experts and electricians say. And the first thing they do is diagnose the battery.
As you know, during engine operation, the PG must provide a charge to the battery. If cans or something else fly off the battery, then the current flow process will be continuous and in large quantities, which will a priori cause the device to overheat.
Article on the topic: What to do if the engine oil level exceeds the norm?
| Cause | Solution | |
| Battery | High voltage consumption due to excessive current output, oxidation, short circuit and failure of cans | Replace battery, charge |
| Diode bridge | Lack of gasket, loose soldering, loose terminals, breakdown | Overhaul, replacement, repair |
| Bearings | Failure of the front, rear or both together | Replacement of wiring, new insulation |
| Wiring | Insufficient insulation, short circuit | Replacement of wiring, new insulation |
Reasons for LED strip heating
In order to understand why the LED strip heats up, you need to consider its operating conditions, connection method and other influencing factors. First of all, it is necessary to study the passport data and find out the operating temperature of the product. There are LEDs that heat up to 100°C or more during operation, this is normal and is a design feature. However, such elements are rarely installed on LED strips. As a rule, they are designed for operation in difficult conditions, when excess heat is dissipated into the cold surrounding space. There are other factors that need to be discussed specifically.
Quality
The number of LED strips on the market is huge. New manufacturers are constantly appearing, and industrial giants are not lagging behind. The more famous and popular the brand, the more fakes there are from Southeast Asian countries. They do not meet the stated parameters in almost all respects, and the main consequence of this is excessive heating. You can avoid such mistakes if, when purchasing, do not hesitate to ask the seller for the necessary certificates.
Overload
Many users purchase inexpensive products from unknown manufacturers. Such products rarely correspond to the parameters stated on the packaging. In particular, most of these tapes have excessively high power. This is done in order to use fewer LED elements and achieve the same brightness as normal products. When power is applied, the LEDs begin to receive too high a voltage, resulting in excessive heating. Simply put, excess voltage turns into heat. The solution to the problem will be either installing additional elements or using a step-down resistor.
Other
The LED strip often gets hot for other reasons:
- Sometimes the cause of overheating is the use of sealed LED strips with IP67 protection in warm residential areas. The elements are located inside a silicone tube, which does not allow excess heat to escape outside. A thermos effect occurs, the LEDs heat up and begin to rapidly degrade.
- Often the cause of excessive heating is too tight installation. The tape is attached so that a large number of elements are concentrated in one place - they are wound on a pipe, strips are laid, etc. Heat removal in such conditions becomes difficult, and the tape begins to overheat.
- Not only the tape, but also the power supply (driver) overheats. This occurs in the absence of some reserve power of the source. Over time, its characteristics decrease, it begins to work with overload and gets very hot. The solution to the problem is to replace the driver with a more powerful device.
Useful tips
In order to avoid overheating, you should know the possible causes and eliminate them at the stage of purchasing the LED strip. Important points to consider:
- for indoor work, tapes with a protection level of IP65 and higher should not be used;
- Installation should be carried out using heat-dissipating bases. It is recommended to use a special aluminum profile;
- There are special types of tapes equipped with a substrate of increased thickness. It effectively removes heat, but is less flexible and elastic. If possible, you should choose such products;
- You should not buy products from unknown manufacturers of questionable quality.
Following these tips will reduce the risk of malfunctioning LED strips.
Reasons for LED strip heating
In order to understand why the LED strip heats up, you need to consider its operating conditions, connection method and other influencing factors. First of all, it is necessary to study the passport data and find out the operating temperature of the product. There are LEDs that heat up to 100°C or more during operation, this is normal and is a design feature. However, such elements are rarely installed on LED strips. As a rule, they are designed for operation in difficult conditions, when excess heat is dissipated into the cold surrounding space. There are other factors that need to be discussed specifically.
Quality
The number of LED strips on the market is huge. New manufacturers are constantly appearing, and industrial giants are not lagging behind. The more famous and popular the brand, the more fakes there are from Southeast Asian countries. They do not meet the stated parameters in almost all respects, and the main consequence of this is excessive heating. You can avoid such mistakes if, when purchasing, do not hesitate to ask the seller for the necessary certificates.
Overload
Many users purchase inexpensive products from unknown manufacturers. Such products rarely correspond to the parameters stated on the packaging. In particular, most of these tapes have excessively high power. This is done in order to use fewer LED elements and achieve the same brightness as normal products. When power is applied, the LEDs begin to receive too high a voltage, resulting in excessive heating. Simply put, excess voltage turns into heat. The solution to the problem will be either installing additional elements or using a step-down resistor.
Other
The LED strip often gets hot for other reasons:
- Sometimes the cause of overheating is the use of sealed LED strips with IP67 protection in warm residential areas. The elements are located inside a silicone tube, which does not allow excess heat to escape outside. A thermos effect occurs, the LEDs heat up and begin to rapidly degrade.
- Often the cause of excessive heating is too tight installation. The tape is attached so that a large number of elements are concentrated in one place - they are wound on a pipe, strips are laid, etc. Heat removal in such conditions becomes difficult, and the tape begins to overheat.
- Not only the tape, but also the power supply (driver) overheats. This occurs in the absence of some reserve power of the source. Over time, its characteristics decrease, it begins to work with overload and gets very hot. The solution to the problem is to replace the driver with a more powerful device.
Main conclusions
Any LED strip heats up during operation. 45° is considered normal, but exceeding this value most often indicates a violation of the operating mode. Common reasons:
- mismatch between the parameters of the power source and the LED strip;
- errors made during installation;
- use of closed tapes in warm rooms;
- low backlight quality.
The solution to the problem is to eliminate the cause of overheating. If it cannot be detected, you have to completely change the backlight, having previously analyzed the conditions and mode of its operation. State your ways to solve the issue in the comments.
Previous
LEDsTypes and connection diagrams for dimmers for LED strips
Next
LEDsDesign, types and connection of RGB LEDs
Reasons for LED strip heating
In order to understand why the LED strip heats up, you need to consider its operating conditions, connection method and other influencing factors. First of all, it is necessary to study the passport data and find out the operating temperature of the product. There are LEDs that heat up to 100°C or more during operation, this is normal and is a design feature. However, such elements are rarely installed on LED strips. As a rule, they are designed for operation in difficult conditions, when excess heat is dissipated into the cold surrounding space. There are other factors that need to be discussed specifically.
Quality
The number of LED strips on the market is huge. New manufacturers are constantly appearing, and industrial giants are not lagging behind. The more famous and popular the brand, the more fakes there are from Southeast Asian countries. They do not meet the stated parameters in almost all respects, and the main consequence of this is excessive heating. You can avoid such mistakes if, when purchasing, do not hesitate to ask the seller for the necessary certificates.
Overload
Many users purchase inexpensive products from unknown manufacturers. Such products rarely correspond to the parameters stated on the packaging. In particular, most of these tapes have excessively high power. This is done in order to use fewer LED elements and achieve the same brightness as normal products. When power is applied, the LEDs begin to receive too high a voltage, resulting in excessive heating. Simply put, excess voltage turns into heat. The solution to the problem will be either installing additional elements or using a step-down resistor.
Other
The LED strip often gets hot for other reasons:
- Sometimes the cause of overheating is the use of sealed LED strips with IP67 protection in warm residential areas. The elements are located inside a silicone tube, which does not allow excess heat to escape outside. A thermos effect occurs, the LEDs heat up and begin to rapidly degrade.
- Often the cause of excessive heating is too tight installation. The tape is attached so that a large number of elements are concentrated in one place - they are wound on a pipe, strips are laid, etc. Heat removal in such conditions becomes difficult, and the tape begins to overheat.
- Not only the tape, but also the power supply (driver) overheats. This occurs in the absence of some reserve power of the source. Over time, its characteristics decrease, it begins to work with overload and gets very hot. The solution to the problem is to replace the driver with a more powerful device.
Troubleshooting
Lack of charging can be caused by a wide range of reasons, which we will talk about today.
These reasons include:
- Weak contacts;
- Winding breaks;
- Short circuit on the rotor housing;
- Interturn short circuits;
- Mechanical breakdowns;
- Closing the positive clamp on the body;
- Short circuit in the phase winding;
- Short circuit of the stator to the housing.
Let's look at these situations in more detail to determine the true cause of the breakdown specifically in your case.
Start by turning off all additional equipment in your car that is not included as standard - DVR, navigator, audio system, etc.
Next, we perform the following operations.
- Measure the current output when the vehicle is cold, not running and all life support systems are disconnected. If there is no return at all, that's good. But this rarely happens. Almost always on tens there may be insufficient contact, some kind of short circuit, due to which there is recoil, but it is small. It’s much worse if the recoil is impressive and leads to battery discharge in one night spent in a parking lot or garage.
- If everything is normal, there are no strong current leaks or they are insignificant, and the battery has retained its charge, then you can return all the devices to the places that were installed additionally.
- Recheck the recoil. If at the same time the instruments show an active leak, then the reason does not lie in the battery and is not related to the generator. The culprit of the problem is one of the additionally connected devices.
- If no recoil is observed, then you need to carefully inspect the generator.
- There are many sources of trouble that can lead to generator failure. These include:
- Insufficient contact between the rotor rings and brushes;
- There was a break in the excitation winding;
- An interturn short circuit has occurred on the field winding coil. In this case, the generator will hum and get very hot;
- The field winding closes to the rotor housing;
- The stator shorts to the housing;
- A break occurs in the stator phase winding;
- The diodes have broken through in the rectifier block, that is, the diode bridge;
- The plus is shorted on the body;
- Mechanical problems have occurred.
Reasons for failure
Now let's look at the reasons. Why do power supplies fail and how can this be avoided?
Quality
The first reason is the low quality of the product itself and its components. If you buy cheap copies, then don’t be surprised that in just a few months you’ll run back to the store for another device.
And so on from year to year. For long-lasting ceiling lighting, it is not recommended to skimp on such a component. The same applies to the tape itself.
How to distinguish a high-quality LED strip from a cheap one, in detail with all examples, is described in another article.
Heat
The second reason for failure is overheating. The power supply must be placed in places with sufficient air access.
No wall or foreign objects should interfere with its heat transfer. The best places for installation are some kind of wall shelf, the top surface of a cabinet, etc.
It is not recommended to hide it behind curtains. Don't forget that this is still a small transformer.
And if there is a short circuit or overvoltage, it may burst into flames. Therefore, place it away from anything flammable or flammable.
Even if you take the factory operating instructions from branded products, several rules will definitely be written there:
the block must be blown with air from all sides
if you still hid it in some kind of box, it should have ventilation holes
You cannot place one block on top of another when the backlighting scheme provides for several sources
There should be a distance of at least 5cm between them.
Very often, when installing ceiling lighting, a small protruding cornice 10cm wide is made.
The tape fits into it easily, but many people also manage to stuff narrow sealed blocks from the Slim series into it.
As a result, when you turn on the LED strip, the profile itself heats up first. And then, instead of releasing all the heat into the air, it begins to transfer it to the surface of the power box.
At the same time, do not forget that it itself also heats up. As a result of such “roasting” as in an artificial oven that you yourself created, the device will not work for even a year.
Therefore, the right installation location must be looked for at the renovation design stage.
How to choose color temperature?
Color temperature is one of the main characteristics of LED products used for lighting. The question often arises: what is it and how to choose the appropriate color temperature? Let's try to figure out these questions.
By definition, color temperature is the temperature of a black body at which it emits radiation of the same color tone as the radiation in question, measured in degrees Kelvin.
In other words, color temperature determines the “shade” of light emitted by a source (lamp or luminaire), from warm, close to incandescent light, which gives off a “yellowness,” to cool white light (cold light fluorescent lamps), which gives off in the blue region of the spectrum.
Color temperature scale for common light sources:
800 K - the beginning of the visible dark red glow of hot bodies; 1500-2000 K - candle flame light; 2000 K - High pressure sodium lamp; 2200 K - incandescent lamp 40 W; 2680 K - incandescent lamp 60 W; 2800 K - 100 W incandescent lamp (vacuum lamp); 2800-2854 K - gas-filled incandescent lamps with a tungsten filament; 3000 K - incandescent lamp 200 W, halogen lamp; 3200-3250 K - typical film lamps; 3400 K - the sun is at the horizon; 3800 K - lamps used to illuminate meat products in a store (have a high content of red color in the spectrum); 4200 K - fluorescent lamp (warm white light); 4300-4500 K - morning sun and lunchtime sun; 4500-5000 K - xenon arc lamp, electric arc; 5000 K - sun at noon; 5500 K - clouds at noon; 5500-5600 K - photo flash; 5600-7000 K - fluorescent lamp; 6200 K - close to daylight; 6500 K is a standard daytime white light source, close to midday sunlight; 6500-7500 K - cloudy; 7500 K - daylight, with a large share of scattered light from a clear blue sky; 7500-8500 K - twilight; 9500 K - blue cloudless sky on the north side before sunrise; 10,000 K is an “infinite temperature” light source used in reef aquariums (anemone blue tint); 15000 K - clear blue sky in winter; 20000 K - blue sky in polar latitudes.
Color temperature gradations.
Approximate division of color temperature gradations:
- Warm white (2700-3200K)
- Day white (3500-4500K)
- White (5000-6000K)
- Cool white (6000-8000K).
It is better to choose exactly the desired color temperature value in Kelvin, because... For different people, “neutral” and “cold” may vary.
Table 1 shows the color temperature ranges of the most common artificial light sources. Moreover, the exact color temperature value of light sources is always indicated on the packaging or in the accompanying documentation for the product (product passport, technical description).
Troubleshooting Methods
If all the indicators are on, but the coil does not heat up, this does not mean that the heating element has probably burned out, although it can also burn out. In this case, the malfunction may be a broken contact between the wiring and the burner or a malfunction of the power switch. If the heating element malfunctions, it must be replaced. If the contacts are broken, they need to be cleaned and soldered again; if the power switch does not work, it can be repaired or replaced with a new part. If, when turned on, the degree of heating of the burner does not correspond to the selected mode, then most likely part of the spiral has burned out or the power switch is faulty. The spiral needs to be replaced, and the switch can be tried to be repaired, and if impossible, also replaced.
LED color temperature
In an LED, light is emitted by a special phosphor coating. Traditionally, all LED lighting sources are divided into three groups according to the spectrum:
- Warm white (up to 3500K);
- neutral white (3500K – 5200K);
- cool white (above 5200K).
Conventionally, we have the following table of color temperature of LED lamps:
What is the color temperature of LED lamps
From the point of view of physics, light temperature is the spectrum emitted by a heated body relative to an absolutely black body. What does lamp color temperature mean? This is the color of the glow of a body heated to the appropriate temperature.
Accordingly, the color of LED lamps has three gradations - yellow (up to 3200K), white (4000-5500K) and white-blue (above 5500K). The higher the temperature, the shorter the wavelength of the emitted light beam.
There are sources with colors above 9000K, but they cannot be used for lighting. We see objects due to the fact that light is reflected from their surface. As the color temperature increases, the wavelength decreases; the shorter it is, the “worse” the light is reflected from surrounding objects.
If you put an 18,000K LED in a powerful flashlight, an outside observer will be able to notice it several kilometers away, but under your feet it will create a spot only tens of centimeters in size.
Color rendering index and color temperature
The color rendering index characterizes the ability to perceive color gradations. When the light temperature of LED lamps is below 3200K, color perception is significantly reduced. Try pulling out a green or brown color from a box of colored pencils by candlelight. Believe me, the task will not be easy.
The color rendering index is very clearly regulated for automotive LED lamps, because if color rendering is poor, a situation may arise when the driver cannot distinguish between the road surface and the side of the road.
Color temperature and lighting quality
It would seem why we need LEDs of warm and cold colors if they are not able to provide normal perception conditions.
One of the main areas of application of LEDs with low color temperature (2400K-3000K) is lighting in a “noisy” optical environment. Simply put, lighting in poor visibility conditions.
Let's take a car head start. In heavy fog, white light, due to its short wavelength, is reflected from water spray, which significantly limits the visibility range. Yellow light has a wavelength several times longer; it does not reflect from small objects, but bends around them. That's why fog lights in cars are made yellow.
At the same time, short waves propagate further without attenuation. As an analogy, consider radio waves and hard short-wave X-rays. Even a thin sheet of metal blocks radio waves, and thick lead is used to protect against x-rays. Cool white light is used in long-distance warning systems, floodlights, signal and search lights.
Choosing LED lamps for the home
When choosing a color temperature, you must first decide for what purposes the LED lighting will be used.
As studies have shown, the emission spectrum of a lamp is important not only for subjective perception. When lighting workplaces with lamps with a temperature of 2000K-3000K, the ability to process information is reduced by almost a quarter. Apparently, this is due to the fact that the brain subconsciously associates such lighting with sunset or dawn.
At the same time, cool white light has a more tonic effect on the brain. Another feature of “cold” LEDs is their high visibility range, which is why this type of light source is widely used in searchlights and search lights.
The color temperature of LED lamps for the home is selected based on the purpose of the premises.
As numerous studies show, the most optimal lighting in an apartment can only be achieved by using several LED light sources with different color temperatures.
Warm white light (2700-3200K)
Warm light is preferable for recreational areas, that is, places intended for relaxation. Such lamps are installed in bedrooms and living rooms. In the living room it is better to combine neutral and warm light.
If there is insufficient natural light, we turn on neutral or both, and in the evening or when watching TV, turn on warm. For the bedroom, you should definitely opt for warm light lamps.
Neutral white light (3200-4500K)
It is preferable to use such lamps in rooms intended for visual work. This radiation spectrum does not tire the eyes and provides the best color perception.
Cool white light (over 4500K)
As already mentioned, cool white light has a stimulating effect on our brain. In everyday life, it is used in situations where periodic concentration of attention is desirable, for example, examination rooms, operating rooms. LED lamps with cool white light placed in the bathroom will help you get into working tone faster in the morning.
Source: svetodiodinfo.ru