Corrugated cable installation is most often carried out when conducting electrical wiring under drywall, as well as in a floor screed. Self-extinguishing corrugated pipes are also used during electrical installation work in a wooden house. It will be quite problematic for a person without experience to thread the conductor, because... its end may cling to the inner walls of the corrugated pipe. In fact, the pulling technology is not complicated, so if you don’t know how to pull a corrugated cable, we recommend that you read the instructions below.
How to stretch a wire
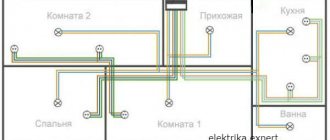
Scheme for pulling wires into the corrugation
You can route electrical cables along the walls or ceiling using special clips. Their diameter is selected in accordance with the cross-section of the corrugation. This method is more common because it securely fixes the pipes and has an attractive appearance. In hidden places it is preferable to use dowel screws or metal staples.
When laying pipes, the joints are connected using a low-cost connecting element - a coupling. If the wires in this section are not insulated, the place of attachment to the pipe coupling can be sealed with sealant. To pass through the walls, special perforated sleeves are used, which, if necessary, are also treated with sealant.
Scope of application of corrugated pipes
Corrugated pipes allow you to lay electrical wiring of any complexity and length with the least number of turns and joints.
Corrugated pipes are widely used in various fields of industry, as well as for domestic purposes.
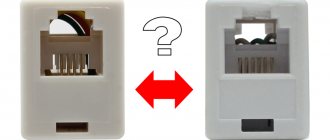
- computer networks (white);
- general electrical wiring (gray);
- connecting electrical appliances, household appliances (brown);
- laying telephone lines (green);
- external wiring (red);
- for connecting heating systems, heated floors (blue);
- gas supply systems (yellow).
For electrical cables, special electrical corrugations made of polyvinyl chloride are most often used.
Laying cables in a concrete floor: installation rules and features
Laying wiring on a concrete floor has its pros and cons, but today it is the most relevant.
The advantages of such installation include a high level of electrical safety - even in the event of a breakdown, the dangerous potential will not reach the resident, even those located near the breakdown site. A layer of concrete will hide the entire electrical network, and a reinforced belt will give the structure additional strength. With proper installation and subsequent operation, wires in concrete will function properly for several decades.
Now we should move on to the disadvantages. The main disadvantage of installing cables in the floor is the impossibility of creating connection points. After all, if a twist or terminal block burns out in concrete, then it is almost impossible to find the location of the damage. Therefore, it is necessary to lay solid lines directly from the panel or connection points located above the floor level.
According to technical standards, the concrete layer above the electrical wiring must be at least 30 cm. If the room is large, creating such a screed will require a large amount of building material, which leads to additional costs.
To replace the electrical wiring located in the floor screed, as well as when troubleshooting or laying a new line, it is necessary to dismantle the concrete surface. And after all the work, re-fill the floor. In order for concrete to gain the required hardness, a certain time must pass, so eliminating errors in cable laying in a concrete floor may take more than one day.
To cut concrete pavement, diamond blades are used, the cost of which is now quite high. You may also need a hammer drill, the use of which will lead to a large amount of construction waste.
Some features
Returning to the first disadvantage of floor wiring, we emphasize that the specifics of installing electrical wiring of any type are clearly stated in the document PUE (“Electrical Installation Rules”). The main point is the availability of the entire system for inspection and repair work.
The points where wires connect/split must be free from mechanical tension from the material covering the floor. For this reason, various pipes made of corrugated, metal or polyethylene are used. The surface of this product takes the load of the coating. Remember that there must be enough free space inside for the wire to move.
One of the main elements of the electrical network in the house are distribution boxes. But placing them under the flooring is unrealistic, so the products are mounted in the wall
It is important to choose the correct height above the floor to avoid short circuits when the apartment is partially flooded and to prevent free access for children
Installation technology
We suggest you familiarize yourself with the basic requirements for installing wiring in corrugated pipes, common mistakes and simple ways to stretch cable ties through the corrugation.
Requirements and errors
When laying wiring in a corrugated pipe, ensure that the following conditions are met:
- the length of one section without transit elements (couplings, tees, splitters) should not exceed 25 m, the number of turns - up to four;
- A one-piece corrugated hose cannot be installed at an acute angle;
- avoid close proximity of two or more turns of the route;
- the rotation angle should be more than 90 degrees, the radius should preferably be larger;
- two corrugated pipes should be located at a distance of at least 200 mm from each other;
- do not connect pipes using electrical tape - it is advisable to use connecting accessories, placing them in the middle of the section, turns and corners;
- one corrugation – one cable network;
- power and low-current lines should be separated from each other (standards are prescribed in the PUE).
How to stretch a cable inside a corrugation
To pull the wiring through the corrugation, you need to use a stiff wire. It is much easier to thread through long lines. The cable is then attached to the end of the wire. If you plan to thread a group of wires, then they are combined into a strong bundle, wrapped with a tie or PVC tape along the entire length. The second option is better, since this product has the necessary smoothness to avoid additional obstacles. If the cable is single, then electrical tape is not needed.
When the harness is ready, you will need to connect it to the broach (wire) using one of the following methods:
- Wrap the bundle with wire and crimp with pliers. There should be several similar twists.
- Simply place the wire parallel to the bundle and wrap strong electrical tape tightly. This option can be used as an addition to the first.
- If you are laying a single cable, then make a hole in its insulation at a distance of 40-50 mm from the edge, and thread the wire through it.
Regardless of the method chosen, if a tourniquet is used, the edge should be carefully wrapped with electrical tape, creating a smooth cone.
The last stage is pulling the harness through the corrugation. Ideally, the procedure should be performed together with a friend: one person holds the broach, the other pushes the tourniquet. Without an extra pair of hands, proceed as follows:
- Attach the free edge of the wire to some stationary object.
- Hold the corrugated product with one hand, providing tension, and with the other, push the tourniquet inside. Do not apply too much force, otherwise the broach may come off the harness. If this happens, cut the corrugation in the area to which the cable was threaded, then repeat the procedure with connecting the wire and the bundle. However, it is not necessary to completely remove part of the corrugation - the joints can be connected with electrical tape. If increased protection from moisture or fire is required, then this option is inappropriate.
The main purpose of the corrugation is to protect cables and wires from mechanical damage, exposure to high and low temperatures, moisture, ultraviolet radiation, chemicals and other environmental factors.
No product can guarantee absolute wiring protection, so it is important to learn how to choose the right tubes based on your specific needs.
Non-standard situations
The most common non-standard situation is that when pulling a string, it is torn off from the conductor due to strong tension. In this case, you need to cut off the part of the corrugation that has already been threaded and leave it. After this, you should reconnect the wire to the end of the cable and finish pulling. Two pieces of corrugated pipe should be connected using electrical tape.
Pulling the wire through the corrugation, if there is no broach, will also not be difficult. It will be enough to simply bend the end of the conductor 180 degrees. After this, you can push the product through the entire lower length. This technology can be seen in the video below:
If there is not enough space in your apartment and you need to thread a long section of corrugated pipe yourself, for example, 30 meters, then you should do it in the room. In this case, the cable must be connected to the string. After this, you can leave the entrance and fasten the free end of the wire to the railing on the top floor. After this, you need to stretch the corrugation until the problem is solved.
Sometimes it may also be necessary to run a conductor in a corrugated hose along the ceiling. This process is quite difficult to carry out, and if the sheets are already sewn up, then the installation must be done through grooves. In this case, a regular pipe will help to insert the corrugated pipe through the ceiling. In the video below you can see all stages of the work.
The latter situation includes laying a cable with rubber insulation in a corrugated area. The main difficulty will be that when pulling, strong friction occurs between the walls of the corrugated pipe. As a result, even wire will not be able to facilitate the process, since there is no broaching. In this case, a special lubricant will come to your aid, with which you can quickly pull the cable through the corrugated pipe. The cost of this lubricant is considered quite high, but if you often perform electrical work, then we recommend purchasing it.
This is all the information we wanted to provide in this article. Now you know how to pull the cable into the corrugation with your own hands if there is no pull-through.
Increased cost of work
Let's figure out whether corrugated installation really leads to a significant increase in the cost of repairs.
For ease of installation of electrical wiring, many use round NYM cable, including VVGng with a round cross-section. At the same time, they tighten it into the corrugation d=16mm.
After which you need to prepare a 20mm*20mm groove. If you have a wall chaser, the width of the groove when installing the disks does not particularly affect labor costs.
Many people initially set the cutting depth to 25mm to make it easier to cut the middle of the furrow. The shallower the cutting depth, the harder the core chips.
Therefore, in order to lay the bare cable in the groove, you will still have to cut a strip approximately 20mm deep. Or work very hard with a hammer drill, which will ultimately lead to no less labor costs. At the same time, do not forget one important nuance - gating in load-bearing walls in panel houses and hollow-core slabs is prohibited.
And where the cutout is not made in load-bearing walls, firstly, the integrity of the reinforcement should not be compromised, and secondly, the depth of the cutout should not exceed 20mm.
Therefore, when we talk about cutting a groove in a wall, in 90% of cases we mean cutting a groove in the plaster. The problem is that not everyone wants to apply 2.0-2.5 cm of mixture to the walls, just because of the wiring.
However, there is still an increase in cost when working with corrugation, and for many it can be critical. When working with this material you need:
special fasteners and nails. Using a mounting gun, on average it takes 3 shots per 1 meter of corrugation.
more junction boxes. If you use boxes with 4 separate inputs, then without corrugation you can place a much larger number of cables there. But when working with corrugation, there are only four!
Therefore, the total number of boxes, although not significant, will increase. It was already said above that the gating itself does not increase costs so significantly, but if we talk about drilling through holes through the walls, then everything can change significantly.
If you drill one hole d=32mm, you can easily pass 4 bare cable lines through it. But for the same quantity, but already in a corrugation, you will need to drill at least 4 holes.
When working in an apartment with soft partitions, this point is not critical. But if you try this in a private house, or in a panel high-rise building with high-quality concrete walls, your labor costs will increase many times over.
For many electricians working alone, it can take a whole day of work just to punch through holes. Therefore, yes, in some cases, depending on the working conditions and the specific object, the increase in the cost of laying cables in corrugated cables can be at least 30%. And for some, this is a significant difference in the total cost of repairs.
But can corrugation, on the contrary, help save a lot? Surprisingly yes. Here is a very original use of it for securing a cable in a groove. Thanks to it, you can completely eliminate the cost of dowel clamps. In this case, you can even use the remains of corrugated hoses, which are no longer needed anywhere.
Replaceability of electrical wiring
Imagine that you needed to hang one or more paintings on the wall a few years after the renovation.
You take a hammer drill, mark the fastening points, start drilling and hear a characteristic pop with the release of a large number of sparks.
And only then do you remember about the cable going to the socket hidden behind the bedside table. It is useless to turn on the machine; there will be a stable short circuit on the line. And all the other sockets in the room can hang on this group.
If you have suspended ceilings installed, then in principle there is no question of replacing the damaged area, but under one condition - if the cable is laid in a corrugated area.
You can easily replace this piece by simply unfastening part of the ceiling, running a new cable and zipping it back up. At the same time, there is no chiselling or breaking into walls.
So that you understand, if someone talks about the replacement of wiring in a corrugated cable, we are primarily talking about vertical sections from the ceiling to the sockets.
On the ceiling itself, when turning at 90 degrees, this trick is unlikely to succeed.
Imagine that with all of the above, the cable is embedded in the plaster? You can, of course, not open the walls, but simply abandon this outlet (by biting off the connection to it under the ceiling).
But then get your longest carriers and extensions ready for unsheathing.
Basic rules for installing wiring in the ceiling
When preparing papers, perform the following steps one by one:
- They determine the place from where electricity is supplied to the local area.
- Points where electricity is consumed are identified.
- Select an installation location for the protection components.
- Draw up diagrams for laying cables between entry points and consumers. The components from the previous paragraph are taken into account.
At the preliminary stage, you need to choose the method of work that will be optimal. The brand and cross-section of the cable are selected from special tables.
The installation method itself can be hidden or external.
The following additional recommendations help to avoid mistakes during work:
It is advisable to lay electrical wiring in special protective corrugations. If this requirement is not met, there is a high probability of short circuits. Electrical appliances in the apartment are prohibited from being connected to one protection device. This is a bad option for further operation, even if the load does not exceed the standards. The appliances will turn off simultaneously when a short circuit occurs.
Only the phase wire is broken by all switches
Otherwise, even the procedure for replacing light bulbs ends with an electric shock. It is unacceptable for the wires to touch or intersect each other. It is important to choose correctly not only the main type of wires, but also the cross-section. Special electrical boxes are used in bathrooms and kitchens. The cables are laid so that further stages of work do not cause problems.
Tree
Cables under such circumstances are pulled through steel pipes. Then fixing the products does not cause any trouble. The diameter should be such that the wiring fits easily inside.
For distribution pipes, it is important to use materials that are resistant to fire. Metal becomes the best choice for any situation. A layer of insulators is placed on the inner sides of such products, which will prevent the box and the current carrier from coming into contact with each other
A layer of insulators is placed on the inner sides of such products, which will prevent the box and the current carrier from coming into contact with each other.
- The drawing is transferred to the surface from a paper drawing. Cable installation lines are marked as accurately as possible.
- Next, distribution boxes are installed.
- The tubes are cut until the length is sufficient. At the next stage, these structures are fixed to the base on the ceiling.
- The individual parts of the pipes are connected, the standard option is welding.
- Cables are laid through pipes using pulling.
- Then they are discharged into the distribution box. The main thing is to leave the ends free, at least 20 cm.
- All wires are connected. The structure is wrapped with electrical tape and fixed.
- Afterwards, a functional check is allowed.
Concrete
- Compared to the thickness of cables without protection, the depth of the groove is 2-3 times greater. Let us assume that the diameter of the protective shell is ½ larger.
- Cable laying is free. There is no tension.
- It is easy to check the depth indicator using a spatula attached to the wall.
- The groove section is covered only after the wiring is finally secured to the section. And on each side there is 1.5 meters in reserve.
Drywall
Restricted access to the base base is the main feature of ceilings made from this particular material
It is important to think in advance about where the points for prevention and inspection will be. Taking into account the type of base floor, the installation method is selected.
Stretch ceiling
The stages of work are the same as in the case of drywall. Create a surface, subsequent access to which is limited. Not forgetting that there must be sufficient distance between the fixed corrugation and the ceiling. Otherwise, the corrugated surface of the structure installed on the ceiling opens to the eye.
Pass-through and distribution boxes are located outside the structure.
Step by step laying
Below are step-by-step instructions for installing electrical wiring under drywall trim.
Step 1. Preparation
Assemble the metal profile, but do not rush to install the plasterboard sheets. Decide where to place the wiring: under the ceiling or along the walls. It all depends on the specific situation. If you have a suspended or suspended ceiling, it is better to hide the wires at the top and then lower them vertically to sockets, switches and other boxes.
If the ceiling in the house is made of concrete or wood, and only the walls are plasterboard, then the wiring should be placed in them, closer to the top. The distance from the ceiling must be at least 10 cm. Remember: when choosing places to install sockets and other equipment. Once you have your diagram on a piece of paper, transfer it to the wall. Calculate materials and proceed with installation.
Step 2. Installation of the box
Place distribution boxes. There should be one of these in every room of the house. Attach the component to the wall or ceiling using self-tapping screws.
Step 3. Laying the wires
Prepare the necessary materials and tools, and then proceed with installation. Secure the clips along the cable route. The distance between the fastening elements must be at least 30–40 cm. It is possible to use plastic clamps, which will speed up the work, but will increase the likelihood of damage to the corrugation due to the sharp ends of the profile.
Before pulling the corrugation through the metal frame, drill holes of a suitable diameter. You can buy a profile with holes already made. A similar method is used to connect the junction box and the points where sockets and switches will be installed. Mark on the drywall where the corresponding component will be, and then sew the sheet to the frame.
Step 4. Switching electrical installation products
All that remains is to install sockets and switches. They are usually called electric points. Using a drill, make holes in the places where they should be located. Install the socket boxes into the drywall. You need to make holes in the bottom to thread the wiring through. Pull out the cable and place the socket box in the groove. When everything is done, check the electrical circuit by supplying power to the apartment or house from the distribution panel.
Analysis of common mistakes when laying underground corrugation
The following are common incorrect practices:
- Construction of a line from SIP wire. It is designed for laying by air; in the ground, due to the lack of armor and intolerance to condensation, it quickly fails.
- Assembling a casing for a power line from several fragments. Such cables are especially sensitive to moisture, so they need the most sealed corrugation.
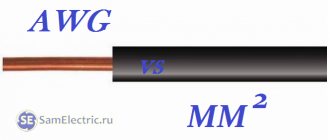
- Using copper cable with a core cross-section of 6 square meters. mm or aluminum 10 sq. mm. Even if such a conductor is suitable for the load, its use is contrary to regulatory requirements: the minimum cross-section is 10 square meters. mm for copper cable and 16 for aluminum.
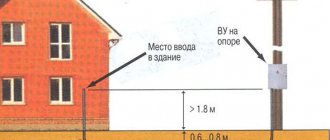
- Placing the conductor near the foundation. It is necessary not only to maintain a distance of 60 cm, but also to extend the cable beyond the line drawn from the base of the foundation at an angle of 45°.
- The conductor is located close to the ground loop. These are often installed in the same trench to save labor and time. The minimum distance is 30–35 cm.
Another common mistake is laying the cable directly on the ground, without an underlying sand cushion. Under such conditions, the corrugation is likely to be damaged by sharp stones and other debris. In the absence of sand, carefully sift the soil.
What is corrugation and where is it used?
An electrical installation corrugation is a corrugated pipe for laying an electrical cable for the purpose of protecting it or protecting structures. Laying electrical cables in corrugated tubes is used in various situations with open or hidden electrical wiring.
Hidden gasket
Hidden installation is the installation of electrical wiring inside the structures of walls, floors and ceilings, behind finishing materials. It is conventionally divided into the following types of installation:
Laying inside non-combustible structures is carried out in grooves of walls and ceilings, in floor screeds or simultaneously with the installation of load-bearing structures (for example, when concreting). In this case, corrugation is used for ease of installation, protection from cable crushing and the ability to replace electrical wiring without disturbing the finishing material, chipping or dismantling wall, ceiling or floor structures. When laying corrugated cables inside structures made of non-combustible materials, the PUE allows the use of any type of corrugated tubes.
Laying behind finishing materials or in false spaces has purposes similar to laying in non-combustible structures (protection from mechanical damage, the ability to replace wiring if necessary), but with the installation requirements being met, as when laying over combustible materials. The fact is that finishing materials often contribute to combustion, so the requirements for such installation are quite strict
It is important to use flame retardant or metal corrugations during this installation.
Underground installation is carried out during landscaping work for wiring electrical power lines to lighting fixtures and various equipment (sprinkler pumps, gate and door opening systems), when laying low-current networks for security systems or telephone lines, and in other situations. The main requirement for such installation of corrugated electrical cables is water resistance and high resistance to mechanical deformation (rigidity).
Open gasket
Open laying is carried out over load-bearing and enclosing structures, finishing materials and when installed outdoors to building facades or through the air.
Laying structures over flammable materials involves installing corrugated electrical wiring to ceilings and walls with flammable finishes or made of wood, plastic and other materials that promote combustion. For fire safety reasons, non-flammable (metal) corrugated tubes are used. For such installation, according to the PUE, it is prohibited to use plastic corrugation made of self-extinguishing and flame retardant materials.
Laying over non-flammable structures and materials is carried out using any flame retardant corrugated plastic tubes. It is possible to use metal corrugations to improve the aesthetics of installation or when used in special conditions (aggressive environments, likelihood of mechanical damage).
Laying outside buildings and structures is used for installing lighting or laying power and low-current networks for various purposes along the facades of buildings and fences, as well as through the air between buildings. The corrugation used in this case should also not spread fire and should be resistant to precipitation, ultraviolet radiation and be durable.
Cable laying in fire or explosive areas is carried out exclusively using metal corrugated pipes in combination with a flame retardant electrical cable.
Lay corrugation along the wall and floor
Many people are probably interested in how corrugated pipes are connected to distribution boxes. We weren’t going to get away with general phrases, listen!
- Individual pieces of corrugation are joined using couplings (price is about three rubles per piece). Use the products offered by the manufacturer. There are many ways to connect the coupling and corrugation. If there are no cable connections in a given area of the site, it is possible to seal the joints with sealant.
- There is a steel broach inside the expensive corrugated models. Pipes for laying wiring in the apartment are used as efficiently as possible: a channel is made in the wall (on the surface), and according to the electrical diagram, the required number of wires is pulled inside.
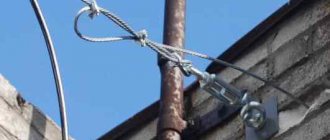
- The corrugation is attached to the wall with specially shaped anchors. Installation on brackets made of metal packaging tape, which is pressed onto dowel-nails, is allowed.
- As for the accumulation of water inside the corrugation, the forums are full of the topic. The legislative part of PUE 6, which we are considering today, has not been adopted. If you are building for yourself, it is more important to feel confident in the quality than to comply with the letter of the law. In dry rooms, it is allowed to use corrugated joints without compaction or sealing.
- The cable is laid through a corrugated wall through a special sleeve, selected in diameter. The passage is sealed if necessary.
The turn is performed by bending the route with a radius higher than that allowed for the bundle cable brands. Similar parameters are often indicated for corrugation
Please note that if it is necessary to replace part of the cores, problems may arise. When rounding the corrugation, be careful not to bend it
Otherwise, the requirement for filling the section (35%) will be violated. In the attic, the height of the cable on the wall is not standardized when using any corrugation. However, the requirements listed above are met.
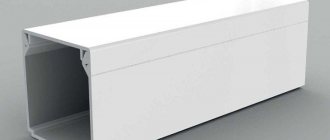
Indoors, it is practiced to lay cable ducts along the walls, because the technique looks elegant. And in basements and attics, corrugation is appropriate due to its excellent insulating properties.
Mounting method
rule
By securing it in this way, you influence it mechanically in any way. If at first glance nothing seems to happen to it, then over time, this method of fastening can play a cruel joke on you.
Even without using ties, but using special expensive fasteners, you still make the cable sag under its own weight.
Such fasteners negatively affect its insulation. This is not a SIP, which was originally manufactured taking into account sagging under its own weight.
And this, in a few years, will certainly lead to false alarms of the differential protection.
As you can see, all the methods that are presented by installers as simple and fast do not really fit into the definition of “durable installation”.
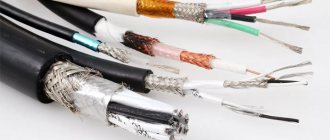
Varieties based on material of manufacture
Corrugated tubes for electrical cables are made of metal or special plastic. Corrugations made from the following materials are widely used in construction:
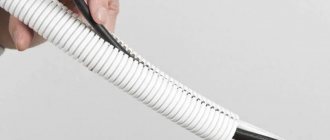
Polyvinyl choride (PVC) is a lightweight material with self-extinguishing properties. Corrugations made from this material are made in gray color. PVC corrugated cables are used in dry indoor areas, as they are sensitive to ultraviolet radiation and are not waterproof. They are most widespread due to their availability (low price) and versatility of use.
Polypropylene (PPR) is a material that does not support or propagate combustion and is resistant to ultraviolet radiation. Corrugations made from this material are waterproof and are used when laying networks outdoors or in rooms with high humidity. The color of these corrugations is blue.
Low-density polyethylene (HDPE) is a moisture-resistant material. Such tubes are also used in damp rooms or outdoors. HDPE is a flammable material, so it is not used in wooden premises. The use of corrugated HDPE in screeds or in structures made of non-combustible materials is permitted. Available in orange or black.
Stainless steel is the most durable and expensive material for the manufacture of corrugated tubes. It is resistant when used in aggressive environments and perfectly protects the cable from mechanical damage (for example, from rodents or accidental damage during construction and repair work). They are used both indoors on flammable and non-flammable materials, inside structures, and outdoors for underground or overhead cable laying.
Polyamide (PA) is a very flexible material that is resistant to mechanical and chemical influences. Has a wide operating temperature range (from -60 to + 150 degrees Celsius). Corrugated tubes made of this material do not propagate combustion and can be used both inside and outside buildings. Produced in dark gray color.
"Fire-fighting" properties of corrugation
Another common misconception is that corrugation is believed to have fire-fighting properties. Very often you can encounter a situation where corrugation is laid on combustible bases behind suspended ceilings.
Or they are even used instead of a steel pipe for hidden installation of electrical wiring in wooden houses.
Do not forget that the corrugated tube is designed to protect the cable from external influences, but does not have any localization ability. In case of short circuits, no corrugation or even a metal hose can save you. The fire will find a way out.
Here is a visual test of plastic corrugated hoses, not with an open flame, as everyone else does, but with hot wire. That is, when the cable is not yet on fire, but has only become as hot as possible due to overloads or a short circuit:
The question is, how will such “protection” save your wooden structures in the event of a circuit breaker failure?
Hidden electrical wiring on combustible substrates must be laid in a steel pipe with localization ability, or using a layer of non-combustible material such as gypsum plasterboard, using false walls.
Some people wonder, where can a short circuit in the middle of the cable come from? There are most often two reasons:
- rodents
- manufacturing defects
While a metal hose can somehow save you from rodents, it won’t protect you from manufacturing defects.
How to insert a cable into a corrugation without wire
It happens that, in order to save money, a user purchases cheaper corrugated tubes without a string probe. Threading a cable inside such products is much more difficult.
The process of laying wiring in corrugation without a tie wire has the following algorithm:
The free edge of the conductor is bent 180 degrees to avoid snags inside the channel. One installer begins to carefully push the cable while the other installer ensures that the corrugated sheath is in a comfortable configuration as it advances. As a rule, it takes a lot of time to implement the procedure in this way. To increase the speed of threading the cable through the corrugation without a string, you can use a special cable gripper (stocking)
The principle of operation of this device resembles a “noose”: when it is pulled, the internal cross-section of the cable is reduced, as a result of which the end of the cable is securely fixed. As you move inside the corrugation, the grip rings shift towards the movement of the wire and become even more intense. To thread cables into very narrow channels, a special clamp with a hole for the cable is included in the grip kit
To increase the speed of threading the cable through the corrugation without a string, you can use a special cable gripper (stocking). The principle of operation of this device resembles a “noose”: when it is pulled, the internal cross-section of the cable is reduced, as a result of which the end of the cable is securely fixed. As you move inside the corrugation, the grip rings shift towards the movement of the wire and become even more intense. To thread cables into very narrow channels, a special clamp with a hole for the cable is included in the grip kit.
cable stocking
Recommendations for installation work
Inserting the cable into the corrugation
The cable is laid in a corrugated pipe using a special string installed by the manufacturer inside the corrugation. The sequence of work when laying an electrical cable in a pipe is as follows:
- The corrugated pipe is stretched over a long straight section. In order to tighten the cable inside the corrugation, you need to have a large space for complete unwinding.
- The end of the electrical cable is connected to the string, the connection point is wrapped with electrical tape for free movement without snagging the wire inside the pipe.
- A minimum of two people are required to complete this work. One person holds the corrugated pipe at one end, the second carefully and without jerking pulls out the string with the electric cable.
- After the cable has appeared on the back side of the corrugation, it is fixed (for example, with electrical tape) on both sides so that it does not jump into the corrugation again.
Fastening corrugated pipes
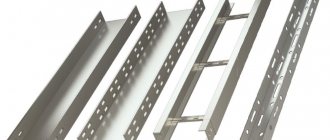
When installing a corrugated pipe with an electric cable, a variety of fastening methods are used. The most common of them:
- installation using plastic clips: used for installation on any type of structure;
- installation using dowel clamps or dowel pins: used when installing corrugations on concrete and wooden structures;
- installation using plastic ties to a metal cable or frame: used when laying corrugation on the street or in the presence of a metal frame (for example, in plasterboard ceilings);
- installation in grooves with subsequent sealing: used in concrete and brick walls, in plaster.
Advantages of corrugated pipes
The advantages of additional protection of wires and cables in the form of a corrugated sheath are as follows:
- PVC corrugated pipes are non-flammable, light weight, and easy to install;
- Pipes made of stainless steel and aluminum are flexible, have high strength, and are resistant to corrosion.
- Polyethylene corrugated pipes do not support combustion and can withstand high external pressure.
- Corrugated pipes, regardless of the material of manufacture, retain the outer insulating layer of electrical wiring for many years.
- When replacing one of the cables, it is not necessary to perform particularly complex dismantling work on straight sections. The damaged wire is pulled out of the pipe, and new electrical wiring is installed in its place.
- The corrugated pipe takes the load from the weight of the cables along the entire length of the pipeline, which eliminates sagging of the electrical wiring if the distances between the support points are correctly selected.
With the help of a factory “conductor”
Most manufacturers of corrugated hoses for installation of electrical wiring integrate a steel string (conductor) into the product. A cable is firmly attached to one of its ends, after which the other end is pulled until the cable is completely pulled into the corrugated pipe. This is the simplest method, but there are some nuances here too. Firstly, an assistant is required to pull the wire through a corrugated hose, especially a long one, and secondly, the flexible pipe must be fixed so that it does not move with the cable.
PHOTO: 5domov.ru As a rule, a corrugated hose is equipped with a steel wire conductor for pulling the cable
Installation of electrical wiring in corrugated open method
Installation of exposed electrical wiring in a wooden house
Installation of corrugated pipes includes several stages. Algorithm for installing electrical wiring in a corrugated open method:
- To fix the hose, special clips made of high-quality plastic are used. They come in different sizes; the choice will depend on the diameter of the pipes used.
- Clips are attached to surfaces at intervals of 30-40 cm. This is done using dowel screws or self-tapping screws. The choice of parts depends on the material from which the surface is made, for example, wood, concrete, brick, etc.
- For reliable fixation, the corrugation is pressed into the clip until a characteristic click appears. If the clips were selected correctly, the possibility of spontaneous loss is excluded.
At the design stage, when laying out a schematic wiring path, you need to take into account the following important points:
- The maximum and permissible radius of rotation of the corrugation is 90 degrees. The smoother the angle, the better.
- Turns should not be located close to each other; the optimal distance between them is 4-5 meters. If this is not possible, for safety reasons the wiring is additionally equipped with a junction box.
- The maximum length of an individual section is 25 meters, the permissible number of turns is 4.
How many wires can be laid in one corrugation
Selection table for corrugated pipes depending on the number of wires and cross-sectional sizes
According to the rules for installing electrical installations, it is necessary to lay the main and backup cables, as well as the cores of emergency and working lighting, through different channels.
Approximate calculation of how many cables can be laid in one corrugation:
- With a diameter of 16, 3 cables fit.
- If it is 20, 4-5 will fit.
- Diameters greater than 25 accommodate 5-6 cables.
The exact quantity is calculated provided that the pipe length is at least 35 meters.
The advantages of corrugation are its affordable cost, light weight, which greatly simplifies the process of transportation and installation, high resistance to thermal and mechanical influences, and long service life.
As a rule, there are no difficulties when choosing and installing corrugated pipes
During work, you must observe personal safety precautions; when working with electrical cables, it is important to de-energize the room and check the voltage in the conductors