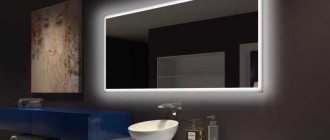
A garland of incandescent light bulbs, also called a retro garland, is used to decorate any festive event in a restaurant or in a private home. It is placed under canopies, in gazebos and tents, a certain area is allocated (for example, for a photo shoot), and fences are decorated. You can make an elegant and unusual retro garland that creates an unusual atmosphere with your own hands.
Peculiarities
Modern industry readily supplies such products. But the external effect does not always satisfy consumer needs. In some cases, the use of retro garlands, which you can even make yourself, brings very good results. Before such work, it is very important to prepare properly and select suitable design ideas. Finding suitable design options and photographs is very easy.
There are a few things to think about:
- will it be possible to fit the product into the decor;
- will it be possible to implement the plan using available components;
- how much is it.
Popular option
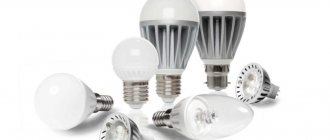
Garlands of Edison light bulbs allow you to create an unusually interesting composition. They fit well even into very modern interiors and look much more original there than many of the latest designs. The appearance is more reminiscent of incandescent lamps (yes, the same ones that were used a very long time ago). Depending on the design of the designers, lamps may or may not be equipped with lampshades.
Regardless of whether there is a lampshade or not, the external attractiveness is not weakened. Tungsten thread is large in size, and it is with it that increased aesthetic characteristics are associated. What is important is that the lamps do not contain toxic mercury and in this regard are better than energy-saving designs. Consumers are pleased with the fact that the color spectrum of the radiation completely coincides with the spectrum of sunlight.
There are several weaknesses:
- high cost;
- short duration of operation;
- significant current consumption;
- strong heating of the outer shell of the flask (danger of burns and fires).
What types of retro garlands are there?
Although an electric garland implies the New Year and is associated mainly with a decorated Christmas tree (it is not for nothing that it is also called a Christmas tree or New Year's tree), but now, as before, the garland can be found everywhere at any time of the year. This simple device was and is used to decorate shop windows and building facades; it can also be an element of the interior.
In this regard, retro products are of particular interest, since modern devices with microscopic LEDs and constant blinking have somehow become boring. How do retro garlands differ from modern ones? First of all, the size of the light sources. A modern option is a wiring harness on which the lamps are practically invisible until you turn on the garland itself.
Classic modern garland
The retro option is primarily large light bulbs. They are usually large and clearly visible even when turned off. The open and unsightly cartridge gives a special charm to such a product.
Retro made of open incandescent lamps
Retro with capped light bulbs Further, the retro garland is not full of all the colors of the rainbow, causing the eyes to crawl out of their sockets. Often in the past, lamps were not painted at all, and if they were painted, it was in several soft, desaturated colors. Thanks to this, the garland did not hit the eyes like its modern counterpart, but glowed softly, creating a calm (and I mean calm) holiday atmosphere. And now some examples of using retro garlands as decoration.
Retro garlands in the interior
Retro devices in landscape design and as facade decoration
How to do it: step by step instructions
Outdoor garlands based on retro lamps can decorate both your home and garden. All work can be easily done with your own hands.
The basic parts for craftsmen will be:
All these elements are present in any created configuration, no matter what technical and design decisions are made. Otherwise, the scope for human imagination is practically unlimited. From the very beginning, you should consider how far the lamps will be placed from each other. It is important to remember that after all the work is completed they will be a little closer. It is recommended to space the backlight points by 650-700 mm, although the distance may vary depending on the design concept and the specific task.
Next, when preparing a garland for home or outdoor use, the wire is folded in half and its edges are wrapped with insulating tape. Whether it is blue or black does not really matter, except for aesthetic reasons. Then they take pliers and bite through the cover casing, exposing the conductive core. If there are no special pliers, you can use a knife to destroy the insulation. When this work is completed, it is time to install the cartridges.
Using a regular nail, tighten the loops where the insulating layer was removed. Do not forget, of course, that at this moment the structure must be de-energized. A pair of conductors is inserted into the rear of the cartridge. The screw is fixed only after connecting the elements with electrical contacts. At the same time, be sure to ensure that the nut does not come out even a little.
Lamp assembly
Example drawing
You can make a street lamp with your own hands using the following algorithm, which for different models will differ only in some nuances:
- draw a drawing according to which the assembly will be carried out;
- we prepare the material - we cut and process wood, bend sheets of metal, etc.;
- Next we create the lampshade. The structure is assembled according to the drawing diagram;
- After that, we proceed to assembling the electrical wiring.
Note! Assembling the electrical wiring for the future lamp is the most important and crucial stage. You can connect a street lamp to the electrical network with your own hands only if you have the necessary knowledge
Otherwise, you should use the services of a specialist. In order to connect a flashlight (LED or any other type), you will need the following materials:
You can connect a street lamp to the electrical network with your own hands only if you have the necessary knowledge. Otherwise, you should use the services of a specialist. In order to connect a flashlight (LED or any other type), you will need the following materials:
- terminal blocks. With their help, reliable fixation of wire connections will be ensured. They must be designed for a current of 5-10 A;
- electrical cable (type VVG). It is recommended to use a two-core cable with a core thickness of 1.5 mm;
- corrugated pipe or metal hose (diameter from 18 to 25 mm). They provide protection for wires from mechanical damage and rodents. Trench for cable
If we are making a landscape model, then for the wires we should dig a trench in which the cable is laid. The optimal depth in this situation will be 70-80 cm. In this case, the distance from the house to the canal should be at least 60 cm.
If you are making a floor lamp type of lamp, then do this:
- we make metal legs. Cleaned pipes can play their role;
- we pull the cable through them;
- then we place the cable in a corrugated sleeve;
- after this, we cut the cable so that its length is at least 10-15 cm;
- Next we prepare the second piece of electrical wire. It should also be passed through a corrugated pipe;
- then we connect both pieces of the electrical cable to each other using terminals.
If the lantern is hung on a wall or facade, then we connect the wires into switching boxes. In this case, all contacts must be reliably insulated. It is necessary to solder all contacts and carefully wrap them with electrical tape.
Selection of Edison lamps
These designs can differ significantly from each other. They can be installed in lamps instead of conventional light sources. But in this case, you will have to check how they are combined technically and aesthetically. Another consideration: matching the style of the room or the facade of the house. If the design is in a classic spirit, a good way to emphasize this is to choose products complemented by decorating cords.
Open Edison lamps are not suitable for outdoors and damp rooms. They may look quite elegant, but safety considerations should not be forgotten. Next, you need to focus on the general illumination of a particular place so that it is not too dark and does not create a blinding effect. As with other products, selection by manufacturer is of great importance. Not all companies supply equally high-quality products - you need to pay attention to reviews and the duration of presence on the market.
Additional recommendations
Experienced professionals advise using:
- PV series wires with many cores;
- homemade boxes for decorating dimmers;
- carbolite cartridges;
- matte spherical light bulbs with a power of 25-40 W.
Soldering irons and accessories for them, markers, and electric drills may be required for work. It is better to take the wire with some reserve; reserve should also be left for the dimmer power. A marker is used to mark the desired boundaries and connections on the folded wire. All places where contacts are attached must be fixed firmly, but without excessive load. The lamps are connected in a parallel circuit so that the failure of one does not disrupt the operation of the rest of the garland.
Unusual option
Instead of mains power, sometimes you need to make a battery-powered garland. In this case, even a sudden power outage will not be an unpleasant surprise. Lithium-based batteries are usually used. The recommended voltage is 3 V (no longer necessary). The diode mounts are attached to the batteries using epoxy glue.
Similar designs can be used for a veranda or hung on an arch, as well as on another decorative element in the garden. Typically, the anode is attached to the positive pole, and the cathode, respectively, to the negative part of the battery. After the glue has set, you need to strengthen the connection by wrapping it with tape. It is recommended to use from 10 to 20 light bulbs in such a garland. If there are fewer of them, there will be no aesthetic effect. If it’s more, the complexity of the work will increase unjustifiably.
Finally, it’s worth mentioning the basic safety rules when using homemade garlands:
- you should not place them where splashes of water will occur at least periodically;
- it is necessary to clearly understand the difference between indoor and outdoor decorative elements both when designing and when hanging;
- You cannot install garlands in aisles or in places where water or snow can fall on them;
- It is unacceptable to install such structures close to the ground or very low, since it is easy to get caught on them or tear them;
- each garland must be connected to a strictly separate outlet;
- Before connecting, you need to check the serviceability of sockets, decorative lamps and insulation.
To learn how to quickly make a retro garland, see the following video.
Flexible neon
This light illumination can be called differently, flexible or cold neon, or more scientifically - electroluminescent cord (El cord).
It glows due to the phosphor in the central core, and voltage is supplied through it through two very thin wires.
Cord tubes can be of any color. Here you can choose according to your taste and color. However, unlike LED RGB strip, the color of neon cannot be changed arbitrarily.
Whatever color cord you bought in the store, this shade will illuminate your façade. There are indeed models with the “crawling snake” effect, but they cost a little more.
Neon cord is a rather unpretentious product. You can bend it at different angles, which is very important on complex and curvy facades.
It consumes very little electricity - about 4 W/m. At the same time, it is ideal for installation outdoors on any surface, as it is not afraid of moisture.
And it practically does not heat up. Therefore, there is no need to worry that it may cause the wooden structures of the attic to catch fire.
Another undoubted advantage over LED tape or garlands is its universal length. Neon can be cut with millimeter precision, absolutely anywhere.
At the same time, it’s easy to build up and solder additional pieces of completely different colors.
It is most often attached to the facade by conventional gluing with sealant or Moment glue.
Slight difficulties may arise with connecting cold neon. The fact is that you can’t just plug it into a socket or 220V network. To power it, a special inverter is required.
On the one hand, this is inconvenient, but on the other hand, it makes it possible to connect it not only from an outlet, but also from battery-powered inverters.
In fact, you don't even have to run any wiring outside. It is enough to hide a sufficiently powerful battery pack in the attic or under the canopy.
Taking into account the low power of the backlight, such power can easily last for a couple of nights. With spare batteries, your facade will glow all night long without interruption.
If you prefer standard 220V, and don’t want to climb into attics and roofs every time to change batteries, then don’t forget about the adapter. It's something like a phone charger.
It reduces the voltage from 220V to 12 or 24V. It is from them that cold neon inverters need to be powered.
The conductors are connected either using a soldering iron or through factory male-female connectors already soldered to the cord.
How to make a cool garland from incandescent lamps?
A garland of incandescent light bulbs, also called a retro garland, is used to decorate any festive event in a restaurant or in a private home. It is placed under canopies, in gazebos and tents, a certain area is allocated (for example, for a photo shoot), and fences are decorated. You can make an elegant and unusual retro garland that creates an unusual atmosphere with your own hands.
For outdoor use
Are our designs suitable for outdoor use? LED – quite. We sealed the LEDs with a heat gun, and the five-volt power supply ensures complete electrical safety, even if water leaks or floods the wires.
But with a garland of 220 V lamps, not everything is so simple. Firstly, the cartridges are not airtight. Secondly, the incandescent lamp gets very hot, and if a drop of water gets on the bulb, it can simply explode. Well, 220 V is a life-threatening voltage, which, by the way, can cause a fire. Thus, this garland can work outdoors, but under a canopy and out of reach of people.
What will you need to make a garland?
To make a garland of light bulbs with your own hands, you need the following materials and tools:
- PV wire 1×0.75 (stranded single with a cross-section of 0.75 mm²), it is important that the wire is soft but can hold its shape;
- 25 W light bulbs with E14 or E27 socket (they shine brightly and are economical);
- carbolite, plastic or porcelain sockets corresponding to the lamps;
- fork;
- rotary switch (dimmer) to change the brightness of the light;
- wire cutters;
- sharp knife;
- marker;
- insulating tape;
- drill or screwdriver;
- screwdrivers - flat and Phillips;
- tailor's meter (it is convenient for measuring curved wire);
- nail;
- multimeter (tester).
The length of the garland is determined depending on the place where it is intended to be used. The wire can be black, white, colored is rare. It must match the color of the cartridges. For a garland 5 m long, you will need 7 lamps, 7 sockets for them, 14-15 m of wire, of which 10 m are the main ones, and the rest is needed as a reserve for connecting to an outlet. If E12 lamps are used, an adapter will be required.
Selection of necessary materials
To make a garland of LEDs, it is important to first assemble everything you need. Components are sold in radio electronics stores and are inexpensive
You will need the following:
LEDs of different colors with a diameter of 4 to 5 mm, permissible current strength of about 20-30 mA. The voltage reduction value in this case should be from 2.1 to 3 V. As for the quantity, you need to determine the length of the garland and the spacing of the lights; most often they are placed every 25-30 cm. Multi-colored LEDs are inexpensive.
It is also necessary to select resistors. If the system uses a serial connection, only one element will be needed. When parallel, you need to use either one resistor for each diode, or divide the system into small groups
It is important to choose an option with suitable indicators; usually the store offers the optimal solution if you explain how the system will be assembled. Scheme of series-parallel connection of three serial groups of LEDs in chains of three LED elements
In each chain on the left there is a current-limiting resistor. It “extinguishes” the excess sum of the forward voltages of the diodes.
The power supply is also purchased for a specific product. It is necessary to calculate the total power of all LEDs used and increase it by 20-30%. The resulting indicator will be a guideline when choosing a block. Connecting the LED strip to the power supply.
It is also necessary to purchase a safe plug; it is convenient to use the dismountable version, it is easy to connect.
Step-by-step instruction
To assemble a garland of light bulbs with your own hands, you do not have to be a professional electrician. The instructions are designed for parallel connection of lamps.
Preparing twisted wire
The basis of the retro-style garland is a twisted wire, similar to the one that was actively used for external wiring until the middle of the last century. The cables are intertwined like this:
- Fold in half, cut, lay out, align the ends and secure them with a tie.
- 1 end is attached to a bent nail inserted into a drill, the second is tied at a distance to some object - a hook, a table leg.
- Turn on the drill. From a simple wire 15 m long you get 7.3-7.4 m retro.
- Without removing it from the hooks, knead the cable slightly along its entire length and let it lie for a while in such a position that all the wires are fixed in a new shape.
Wire processing
At this stage, the points where the lamps will hang are determined and prepared for connection:
- Measure out a section of at least 1.5 m for connection to the socket on one side of the cable. Choose the design option for the other side; it can end with a lamp or an additional socket.
- Measure and mark with a self-adhesive marker the location of the lamps (depending on the size, they are placed in increments of 45-60 cm). It is better to make markings along the entire length of the product at once in order to adjust the distance between the elements.
- Insert a flathead screwdriver at the marked point and push the cables apart so that a ring-shaped section is formed between them.
- They expose 1-1.5 cm in the center of both wires opposite each other using a stripper or knife. The insulation layer is removed carefully so as not to damage the conductors.
- Twist the exposed areas into loops using a screwdriver or thin nail.
As a result of processing, sections with loops arranged in pairs appear on the cable; a cartridge will be attached to each pair.
Fork
The plug is selected according to its appearance, without grounding. First you need to disassemble it and then connect it to the cable:
- Expose the ends of the wires by 1.5 cm. The part that will be pressed by the clamp should remain insulated, this will protect the cable from severe kinks.
- Clamp the ends of the wires with the fixing screws so that the exposed parts do not touch each other.
- Put on and secure the cover.
If you plan to make a garland with a dimmer, you will also need a connecting block that quickly provides contact and good insulation. Loosen the screws in the block (4 pieces), then insert the garland wires into the sleeve channels on one side, and dimmers on the other, and tighten the screws.
It is better to purchase a dimmer with a cable and plug - it is easier to install (according to the technology, connection to the device is carried out by soldering).
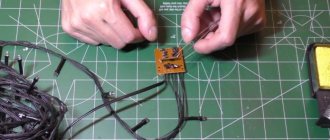
Installation of cartridges
In a garland, it does not matter which cable is connected to which contact. For retro-style products, old-style cartridges are more suitable - carbolite, which consist of 3 parts:
- cylindrical body with thread;
- bottom (skirt);
- ceramic liner.
The cable is passed through the bottom of the cartridge, the wires twisted into loops are put on the contacts of the ceramic insert and secured with screws so that the exposed parts do not touch each other. Then the housing is screwed on.
Connection
The garland, which is a wire without breaks, is reliable when stretched and sagged. It is designed for 220 volts. It is recommended to check each lamp for integrity using a multimeter before screwing it in. Only after this can it be included in the network.
One, two, three, Christmas tree, burn!
Today, no one will be surprised by a Christmas tree shimmering with multi-colored lights of an electric garland, which can be made from several hundred LEDs. But relatively recently, many only dreamed of such luxury. It was not easy to find electrical jewelry in the trade, so some craftsmen created it with their own hands. Nowadays, it is much easier to make such a product; you can purchase all the components in one store. However, the electric retro garland is made by hand only with stakes. And all because of a lack of knowledge and fear of electricity. In fact, anyone can make this original and wonderful attribute of the New Year’s tree, the main thing is to do everything in accordance with the recommendations.
How to make a retro garland with incandescent lamps with your own hands? First, you will have to check the availability of tools and components, and get the missing ones in a store or on the market. You will need:
- single stranded wire, cross-section 0.75, insulated;
- switch, preferably a dimmer (to adjust brightness);
- carbolite cartridges (E14);
- light bulbs (matte ball, E14 base, power 25 W);
- electric plug;
- screwdrivers, knife, soldering iron with solder, drill, hot gun with silicone.
It is better to purchase the wire with a small reserve, based on the calculation of 40 m of wire for a garland of 15 lamps, 10 m long. The dimmer switch is selected based on the total power of all light bulbs, which in this case will be 375 W. However, it is better to take more, because if you replace 40 W bulbs, you will need a 600 W dimmer.
DIY electric retro garland
After preparing all the necessary materials, you can begin direct assembly of the device.
- To begin, fold the prepared wire in half and secure the covers with electrical tape.
- Using a marker, we mark the places for removing insulation, starting from one of the edges of the wire, with the interval between marks being 80 cm. In total, 15 pairs of connection points will be needed. At any mark, remove approximately 2 cm of insulation. We twist the exposed wiring for convenience.
- Now it is necessary to install the prepared cartridges. Once all 15 cartridges were connected, a solid wire came out with the cartridges mounted in parallel. This will allow the garland to glow even if any of the bulbs burns out.
- All that remains is to twist the wires together, and then attach the dimmer and plug. In principle, the garland is ready for work, however, to ensure safety, it is recommended to protect the places where the wires enter the sockets, dimmer, and plug with silicone from a hot gun. Well, it will add more beauty if you paint the light bulbs with multi-colored paints.
But if you have never worked with electrical appliances, then it is better to find a video on how to make a retro garland with your own hands, carefully look at the work of specialists and work in accordance with the video tutorial.
Additional recommendations
A retro-style garland with incandescent lamps cannot be used in the following conditions:
- under snow, rain, temperature changes (the bulbs will burst or a short circuit will occur);
- near flammable materials (paper, fabric);
- leave it turned on unattended for a long time, for example, at night;
- install on the ground or a short distance from it, because It's easy to get caught and break the wire.
Plastic sockets have cable terminals that are not designed to support more than the weight of the lamp and socket. Therefore, when using them, you need to attach a garland every 1.5 m.
It is not recommended to connect elements in series when making a garland, because the power consumption of each subsequent lamp will be less than the previous one, for example, out of 15 lamps, only the first 3-4 will shine brightly. And if 1 lamp burns out, the circuit is broken and all the others go out.
When connected in parallel, lamps of different sizes and power can be screwed into one garland. If you want to make 1 long decoration, you need to take into account the power of the power source. The standard plug and socket are designed for a load of 5 A (1 kW). If there are several garlands, each should be connected to a separate outlet.
Lamps can be painted with watercolors or gouache. Store the garland in a box, avoiding mechanical pressure.
Calculation of connection diagram
Even series-connected LEDs must contain a current-limiting resistor in the circuit:
- red elements with a voltage drop of 1.5-2 V - a resistor with a resistance of 420 Ohms;
- green and blue at 3-3.2 V - 82 and 75 Ohms, respectively.
You can use a standard 220 V controller for RGB technology with a common anode: “minus” is supplied to all channels, and “plus” is supplied to the common cable.
Advantages and disadvantages
Before you make a garland of LEDs with your own hands, you need to accurately determine its purpose. To do this, you will need to take into account all the advantages and disadvantages that may affect the performance of the New Year's decoration.
Among the positive aspects of using such garlands, it is worth highlighting the following:
- Long service life. High-quality lighting devices can operate for 10 years. This figure is significantly higher than that of New Year's decorations made from ordinary lamps.
- Minimum amount of electricity consumed. This type of garlands is considered one of the most economical. LEDs consume 10 times less energy than incandescent light bulbs. At the same time, the brightness of the light they produce is not inferior to outdated analogues.
- High safety indicators. High-quality LED garlands operate at a voltage of 12 V and practically do not heat up. Such features help reduce the likelihood of fires to a minimum. In addition, the likelihood of electric shock is almost completely eliminated.
- High brightness. Garlands of LEDs always shine very brightly. Because of this, they are made compact, which allows you to decorate even small objects.
- Light weight. Thanks to their minimal dimensions, these luminous decorations are very light. This advantage allows you to hang the garland on thin interior items or small tree branches.
- Parallel connection. This allows the garland of lamps to work even if problems occur in one or more links of the chain. Older jewelry used a series connection, and if one of the bulbs burned out, the entire device would fail.
- Ease of Management. All modern New Year's garlands can be adjusted using a special control unit or remote control. These devices allow you not only to turn the decoration on and off, but also to change the lighting modes.
- Durability and reliability. LED garlands are protected from mechanical influences and any other damage. This is ensured by high-quality coating of lamps with their strength characteristics.
Among the many advantages, there is one drawback. It lies in the slightly overpriced price of the garland. However, all financial costs will quickly pay off due to energy savings.
Where can you buy frost-resistant LED street garlands and how much do they cost?
Garlands are sold seasonally in almost every store, but not all of them are intended for the street. Check the product label carefully. You can also search for suitable jewelry on the Internet.
The cost of street garlands starts from 1.5 thousand rubles and can reach hundreds of thousands, depending on the complexity of the design and size.
To summarize, it should be noted that it is difficult to imagine the New Year without colorful lighting.
Spare no time and money to decorate your home and site; your purchases will pay off with a great mood and the admiration of others
Happy upcoming holiday! Don't forget to share your invaluable experience and impressions!
Previous Landscaping How to create a beautiful and functional landscape design for a summer cottage: photo ideas Next Landscaping How to make and lay paving slabs with your own hands
DIY methods
The easiest option for obtaining jewelry is to purchase it. To do this, just visit a store that sells lighting fixtures or New Year's goods and choose the most suitable device. If you don’t have extra money, you can make an electric garland with your own hands. This option will be less expensive from a financial point of view, but more labor-intensive.
To connect to the mains
This method of making homemade jewelry is considered the simplest and most frequently used. It gained its popularity due to the minimal investment of time and money. A distinctive feature of such a garland is its connection to the mains via a special power supply. To make a New Year's attribute, you will need the following materials and tools:
Power type
Everyone is familiar with the device in the form of an electric New Year's garland powered from the mains. It is enough just to insert the plug into the socket for the cheerful lights to “come to life” in the light bulbs. But not all conditions are suitable for their operation. For example, without electricity, such a garland would never become a decoration.
An autonomous analogue of the garland, powered by batteries, will come to the rescue. Wireless garlands are mobile and varied in design. These two big advantages have made them the best-selling products in this category. On pre-holiday winter days, wireless garlands in the form of rain, mesh, large balls and small icicles are swept off store shelves in packages.
Safety regulations
Despite the fact that garlands made from LED lamps are considered one of the safest, care must be taken when using them. This will help avoid unusual situations that could lead to electric shock and its negative consequences. To prevent this from happening, you must follow a few simple rules:
- All garlands used for decoration should be located high above the ground or floor. If you neglect this rule, you may accidentally tear the jewelry and receive an electric shock. In addition, such a precaution will protect small children and pets from contact with a potentially dangerous object.
- When using the garland outdoors, you need to tighten the wires well and make sure that they do not sag. Failure to comply with this condition may result in the appliance falling into a puddle. In addition, you can simply get caught on the wire and fall.
- It is recommended to use wires that are not too thin, as there is a possibility of rapid wear or chafing from external factors.
- It is imperative to check the garland for functionality. Only after this can it be hung on the New Year tree or any piece of furniture.
- It is prohibited to connect several garlands to one outlet at the same time. This may cause overheating and failure.
- You cannot leave home and leave the garland on. Such carelessness can lead to fire and other unforeseen situations.
- When decorating a holiday tree, you need to check the insulating layer of the wiring. If it has even minimal defects, then it is better to refuse such a garland. Otherwise, you can provoke the appearance of a spark, which will lead to a rapid ignition of the Christmas tree.
- If any emergency occurs, you must immediately turn off the power to the luminous decoration.
A garland of LED lamps is a wonderful decoration option for the entire apartment. They can be placed not only indoors, but also outside, which ensures maximum effect from observation from the outside. With proper manufacturing and compliance with safety precautions, you can reduce the risk of an unusual situation and avoid negative consequences. A well-made garland will delight all people and give them a festive atmosphere.
Idea No. 2 – Modernize an old electric garland
If you just don't like what was on the tree last year, you can decorate an electric garland in an original way using regular paper coffee cups. Making a beautiful New Year's product is quite simple. To begin, prepare glasses, scissors, glue, tape and scrapbooking paper.
After this, cut and unfold one of the cups, which will become a template for cutting out the decorative wrapper. Having cut out the blanks, glue them onto the glasses using glue or double-sided tape.
After this, we cut out a place in the bottom of the homemade lampshades for the glowing bulbs and insert them there, securing them on the outside with a thin strip of tape.
That's all - the electric garland is ready! In this way, you can make an LED or regular garland for the New Year tree more elegant and festive!
Retro garland with incandescent lamps | Vintage Light String
Good afternoon. My name is Evgeny Sushnikov, it’s time to tell you how in our workshop I make cool, real garlands with lamps with my own hands. All the secrets, preparation, difficulties and moments of pleasure from the work done. I make to order.
Preparation
Ideas are in the air and live independently of our will, we just need to catch it, let’s take Plato at his word. We get inspired, come up with an idea, while looking at websites and blogs about design.
I use Tumblr for this, everyone posts pictures there and it’s easy to scroll, for example awelltraveledwoman, modernhepburn, thelittlefrenchbull, sweethomestyle, calmingcalamity I look at a friend’s feed with the tag https://evgenesushnikov.livejournal.com/friends/Design. Here's a website with a Swedish design: https://www.stadshem.se/. The same https://www.lookatme.ru. Interior, details, before/after, very cool, all night long https://www.designsponge.com/category/before-and-after.
I save interesting things in the “Repair, Do” folder, then I look through them and come up with ideas when I have free time. There are a lot of things, share your craft sites with “eidos” in the comments, I will be glad.
The idea is ready, let's materialize it. We spend half a day or a day shopping, scraping the bottom of the barrel and finding everything we need:
- PV wire 1 x 0.75 stranded single copper in white insulation with cross section 0.75
- A dimmer switch for a sconce that hangs on a wire or a regular one for walls + make a beautiful wooden box for it.
- Carbolite cartridges E14
- Regular frosted light bulbs, balls for 20 rubles. with E14 socket for 25W (at most 40W)
- Fork
- Screwdrivers: flat, small flat, Phillips
- Wire strippers, wire cutters, pliers
- Small electrician's knife with a short blade for convenience
- Soldering iron, soldering acid, tin
- Drill
- Two small nails
- Hot gun and silicone tubes for it.
- Marker
- Finger patch
How to make a glowing garland with your own hands
With the New Year holidays approaching, many people can’t wait to decorate their homes with various decorations and garlands. This procedure adds a festive mood, and the finished result will delight and amuse both the whole family and guests who come to the house for almost a whole month.
Therefore, careful preparation cannot be avoided. And, to make it more interesting, it is recommended to make garlands with your own hands. Not only will they be unusually made, but it will also be possible to make them according to your desires and needs (for example, taking into account the size of the room).
Let's look at two ways to do this.
Corrugated paper, napkins
12 napkins, glue, a stapler, a round template - and a fluffy pompom is ready!
To do this, you need to staple 6 pieces of napkins in the center, cut out a circle according to the template, glue the adjacent sides and fluff them up. The corrugation is ideal for cute roses - cut out a spiral, twist it and secure it with twine.
We recommend reading:
- Do-it-yourself brooch: master class from and step-by-step instructions on how and what you can make a brooch from (125 photos)
- DIY birdhouse - the best ideas and tips on how to make a beautiful and decorative birdhouse (video + 120 photos)
- How to make a candlestick with your own hands - the best ideas, instructions and master classes on making candlesticks (95 photos + video)
Retro garland of ordinary light bulbs
Assembling such an interesting glowing garland is quite simple. It is only important to observe the sequence of the electrical circuit. For this you will need:
- The wire. For a more attractive appearance, you can use a decorative twisted one, but a regular one (both two-core and single-core) will do. It is recommended to choose a length of 6m; you can increase or decrease it at your discretion.
- Cartridges, 10 pieces;
- It is best to buy the weakest lamps. For example, 15W.
- Fork.
- You will also need the following tools: pliers, screwdriver, scissors, tape measure, electrical tape.
- The assembly sequence is as follows:
- it is necessary to cut the wire into 9 equal parts 50 cm long. The remaining part will remain for connecting the plug and connecting to the electrical circuit;
- strip all ends of the wire.
Note! It is best to use a special wire stripper to strip the ends.
- Next, you need to assemble the plug: take the long rest and tighten two screws on it;
- All that remains is to assemble the entire circuit: unwind all the sockets, using a parallel connection, connect the entire garland, screw in the lamps.
When the garland is ready, you can connect it to the power supply, and then enjoy the New Year's lights in your room.
Note! If you use lamps of more than 15W, the electricity consumption will become quite large, equal to the operation of a powerful heater.