SHARE ON SOCIAL NETWORKS
FacebookTwitterOkGoogle+PinterestVk
It’s hard to imagine a modern kitchen without a dishwasher. Using this unit saves time and effort. Two steps are required to make the dishwasher ready for use: installation and connection. Before starting work, you need to determine a suitable location, and also take into account many small nuances, without which it will not be possible to carry out the work correctly.
Installing a dishwasher is a rather complex process with many small nuances.
Features of installing a dishwasher depending on its type
There are several options available to ensure harmonious integration of the dishwasher into the kitchen furniture. Most often, the dishwasher (DMM) is installed in the place that was previously selected for it. All devices of this type are divided according to their dimensions into three types:
In terms of size, dishwashers come in full-size, narrow and compact sizes.
- compact;
- narrow;
- full size.
Units that belong to the first group can accommodate a small number of cookware sets (up to 5). They are most often installed under the sink. Sometimes such models are located above the countertop. The width of these models is 60 cm. They are great for people living alone. Installing dishwashers of this type is not particularly difficult. This model can also be placed in a cabinet above the sink.
Narrow PMMs are so called because of their width, which is 45 cm. Such models are more spacious, since in other dimensions they are similar to full-size machines. The number of sets that can be loaded into such a device ranges from 6 to 10. Narrow models are divided into fully and partially integrated. They are installed in a kitchen unit, the doors of which act as facades. They can have dimensions of 45 and 60 cm. The front for the dishwasher is best purchased separately.
Full-size units have a width of 65 cm and a height of 90 cm. They have the largest capacity among all types of PMM. Devices can be integrated or installed separately from the headset.
Full size dishwashers are 90 cm high and 65 cm wide
Note! Having a pre-designed diagram describing the installation of the dishwasher greatly simplifies the task. The drawing can be prepared for a specific model, for example, for installing a Bosch dishwasher (or any other brand).
Most often, companies involved in the production of kitchen furniture provide a special place in which the future dishwashing device will be located. To do this, manufacturers take the dimensions of a narrow unit as a basis and add 5 or 10 cm (on each side) to these values. If a set of kitchen furniture does not imply the installation of a PMM, then it is best to purchase a separate device.
When choosing free-standing models, it is very important to understand one nuance: the appearance of the device body must be in harmony with the design of the kitchen space. If this rule could not be followed for one reason or another, then you should choose a place for installation in the immediate vicinity of the sink. Before starting work, be sure to carefully study the instructions indicating how to install the dishwasher. Bosch is the best choice for integrating with minimal effort.
The distance from the body of the dishwasher to the back wall must be at least 5 cm. This is a very important point, failure to comply with which will lead to failure of the machine, since there will be no good ventilation.
Most often, companies producing kitchen furniture provide a special place for a dishwasher.
Neighborhood: dangerous and not very
Correct installation of any household appliance guarantees its long and uninterrupted operation. Therefore, it is important to pay attention to the advice of manufacturers and specialists so that your mechanical assistants work efficiently and for a long time. Let's look at a few of the recommendations.
Tip 1. It is not recommended to install a built-in dishwasher from the very edge of the kitchen unit as its extension, otherwise you will have to additionally order cabinet parts and countertops from furniture makers.
Tip 2. The dishwasher should be placed away from any heat sources, be it a radiator, oven or hob. The recommended distance from the oven should be at least 40 cm; some manufacturers even indicate this in the installation instructions. Failure to comply with this rule may result in the service center refusing warranty repairs.
The dishwasher must be installed in a specific place in the kitchen, taking into account the location of other built-in units
In addition, excessive heat will cause the machine to overheat, which will affect the quality of the seals, which will dry out very quickly and become unusable. If, nevertheless, the dimensions of your kitchen do not allow you to install the appliances at the required distance from each other, then lay a sheet of foil polyethylene between the appliances.
Tip 3. It is not advisable to place dishwashing equipment close to the washing machine. During the wash and spin cycle, the washing machine vibrates quite strongly and hits neighboring objects, which is quite destructive for them.
It's only worse if you turn on two devices at the same time. The vibration of one device, transmitted to another, can break fragile dishes located inside the washing chamber.
The dishwasher should not stand next to the machine, the latter can cause serious damage to it.
Tip 4. The seemingly harmless microwave oven does not have a good effect on household appliances. The electromagnetic waves it emits can have a negative effect on the electronics of washing machines and dishwashers. Ideally, it is generally better to hang the stove on special brackets that are attached to the wall or place it at a distance of at least 50 cm from any household appliances, but this is not always possible.
Tip 5. The dishwasher will easily tolerate proximity to the freezer and refrigerator. It does not heat up very much and vibrates very slightly, which does not in any way affect the operation of nearby equipment.
But we can place the device we are interested in next to the refrigerator, since it will be a completely safe neighborhood for it
How to install a dishwasher: choosing a location
Before you begin installing the dishwasher, you need to determine the location in which it will be located. It is worth considering several important points. The easiest way is to choose a place for models that are integrated into the kitchen set. Such devices are most often mounted in furniture modules, which belong to the first level (floor cabinets). An area with a small amount of space should be allocated for the dishwasher.
Compact models, if desired, can be built in a place that is most convenient to reach. They can be placed at chest level in a furniture set. Errors when choosing the location of the PMM often lead to difficulties with operation and maintenance, so first of all it is necessary to build on the type of dishwasher and the features of a particular device. This will allow you to integrate it into the kitchen ensemble as harmoniously as possible.
Note! Chinese models may have design features that influence the integration process. For example, some Medea dishwashers are equipped with special adjusting screws that are responsible for the degree of tension of the facade.
The most suitable place to install a dishwasher is the module located next to the sink. This is quite logical, since all the water supply and sewerage units that are necessary to connect the PMM are concentrated in this area. By choosing this location, there will be no problems connecting hoses to all necessary communications.
The module located next to the sink is considered the most suitable place to install a dishwasher
Models from foreign manufacturers (for example, Electrolux) are best suited for quick installation. Installing a dishwasher is often accompanied by a variety of minor setbacks. Problems arise much more often if you need to choose a place for a dishwasher in a finished set. In such a situation, there is only one thing left to do - adjust the dimensions of the furniture to the dimensions of the device. If this fails, then you will have to dismantle individual modules of the kitchen ensemble.
Thus, the most important rule is to select in advance a suitable place in which the dishwasher will be placed. This rule applies not only to dishwashers, but also to other kitchen appliances. The sketch of the kitchen set should be drawn up second.
Necessary communications
So, we have decided on the model and dimensions of the equipment. Now you need to prepare a place where the kitchen assistant will stand. If you purchase equipment at the same time as furniture for an empty room, then you will need to carefully consider and calculate the location of all communications that will be required to connect the machine, namely:
- water pipe;
- sewerage;
- electrical outlets.
A little tip: consultants in furniture stores will help you quickly design your kitchen, taking into account all the sizes and placement of cabinets and appliances.
Approximate layout of the dishwasher and other kitchen appliances
When drawing up a project, keep in mind that it would be best to place the unit next to the sink, but away from heat sources, since elevated temperatures can negatively affect the operation of the equipment.
You can develop a project on a computer using one of the many design programs. A special article will tell you about the main nuances of making kitchen furniture drawings yourself.
Instructions for preparing and installing communications and connecting to them
Before installing the dishwasher, we need to prepare the communications to which we will connect the equipment. How to do this - read the instructions.
To connect the dishwasher, you need to prepare some tools
And before you start work, prepare the necessary tools and components that you will need:
- flat-head and Phillips screwdrivers, adjustable wrench, pliers;
- level and tape measure (laser tape will be very convenient);
- screwdriver, hammer drill or drill, chisel, wall chaser;
- sewer tee;
- cold water hose (sold with the product);
- corrugation, clamps, adapter, three-way valve;
- filter (if not included in the machine);
- siphon;
- rubber gaskets;
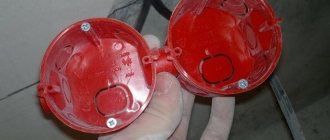
- European standard socket (preferably with moisture protection) and socket box;
- three-core cable with a core cross-section of 1.5 mm;
- rubber cuff.
Be prepared for the fact that you may need many more little things, for example, self-tapping screws of different lengths, tape, which it is advisable to wrap around threaded parts.
Step No. 1 - connect to electricity
Appliances such as a dishwasher require a separate outlet, preferably grounded. To do this, from the junction box, which is usually located under the ceiling, you need to run a wire using hidden or surface (open) mounting, that is, in a groove or cable channel to the expected location of the outlet. It should be taken into account that the distance from the installation site of the machine to the socket should be no more than one and a half meters, since according to the standard, the cord length of the product is usually 1.5 meters.
It is mandatory to equip the dishwasher with a separate outlet.
Important! Before and during electrical installation work, it is necessary to de-energize live elements (turn off the circuit breaker in the panel). If you do not have the necessary experience, then electrical installation work must be entrusted to a qualified specialist.
The dishwasher requires a separate outlet, as safety rules dictate.
Hidden installation
Hidden installation is carried out in a room where the walls are not yet covered with a finishing decorative coating, for example, wallpaper or tiles. This type of work involves hiding the electrical cable in the wall. Using a wall chaser and a hammer drill, we select a groove and a niche for the socket box in the wall.
Work can be carried out on bare walls that have not yet been painted or even leveled
We install a socket box in a niche using construction adhesive (liquid nails, tile adhesive, gypsum mortar, etc. are suitable), and for a more durable fixation we tighten it to the wall with self-tapping screws.
We lay the copper cable in the groove, connect it on one side in the distribution box, and connect the socket to the other and secure it in the socket box. We fill the groove with a building mixture (gypsum, alabaster, putty, etc.). We level it and sand it after drying. During the final finishing of the walls, such wiring will be completely invisible.
So-called open installation can also be carried out, in which the installation of the machine will be carried out in a room with ready-made repairs
Outdoor installation
Open installation is used for finished repairs, so as not to spoil the appearance of the walls with grooves. With this type of work, a cable channel of the required cross-section and an external socket are mounted from the distribution box to the intended location of the socket to the wall. Next, the cable is connected in the same way as the hidden wiring option.
Installation of cable channel
After completing the installation of electrical wiring, you should turn on the current supply and perform a test run of household appliances.
Step No. 2 - connect the water supply
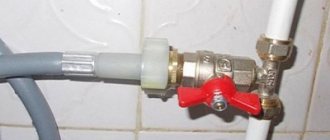
Before connecting the water supply to the machine, turn off the water supply valve to the house. This faucet is most often located in the bathroom. Next, at the connection point of one of the water consumers (washing machine, cold or hot water tap, filter), we install a tee with a three-way corner valve, restore the water supply to the existing consumer and connect the inlet hose of our washing equipment. Please note that if the threads or diameter of the tee and hose do not match, you will need an adapter.
At this stage the water supply will be connected
If you use rigid pipes instead of an inlet hose, you should install filters for rough water purification in front of the three-way tap in order to extend the correct operation of the dishwasher for a longer period.
It is better to use a flexible hose when connecting
There is a simpler connection option - this is a direct connection of the inlet hose directly to the faucet on the sink. But this method has a significant drawback - the inability to use water while the machine is running and the unattractive appearance of the hose.
The dishwasher must be connected directly to cold water
Many people have a question: what kind of water to connect the dishwasher to? It would be more correct to connect to a cold one, since each unit has several programs and corresponding temperature conditions, that is, the machine itself will heat the water to the required temperature.
But I must say that you can also connect to hot water. This is done in order to save energy consumption for heating water by the machine. Although here it is worth weighing the pros and cons of such savings, especially if you use central heating and water heating.
Step No. 3 - connect the sewer
The last important step in connecting the dishwasher to communication networks is drainage, or, in other words, connection to the sewerage system. There are two possible options for performing this operation.
- Using a tee.
- Install a siphon.
There are several options for arranging a drainage system
Let's consider each of the options. Installing a tee is not the most successful way, but it happens that there is no other option. It is used if the equipment is installed at some distance from the sink, and since the hose of the unit cannot be extended, the option of inserting an oblique tee into the sewer pipe as close as possible to the machine remains the only correct one.
This is not an easy job, so try to follow the recommendations of specialists related to the installation of this system
We insert a rubber sealing collar into the tee, which serves to seal the connection between the drainage hose and the sewer, as well as to prevent unpleasant odors from entering the kitchen from the pipe. We insert the dishwasher drain hose into the cuff, into which it will be securely fixed and water leakage during operation of the device is excluded.
To avoid unpleasant smells from the sewer getting into the dishwasher chamber, it is necessary to create a bend in the drain hose - a water seal, that is, lower part of the hose below the level of the insert into the tee.
The second option with installing a siphon is simpler and more reliable. To do this, you need to replace the regular siphon under the sink with a model with an additional pipe. We connect the hose, but straight, without kinks, to the siphon and, for reliability, secure the connection with a clamp.
You can simply and quickly install a siphon, and the system will work with a bang
Installing a built-in dishwasher: preparing tools and materials
Most manufacturers of dishwashers include instructions for the units. Such manuals may indicate what tools and materials are needed to integrate the dishwasher into the kitchen ensemble. However, such instructions are not always included. Before starting work, you need to prepare the following tools:
- electric drill;
- screwdriver;
- Screwdriver Set;
- chisel;
- regular hammer;
- pliers;
- level.
The tools that will be needed to install the unit are an electric drill, screwdrivers, a screwdriver, a hammer, a level, and pliers.
Instead of a drill, you can use a hammer drill to install the dishwasher yourself. Screwdrivers should be prepared not only with flat tips, but also with Phillips heads. It is quite inconvenient to use a regular level in such work. Experts recommend using laser, if possible. You will also need to prepare some auxiliary tools: a pencil, a tape measure and a construction square.
Helpful information! Installing a dishwasher into furniture is one of the stages of its integration. If it is necessary to connect the PMM to communications, then the list of tools requires addition.
The parts that will be used to connect the device should not be used, since their reliability is significantly less than that of new ones. It is especially not recommended to use used parts when installing Bosch dishwashers. It is quite problematic to carry out all stages of installation and connection with your own hands, so it is recommended to study photo and video materials related to this issue.
Dishwasher installation rules and some useful tips
Before purchasing and installing a dishwasher, you need to measure the location that was previously chosen for it. The check is carried out using a construction tape. An even better solution is to take a measurement before purchasing the unit. How to find out the size of the PMM? As a rule, the dimensions of products are indicated on the websites of manufacturers and companies involved in their sale. If the size of the niche exceeds the dimensions of the dishwasher, then you can adjust the height of the device using the legs.
Before purchasing a dishwasher, you need to measure the location you have chosen to install it.
It is very important to remember that some PMM models are highly sensitive to tilt angles. Even at the slightest angle (2 degrees), such dishwashers may experience interruptions in operation. This category includes products from Hotpoint Ariston, as well as Indesit dishwashers. The instructions that come with them are a must read, as they contain many important nuances, including those related to installation.
Before proceeding with the integration of the device, it is recommended to place a metal plate under the tabletop. This measure is necessary to protect the wooden material from steam. Devices that are fully integrated into furniture most often include such a plate, but it is easy to make it yourself.
You can install a compact dishwasher under the countertop. Some of the best devices of this type are models produced by. Installing a dishwasher of this type is very simple, due to its size.
Most dishwashers come with special parts that are used when hanging the door. To carry out installation correctly, it is recommended to check preliminary calculations, wiring diagram and other details several times in a row.
Special parts are included for hanging the door
Useful tips
Here are some useful tips for your attention that will not only allow you to connect your dishwasher correctly, but will also extend the life of the equipment:
- Installing a drain hose into a sink is extremely unsafe, although it makes the connection process much easier. The danger is that the waste water drain may fall out of the sink and flood the neighbors below.
- Electrolux equipment is very demanding in terms of installation rules. The maximum tilt to one side should not exceed 2 degrees, so be sure to check this point with a building level.
- If you decide to buy any model from Siemens, be sure to look at the dimensions of the case and check it with the manufacturing standards of the furniture into which it will be installed. Very often, Siemens neglects technical standards and creates non-standard dimensions, as a result of which difficulties arise when installing a dishwasher in a finished kitchen.
- Do not connect the grounding contact to gas or water pipes under any circumstances. The grounding must be connected to the grounding bus of the apartment panel. We talked about how to make grounding in an apartment in a separate article.
- The air gap between the wall and the back wall of the equipment should be at least 5 cm, which is quite enough for air circulation.
- The kit necessarily contains connection rules and a visual diagram for a specific model. You only need to rely on it, because... All conditions are purely individual, although they have much in common.
- It is not recommended to use surge protectors (extension cords), because they very often cause accidents and fires. If there is no other way to supply power, it is recommended to make an electrical extension cord yourself. This method of connecting a dishwasher via an extension cord can be used as an exception.
- If you decide to place a free-standing dishwasher next to a stove, refrigerator or oven, connect a separate line from the distribution box to each appliance so as not to overload the outlet installed near all devices.
We also recommend watching the visual video instructions for proper use of the dishwasher:
Dishwasher operating tips
https://youtube.com/watch?v=vUIT6ixqu18
That's all the instructions on how to connect a dishwasher to the water supply, electrical network and sewerage system with your own hands. We hope that the information was useful and interesting for you. We also recommend that you familiarize yourself with the main malfunctions of dishwashers, so that in the future you will be familiar with how to repair appliances at home!
Optimal dimensions of dishwashers for installation
The largest percentage of dishwashers are 60 cm wide. Such devices can cover the needs of any family. There are also narrow models suitable for embedding, the width of which is 45 cm. It is worth saying that devices with a width of 448 mm have good functionality, not much different from standard models.
The height of narrow dishwashers ranges from 815 to 875 mm. These values were not taken by chance - they were selected in accordance with the standard height of the cabinets included in the kitchen set. When drawing up an installation diagram for a dishwasher, it is worth taking into account not only its dimensions, but also the small margin that the niche should have.
Note! If the kitchen furniture was made to order, you should be careful. Standardized devices may not be suitable for this type of headset. It is recommended to take your own measurements of the niches and compare them with the dimensions of the device.
The easiest way to integrate a 45 cm built-in dishwasher is to install such devices in a matter of hours. The depth of dishwashing units is most often 55 cm. On sale you can find models that differ in height and depth. You should pay attention to the dimensions before purchasing a PMM.
Optimal dimensions for installing dishwashers: height – 82 cm, width – 60 cm, depth – 58 cm
How to protect your countertop
When the dishwasher is opened, steam escapes and moisture settles on the underside of the countertop. Regular wetting can lead to swelling and destruction of the surface. In this case, not only the tabletop will suffer, but also the facade. To protect furniture from moisture, special waterproof plates should be used. Manufacturers offer various protection options - elements made of metal, plastic or film. Bosch dishwashers come with metal linings. Electrolux offers protection from a special film. If a plate is not included in the set, this does not mean that it is not needed. In this case, you will have to find an alternative yourself - you can stick tape, attach a piece of metal, or purchase a ready-made element separately.
How to integrate a dishwasher into the kitchen: integration into the cabinet
The cabinet located next to the sink must have a width greater than 45 cm. In such a situation, there is no need to come up with complex installation diagrams; you just need to install it into the adjacent module. When purchasing products from some brands, you should be aware that they require the installation of a special siphon when connecting (for example, Electrolux devices). Videos of installing a dishwasher of this type can be easily found on the Internet.
To prepare the lower cabinet for installation, you will need to do several manipulations. First of all, you need to remove the transverse partitions (shelves) from the cabinet, and also dismantle the back wall. The bottom panel is removed only if necessary, for example, if the height of the module itself is not enough to accommodate the dishwasher. To fix the case, it will need to be positioned strictly in a vertical plane. For this, adjustable legs and a building level are used.
If you wish, you can call a specialist who will do the job professionally. However, this will come with additional costs. The cost of installing a dishwasher depends on many factors: model, location, technical difficulties, etc.
Don’t forget about the front panel, which performs a decorative function and contributes to the harmonious integration of the dishwasher into the kitchen set. The facade is usually made from a cabinet door. However, it can also be purchased separately (to order). Devices that are part of the partially integrated group do not require a decorative front panel.
To prepare the lower cabinet for installation, you will need to remove the transverse partitions and dismantle the back wall
Installing a dishwasher in a separate module
Sometimes there are situations when it is not possible to allocate free space for installing new kitchen appliances. In this case, you can place an order for a separate module that will complement the existing kitchen ensemble. However, the rules regarding its location are the same. It must be located in close proximity to water supply and sewerage.
Related article:
Built-in dishwasher: modern appliances for a comfortable life
Varieties of models according to installation method and dimensions. Functionality of compact devices. Manufacturers and prices.
Thus, it is possible to transfer equipment that was previously located near the sink into the new module, and integrate a dishwashing unit into the old one. In this case, everything will depend on the features of the installation. Built-in dishwashers must be leveled and secured. This is required to ensure that the device does not produce vibrations during operation. If you ignore the fixation of the PMM, then it will make a lot of noise and move the cabinet.
Helpful information! The hoses located behind, in the space between the rear wall of the dishwasher body and the wall, must run parallel to the surfaces. Access to them must be free so that problems do not arise if it is necessary to replace a failed element.
When connecting certain models, you must carefully read the instructions. Bosch dishwashers, as well as other devices from popular brands, are sometimes quite difficult to integrate into an old set. To avoid having to change furniture, you need to study the issue of “compatibility” at the stage of choosing a PMM.
Access to hoses supplying and removing water in a separate module must be free
If the unit is located under a common kitchen countertop, maintenance becomes more complicated. A communication problem that arises in such a situation will require dismantling the dishwasher unit.
Possible embedding options
- height 815-875 mm;
- width 598 and 448 mm;
- depth 550 mm.
The range of dimensions allows for the use of several installation options. The control elements of the devices are located at the end of the door, and the legs can be adjusted in height. For a tight fit, the equipment is equipped with corner fasteners and self-tapping screws.
When installing it yourself, it is important to take into account the parameters of the kitchen unit, the presence of water supply and sewerage communications, as well as a free line with an outlet. Advice! Install the machine next to the sink, where there is access to the main water supply and drainage units
Advice! Install the machine next to the sink, where there is access to the main water supply and drainage units.
Cabinet installation
If there are cabinets more than 45 cm wide next to the sink, you can disguise household appliances. Installing a built-in compact dishwasher in a cabinet will allow you to connect the drainage and water intake pipes to ready-made communications. The work includes:
- removal of shelves, bottom panel and back wall from the cabinet;
- vertical adjustment of the PMM body using legs;
- connecting an extended pipe with a shut-off valve for cold water;
- laying a drainage pipe into a siphon;
- organization of an additional outlet;
- installation of a decorative front panel on the device door.
Installation in a free-standing module
- aligning and securing equipment so that it does not move during operation;
- laying hoses and pipes along the walls for ease of access.
Important! The location of the PMM in a separate module eliminates the difficulty of dismantling if the hose breaks
Niche installation
The presence in the kitchen set of a special niche for a microwave, oven or compact equipment solves the question of how best to integrate a household dishwasher into a ready-made, assembled kitchen.
Separating the niche from communication networks involves the use of long flexible hoses for supplying water and drains. The front part of the machine is covered with a cover for the facades.
If embedding is not suitable
- place on the table if the dishwasher is no larger than the oven;
- place in an open module;
- place under the sink;
- allocate a small area for narrow models.
Connection to communications is carried out only after installation of the equipment is completed.
Advice! If there is no room for a built-in device, remodel the kitchen unit, move the lines, but be prepared for large financial costs.
Sources
- https://mebel-expert.info/kak-ustanovit-vstraivaemuju-posudomoechnuju-mashinu/
- https://roomester.ru/interer/kuhnya/ustanovka-posudomoechnoj-mashiny.html
- https://rem.ninja/kuhnya/tehnika/montazh-vstraivaemoy-posudomoechnoy-mashiny-v-gotovuyu-kuhnyu.html
- https://cosmo-frost.ru/posudomoechnye-mashiny/ustanovka-vstraivaemoj-posudomoechnoj-mashiny-chto-delat/
- https://rem.ninja/kuhnya/uhod/kak-vstraivaetsya-posudomoechnaya-mashina-v-kuhnyu.html
- https://kachestvolife.club/o-chistote/bytovaya-tehnika/posudomoechnaya-mashina-kak-samostoyatel-no-vstroit-v-gotovuyu-kuhnyu
- https://tstmoskva.ru/bytovaya-tehnika/kak-ustanovit-posudomoechnuyu-mashinu-poshagovaya-instrukciya.html
- https://vmk-mebel.ru/tehnika/ustanovka-i-podklyuchenie-posudomoechnoy-mashiny/
- https://kuhnier.ru/tehnika/vstraivaemaya/kak-vstroit-posudomoechnuyu-mashinu.html
- https://tehnikoved.ru/kuhnya/posudomoechnaya-mashina/ustanovka-vstraivaemoj-posudomojki.html
What to do if embedding is not practical
Some kitchen sets do not provide the possibility of installing a dishwasher. In addition, there may simply not be free space in the furniture. What to do in this case? In such a situation, it is best to purchase a freestanding model.
Dishwashing units of this type do not require complex integration work, so this option is perfect for people who do not want to spend a lot of time fiddling with the installation. There are three placement methods for freestanding devices:
- on the floor;
- into a niche;
- on the tabletop.
The best models, installed separately, are also produced by Electrolux. Installing a dishwasher of this type will not cause any particular difficulties. In this case, all work is reduced, as a rule, only to connecting to the power grid and other communications.
If it is not possible to install a dishwasher in your kitchen unit, you can purchase a separate model
You can completely remake some of the modules that are part of the kitchen ensemble. Transferring communications is also possible, but this is quite labor-intensive work. Usually this option is chosen last, when it is necessary to integrate a free-standing model and install a decorative facade on its front side.
Connection between drain and sewer
This method of independently connecting the dishwasher to the sewer is considered very common. In this case, the connection will be made through a siphon. The method in question requires the technician to act carefully and follow all the advice regarding connecting the dishwasher to the sewer. The drain will need to be equipped with a special outlet and a check valve. This will reduce the likelihood of water flowing directly from the drain into the dishwasher.
The outgoing hose from the machine must be fixed to a wall or cabinet. It is best to place it 50 cm above the drain entrance. To drain water from the dishwasher on its own, tilt the hose at a special angle. The angle is specified in the instructions for your car model. We connect the drain circuit to the siphon under the sink itself. When there is no drain siphon under the sink, then the PMM drain hose must be connected to the sewer pipe outlet, after which the joint should be wrapped as tightly as possible with tape. Under pressure, the hose may fall out; to keep it tightly in the sink, you will need to use a special holder. To connect to the siphon, you need to use an additional fitting. In Moscow stores you can find ready-made options for PMM. Before connecting the drain, you need to re-check the hose size
It is important that there is enough of it; it is better not to use a very long one, because... this has a negative impact on the efficiency of pumping equipment.
How to install a dishwasher: checking the contents and unpacking
Preparing for installation of a dishwasher includes two more stages, in addition to choosing a location: unpacking and checking the contents. It is recommended that unpacking be carried out in the presence of employees of the company from which the unit was purchased. This is necessary in order to check the presence of all parts necessary for installation. If there is a problem with the packaging, then you must inform the company’s employees about it.
Note! You also need to check the availability of instructions (necessarily in Russian). Without it, it is much more difficult to independently understand the design features of a particular model.
If necessary, you can try looking for installation instructions on the company's website. Many well-known brands add them to the product description (for example, Bosch). Dishwasher instructions are very important, so don't ignore this point.
When checking the package, you need to pay attention to the presence of instructions in Russian
In addition to the dishwasher itself, the kit often includes parts that are necessary for the correct installation of decorative trims. It is also necessary to check the presence of retaining elements, a rubber apron used for protection, and gaskets with hoses. The latter are needed when connecting the device.
What do experts advise?
- The cabinet parameters should be measured before purchasing a PMM.
- It is better to check the adjustment of the legs with a level.
- The machine should be placed near the sink - this makes it more convenient to switch between drain and fill.
- A metal plate can be used as a vapor barrier.
- The height of the dishwasher should be equal to the height of the countertop.
- The optimal length of the drain hose for normal load on the pump is up to 2.5 m.
- Grounding will prevent electric shock.
- Equipment cannot be connected via extension cords.
Watch a video about installing a dishwasher
Dishwasher: installing a built-in model
Before you begin integrating the built-in model into the suite, you need to once again make sure that the cabinet has the appropriate dimensions. You will need to make holes in its walls through which hoses will pass connecting the device to the communications. Installation is carried out in stages. Let's consider this process using the example of a Bosch dishwasher. Installation of the built-in model requires care.
So, the first step of installing an integrated PMM involves its location opposite the niche that was chosen to place the device. Then you will need to pull the hoses responsible for supplying and removing water through the holes. This is to ensure that the hoses are the correct length. If necessary, they will need to be lengthened.
The next step in installing a Bosch dishwasher (or any other) requires the use of instructions. You will need to glue a special film to the inside of the tabletop. It will protect the wooden material from moisture. Then you need to fix the tapes needed for sealing along the edges.
Before installing the built-in model into the suite, you need to make sure once again that the cabinet has the appropriate dimensions
Next, the mounting plate and special damping elements are installed. The latter are used to dampen vibration of the dishwasher. The next step is to adjust the height of the legs. The unit body must be positioned strictly vertically. After this, use a tape measure to check the distance from the walls of the niche to the edges of the PMM.
Note! Dishwasher sets often include soundproofing material. It is fixed at the bottom of the niche. Without soundproofing material, the device will make too much noise during operation.
The next stage is the installation of decorative elements. Trims can be custom-made or made yourself from the front parts of the cabinet. To make a decorative facade, it is necessary to adjust the doors to the dimensions. To do this, it is recommended to study the corresponding video. The installation of the built-in dishwasher is nearing completion. The linings are fixed using self-tapping screws, which often come complete with other auxiliary elements. After installing the front part, the PMM is connected and a test run is performed.
First start
The first start is made empty without loading dishes. This is necessary to wash off various deposits remaining after factory assembly on the surfaces inside the washing chamber. Perform the following actions:
- At the bottom of the chamber, unscrew the compartment lid;
- regenerating salt is poured into the neck to the very top;
- screw the lid back on;
- on the inner surface of the door, pour gel or place a tablet into containers, pour in rinse aid;
- on the control panel, by pressing the corresponding keys, set the degree of water hardness, select the washing mode (at the first start, set the economical program);
- press the “Start” button and close the door.
- After finishing work, the dishwasher can be loaded with dirty dishes.
How to Install a Built-in Dishwasher: Cabinet Remodel
When integrating a dishwasher into a cabinet, you need to understand exactly how this procedure should be carried out. Let us consider in detail the sequence of actions that allow you to install the PMM in one of the lower compartments of the furniture set. First, you need to remove the bottom shelf from the cabinet, after which the front plinth is dismantled.
First, the bottom shelf is removed from the cabinet, and then the front plinth is dismantled
Then you can remove the doors. It is important to understand that the walls, the back panel, and the top must remain. The video “Installing a Bosch dishwasher” will allow you to visually familiarize yourself with the integration process. The instructions that are given in it greatly simplify the work.
All dishwashers have the ability to be fixed to the countertop and walls located on the sides. However, each manufacturer produces individual retaining elements, so there are no universal recommendations in this regard. It is necessary to start from a specific model.
Particular attention should be paid to methods of fixing domestic models (for example, “Hephaestus”). Dishwashers are characterized by good build quality, but when integrating them into a cabinet, various problems may arise due to design features. Mounting methods also depend on the type of furniture.
The dishwasher unit is usually fixed to the cabinet walls using polymer inserts. Their number is most often 4 pieces. They should be located on both sides (bottom and top). A dishwasher installed in this way not only has good stability, but also produces less vibration.
The dishwasher is fixed to the cabinet walls using polymer inserts
Some models do not provide for the use of such a number of polymer liners. Some devices can be cited as an example. Installation of built-in dishwashers of this type is carried out using only two inserts, which are located in the upper part of the cabinet (under the countertop).
There is another common situation to consider. If the kitchen countertop is solid, the cabinet must be completely dismantled. Thus, the device will be placed between two walls. The bottom panel in this situation is not mandatory, but can be removed if desired.
Connecting hoses and testing
We connect the hoses to the machine at the very end, but before the side fastening is made.
The housing moves forward to provide access to all components. Both hoses are usually attached to the body on one side, at the top or bottom.
They protrude a few centimeters, and to provide space in the closet, the back wall is usually simply removed.
The connection is made as described above: the hoses are inserted into the holes and secured with union nuts or clamps. No special tool is needed for fixing; everything is done manually, with a screwdriver or pliers
Once connected, the machine is placed in place for testing. We turn on the machine on the panel, then plug into the socket, ensure the water supply and press the “ Test ” or “ Start ” button. How to perform testing correctly is explained in the instructions.
If there are no leaks, the machine does not hit the countertop or walls, and the test wash cycle went through without incident, then you succeeded in installing the dishwasher yourself.
But before you start using it, it is advisable to familiarize yourself with the rules of operation and maintenance of the machine.
How to install a front on a dishwasher: details of the process
The front part of the integrated devices must be closed using a panel, which is most often made to order. It must fully comply with the design of the room. In order to install such a panel, a special fixing element and a pattern are included with the PMM.
Note! To install the front on the dishwasher, you need to take a paper model. It marks all the necessary areas, as well as the places where the clamps will be installed. This sheet is applied to the front door, and the decorative element is marked on it. All necessary zones can be marked using a regular awl.
To install the front panel, the dishwashers come with a template and a special clamp.
Next, you will need to remove the paper model and drill holes for the screws. Locks are installed in the required places, as well as the front door handle. This manual is suitable both for installing fronts for 45 cm dishwashers, and for installing larger front parts.
After assembling the panel, you can begin installing it. To do this, you will need to fix the decorative element on the doors of the dishwasher and screw pre-prepared screws into it.
Installation of new pipes
For major installation you will need a varied range of materials:
- polypropylene pipe PPR PN20 with a diameter of 20mm
- water socket
- union nut connectors
- 90 degree connection fitting PPR-90
- HP/HP elbow with ¾" external thread
- FUM sealing tape
When installing pipes, the socket method is used. To do this, you will need a special apparatus for soldering polypropylene pipes.
The total length of the pipe and the number of fittings are selected individually. This depends on how far the dishwasher is from the cold water collector.
To begin with, mark the route where the pipes will be laid from the distribution manifold to the installation site of the PMM.
Then, use a wall chaser to cut to the required depth.
Next, connect the PPR connectors with a union nut to one of the manifold outputs.
Cut a piece of pipe so that it will last until the first turn or corner. At the same time, do not forget to leave a margin of 15mm for connections on each side.
Connect the pipe and fittings using the soldering method, controlling the position of the elbow.
After connecting all the pipes along the marked area, install a water socket at the very end. Be sure to fix it on the wall.
Next, screw a ¾-inch male threaded elbow into the water socket.
Mount the water supply hose onto the angle.
The AquaControl or AquaStop system with which it may be equipped should protect against leaks in the event of a breakdown and automatically stop the water supply.
Turn on the water and check the entire system. If everything is fine, you can finally seal the groove.
DIY installation of a built-in dishwasher: protecting the countertop
All dishwashers have one design feature that leads to damage to the countertop during PMM operation. Dishwashers produce steam and moisture that rises and impacts the countertop. This happens when the door is opened.
In order to protect the countertop, you will need to install protection from steam and moisture. For this purpose, various materials are used, such as film, plastic, metal sheets. In order to protect the tabletop from moisture, you can use tape.
You can protect your countertop by installing special protection against steam and moisture.
The machines that are produced are equipped with special plates made of metal. The Bosch dishwasher installation instructions will help you find out what steps need to be taken to install the plate.
Products from other well-known brands can also be equipped with plastic or metal plates, but film is more common. It is glued to the bottom of the tabletop. After installing the protective material, the side gaskets are installed and the height of the machine is adjusted.
How to install a dishwasher: what else needs to be considered
A special niche can be located in the kitchen, prepared for the integration of other appliances (oven, microwave, etc.). It can be used to install PMM. But only a compact device will fit into a small niche, which is worth considering when choosing it. If furniture with a free cavity is located far from the sewerage system and water supply, then you will need to prepare flexible hoses for connection.
Combined units of equipment can also be integrated into the kitchen set. For example, stoves with dishwashers are very popular. They are quite easy to install in a modern set, but problems may arise when installed in old kitchen furniture.
It is recommended to install a product with adjustable legs in the fully lowered position
What other installation aspects should be considered? At the installation stage, it is necessary to ground the dishwasher. There is also a rule that prohibits placing PMMs in close proximity to the hob. If the kitchen has quite a lot of expensive equipment, then experts recommend taking care of installing a stabilizer.
Helpful information! Do not forget about the need for installation instructions for the dishwasher. Bosch, Electrolux and other large companies describe in detail all the nuances of installing and using their equipment.
It is recommended that the unit, which has adjustable legs, be installed in such a way that it is lowered all the way. It is advisable to install a separate socket to connect the dishwasher to the mains, since the power of this device is quite high.
Electrical connection
To connect the dishwasher to a 220V network, you will not need many materials:
- three-core copper cable VVGnG-Ls 3*2.5mm2
- 16A socket “Schuko” type with grounding contact
- RCD or diffavtomat 16A with leakage current 30mA
A dishwasher (DMM) is not a particularly powerful consumer of electricity, such as a hob (from 7 kW and above). Its power usually does not exceed 2.0-2.5 kW.
Modern energy consumption models correspond to class “A” or “A+”. That is, in a year, approximately 220 kW will run on your meter.
Despite this, it is still advisable to connect the PMM at the repair stage to lay an independent cable line in a separate groove.
If your renovation has been completed a long time ago, and after purchasing the equipment you don’t feel like scratching the walls again and ruining the wallpaper, then you can make do with the existing outlet. Just be sure to make sure that it is protected by an RCD.
Connecting a dishwasher through a simple modular machine is extremely dangerous.
The socket should be placed at a convenient height - up to 90cm from the floor level.
At the same time, place it on the right or left side of the washing machine, but not behind it.
Please also take into account the fact that the total length of the cord with plug for this equipment rarely exceeds 1.0-1.5 m. Based on this, choose a place for the outlet so that you don’t have to use an extension cord later.
The outlet itself must, of course, be grounded. But not everyone has this same grounding. Especially in apartments of old high-rise buildings. Therefore, many people use ordinary ones, and everything seems to work fine. However, the level of protection will no longer be sufficient.
Roughly speaking, if there is a grounding contact and there is a current leak, then you will not even be able to turn on the RCD. The consequences of these leaks, even small ones, can be quite lethal.
With a simple socket, the shutdown will occur only at the moment when you touch the body, which is already energized.
And you will still feel this electric shock, at least at the initial moment.
Step-by-step instructions for installing PMM: free-standing
Having decided the question of how to place the PMM, and having prepared the necessary tools and consumables, you can begin installing the device. When installing a dishwasher - Electrolux, Indesit, Bosch or any other - you must first of all decide on its location. When deciding where to put the equipment, you need to consider the following points:
- the distance from the installed device to the point of discharge into the sewer should not exceed one and a half meters, otherwise the equipment will fail much faster;
- It is advisable that there is an outlet close to the installation site; if this is not the case, then you can use an extension cord, or better yet, connect the power supply;
- for a tabletop model, it is enough to fix the drain hose in the sink - the waste water will go away by gravity.
After selecting the installation location, as well as preparing the necessary tools and materials, the procedure is as follows:
- Disconnect the mixer hose from the metal-plastic water pipe (only cold water is used for supply).
- We mount a tee and connect the mixer and PMM hoses to it. When connecting, we wrap FUM tape onto the thread.
- We connect the PMM drain hose to the siphon under the kitchen sink. In this case, a bend must be formed at the connection point with an upward angle so that dirty water leaving the sink does not enter the machine. Such an angular bend is provided by a special adapter.
- Next, the electricity is connected. The electrical outlet must be grounded and the wiring must withstand 16 A of current.
- Using a level, we level the installed device and check how it functions - how quickly water flows in and out. Among other things, it is necessary to check the joints and hoses for leaks.
To increase the service life of the described equipment, you can additionally install a fine water filter, which will purify the water entering the PMM.
Types of dishwashers
There are several main models based on the type of installation and dimensions. Partially or fully built-in (Electrolux ESL 4500 LO, Bosch SKE 52M55, Whirlpool ADG 658/1 IX). Can be easily placed in a kitchen unit. For example:
- Under the sink. The advantage is proximity to communications; the dimensions of the equipment often coincide with the location. The downside is the likelihood of buying a new siphon.
- In the closet. In this case, the device is completely hidden behind the facade. The advantage is that the design of the room is preserved; there is no need to carefully select the colors and suitable appearance of the PMM. When built into a finished kitchen, it may be necessary to remodel furniture elements.
- In place of the niche is a headset. One module is dismantled and the machine is installed. You need to choose the ideal size of the equipment, while reducing the space for storing kitchen utensils.
Compact (Bosch Active Water Smart SKS41E11RU, Candy CDCF 6-07). Easily fits into any kitchen set. Their dimensions do not exceed a conventional microwave oven. The PMM model can be placed on any surface, taking into account the convenience of connecting to communications.
Freestanding dishwashers (Bosch SRS 45T62 EU, Indesit DSG 051). Not intended for installation in furniture. To save space, you can place it under the countertop if you remodel or dismantle the cabinet.
The operation of the PMM requires connection to water and electricity. Therefore, when installing it yourself, you need to follow the instructions.
An indispensable assistant in the kitchen
Regardless of the functional equipment, the dishwasher will be able to benefit the housewife in her everyday affairs. It saves time as well as water consumption. This is especially true in modern conditions, when one can only be amazed at how quickly utility tariffs are rising. This useful household appliance will be able to return the money spent on it in literally 2-3 years of active use.
Lately, many consumers don’t even think much about whether they need a dishwasher in their kitchen. Many people can no longer imagine their life without this useful unit, so after purchasing a stove and refrigerator they begin to think about this device. But in order for this equipment to work within the period that the manufacturer set for it, it is necessary to install it correctly.
Many owners install a dishwasher in their kitchen unit with their own hands, thereby hoping to save not only time, but also money. But this does not always go without complications, because not everyone is familiar with the nuances of this process. Even the fact that each model comes with installation instructions doesn't help them much. To do this, you need to have certain skills and knowledge that the average consumer simply does not have.
Preparatory work before installation of the PMM
You can entrust the installation of PMM to specialists. In this case, you do not need to worry about the correct order of actions when embedding or installing equipment. The workers who installed the machine will also be responsible for the final result. But if you are installing the device yourself, it is useful to have an idea of the preparatory work before installation. This applies to choosing a location for installation, as well as preparing the tools and materials that will be needed during installation.
Choosing a location based on size
As mentioned above, built-in PMMs must correspond to the dimensions of the niche specially designed for them; there are no other options; they will have to be built into it. If this location is unsuccessful, it is difficult to operate the device installed there, you will have to think about partially redoing the furniture, ordering a separate cabinet to install the PMM in it, or even completely replacing the kitchen unit. The classic place for a niche for such equipment is the area around the sink - there are usually no problems with connecting communications there. How a dishwasher is built into a kitchen is discussed in detail below.
A freestanding dishwasher can theoretically be installed anywhere, but in reality there are always limitations associated with the ability to connect communications to it or ease of use. In order to correctly install the equipment, you should first determine all possible places for its installation, taking into account the dimensions of the PMM. It may happen that the desired model simply does not fit into the existing kitchen configuration. There may be two options here - remodeling the kitchen or purchasing a more compact model that fits into the existing layout. The easiest way is to determine the location for the tabletop model. This is any flat surface that is convenient to reach; you can supply water, connect the drainage system and connect electricity.
Required tools and materials
Before installing a dishwasher in a finished kitchen, you need to prepare the appropriate tools and materials. If you plan to install a compact dishwasher on a countertop, then you can get by with a small set of tools; usually everything you need is always at hand. You may only need a screwdriver and pliers. If you need to build a dishwasher into a finished kitchen or install a full-size free-standing model, you will need more tools. Often the user manual will indicate what tools may be needed for installation. Just in case, it is useful to have the following set of tools and materials on hand:
- screwdriver or drill;
- flat and Phillips screwdrivers of different sizes;
- hammer and chisel;
- pliers;
- knife;
- shears for metal-plastic pipes;
- adjustable wrench;
- tee and stopcock (if necessary) ¾ inch size;
- FUM tape and tape.
Of course, this list can be supplemented in some cases; it is difficult to determine exactly in advance how much will be needed. It all depends on the specific conditions, features and complexity of installation.
Recommendations for correct installation
To properly install the PMM (dishwasher), follow the rules:
- We install a dishwasher next to all communications.
- We check whether grounding is done.
- We install a metal plate under the tabletop to protect the equipment from steam and prevent deformation.
- Before installation, we check all irregularities.
- We do not install the device under the hob.
- We supply water correctly. We install a shut-off valve, a tee for water drainage, or flexible wiring on a tee with an angle tap on the valve.
- The drain hose should not be more than 1.5 m. The pump can quickly break due to heavy load.
- To avoid unpleasant odors and dampness, we make the drainage system with a sealed direct drain.
- To prevent the engine from burning out, we draw a separate line with a switch from the dishwasher to the panel.
- We check the dishwasher without filling it with water.
Features of self-accommodation
Let's consider two possible options for installing equipment in the interior. This is installation into a new set, the design of which takes into account the order of a special niche for the dishwasher. And also, placement in an old kitchen, taking into account the presence of ready-made cabinets.
Installation in a new kitchen
Typically, built-in PMM models are made narrower. When ordering a kitchen, it is much easier to provide a place for the appliance in advance, otherwise it will be difficult to fit the appliance into the set without remodeling the furniture.
If there is nothing in the room except the walls, then make a sketch of the future kitchen. Consider the space for household appliances, the possibility of convenient connection (location of sockets, proximity to communications).
Have you already decided on your choice of dishwasher (Bosch, Whirlpool, Kandy)? If you want to fit the device into an Ikea kitchen, then measure the dimensions of the model in the store, enter the results into a sketch and pass it on to the furniture makers. Don't forget about space for ventilation.
The walls of the PMM should not come into contact with the furniture. A minimum gap of 5 cm is left on the sides and back. It is important to remember about connecting hoses and wires. Therefore, the cabinet can be ordered without the back. The thickness of the facade is included in the calculations.
This is a headset panel that will help hide your equipment from prying eyes. The method of attaching it to the dishwasher is taken into account. These can be bolts or self-tapping screws.
Accommodation in a finished kitchen
If space allows, move the kitchen cabinets apart to a distance of 45-60 cm. It is important to choose a place close to the sink. Also consider the distance of the outlets. A conventional PMM on legs with wheels makes installation easier.
You can put it in a cabinet or under the sink, and adjust the height of the legs. Additionally, there may be fastenings for fixing the case to the walls of the headset.
The installation of a free-standing machine under the countertop should take place in the following way:
- The top panel of the PMM is located close to the tabletop. But this should not prevent the door from opening.
- The desired height is set by adjusting the legs. If the legs are static and you need to raise the equipment, then fit a wooden box under the base.
If the depth of the niche allows, move the dishwasher deep enough to hang the cabinet door. Prepare the cabinet for installation:
- remove the front part;
- remove all drawers and shelves;
- unscrew the back wall, it will no longer be needed.
No free cabinets to place your equipment? Then the only option left is with a sink. This may be a corner location, the main thing is that the dishwasher fits into the hole.
To gain extra space, install a new siphon that drains water back and then down. If the sink is too deep, it can be replaced with a shallower one.