Repair technology
So, to make the repair instructions clear to you, we will consider it step by step, with photo examples for each important point of repair.
- First you need to prepare a tool: a marker, fine-grained sandpaper, an indicator and a regular screwdriver.
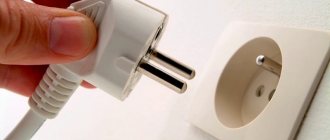
- Turn off the circuit breaker at the input panel to de-energize the electrical network in the house and protect yourself from electric shock.
- Make sure there is no voltage in the room by checking the presence of power at a nearby outlet yourself using the indicator. If you do not know, we recommend that you read the instructions to which we referred.
- Remove the light switch from the gate. Before repairing the product, you need to remove the decorative cover yourself, check again that there is no voltage with an indicator screwdriver, unscrew the side screws and pull the housing out of the socket.
- Disconnect the wires. If the light switch is a two-key switch, we recommend marking with a marker which of the wires is the input one, so as not to confuse it later and to make the connection correctly on your own.
- Disassemble the case and get to the contacts, which are most likely the cause of the repair. These structural elements are located immediately behind the plastic key, which is secured with screws. Repairing them will not be difficult, as you will see further.
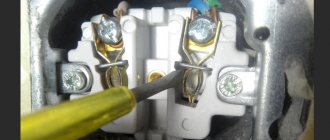
- Visually inspect the contacts in the form of a hemisphere (you can see them in the photo) and if they are burnt, use fine-grained sandpaper to clean them to a metallic shine. If you cannot remove the carbon deposits well with sandpaper, you can carefully clean it with the tip of a screwdriver. This is enough to fix the light switch yourself.
- Reassemble the housing in reverse order. The video below shows how a light switch is disassembled and assembled at home.
- Connect the wires and install the housing in the socket box.
- Turn on the machine on the dashboard and check if the light switch works. If the switch does not crack and works correctly, you can be proud - you managed to fix the product. If the light is on when the switch is off, it means that you did not clean the contacts properly or did not connect correctly, so you will have to do everything again.
Video instructions for assembling the case
Thus, in 10 steps you can repair the product yourself. As you can see, the repair is not difficult and even a novice electrician can do it. We also recommend that you familiarize yourself with the tips provided below, which will allow you to quickly and correctly repair a switch in your apartment.
- If an old-style switch breaks, you can of course fix it, but there is no point in doing so, because... Every part wears out over time, and in electrical work it is very dangerous to use old switches and sockets, especially if they often break down. Today, even such leading companies as Legrand have inexpensive but reliable products, even with lighting, a chain (cord) or a dimmer.
- The reason why the contacts on the key switch burn out quickly is because the light bulbs are too powerful. We recommend replacing incandescent lamps with more efficient and at the same time less powerful light sources -. In this case, you can forget about repairing the switch for a long time.
- Before proceeding with complete disassembly of the case, check how well the wires are tightened with screws. You may be able to fix the switch simply by tightening the screws with a screwdriver.
- In order not to confuse the order of assembly of spare parts of a disassembled case, we recommend using a camera: take photographs of each of the disassembly stages one by one and, if necessary, assemble the structure from the photo.
One of the main malfunctions of switching devices is sparking contacts or their complete absence. The main cause of this problem is wear of the contact system or failure of other components of the device. If you do nothing about it, you will end up having to completely replace the switch, relay, or other switching device. In addition, sparks and heat can cause a fire. But let's take a closer look at the reasons for sparking contacts and how to eliminate them.
Features of disassembling the device and cleaning contacts
If the dimmer switch for the light line shorts when turned on, you need to disassemble and clean the contacts. The work is carried out as follows:
- Removing the adjustment knob. You will need to remove semicircular parts or slots. Hold the body with one hand, and gently pull the handle with the other.
- Removing the mounting locknut or screws. Use a screwdriver by turning it counterclockwise.
- Removing the plastic cover and frame.
- Loose internal fasteners of the dimmer mechanism.
- Removing the switch from the socket box.
The contacts have the shape of hemispheres. If carbon deposits are detected, the elements should be cleaned to a shine with sandpaper. If the carbon deposits are not completely removed, the contacts are cleaned with the tip of a screwdriver.
Before completely assembling the case, it is better to check whether the wires are tightly tightened.
Why do energy-saving lamps that are turned off blink?
The blinking of electric lamps is clearly visible at night or in a dark room. These are noticeable flashes of light with a frequency of approximately once per second. Here the problem may also be hidden in the backlit switch. The problem does not exist on switches that do not have such backlighting.
The reason is this. Every energy saving lamp has a capacitor that runs the lamp. When the switch is turned off, its LED backlight is on. This means that a small electric current passes through it (from the mains and through our energy-saving lamp).
It is this small flowing current that charges the capacitor, which at a certain point in time starts the energy-saving lamp. Then a small flash occurs and the capacitor discharges again and the process repeats. This is why energy-saving light bulbs flicker.
Eliminate blinking LED lamp using a capacitor
If you don’t have a resistor, then instead you can use a capacitor with a capacity of 0.01 to 1 µF and a voltage with a double surge noise margin of 2*220=440V. But it is most reliable to take at least 630V.
When there is no capacitor for 630V, but there is one for 400V, then using a soldering iron you can assemble a circuit like this.
Here, one resistor serves to protect the capacitor from impulse noise, and the second to discharge the capacitor.
Therefore, installing a capacitor is more preferable and safer. Install it in the same places as described above using resistance (distribution box, chandelier terminal block).
Where can I find such a capacitor? In order not to run around radio stores, you can simply disassemble the already burnt-out energy-saving lamp and pull it out or take it from a regular starter for fluorescent lamps. True, there is one BUT. It is better to use paper or ceramic, because... Electrolytic may explode unsafely during power surges. So if you take it as a shunt, be sure to take it with a large voltage margin.
How to repair touch switches
Touch switch board
Touch modifications are equipped with a remote control and special boards with control chips. It is worth disassembling such a switch after reading the manufacturer's instructions.
Device repair:
- Removing the decorative trim.
- Visual search for the panel with sensors, which is located under the plate. Depending on the number of lines served, there are 1-3 elements.
- Search for a sensitive area on the pad - sensors are indicated by circles.
- Detection of LEDs indicating the position of the switch (red - on, blue - off). Under this panel there are nodes to which conductors are connected.
- Disconnecting inputs and outputs. You need to remove the clips that secure the touchpad.
- Removing the bolts from the housing mounted on the socket box and inspecting problem areas.
- Checking voltage on individual cables. The faulty wire is replaced.
- Reassembling the mechanism. The main unit is connected to the power supply, placed in the socket and secured with screws. After this, the touch panel and decorative overlay are attached.
Measures to prevent short circuits in the home electrical network
During the inspection, the following actions must be performed:
if the socket starts to heat up, sparks, or has a plastic smell, then it should be replaced with a new one or repaired; an audit of the entire lighting network and power group of wires is carried out every six months
You need to pay attention to the color of the insulation. Possible places of dangerous heating are determined by the color of the wire insulation; installation of a circuit breaker with RCD
The circuit breaker will turn off the network in the event of a short circuit, and the RCD (residual current device) reacts to a person touching exposed wires. The use of this device can save lives; the cross-section of the electrical wiring wires is calculated based on the total power of all electrical appliances; During installation, do not lay the wiring cables too tightly; If you need to do any work, for example, drill a wall, you should make sure that there is no electrical wiring under the plaster in this place.
Most short circuits and the fires they cause can be avoided. To do this, you should follow simple rules:
- Do not overload the electrical wiring with power (current). Select the cable cross-section and lay it in accordance with the requirements of the PUE.
- Periodically inspect the electrical panel, sockets and switches. The smell of burning, smoke, sparking and crackling are harbingers of a short circuit and fire.
- Replace old circuit breakers with new ones. Especially if a revision of the shield has not been carried out since Soviet times.
- If you use fusible plugs at the entrance to the apartment, then under no circumstances place so-called bugs on them. Even if an electrician I know “did this 100 times and everything was fine.” It is best to replace traffic jams with automatic machines.
A short circuit is one of those problems that are easier to prevent than to correct the consequences. Any wiring, various devices and panels require periodic inspection by a specialist. Compliance with this rule will ensure long and safe operation of electrical equipment.
If it was not possible to avoid a short circuit, then you need to think about its causes. Wiring that is old, too thin or damaged by animals must be replaced. Damp - dried and further tested by a professional electrician using a megger or more advanced instruments.
What to do if there is a wiring smell in the apartment
It is difficult to notice a wiring fault if there are no obvious signs, and they appear late.
Therefore, in fire reports there are many cases with the most common problem being a short circuit. What to do if the smell of burnt wiring appears in the apartment?
#2
Posted May 28, 2008 - 12:59
Well, what can I tell you, climb into the panel and look for short ones and twists. If the stop lights are constantly on, it means the limit switch is jammed under the pedal or the wiring from it. If the backlight of the buttons does not light up, the brightness control has probably failed. It's easy to check, remove the connector from it and short-circuit it. You can only get rid of the rest by picking the wires.
Why does the washing machine spark?
The source of this could be the following details:
- Commutator brushes;
- The heating element, which is responsible for heating the water in the washing machine;
- Electronic module.
Most often, these three sources are the main culprits of possible sparking. If you are not confident in your knowledge, then it is better to call a specialist to your home who can carry out quick and high-quality repairs.
General progress of repair work
Checking for no voltage
Important! There is no need to make special efforts to disassemble the case, since usually the cover of a closed switch can be easily removed
Removing the switch housing
Removing the switch cover
If a switch with two buttons is closed, then mark with a felt-tip pen the wire that supplies electricity and is common to both switching modes.
Switch screw location
Removing the mounting screws
Almost every apartment owner is faced with such a problem as a faulty light switch. If such a situation arises, you do not need to immediately call a specialist to your home. Most often, you can fix this problem yourself. A light switch malfunction is most often caused by poor contact between the connecting plates of the electrical wires. To fix it, you just need to clean the contacts and check the tightness of the wires in the switch connectors.
The whole process consists of three stages: preparatory work; disassembling and cleaning contacts; assembling and installing the light switch in its original place.
Preparatory process
At the initial stage of repairing the switch, you need to completely de-energize this section of the electrical network and prepare the necessary devices and tools. To clean the disassembly and strip the contacts, you will need a screwdriver, an electricity indicator and regular sandpaper or a file.
It is important that there is no electricity in the network. This is why you need an indicator. A file is useful for removing plaque from the contacts, and a screwdriver for unscrewing and assembling the entire installation
A file is useful for removing plaque from the contacts, and a screwdriver for unscrewing and assembling the entire installation.
Disassembling the switch and cleaning the contacts
First you need to make sure that there is actually no electricity going to the light switch. Then, prying the device button with a screwdriver, remove it from the device. The plastic shell can also be removed with a little force.
The next step is to remove the switch from its mounting location. To remove it from the plastic shell in the wall, you need to loosen two screws. After unscrewing them a little, we pull the device out of the wall. To disconnect the light switch from the wires, loosen the fasteners and pull them out of the clamps.
Having seen blackened and coated contacts, we clean them with a file or special sandpaper. The cleaning process must be continued until plaque and fumes are completely removed.
Assembly and installation of the switch
After completing all the steps to clean the contacts from plaque, you can begin assembling the device. To do this, you need to connect all the wires to their original place and tighten the clamps
It is important to create excellent communication to prevent bad interactions. Having assembled the entire structure, we insert the switch into the plastic case. After making it level and even, tighten both fastening screws
If the plastic frame is not put in its original place, you will have to loosen the screws and put it on until the switch is completely installed in the network. Although, if the switch is properly mounted in the wall, this should not be a problem.
After making it level and even, tighten both fastening screws. If the plastic frame is not put in its original place, you will have to loosen the screws and put it on until the switch is completely installed in the network. Although, if the switch is properly mounted in the wall, this should not be a problem.
At the final stage, insert the power button and start the central electricity monitoring device. Now we check the functionality of the switch. To do this, turn on the light in the room several times. If everything works stably, then calling an electrician will not be necessary.
If the switch has stopped working, then you should look into the root cause of its failure. Today there can be many reasons. You don't necessarily need to call a professional. You can repair the light switch yourself. The causes of failure are usually minor and therefore almost anyone can cope with them.
Sometimes, in order to restore the device's operation, you will need to clean the switch contacts. In this article we have provided detailed information on how to fix a light switch. The reasons for breakage of the switch can be varied, and in this article we will look at them.
In the lamp
The cause of flickering lamps may be a malfunction of the lighting fixture, electrical wiring, or alternating current (AC) characteristics. When the light flashes, you need to check all lighting fixtures.
This will help determine whether one lamp is flickering or a whole group. If the remaining lighting elements are operating normally, we can conclude that the lamp, luminaire, switch or other sections of electrical wiring are faulty.
A faulty switch produces a characteristic crackling sound inside the housing, which indicates a weak contact. To eliminate the cause, you need to tighten the screws that tighten the wires. The lamp may flicker if debris gets on the contacts or spring. To fix the problem, you can unscrew the light bulb, then remove and clean the switch, following safety regulations.
If the above steps do not bring a positive result, you can try replacing the lamps. If the lighting pulsation continues, it remains to check the serviceability of the lighting fittings, as well as the condition of the electrical wiring in general.
If you have no experience disassembling modern lamps, it is better to contact a qualified electrician.
When troubleshooting the problem yourself, be sure to turn off the power to the light source. Then you need to check the integrity of the light bulb socket.
The contact plates must be in good condition, not burnt and slightly bent in working order. Then you can disassemble the lampshade, since contact may have been broken at the junction of the screws and wires. In this case, they need to be tightened.
After the above steps, it is necessary to apply voltage to check the operation of the lighting device. If nothing happens and the lighting flickers as before, then you need to check the connection of the wires of the lighting fixture to the power cable. First of all, it is necessary to de-energize the line, after which you can begin repair work.
Causes of sparks and arcs
Before we look at why contacts spark, let's understand the basic concepts. The switching device and its contact system must provide a reliable connection with the possibility of breaking it at any time. The contacts consist of two electrical plates, which in the closed position must be securely pressed against each other.
An arc occurs when switching inductive circuits. These include various electric motors and solenoids, but it is worth remembering that even a straight piece of wire has a certain inductance, and the longer it is, the greater it is. At the same time, the current in the inductance cannot stop instantly - this is described in the laws of commutation. Therefore, a self-inductive emf is formed at the terminals of the inductive load, its value is described by the formula:
E=L*dI/dt
Interesting! In our case, the rate of change of current plays an important role. When turned off, it is extremely high, and accordingly the EMF will tend to large values, up to tens of kilovolts (for example, a car ignition system).
As a result, the EMF increases to such an extent that its value breaks the gap between the contacts - or sparks are formed. The quality of any connections is described by their contact resistance: the lower, the better the connection and the less heating. When they open, it increases sharply and tends to infinity. At the same moment, the area of their contact heats up.
In addition, between the open contacts against the background of increasing self-induction EMF and increased air temperature due to heating of the surfaces when the plates are opened, air ionization occurs. As a result, all the conditions for arcing and sparking are present.
If we talk about why contacts spark when an electrical circuit is closed, then this happens not with an inductive load, but with a capacitive load. You see this every time you plug in your laptop or phone charger. The fact is that the discharged capacitance (capacitor) at the input of the device at the initial moment of time represents a short-circuited section of the circuit, the current of which decreases as it is charged.
If you observe sparking in a relay or switch in the closed position, the reason for this is the poor condition of the contact surfaces and their high temperature.
Possible consequences
For those who are delaying the repair of a sparking socket, we recommend that you read this section carefully and then begin immediate repairs.
Without eliminating the cause of the sparking, the home master puts himself and everyone who lives with him at risk. A problem plug can cause a fire in your home. Sometimes a weak spark is enough for a fire to engulf a home.
The plastic of high-quality products is not subject to combustion, but this does not mean that it will not melt and if you try to pull out the plug, you may be exposed to the harmful effects of electric current.
You should not blindly rely on the operation of circuit breakers, especially if they were installed 5-10 years ago and were not checked after that. Connecting a high-power device or extension cord with equipment connected to it may cause the wiring to catch fire due to overload, and the AV may become faulty. In practice, such cases are not uncommon; it is especially surprising when a plug is inserted into a sparking connector, since it is located very conveniently.
To repair an outlet or replace it, it will take no more than 10-20 minutes, a maximum of twice as long if you lack the skills. But with a reliable electrical contact, the danger will no longer threaten your home.
Signs of malfunction and main types of breakdowns
The switch is faulty if you hear a crackling noise when you turn it on.
Before you can fix a faulty switch, you first need to understand how it works and also become familiar with the main reasons why it could break. Characteristic signs of failure:
- when you press the key, the changeover mechanism begins to jam and does not move to the desired position;
- at the moment of switching, you can hear a crackling sound, and sometimes you can notice something sparkling inside;
- After pressing the button, the device simply does not turn on the lighting.
Typically, these malfunctions are observed with only one of the keys, but the possibility of failure of two or even 3 switching mechanisms at once cannot be ruled out.
In the first case, the axis on which the base of the key is fixed could presumably fall out or a foreign object could get inside (dust accumulated). With characteristic crackling and sparking, one of the closed contacts or both of them has probably burnt out. If the light does not turn on at all after pressing the key, the problem is most likely that the contact at one of the points where the conductors connect to the terminals is broken and the current is not supplied to the load. In this case, it is first checked to see if the voltage has gone out in the entire apartment and that the light bulb is fully operational.
Why does the socket spark?
Most often, sparking in a socket is discharges that occur when electric current flows not directly from conductor to conductor, but through a gas, an air gap between the conductors.
The socket sparks due to poor mechanical contact between the conductive parts of the electrical network.
Typically, sockets spark in two cases:
1. If there is a poor connection between the conductors of the input electrical cable and the terminals of the socket mechanism
2. If the contacts of the socket connector are poorly connected to the pins of the electrical plug
As you understand, sparking can occur not only in an electrical outlet; any unreliable connection of conductors can begin to spark. By the way, this is one of the main reasons for the small number of permitted methods for connecting wires in junction boxes during electrical installation.
Repair procedure
If the switch sparks due to a loose contact, it is necessary to ensure a continuous connection between the pair and the receiving plate when the light is on.
When a light switch crackles, there is probably a short circuit in the circuit, so you need to clean the wire contacts and reconnect the device to the line. If it continues to work incorrectly, you need to replace the device with a new one. A shorted switch cannot be used.
How to repair your device:
- Disconnect the power supply and check with an indicator screwdriver that there is no voltage.
- If the key switch sparks, you need to pry off the housing with a screwdriver.
- Pull out the circuit of the switch cover, check the voltage at the terminals.
- If there is carbon deposits on the wires, they need to be disconnected from the socket and cleaned.
- When the indicator sparks due to unstable contact, it is enough to tighten the terminals with screws.
After this, you need to assemble the device in the same sequence
It is necessary to pay attention that a phase should be connected to the contacts of the key switch - this guarantees the safety of replacing lamps in lighting fixtures. By pressing the key the phase is switched off
- The current and operating voltage are indicated on the inside of the case.
- An important parameter is the build quality, on which the operation of the device depends.
- The optimal height for installing the switch from the floor is one meter.
- Installation of devices is carried out on phase wires in socket boxes.
- First you need to connect the wires, then install the mechanism in the box.
- The screws are tightened alternately to avoid distortion of the device.
After snapping the frame, the switch should not wobble. The functionality of the device is checked after turning on the network. If the device sparks when the light is turned on, there is no stable contact between the wire and the plate. The device will heat up, causing the plastic case to melt. Any breakdown of electrical devices must be corrected in a timely manner.
One of the main malfunctions of switching devices is sparking contacts or their complete absence. The main cause of this problem is wear of the contact system or failure of other components of the device. If you do nothing about it, you will end up having to completely replace the switch, relay, or other switching device. In addition, sparks and heat can cause a fire. But let's take a closer look at the reasons for sparking contacts and how to eliminate them.
Types of electrical devices
If the switch sparks, it must be replaced with a new device or repaired. Turning on the light with a crackling sound, sparking and other problems is unacceptable - a short circuit in the wiring, fire and fire may occur.
To repair a light switch, you need to know what types of devices there are:
- One-, two- and three-key - widely used in residential premises, the circuit is closed when a key is pressed.
- Push-button products are equipped with an LED indicator and have no fundamental difference in the design of the mechanism from keyboard models.
- Dimmer devices with the ability to adjust the light intensity: the switch contacts when the wheel rotates.
- Rotary models have a simple design; they turn on the lighting when you turn the handle on the body.
By type of control, innovations in the field of electrical engineering include touch switches, products with an electronic time delay timer, acoustic and remote models. Most consumers have keyboard products installed that they can repair themselves.
List of required tools
Some consumers, if they detect a malfunction of the switch due to sparking, crackling or humming of the device, immediately turn to electricians. However, damage that can be repaired can be repaired yourself. In most cases, it is enough to bend the contacts for the device to function normally.
The following tools are needed for repairs:
- indicator screwdriver with a lamp or electronic display;
- a regular type screwdriver for unscrewing screws/screws;
- insulating tape and fine-grain sandpaper;
- pliers, marker, knife for stripping wiring insulation.
All switches have a plastic housing, a protective frame and an internal operating mechanism. The frame can be attached to the mechanism with latches or screws. The socket box contains a working mechanism, fixed with spacer tabs or screws. To perform repairs, you need to provide access to the contact group by removing the outer box from the device.
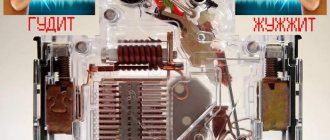
The machine buzzes or crackles
With sound in the form of buzzing it’s a little more complicated. If you hear a buzzing from your switchboard, and not a dull hum, urgently look for the cause, otherwise disaster will come to pass.
This sound is caused by a small electric arc that occurs when there is poor contact. This noise may come and go.
Your primary task is to determine the specific location where this sparking source appears by turning off all the machines in the row one by one. At the same time, do not turn off the load from the sockets, otherwise the crackling sound may disappear.
When you have found the culprit, carefully examine his contacts. Unlike the first case (humming), the modular machine itself or its internal components may have nothing to do with it.
As a rule, the culprit is insufficiently good contact at the point where the cable cores are connected to the terminal.
What to do if you examined all the contacts, but did not find any visible traces of sparking or burning? In this case, turn off the voltage in the entire panel room by unclipping the input load breaker.
Next, use a screwdriver to tighten the screw terminals of all switching devices in the panel.
If you have a special insulated electrician's screwdriver, then this can be done without completely cutting off the electricity.
After this, turn on the entire load again. If the sound still does not disappear, then change the culprit machine.
You can’t leave everything as it is, even if there are no visible traces of melting. Do not forget that most often the source of fire in an apartment or house is the electrical panel. And it all starts with a small machine gun.
It is in the switchboard that the entire load is concentrated and all the devices and switching wires are most densely located.
As soon as an open electric arc occurs, it will immediately transfer to all neighboring elements.
By the way, if not quite perfect, but more or less working protection has already appeared against sparking in sockets, in the form of UZM-51MD or UZIS, then the switchboard itself is practically not protected from this in any way.
It should be noted that the work of re-tightening all contacts must be done at least once a year. Even if nothing buzzes or sparks.
Moreover, it is not known with what force they were tightened.
Maybe they didn’t reach the inconspicuous 0.1 newton meter. And he subsequently played his role.
Therefore, an annual audit guarantees the safe and reliable operation of all protective devices in the switchboard. From automatic machines to RCDs and various relays.
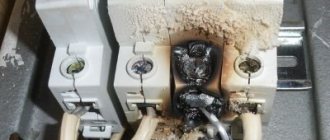
Visually, the place of heating may not be noticed. Initially, a small dark spot forms on the side of the body.
If your machine gun is in the middle of the whole assembly, then you will definitely miss it.
But if you miss this moment, traces of burning and melting appear on the terminal. At the same time, due to the protective casing, the external door on the electrical panel or an incorrectly installed seal, you will not see them until a distinct smell appears.
Machines with such melted contacts are also subject to replacement. Most often this occurs when connecting aluminum conductors.
For example, when connecting a SIP wire to an input circuit breaker.
Another such poor contact can occur when several wires of different cross-sections are connected to one connector.
This will already be a “jamb” and the fault of the electrician, and not the manufacturer of the machines. Another common mistake is pinching the wires together with the insulation in the terminal.
You won't notice this until you loosen the clamp and pull the core out. All this gradually leads to heating.
As a rule, the appearance of buzzing sounds may be preceded by the formation of foreign odors. So there is nothing wrong with periodically “sniffing” your shield room.
If a smell appears, this indicates the beginning of the process of destruction and melting of the plastic housing of the protective device.
In this case, you need to immediately turn off the power to the entire apartment and find the defect. Often, along with the machine, you have to replace burnt wires.
With such melted insulation, it is no longer possible to connect the wiring to a new device.
Tips for selection and installation
You need to choose electrical devices responsibly so that incorrect operation of the devices does not lead to a fire in the wiring. Minor problems lead to home discomfort - the lights flicker, the room lighting is dim.
Useful recommendations on how to choose a device and install the device so that the switch does not spark:
- The current and operating voltage are indicated on the inside of the case.
- An important parameter is the build quality, on which the operation of the device depends.
- The optimal height for installing the switch from the floor is one meter.
- Installation of devices is carried out on phase wires in socket boxes.
- First you need to connect the wires, then install the mechanism in the box.
- The screws are tightened alternately to avoid distortion of the device.
After snapping the frame, the switch should not wobble. The functionality of the device is checked after turning on the network. If the device sparks when the light is turned on, there is no stable contact between the wire and the plate. The device will heat up, causing the plastic case to melt. Any breakdown of electrical devices must be corrected in a timely manner.
Problems with new electricity meters
A similar malfunction can occur with a new device. In this case, abnormal sounds and operational problems are caused by:
- overload, when connecting a large number of powerful consumers;
- factory defect;
- ingress of foreign objects and particles;
- improper installation - the hum may be due to vibration if the device is not securely fastened.
If a malfunction occurs with a new meter, you should not open the device yourself to eliminate the defect. The electricity meter is sealed by the controlling organization and the manufacturer. If energy inspection seals are violated, the consumer will face a heavy fine for unauthorized interference with the operation of the device.
The consumer needs to call the supplier's representative and report the problem. Once the cause is determined, the defect will be repaired by qualified electricians from the resource supplier or the manufacturer under warranty.
You should absolutely not do the following:
- break the seals. If they are accidentally damaged, it is necessary to immediately inform the regulatory organization so that the consumer is not accused of deliberately interfering with the operation of the device;
- find out the cause of the malfunction yourself by disassembling the device;
- subject a product that operates deviating from normal mode to high load;
- interfere with a working apparatus that is energized;
- subject the electric meter to shocks or influence it in any other way.
Such measures will not help solve the problem, but can completely damage the meter, putting the owner in danger.
Legislation obliges the owner to monitor the operation of the electric meter, which includes creating appropriate operating conditions and taking measures if necessary.
The consumer must regularly monitor the operation of the individual electricity meter. If an emergency occurs, you must turn off the power supply and call a qualified technician to fix the problem.
Why are Chinese machines so unreliable?
Everyone understands that the only advantage of the “Chinese” is low cost. But it is achieved precisely by saving on materials. Budget Chinese models have cheap everything: plastic, metal, release mechanisms.
All these reductions in price will sooner or later come out sideways. For example, even due to elementary savings on rivets, the strength of the entire structure is lost. As a result, some parts fall off over time and the cocking mechanism weakens. This causes the problems listed above and will require replacement soon.
Electricians often swear at the “Chinese”. In fact, if you take the cheapest ones and take them apart to see what's inside, you'll be surprised how they even work. They usually have a lightweight design, thin springs, power contacts that barely hold, and other obvious problems. This doesn't inspire confidence.
Even worse are Chinese counterfeits of well-known brands, sold below the cost of the originals. Unfortunately, there are a lot of them on the CIS market. It is quite natural that the most popular brand, ABB, has the most counterfeits. This is a Swedish-Swiss manufacturer that produces fairly high-quality machines. Accordingly, you yourself must understand that they will not be too cheap.
To achieve high reliability and quality of releases, more expensive metals are needed: sputtering of silver, gold, etc. In addition, Europeans usually do not skimp on materials. There will definitely be an arc chute there and a heat sink will be made. And this all increases the cost, so there are no good machines cheaper than $3.
What to do if your heat meter is broken
When you pay your next utility bill, you suddenly receive an amount that is slightly more than what you paid last month. When you make a verbal complaint, they will explain to you that you have to pay more because the meter is broken. Before paying an unfairly inflated payment, you should write a written request to clarify the situation and ask for a full recalculation of the payment.
Once you receive a response, you either challenge the decision or pay the bills. An excellent option would be if other apartment owners also come with a written appeal, so the proceedings will end in your favor.
This article described in detail what should be done if the device buzzes loudly, and also touched upon the topic of how to pay if the heat meter is faulty. We hope our advice will be useful in life. We wish you success!
Why is the switch rattling?
The switch may crackle and even spark with a bang for the following reasons:
Poor contact, the screw clamps are loose, you need to turn off the electricity in the panel, remove the switch keys and tighten the screw clamps of the wires, it is important not to confuse them with the screws securing the switch, these are the screws in the photo. Perhaps your chandelier or lamps have too powerful lamps, the switch is not designed for such a load (I mean the total load from all the lamps), it gets hot, sparks and crackles
Perhaps your chandelier or lamps have too powerful lamps, the switch is not designed for such a load (I mean the total load from all the lamps), it gets hot, sparks and crackles.
The lamps in the lighting fixtures must be changed to less powerful ones.
High humidity in the premises leads to oxidation of the contacts; the contacts must be cleaned and tightened (again, first turn off the electricity in the panel).
The wear and tear of the switch (its operating mechanism) can only be helped by replacing the switch with a new one; switches have their own service life, apparently it is completely exhausted.
Constant voltage drops in the network can lead to crackling and sparking of the switch.
Installing a voltage stabilizer will help.
The spring (more precisely, the plate) that presses the contact when the switch is turned on has weakened; it can also crack, the contacts are not fully closed, in this case either the spring or the switch changes completely.
Several times I encountered factory defects in the switch; they bought inexpensive and therefore low-quality switches.
Started cracking immediately after installation.
In this case, it is better to simply replace the switch with a new, better one.
Very often we are faced with such a problem as the sudden appearance of an abnormal operating sound from a circuit breaker in the panel room.
A slight hum from an electromagnetic starter surprises few people, and some even consider this effect to be its usual mode of operation, although this is not the case for new devices. So what should you do when your machine buzzes like this or buzzes?
Is it worth changing it right away, or is the reason not in it at all, but in the electrical wiring or connected load? Let's take a closer look.
If this sound appears, then first of all decide what it sounds like:
All your further actions will largely depend on this.
Such sounds appear when the machine is energized and under load. That is, current flows through it. Moreover, the greater the load, the louder the machine can make noise.
Circuit breaker hums
Let's look at the first fault, namely humming. If your machine makes a sound during operation like a starter or contactor, this indicates a defect or defect.
Typical causes of failure
The light switch serves to close/open the circuit and supply electricity to lighting fixtures - chandeliers, lamps, lamps. The operating principle of an electrical device is based on the formation of contact between the receiving plate and a contact pair (one or more depending on the type of switch).
If there is poor contact between the plate and the wire, a spark is formed - an electric arc, indicating an interruption (break) of the contact. The switch shorts out, causing sparking to occur, which further causes the light to crackle and flicker.
Main reasons:
- High humidity in the room or directly at the installation site, which leads to oxidation of wires and contacts.
- Insufficiently well secured contact, wear of the working mechanism - as a result, the device shorts.
- Using a broken device. Some consumers continue to use the switch if it crackles, buzzes, or sparks.
- Violation of the voltage parameters of the electric current on the current-carrying conductors connected to the switch.
- Stable voltage drops in the network, which provoke failure of the internal mechanism of the device.
- The total power of lamps switched on by the device exceeds the permissible value for a specific switch.
It is extremely rare that a device has a manufacturing defect, which leads to malfunctions. Mostly devices begin to spark due to the direct or indirect fault of the user. A common cause is moisture in rooms such as the bathroom or kitchen. High indoor humidity and constantly changing temperature can cause oxidation of contacts.
How to prevent sparks
To prevent sparks from forming at the contacts, manufacturers install arc suppression chambers that cool the arc. Some brands may make solderings from materials that are not susceptible to oxidation. Current will pass through them. You can use several methods yourself.
Spark arresting circuits
Suitable for high-speed devices that generate sparks at the moment of closing. Most often there are two options:
- For relays and DC starters. You will need a diode with an anode on the negative pole and a cathode on the positive pole. Energy dissipation occurs on the active part (self-induction). The diode will close the circuit.
- Snubber. The shunt RC circuit is designed to dissipate the energy accumulated in the inductance at the moment of active resistance of the network.
The contacts are located close together, so the spark extinguishing circuit reduces the load.
Pressure plates
The method is suitable for sparking contacts of a starter or machine. A special spring mechanism ensures tight contact between the contact pads. To connect, you will need to install a spring mechanism in the closed contact position, retracting it and lowering it back. A click/thump should be heard.
Removing carbon deposits
You can clean the surface of conductors not only with fine sandpaper. An eraser or a wooden match will ensure a smooth surface and eliminate the risk of increasing contact resistance.
Causes of noise from a new meter
It happens that in a completely new house, where there is new wiring and stable voltage, there are no problems with electricity, the electric meter suddenly begins to hum. If everything is clear with old devices, then with new ones things are somewhat more complicated. First, let's look at what you shouldn't do with a new energy metering device:
- break the seal. If this has already been done, you must call and inform them of the need for a new sealing;
- disassemble the electric meter yourself;
- put a high load on the device, from which sparks are already flying;
- when sparking, climb into a working device;
- knock on the meter, rearrange, pull wires.
Worn wiring
The next reason for an outlet to fail is the deterioration of the electrical wiring in the house (or apartment).
If the diameter of the cores is small, then you should not connect powerful electrical appliances (for example, a microwave), otherwise the line will simply not withstand the current load, as a result of which the outlet will begin to spark. Here you need to first inspect the old current-carrying line and, if necessary, replace the electrical wiring in the house. Correct replacement is carried out based on calculation of the cable cross-section for power and current.
How to avoid problems?
Above we have provided the main reasons why the socket sparks when the plug is turned on and how to repair the product yourself. Now I would like to talk about how to avoid these problems, and in other words, about preventive measures.
- Check your electrical wiring at least once a year. A visual inspection will allow you to prevent trouble in time.
- Inserting and removing the plug should only be done when the power to the electrical appliance is turned off. The course of action is as follows (using the example of a TV): connect to the network, turn on the button and vice versa - turn off the button, disconnect from the network.
- Install a circuit breaker on the outlet line, which will prevent current overloads and save not only the power source, but also household appliances.
- In wet rooms (for example, a bathroom or bathhouse), install only waterproof devices.