Not a single operating power supply system can do without power sockets, in the absence of which the normal functioning of household appliances is impossible. Due to the constant increase in the number of devices connected to them, the current load on the power lines increases noticeably. This cannot but affect the architecture of household electrical networks, the total number of outlets in which has to be increased. Users often need to connect 3 sockets from one wire without disturbing the distribution of currents in the supply line.
Combined wiring
Combined wiring
This method is used when you need to connect additional ones from one electrical outlet, but you cannot drill into the walls. The procedure for installing and connecting wires in this case is as follows:
- Power outage. It is necessary to de-energize the entire apartment or room in which the work will be carried out. Using a tester, you need to make sure that there is no voltage.
- Removing the protective cover from the main power point.
- Removing the socket by loosening the retaining contacts.
- Connecting wires to the new power point.
- Next, it is checked whether the limiter will not squeeze the wires. If it interferes with the cables, you need to carefully break off a small piece from the socket box or wall to the size of the wire.
- Reinstalling the socket.
- Creating a hole in the decorative cover for the wire.
- Installing the cover.
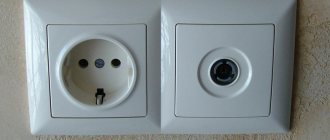
Installing an indoor outlet
It must be said right away that all sockets are divided into internal and external. Their operating principle is the same. The difference between them is that external sockets are installed directly on the wall, and internal ones are installed in boxes (socket boxes), which are “hidden” in the wall.
First of all, for safety reasons, it is necessary to disconnect all electrical wiring in the apartment from the power supply. We are talking about automatic switches in the electrical panel, which is usually located in the hallway of the apartment or on the landing.
If you are left completely without electricity in your home, you may need lighting in your workplace. It’s good if there is enough daylight, but in the dark you need to think about alternative lighting sources, for example, a flashlight may come in handy.
Necessarily! Additionally, use a multimeter or an indicator screwdriver to make sure that there is no voltage in the outlet.
Prepare your tools:
- Wire cutters
- Level
- Pliers
- Screwdriver
- Pencil
- Knife.
Basic mistakes
Brown wire - phase, blue - neutral, yellow-green - ground
Installing an additional outlet is usually not difficult. But beginners can make the following mistakes:
Wrong choice of wire cross-section. You need a cable of the same thickness as the main outlet. Using a wire made of a different material. Connecting two different wires causes additional difficulties, and the contact itself is less reliable. Violation of the order of connecting wires
Particular attention should be paid to the grounding conductor. If it is not available in the house (especially in old buildings), it is better to purchase sockets without ground. Unreliable contact
You need to familiarize yourself in advance with the existing methods of creating a contact and practice connecting on spare sections of wires. Installing wires diagonally. Standards only allow vertical cable routing.
There is also a risk of buying a model that is not suitable in design. This is not a critical error from a technical point of view, but can disrupt the overall concept of the room. Therefore, when purchasing, it is recommended to select the color of the product, its shape and size in advance. Manufacturers of electrical products offer a wide range of products; any buyer will find a product that suits the style.
Assembly components
You can purchase triple sockets, but more often they are assembled by hand from separate parts into one device. Possible problems in selecting components:
- The price of the product is significantly higher than three separate sockets.
- The requirements for it do not correspond to the purpose of the installation.
In this case, the solution is self-assembly of three single triple sockets. To do this you need the following details:
- standard single sockets of equal size with a current rating of 16 A,
- an overhead frame that combines three cores of single sockets,
- fastening elements, for example, screws for fixing decorative fittings.
Decorative covers for single sockets will not be needed, but it is better not to throw them away, but to leave them as components for single sockets that are still in the house, to replace damaged or worn ones.
Sockets in drywall
This is both hidden and open wiring - it belongs to the first category because the wires are not visible, and it falls into the second category because the wires are not walled into the wall and can be reached. In addition to standard tools (unless you are installing a socket block), you will need steel wire for installation. The procedure is as follows:
- The socket and socket box are removed from the wall. They are screwed to the drywall, so there is no need to break anything.
- The steel wire is inserted into the hole and pushed in the direction where the new socket is planned to be installed. At this stage, you just need to make sure that there is a gap between the plasterboard slabs, profiles and the wall into which the corrugation with wire will pass (wiring unprotected from mechanical damage cannot be left inside).
- If you can find the way with the wire, then a hole is drilled in the right place for a new socket box. A strong rope is screwed to the wire and it is pulled back.
- Then, using a rope, a corrugation is pulled between the sockets, the wires are inserted into it and connected.
Compliance with safety precautions when installing sockets
Work with electricity is classified as dangerous. Even low voltage leads to burns, injuries and other unpleasant consequences. Compliance with safety precautions:
- de-energize the room in which the work is being carried out;
- check the area before starting with a special device (you can plug the device into the network);
- use rubber gloves and equipment with rubberized handles;
- when “increasing” the length, it is not enough to twist the wires; soldering is required;
- contact with connected bare cables is not allowed;
- the excess should not “stick out” - it is shortened and placed in the wall;
- check whether the devices are suitable for the current and voltage levels used.
Anyone can connect sockets using these methods. The circuits have advantages and disadvantages; before making the final choice, it is important to establish the power of the equipment and the method of branching the wiring.
Installing a block with two and three keys
Installation of such a block makes it possible to control two light sources in different rooms, or two in one room. In this case, not 4 wires are supplied from the distribution box, but five.
- The phase is connected to the jumper of the switching block.
- Only the neutral wire and the grounding conductor are attached to the socket contacts.
- Then the two remaining conductors are connected to the switch contacts.
- In the distribution box, twists are made of the cores that supply the core and those that go to the lighting fixtures.
Three-key combined devices are the best option for small apartments. They often have a bathtub, a toilet and a kitchen nearby, and the lighting is switched on on one wall. If there are three keys, then you will need a cable with six cores, three of which are also connected to the switch terminals.
Drilling out socket boxes
Next begins the noisiest and dustiest part of electrical installation work - drilling and chipping.
In order to minimize the amount of dust, construction vacuum cleaners are used.
In addition, each tool in this case must have an outlet with a pipe or a dust removal device.
Small hammer drill, medium hammer, large hammer, wall chaser, all of these tools must have dust removal, otherwise your vacuum cleaner will be of no use.
First, the centers of the socket boxes are drilled out using a d-6mm drill. Then, based on the material of the walls, a tool is selected for arranging niches for socket boxes.
It could be:
medium hammer drill with diamond bit
large hammer drill with impact bit
wall chaser with a cut 60mm deep
Wire selection
The wire is selected according to this principle:
number of cores If you decide to install a socket with a grounding contact (see above), it is connected with a 3-wire wire. Otherwise, use 2-wire;
material. In general, when installing wiring, it is recommended to use copper cable - brand VVGng (in non-flammable insulation) or NYM (imported analogue). Copper is superior to aluminum in electrical conductivity and ductility (the aluminum core breaks off after several bends). But with a daisy chain connection, a wire made of the same material is used that is connected to the first outlet. If a copper conductor is directly connected to an aluminum conductor, when current flows, both materials are destroyed due to an electrochemical reaction. A special neutral alloy adapter is required. Aluminum wires (brand AVVG, etc.) are found in old houses
Therefore, before installation, it is important to open the existing outlet and see what it is powered by;
core section Also selected according to the wire connected to the first socket (when using cables of the same material)
There is no point in using a wire with a larger cross-section, since the throughput of the “chain” is still determined by the capabilities of its weakest link.
For household sockets, the minimum recommended core cross-section is 2.5 mm2 (for copper wire). Such cables, when laid hidden, can withstand a current of up to 16 A (when open, even more due to good heat dissipation), so you can safely plug in any device into the outlet, except for particularly powerful ones - an electric stove and an instantaneous water heater.
If the first socket of the loop is powered by a wire with 1.5 mm2 cores (mainly used in lighting networks), you should think about replacing it. Otherwise, only the lowest-power devices can be connected to the loop sockets.
Pros and cons of this connection method
There is only one advantage and it is always visible - ease of use, because you no longer have to fiddle with carriers, trip over wires or worry that the tee will loosen the contacts of the socket and fall out of it.
In order to fully evaluate the possible shortcomings, you need to disassemble the device and see what wire is connected to it - most often it is wiring with a cross-section of 1.5 or 2.5 square millimeters. Such a cable will easily support the connection of one household device with a power of about 2 kW and, with some stretch, a couple of such devices. What saves sockets and wires is that several powerful devices are connected to one of them quite rarely - basically it is one device of 1-2 kW and several weaker ones.
Before you install an outlet or several from an existing one, you must take into account that each subsequent one is a connection of wires, which is an additional resistance to electric current. Even if you connect one powerful device, but to the last socket, there is a possibility that the previous contacts will heat up. The nature of electric current is such that it has a vibration effect on the wiring, as a result of which the contacts inevitably weaken over time. According to the rules, all electrical contacts in enterprises must undergo an annual inspection and tightening of bolted connections.
On the other hand, in living rooms the most powerful device is usually an electric heater - if it is not homemade, with contacts made unknown, then two sockets connected in series and their wiring can easily withstand it.
The third question is the kitchen - this is where the most powerful devices are usually assembled in terms of electricity consumption: dishwasher, microwave, electric oven, oven, electric kettle, toaster and others that “eat” from 1.5 kW. “Hanging” them on one wire is strictly not recommended, unless it is the weakest of them, for example, a microwave oven paired with a kettle or toaster.
Some tips
Since these units are still considered new, it is necessary to provide several recommendations regarding how to connect an outlet with a switch.
- If installation is planned in a wooden house, then the socket box should be metal.
- When the unit is mounted near a doorway, the part that is the switch is located closer to the door.
- If you don’t have enough knowledge in electrical engineering, no work experience and no confidence in the correctness of your actions, it is better to entrust the work to professionals.
- Often home craftsmen make various mistakes when connecting. The most “popular” mistake leads to the fact that the socket is in working condition, but the switch refuses to function. In this “severe” case, the incorrect distribution of wires is to blame - confusion with the phase and neutral on the socket. The solution is to connect the phase conductor to the jumper and return the neutral conductor to the socket.
Sometimes such designs become the only possible solution, and in this case the owners no longer have to think about the pros and cons of the blocks. Understanding how to connect an outlet with a switch will make it possible to cope with similar work in the future.
An example of such a connection can be seen in this video:
Open and closed wiring
The difference between the methods is noticeable to the naked eye. The closed wiring is located inside the wall, for which grooves (grooves) are punched or cut into it, in which the connecting wire is hidden under a layer of putty. Open wiring is laid along the surface of the wall, on which it is held in special fasteners or laid in plastic guides - cable channels.
Accordingly, if you can see the wires that fit into the outlet, then the wiring is of an open type. Otherwise, closed wiring is used, for the installation of which the walls were cut.
These two methods of connecting an outlet can be combined with each other - if the old points are connected in a closed way, then nothing prevents you from connecting a new one in an open way. There is only one choice - in wooden houses the socket can be connected exclusively in an open way, just like all other electrical wiring.
Open wiring - advantages and disadvantages
An analogy with the most common extension cord (surge protector), which is essentially an additional branch of the electrical network, but is connected not to a junction box, but to an outlet, will help you understand why open wiring is good.
Advantages:
- You don't have to cut the wall to install a new outlet. This is especially true for those premises that have already been renovated.
- Installation does not require tools such as a wall chaser or a hammer drill.
- In the event of a breakdown, you don’t have to open the wall - all the wiring is in front of your eyes.
- Installation speed. Even after all the work has been completed, adding another point to the existing wiring is a matter of several minutes.
- If desired, you can quickly completely change the wiring - ideal for temporary connection schemes.
Flaws:
- There is a high probability of external influence on the wiring - children, pets, you can simply accidentally hook it. This disadvantage is mitigated by laying wires in cable channels.
- Exposed wires spoil the entire interior of the room. True, it all depends on the design abilities of the owner of the room - cable channels will fit perfectly into modern design solutions, and if the room is made in a retro style, then special wires and other accessories are produced for this.
- The need to purchase special fasteners, even if cable ducts are not used - in wooden houses, open wiring should be laid at a distance of 0.5-1 cm from the wall surface. Wires are often laid inside iron pipes - all these requirements are aimed at increasing the safety of using open electrical wiring.
As a result, this connection method justifies itself if for some reason there is no point in laying the wires to the outlet inside the wall. Besides the fact that the wiring will be visible, there will be no differences in the operation of the outlet.
Hidden wiring - pros and cons
Despite some significant disadvantages, it is used almost everywhere - the advantages of its use still outweigh.
Advantages:
- The wires to the socket fit into the wall, so wallpaper or other finishing can be done freely on the outside.
- Meets all fire safety requirements (in concrete buildings) - even if a short circuit occurs, there is no fear of a fire from the wires in the wall.
- There is a very low probability of damage to the wiring - it can only be damaged when drilling walls.
Flaws:
- For installation you need to cut the walls.
- It is difficult to carry out repair work.
- If the walls are finished, then after installing an additional outlet you will have to redo it.
The disadvantages are leveled out by preliminary calculations - if you plan in advance where and which block of sockets should be installed, then problems usually do not arise in the future.
Serial and parallel connection
The daisy chain method is otherwise called serial connection of sockets. In contrast, the parallel connection method provides for powering each outlet with a separate line from the distribution box (for the most powerful devices, a line is drawn from the distribution board).
Advantage of daisy chain connection:
- less dirt and dust is formed: the groove is made in a short area between the sockets;
- for the same reason, labor costs are reduced;
- cable costs are reduced.
But there are also important disadvantages:
- low reliability: if the wire burns out, all subsequent sockets of the loop become inoperable;
- limited power: the maximum permissible current, determined by the cross-section of the cable cores of the first socket (at 2.5 sq. mm 16 A), is divided by all devices included in the loop (with a parallel connection, each socket can consume the maximum current);
- startup and shutdown of the device are accompanied by more noticeable voltage drops in adjacent sockets than with a parallel connection.
Conclusions and useful video on the topic
Video guide on using the loop method:
Video: one of the safe options for connecting sockets:
Given that the amount of electricity spent on household needs is only increasing every year, and therefore the requirements for the reliability of sockets will certainly increase, a parallel wiring diagram should still be preferred. Especially when it comes to serious energy consumers. To power lamps, electric alarm clocks and similar devices, a cable connection option is suitable.
How are sockets and switches connected?
We hope that the general part of the circuit structure is clear to everyone. Now let's see how the electrical points are connected to it.
Connection diagram for luminaires via a two-key switch
So, we have a group power wire that comes into the junction box. This wire can have two or three cores. According to modern standards, three-core wires are used for these purposes. It is worth saying that the connection diagram will not change much depending on the number of available wires.
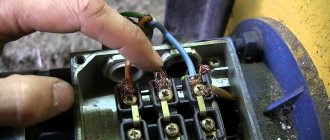
- All three wires will have different color markings. White or pink is phase, blue is zero, and yellow-green is ground. Be careful and careful when making connections, as there is always a chance that the electrician connected the wires to the machine incorrectly. Pre-check the wires for voltage with a tester.
- Let's start the analysis by connecting the outlet. The phase and neutral are connected to its power contacts, while the “ground” is connected to the grounding contact. That is, to connect it to the network, all three wires are used.
Grounding is required to transfer charge from the device body to the ground loop, which avoids electric shock.
- With the switch, everything is a little more complicated, since this part of the circuit also includes a lighting device.
- So, we have three wires in the box - they are separated from each other and we can clearly see the color coding, which corresponds to the actual parameters of the circuit. A two-wire or three-wire wire is laid from the distribution box to the switch box - the first is taken for a single-key switch, and the second for a two-key switch. If there are even more keys, then the number of conductors increases proportionally.
- We screw the stripped ends of the wire to the switch terminals. Let us say right away that only phase wires will be suitable for this device, regardless of their number. The fact is that the task of the switch is to break the circuit and stop the supply of electricity to the lighting fixture. That is, the ends of the wire are input and output.
- Already in the distribution box, one core connects to the phase conductor of the group wire. The second core is connected to another wire, which is extended to the lamp as a phase. This wire also has two or three cores - the second is connected to zero according to the color marking, and the third is connected to ground. We do the same if the switch is two-key, but according to a slightly more complicated scheme. Here the task is to divide the lighting fixtures into groups and turn them on separately.
Connecting wires in a junction box
Video - Connecting a socket and switch
If you have read the above carefully, then you already understand that the connection diagrams for the points are completely different and there is simply no zero or grounding in the switch box so that you can connect the outlet. So how can this be done? Let's name all acceptable methods.
Installation technology: how to do it?
Advice It is necessary to study the type of socket being installed and choose the most suitable method.
socket installation
How to install a surface-mounted device?
Actions should be performed according to the following algorithm:
- The power supply in the apartment or house is turned off.
- The decorative cover is removed from the device.
- The device is applied to the fixation site.
- The points at which the dowels will be screwed are marked with a pencil or marker.
- Using a drill, recesses are drilled to a depth equal to the dowel casing.
- The covers are inserted and the upper part of the hole is widened if necessary so that the caps do not interfere with the device's tight fit to the wall.
- The dowels are inserted into the holes of the mounting plate, screwed in with a screwdriver or driven in with a hammer.
- The zero and phase wires are inserted into the terminals.
- The socket is fixed and checked for fastening strength.
- Functionality is checked.
Hidden wiring products
- A marking of the mounting location is required, and if there are no wires laid from the junction box, then also the grooves for the wiring.
- A recess is drilled for the box using a core drill or with pobedit coating (in concrete, brick walls).
- Ditches are being dug for laying wiring.
Connection after such operations is performed as follows:
- The mains power in the apartment is turned off.
- The holes are prepared and cleaned of dust.
- With cement or gypsum mortar placed on the internal cavity, a socket box is inserted.
- It is necessary to wait until the material sets so as not to disturb the position of the box.
- To connect the wires from the junction box, the insulation is removed from 0.5-1 cm at the end.
- The wires are inserted into the holes of the terminals and secured by tightening the screws. It is necessary to tighten them well so that the dangling wire does not lead to heating or sparking of the contact.
- The device is installed on self-tapping screws and fixed on the socket box.
- Functionality is checked.
correct installation of the socket Attention The voltage between ground and phase, neutral and phase must be 220 V if measurements are carried out with a multimeter.
Device connection diagram
- First, at a distance of approximately 10 cm from the edge, it is necessary to strip the overall insulation of the wire to gain access to the three cores. Even remove about 0.5-1 cm of insulation from the ends of the wires with a knife or wire cutters. It is necessary to perform all operations very carefully so as not to damage the insulation, which will lead to a short circuit and burnout of the outlet. To connect the ground wire there is an additional hole, which is located further from the power outputs. The operation of the device is not affected by the order in which the wires are connected.
- It is necessary to ensure good insulation and reliable contacts. To do this, put on thermal attachments, push them closer to the terminals and melt them with a lighter. The main thing is not to overexpose the fire, so as not to melt the insulation completely, 1-2 seconds is enough.
- It is necessary to firmly tighten the screws that secure the wires so that heating or sparking does not occur due to poor contact.
How to choose the right method
Connecting two outlets to one cable
To choose parallel or serial connection of outlets, you need to calculate several parameters: the amount of money that can be spent on electrical wiring, equipment power and wall decoration (the ability and desire to redo repairs in case of breakdowns).
The optimal way is to connect two sockets to one wire of a panel or distribution box - a parallel connection. If the room does not have a large number of sockets and appliances (for example, only a TV), the loop method is suitable.
Which way to use
This issue is resolved in each case individually, depending on where the “parental” outlet is located and what power the connected device will be. If these are not kitchen sockets for an oven or points for powering a boiler with a washing machine, then calculations and practice show that several sockets will work without problems without causing overloads in the network.
The main condition when installing any sockets is good contacts between the wires, which reduces the overall resistance of the wiring and the likelihood of it heating up during operation.
Is it possible to connect sockets in series?
Connecting sockets in series mode has a number of disadvantages and limitations. In a large room and a significant number of powerful electrical appliances, this method cannot be used - the load is too high. It is better to parallel the sockets or use the ring type. The recommended quantity per chain is 5-6 pieces.
Another disadvantage is the uneven distribution of voltage at power points. Each outlet accounts for a portion of the total electrical flow. Therefore, serial connections are not used in residential and industrial premises. But you can use it in Christmas tree garlands and others.
Types of devices and their features
There are quite a lot of varieties of plug sockets and blocks. Each type has its own design features and purpose.
- Hidden devices are mounted directly into the wall - in special socket boxes.
- Open devices are produced for those apartments where the electrical wiring is not hidden in the wall.
- Retractable socket blocks are mounted in a table or other furniture. Their convenience lies in the fact that after use, the devices can be easily hidden from prying eyes and playful children’s hands.
The devices differ in the method of clamping the contacts. It comes in screw and spring types. In the first case, the conductor is fixed with a screw, in the second - with a spring. The latter are more reliable, but they are not so easy to find on sale. The devices are fixed to the walls in three ways - claws with jagged edges, self-tapping screws or a special plate - a support that facilitates both installation and dismantling of the socket.
In addition to conventional, inexpensive devices, there are models equipped with grounding contacts. These petals are located in the upper and lower parts, and a grounding wire is attached to them. To ensure safety, sockets are equipped with curtains or protective covers.
Main popular types
These include:
- type “C”, it has 2 contacts - phase and zero, usually purchased if intended for low or medium power equipment;
- type “F”, in addition to the traditional pair, is equipped with one more contact - a grounding one; these sockets are becoming more popular, since a grounding loop has become the norm for apartments in new buildings;
- Type “E”, which differs from the previous one only in the shape of the grounding contact, is a pin, the same as the elements of the socket plug.
The last type is less common than the others, since it is less convenient to use: turning the plug 180° with such a socket is impossible.
The security of the case is the next difference between the models. The degree of security is indicated by the IP index and a two-digit number following these letters. The first number indicates the class of protection against dust and solids, the second - against moisture.
- For ordinary living rooms, IP22 or IP33 class models are sufficient.
- It is recommended to buy IP43 for children, as these sockets are equipped with covers/curtains that block the sockets when the equipment is not in use.
- IP44 is the minimum required for bathrooms, kitchens, and baths. Not only strong humidity, but also splashes of water can pose a threat. They are suitable for installation in basements without heating.
Installing an outlet on an open balcony is a sufficient reason to purchase a product with a higher degree of protection, this is at least IP55.
Installation procedure
Drywall is a fragile material and must be handled with care.
Before you begin installing sockets yourself, you will need to read the installation instructions. The easiest way to consider an example is when they are installed in a plasterboard wall. The work order in this case looks like this:
- Take an electric drill with a “crown” type attachment, through which a hole for the socket is prepared in the selected location. Its diameter must match the size of the plastic case (glass) used as a mounting base and fixed directly at the installation site.
- The mounted socket is placed in the glass and secured in it using long spacer screws.
- It is necessary to connect the phase and neutral conductors brought out to the contacts, and then close the product with a decorative cover.
At the final stage of work, you should supply power to the line and check the socket for functionality - connect any household appliances to it.
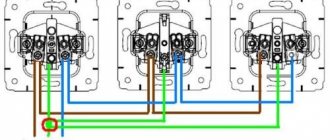
To correctly connect several outlets in a row at once (with a cable), experts advise paying attention to the following points:
- The wire from the phase terminal of one socket unit is pulled to the same contact of the next product, and so on. To such a cable you can add the entire set of sockets installed in a given room.
- The same is done with the neutral conductor, laid from the corresponding contact to the second and subsequent products mounted on the wall.
- If there is a grounding conductor, the same operations are performed with it.
The advantages of this connection method include ease of implementation and economical use of consumables (wires). The disadvantages are the unreliability of the system, in which a break in one of the conductors will lead to de-energization of all subsequent sockets connected to this loop. In this sense, a star connection looks much preferable.
Where are double sockets installed?
Their metal may damage the insulation when tightening the screws.
Removing an old outlet Before you start working with electrical wiring, you need to take care of your safety. Where are double sockets installed?
Instructions for those who want to connect the outlet themselves: If the quality of the installation is in doubt, seek help from a professional electrician. But since the socket box, the lever on which is located in the center, is subject to a double load, after prolonged use the fastenings become loose and weaken. When the caliper frame is securely fastened, a decorative trim is installed. Before connecting a double socket, you need to make sure that the power supply is turned off and there is no voltage on the cable. Like power sockets, Internet analogues are inserted into sockets. The distribution cable is laid openly or closed in the walls. Finally, its caliper is connected with self-tapping screws to the body of the installation box.
Connecting an outlet to a three-wire electrical network has a slight difference. If you do not do this, then you will not be able to install and connect the working part. It is better to check the operation of the outlet when turning on inexpensive household appliances, for example, a table lamp.
The wiring looks a little different, with a unique connection. There are also models that are not equipped with fixing tabs, which are secured by screwing them onto screws.
Therefore, when installing electrical wiring, you should clearly understand what can happen if you do something wrong. To make it easier to solve the problem, the wire insulation is painted in different colors: phase - red, brown or white; zero - blue, blue or black; grounding - yellow or green. To plug an electrical appliance into an outlet, you have to turn them over. By pressing the fasteners, the upper part of the device is separated from the caliper. In addition, on the front part there are mounting screws for fixing the socket support.
Deviation from this pointer may result in uneven installation of the decorative socket cover. For ease of subsequent connection, it is recommended to slightly raise or lower the ends of the wire. The lack of power in the network is checked again. How to connect a Socket and Switch (EASY)
Connecting the cable
Connect to an existing outlet like this:
- the end of the new cable is cut to a convenient length;
- free the ends of the cores from insulation to a length of 1 cm. There is a special tool for this operation - a stripper (also known as a crimper), which eliminates the possibility of damage to the core. In its absence, the insulation is carefully cut off with an ordinary knife, trying not to damage the core;
- the bare ends of the strands are bent into loops and lightly squeezed with pliers;
- Having pressed the spacer antennae, remove the inner part of the socket and loosen the screws on the phase and zero terminals. The grounding conductor is completely unscrewed;
- the power cores of the new cable are inserted into the terminals and the screws are tightened. Now each terminal has two wires - from the power cable and from the jumper for the new socket. The colors of the insulation on the cores in each terminal are the same.
Grounding is connected differently. For it, connecting with a cable is unacceptable due to low reliability: if the contact in one of the sockets burns out, all subsequent ones will be left without grounding. According to the PUE, it is necessary to maintain the continuity of the conductor by making a branch for each socket.
Do this:
- a crimp sleeve is put on the unscrewed grounding conductor of the supply cable and two more conductors are inserted into it: from the jumper cable and a short section - a branch for the existing socket;
- press the sleeve with press pliers;
- put a heat-shrinkable tube on it and heat the latter with a hot air gun or lighter (insulation);
- Screw the branch to the grounding contact of the existing outlet.
Do the same when connecting each subsequent socket of the cable. The existing outlet is being assembled
It is important to make sure that the limiter on its inside (a rectangular metal plate) does not squeeze the jumper wire. If this is discovered, a cutout is made for the wire in the socket box, and if necessary, the hole in the wall is deepened
Scheme for connecting sockets with a cable
After the socket boxes are installed, it is necessary to prepare the cable for the jumpers. We measure the cable with a reserve for each block, but do not make too long jumpers. Their length should be such that after connecting the socket, it can be installed in the socket box. For jumpers, I used a cable of the same brand and cross-section as the supply cable.
Connecting sockets with a cable involves connecting several electrical sockets to one wiring line. To implement this method, it is necessary to connect the incoming and outgoing cables with a loop directly on the contact part of the socket. All wires: phase, neutral, grounding are connected in parallel.
Kinds
A new outlet is selected based on a number of important technical parameters.
type of instalation
There are two options:
- mortise: installed in a hole drilled with a crown;
- overhead: screwed onto the wall with self-tapping screws.
Mortise ones in combination with hidden wiring (cables are hidden in grooves and sealed with mortar) are installed in residential and other premises with high aesthetic requirements.
Invoices with open wiring are used in garages, country houses, etc. - they are easier to install.
Presence of grounding contact
Grounding household electrical appliances is desirable because it protects the user from electrical injury. But it can only be implemented in houses with a grounding system organized according to new standards (type TN-CS).
In older houses with a TN-C system, grounding is not connected to sockets; therefore, you should purchase a product without a third contact.
Even if the house has a modern TN-CS grounding system, you should not rush to buy an outlet with a grounding contact. Since it was decided to power the new point from an existing outlet, you first need to make sure that a 3-wire wire is connected to it.
If it is connected with a 2-wire wire, then even if there is a grounding contact on it, there is no point in buying a socket with grounding.
Socket diameter
There are two types of sockets:
- Soviet model;
- Euro sockets: with sockets of increased diameter.
The choice of outlet depends on the type of plug on the electrical appliance. The error is not critical: there are adapters for connecting Soviet-style plugs to European sockets and vice versa.
Terminal type
This determines the quality and reliability of the contact in the socket. If the contact is poor, the wire becomes very hot, which can lead to burnout or fire.
Sockets are equipped with three types of terminals:
- flat spring. The most reliable variety;
- screw with pressure plate. To fix the wire in the terminal, tighten the screw against the copper plate. The terminals are flat spring, inferior in reliability, but quite acceptable;
- screw without pressure plate. The option where the cores are simply pressed with a screw is the worst; purchasing such a socket is not recommended.
Several rules when connecting 380 volts in a private home
Outdated power lines are gradually being modernized and transferred to the new TN-CS model. With this method, the fourth PEN wire is laid from the supply substation not with one wire, but with two disconnected wires: PE and N.
Input of three-phase voltage into the building
To connect 380 volts to a private house, you must follow some rules:
- voltage is transmitted from the transformer substation via power lines (four wires), which include three phase conductors (L1, L2, L3) and one common neutral wire PEN;
- Most often such a line is overhead and less often cable.
A three-phase connection is based on the connection of all conductors to the input apparatus of the object. Next, the current enters the metering device and passes into the distribution panel, for the purpose of subsequent distribution to electrical receivers.
In the middle of the input device, the working zero N and the protective zero PE are separated. Then they are connected to the main ground bus (GZSh). Then it is connected to the repeated grounding circuit of the room.
The last section of the line from the support to the entrance to the house is carried out by air or underground. It is also called a branch. It is listed on the balance sheet of the power supply organization, so the connection of the house is made with the permission of the owner of the power line.
If the cable line runs underground, then the branch is mounted in a metal cabinet, which will be located near the route, and for overhead power lines - directly on the support. In both cases, the owner is obliged to ensure their safe operation and prevent unauthorized people from invading the electrical panel.
Outgoing lines
With three-phase power supply, an input distribution board (IDB) is installed on the facade of the house. It is in it that the PEN conductor is separated and the input circuit breaker is installed, as well as circuit breakers for the group circuits of the house.
All three phases L1, L2, L3 are connected to a three-pole input circuit breaker (3). An electricity meter is also installed there in order to keep track of the resource consumed. Three conductors from the input machine and conductor N from the main generator are connected to the input terminals of the metering meter. The electricity meter output is connected to a common circuit breaker (four-pole) for protecting the entire house. If it goes off, the entire house will be cut off from power.
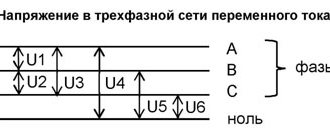
The operating voltage between phases is 380 V, and between phases and zero 220 V. After all, this voltage represents three phases in three different wires, only with different instantaneous potentials and a frequency of 50 Hz.
Electrical wiring in the house should be divided into groups, each lighting line is protected by a single-pole circuit breaker (5). Each group is powered from different phases.
In rooms with high humidity levels, you need to use a difavtomat (6), which is triggered when the current reaches no more than 30 milliamps.
For a kitchen group, it is advisable to install a three-pole circuit breaker (9) and a four-pole circuit breaker (10). This is due to the fact that the kitchen power supply is three-phase, so if a phase is short-circuited to zero, it will be necessary to cut off the zero worker and all phase conductors at the same time.
Electrical outlet device
Almost any master had to deal with connecting an outlet. At first glance, this procedure is very simple, but there are many nuances hidden beneath it. To prevent a self-connected outlet from becoming a source of problems, you need to understand the principle of its operation. It consists of the following components:
- Decorative overlay with fixed screw.
- Socket box. To fasten the element inside the mounting hole, it has tabs, with the help of which the insert is attached to the hole. The pads, whose contacts are movable, are more difficult to install, but thanks to their design it is possible to adjust the position in tilt and height. It is advisable to choose models with two-toothed feet. Compared to single-tooth ones, they are much more reliable.
- Contact box assembled. The terminals can be connected in various ways, such as with contact screws directly, or they can be made as a single unit. Two contacts, neutral and phase, as well as grounding which is located separately.