Problems with electrical wiring are a serious reason to pay attention to the condition of the electrical circuit, connected devices and devices. A careless attitude can cause a short circuit, melting of conductors, and lead to a fire.
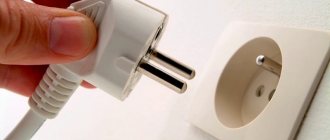
When a light switch sparks when you turn on the lights in an apartment or house, a crackling sound is heard, homeowners need to immediately solve this problem or seek help from electricians.
How to prevent sparks
suppression circuits
To prevent sparks from forming at the contacts, manufacturers install arc suppression chambers that cool the arc. Some brands may make solderings from materials that are not susceptible to oxidation. Current will pass through them. You can use several methods yourself.
Spark arresting circuits
Suitable for high-speed devices that generate sparks at the moment of closing. Most often there are two options:
- For relays and DC starters. You will need a diode with an anode on the negative pole and a cathode on the positive pole. Energy dissipation occurs on the active part (self-induction). The diode will close the circuit.
- Snubber. The shunt RC circuit is designed to dissipate the energy accumulated in the inductance at the moment of active resistance of the network.
The contacts are located close together, so the spark extinguishing circuit reduces the load.
Pressure plates
The method is suitable for sparking contacts of a starter or machine. A special spring mechanism ensures tight contact between the contact pads. To connect, you will need to install a spring mechanism in the closed contact position, retracting it and lowering it back. A click/thump should be heard.
Removing carbon deposits
You can clean the surface of conductors not only with fine sandpaper. An eraser or a wooden match will ensure a smooth surface and eliminate the risk of increasing contact resistance.
Main causes of the problem
Weak contacts or oxidation may cause a crackling sound when the switch is turned on.
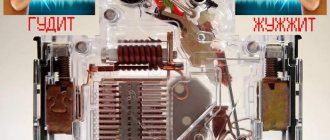
The crackling noise may sound like a buzzing or buzzing sound. There are several reasons for a breakdown.
Oxidation of contacts
If the contacts of the device become overgrown with carbon deposits or oxidize, an electric arc occurs the moment they come together. The cause of sparking is complicated by the size of the deposit. When shoots form on the end plates, the wiring can catch fire, i.e., the contacts close.
Plate loosening
The spring that presses the contact at the moment of switching on weakens - the characteristic sharp and clear click is no longer heard. A problem is indicated by the device turning on softly and the need to press the button for the light to appear. The danger is that the switch sparks constantly, causing a fire risk.
Lamp power mismatch with contacts
A halogen lamp or high-power LED source creates a load on the contacts. The simplest way to solve the problem is to replace the switch with one that corresponds to the lighting power indicators.
Poor quality of contacts and plates
A breakdown typical of budget models. The button operates on the principle of soft start, which, in combination with low-power automatic machines, provokes sparking.
Other causes of contact failure
High humidity causes oxidation of switch contacts
Factors that cause switch sparks and crackles also include:
- high humidity – activates the oxidation reaction;
- incorrect or weak connection of cores;
- increased load on contacts - humming occurs;
- constant voltage fluctuations.
Broken contacts will lead to failure of household appliances.
Wiring cracking in the wall
The article discusses the most common causes of problems in electrical wiring, and tells how to deal with them yourself. Why does the light suddenly go out in the apartment, and
- Electricity keeps going out
- Repair step by step
- Order Description
- Dim or flickering light bulbs
- Preparatory measures
- Drawing up electrical wiring diagrams in private homes: nuances of the work
- Number of incoming phases and their distribution
- Examples of diagrams for performing electrical installation work
- Electrical outlets or switches
- How to avoid getting caught in a cable when drilling a ceiling
- Electrical: Install sockets. Quantity – 5. Purchase materials for.
- How often should the wiring be checked and replaced?
How to prevent sparks
Spark arresting circuits
To prevent sparks from forming at the contacts, manufacturers install arc suppression chambers that cool the arc. Some brands may make solderings from materials that are not susceptible to oxidation. Current will pass through them. You can use several methods yourself.
Spark arresting circuits
Suitable for high-speed devices that generate sparks at the moment of closing. Most often there are two options:
- For relays and DC starters. You will need a diode with an anode on the negative pole and a cathode on the positive pole. Energy dissipation occurs on the active part (self-induction). The diode will close the circuit.
- Snubber. The shunt RC circuit is designed to dissipate the energy accumulated in the inductance at the moment of active resistance of the network.
The contacts are located close together, so the spark extinguishing circuit reduces the load.
Pressure plates
The method is suitable for sparking contacts of a starter or machine. A special spring mechanism ensures tight contact between the contact pads. To connect, you will need to install a spring mechanism in the closed contact position, retracting it and lowering it back. A click/thump should be heard.
Removing carbon deposits
You can clean the surface of conductors not only with fine sandpaper. An eraser or a wooden match will ensure a smooth surface and eliminate the risk of increasing contact resistance.
Unsuitable cookware
Not only internal damage, but also the use of unsuitable utensils can cause sparks in the microwave. If you put metal utensils in the oven (even if it only has a small metal edging), the microwave will spark.
If you discover that you have accidentally left a metal cutlery (fork or spoon) in a dish, stop the oven, remove the prohibited cutlery, or replace the cutlery with the correct one. The sparking will stop.
Also, the formation of sparks is caused by too small a volume of heated food. In this case, the microwaves will be reflected from the walls of the chamber and spark.
Causes of sparks and arcs
Before we look at why contacts spark, let's understand the basic concepts. The switching device and its contact system must provide a reliable connection with the possibility of breaking it at any time. The contacts consist of two electrical plates, which in the closed position must be securely pressed against each other.
An arc occurs when switching inductive circuits. These include various electric motors and solenoids, but it is worth remembering that even a straight piece of wire has a certain inductance, and the longer it is, the greater it is. At the same time, the current in the inductance cannot stop instantly - this is described in the laws of commutation. Therefore, a self-inductive emf is formed at the terminals of the inductive load, its value is described by the formula:
E=L*dI/dt
Interesting! In our case, the rate of change of current plays an important role. When turned off, it is extremely high, and accordingly the EMF will tend to large values, up to tens of kilovolts (for example, a car ignition system).
As a result, the EMF increases to such an extent that its value breaks the gap between the contacts - or sparks are formed. The quality of any connections is described by their contact resistance: the lower, the better the connection and the less heating. When they open, it increases sharply and tends to infinity. At the same moment, the area of their contact heats up.
In addition, between the open contacts against the background of increasing self-induction EMF and increased air temperature due to heating of the surfaces when the plates are opened, air ionization occurs. As a result, all the conditions for arcing and sparking are present.
If we talk about why contacts spark when an electrical circuit is closed, then this happens not with an inductive load, but with a capacitive load. You see this every time you plug in your laptop or phone charger. The fact is that the discharged capacitance (capacitor) at the input of the device at the initial moment of time represents a short-circuited section of the circuit, the current of which decreases as it is charged.
If you observe sparking in a relay or switch in the closed position, the reason for this is the poor condition of the contact surfaces and their high temperature.
Main causes of the problem
Weak contacts or their oxidation can lead to a crackling sound when the switch is turned on.
The crackling sound may resemble a buzzing or buzzing sound. There are several reasons for a breakdown.
Oxidation of contacts
If the contacts of the device become overgrown with carbon deposits or oxidize, an electric arc occurs the moment they come together. The cause of sparking is complicated by the size of the deposit. When shoots form on the end plates, the wiring can catch fire, i.e., the contacts close.
Plate loosening
The spring that presses the contact at the moment of switching on weakens - the characteristic sharp and clear click is no longer heard. A problem is indicated by the device turning on softly and the need to press the button for the light to appear. The danger is that the switch sparks constantly, causing a fire risk.
Lamp power mismatch with contacts
A halogen lamp or high-power LED source creates a load on the contacts. The simplest way to solve the problem is to replace the switch with one that corresponds to the lighting power indicators.
Poor quality of contacts and plates
A breakdown typical of budget models. The button operates on the principle of soft start, which, in combination with low-power automatic machines, provokes sparking.
Other causes of contact failure
High humidity causes oxidation of switch contacts
Factors that cause switch sparks and crackles also include:
- high humidity – activates the oxidation reaction;
- incorrect or weak connection of cores;
- increased load on contacts - humming occurs;
- constant voltage fluctuations.
Broken contacts will lead to failure of household appliances.
List of required tools
Some consumers, if they detect a malfunction of the switch due to sparking, crackling or humming of the device, immediately turn to electricians. However, damage that can be repaired can be repaired yourself. In most cases, it is enough to bend the contacts for the device to function normally.
The following tools are needed for repairs:
- indicator screwdriver with a lamp or electronic display;
- a regular type screwdriver for unscrewing screws/screws;
- insulating tape and fine-grain sandpaper;
- pliers, marker, knife for stripping wiring insulation.
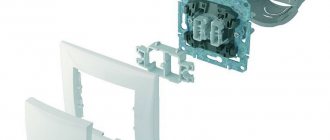
All switches have a plastic housing, a protective frame and an internal operating mechanism. The frame can be attached to the mechanism with latches or screws. The socket box contains a working mechanism, fixed with spacer tabs or screws. To perform repairs, you need to provide access to the contact group by removing the outer box from the device.
Signs of malfunction and main types of breakdowns
The switch is faulty if you hear a crackling noise when you turn it on.
Before you can fix a faulty switch, you first need to understand how it works and also become familiar with the main reasons why it could break. Characteristic signs of failure:
- when you press the key, the changeover mechanism begins to jam and does not move to the desired position;
- at the moment of switching, you can hear a crackling sound, and sometimes you can notice something sparkling inside;
- After pressing the button, the device simply does not turn on the lighting.
Typically, these malfunctions are observed with only one of the keys, but the possibility of failure of two or even 3 switching mechanisms at once cannot be ruled out.
In the first case, the axis on which the base of the key is fixed could presumably fall out or a foreign object could get inside (dust accumulated). With characteristic crackling and sparking, one of the closed contacts or both of them has probably burnt out. If the light does not turn on at all after pressing the key, the problem is most likely that the contact at one of the points where the conductors connect to the terminals is broken and the current is not supplied to the load. In this case, it is first checked to see if the voltage has gone out in the entire apartment and that the light bulb is fully operational.
What to do if some of the lamps stop burning?
As a rule, light sources do not burn out all at once, but one by one. In this case, you can almost immediately exclude the failure of the transformer unit, but to make sure that it is working, you can connect this unit to a 220V power supply:
- check the response of the chandelier receiver controller to commands sent from the remote control;
- check the relation to “zero” voltage of 220V when the outputs are turned on;
- check the voltage supply to the power supplies of the lighting groups;
- check the correct voltage at the outputs of the group blocks;
- check the serviceability of the electrical wiring in the area from the block to the lamps;
- check the serviceability of the lighting lamps.
Checking lamps that do not light is carried out visually or by test replacing the element
The replacement of halogen lamps requires increased attention and caution, which is due to the design feature of such a lighting element
If any contaminants or a large amount of dust gets on the surface of the glass cylinder, after turning on the chandelier, local burnout of substances, redistribution of temperature heat and burnout can occur.
Burnt-out halogen light sources should be replaced only with bulbs that have similar parameters.
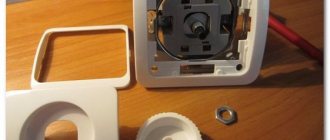
Repair algorithm
Dismantling the switch
If the switch shorts, you can repair it yourself, working in stages:
- Line loss. The machine in the input panel is turned off.
- Checking for voltage. This can be done by touching the indicator screwdriver to an outlet in another room.
- Dismantling the device. You will need to remove the switch from the groove and remove the decorative trim. After this, the voltage is checked again, the screws on the sides are unscrewed, and the housing is removed from the socket.
- Disconnecting cables. For two-key models, you will need to mark the input wire with a marker.
- Disassembling the case and searching for contacts. The contact group is located above a plastic button mounted on screws.
- Troubleshooting. The contacts are cleaned or the device is completely replaced.
- Reassemble the case in the reverse order, reconnect the wires. The finished mechanism in the housing is returned to the socket box.
- Turning on the machine in the panel and testing the switch for serviceability.
How to repair touch switches
Touch switch board
Touch modifications are equipped with a remote control and special boards with control chips. It is worth disassembling such a switch after reading the manufacturer's instructions.
Device repair:
- Removing the decorative trim.
- Visual search for the panel with sensors, which is located under the plate. Depending on the number of lines served, there are 1-3 elements.
- Search for a sensitive area on the pad - sensors are indicated by circles.
- Detection of LEDs indicating the position of the switch (red - on, blue - off). Under this panel there are nodes to which conductors are connected.
- Disconnecting inputs and outputs. You need to remove the clips that secure the touchpad.
- Removing the bolts from the housing mounted on the socket box and inspecting problem areas.
- Checking voltage on individual cables. The faulty wire is replaced.
- Reassembling the mechanism. The main unit is connected to the power supply, placed in the socket and secured with screws. After this, the touch panel and decorative overlay are attached.
A special feature of the touch switch is that it interrupts the power supply in the event of a breakdown. When the light bulb burns out, the device is switched off. It does not change even after installing a new lamp. To turn on the light you need to touch the plate.
Causes of sparks and arcs
Before we look at why contacts spark, let's understand the basic concepts. The switching device and its contact system must provide a reliable connection with the possibility of breaking it at any time. The contacts consist of two electrical plates, which in the closed position must be securely pressed against each other.
An arc occurs when switching inductive circuits. These include various electric motors and solenoids, but it is worth remembering that even a straight piece of wire has a certain inductance, and the longer it is, the greater it is. At the same time, the current in the inductance cannot stop instantly - this is described in the laws of commutation. Therefore, a self-inductive emf is formed at the terminals of the inductive load, its value is described by the formula:
E=L*dI/dt
Interesting! In our case, the rate of change of current plays an important role. When turned off, it is extremely high, and accordingly the EMF will tend to large values, up to tens of kilovolts (for example, a car ignition system).
As a result, the EMF increases to such an extent that its value breaks the gap between the contacts - or sparks are formed. The quality of any connections is described by their contact resistance: the lower, the better the connection and the less heating. When they open, it increases sharply and tends to infinity. At the same moment, the area of their contact heats up.
In addition, between the open contacts against the background of increasing self-induction EMF and increased air temperature due to heating of the surfaces when the plates are opened, air ionization occurs. As a result, all the conditions for arcing and sparking are present.
If we talk about why contacts spark when an electrical circuit is closed, then this happens not with an inductive load, but with a capacitive load. You see this every time you plug in your laptop or phone charger. The fact is that the discharged capacitance (capacitor) at the input of the device at the initial moment of time represents a short-circuited section of the circuit, the current of which decreases as it is charged.
If you observe sparking in a relay or switch in the closed position, the reason for this is the poor condition of the contact surfaces and their high temperature.
Consequences
For an electric motor, operating in two phases out of three is emergency and extremely undesirable. Also, in three-phase networks, due to the loss of one of the phases, the uniformity of the load of the transformers and the network as a whole is disrupted. For a three-phase electric stove, this mode of operation is not so dangerous - some burners simply will not work. All this leads to increased current in the neutral wire, its possible burnout and further development of emergency situations.
In conclusion, I would like to note that the solution to the problem of lack of voltage in an apartment or on a specific line essentially lies in checking all connections and switching equipment of this line. There are only two reasons for it - either phase imbalance, or burnout of the conductor due to poor contact or increased load. We strongly recommend that when working in electrical wiring, turn off the power and, if possible, work with approved dielectric gloves. Do not interfere with access switchboards and electrical networks - it is better to have this done by electricians from the organization on whose balance sheet this network lies.
Typical causes of failure
The light switch serves to close/open the circuit and supply electricity to lighting fixtures - chandeliers, lamps, lamps. The operating principle of an electrical device is based on the formation of contact between the receiving plate and a contact pair (one or more depending on the type of switch).
Main reasons:
- High humidity in the room or directly at the installation site, which leads to oxidation of wires and contacts.
- Insufficiently well secured contact, wear of the working mechanism - as a result, the device shorts.
- Using a broken device. Some consumers continue to use the switch if it crackles, buzzes, or sparks.
- Violation of the voltage parameters of the electric current on the current-carrying conductors connected to the switch.
- Stable voltage drops in the network, which provoke failure of the internal mechanism of the device.
- The total power of lamps switched on by the device exceeds the permissible value for a specific switch.
It is extremely rare that a device has a manufacturing defect, which leads to malfunctions. Mostly devices begin to spark due to the direct or indirect fault of the user. A common cause is moisture in rooms such as the bathroom or kitchen. High indoor humidity and constantly changing temperature can cause oxidation of contacts.
Types of switches
Three-key switch
When the switch crackles or sparks when turned on, it is necessary to install a new device or repair it. Flickering lights or switching on with a bang can lead to line shorts, fires, and breakdowns of household appliances. To properly repair the device, you need to understand its design.
Manufacturers produce the following product modifications:
- With one, two, three keys. Designed for installation in residential premises. To turn on the device, you need to press a key, closing the circuit.
- Push-button. Models that have an LED indicator. The design does not differ from standard ones.
- Dimmer. Allows you to adjust the lighting at the user’s discretion - adjustable brightness or intensity. The contacts are activated by rotating the wheel.
- Repeated. Devices that turn on the light by turning a button on the body.
Depending on the type of control, you can choose sensor devices, devices with a timer, acoustic or remote options.
Most houses and apartments have key switches that are easy to repair.
Typical causes of failure
The light switch serves to close/open the circuit and supply electricity to lighting fixtures - chandeliers, lamps, lamps. The operating principle of an electrical device is based on the formation of contact between the receiving plate and a contact pair (one or more depending on the type of switch).
Main reasons:
- High humidity in the room or directly at the installation site, which leads to oxidation of wires and contacts.
- Insufficiently well secured contact, wear of the working mechanism - as a result, the device shorts.
- Using a broken device. Some consumers continue to use the switch if it crackles, buzzes, or sparks.
- Violation of the voltage parameters of the electric current on the current-carrying conductors connected to the switch.
- Stable voltage drops in the network, which provoke failure of the internal mechanism of the device.
- The total power of lamps switched on by the device exceeds the permissible value for a specific switch.
It is extremely rare that a device has a manufacturing defect, which leads to malfunctions. Mostly devices begin to spark due to the direct or indirect fault of the user. A common cause is moisture in rooms such as the bathroom or kitchen. High indoor humidity and constantly changing temperature can cause oxidation of contacts.
Dependence of characteristics of automatic circuit breakers on temperature
Our publications have already described the characteristics of circuit breakers. They have a certain protection response time depending on the load. According to the requirements set out in GOST 50345-2010, the current characteristics of the machines are always presented at an ambient temperature of +30˚С.
Friends, before we find out the reason why the machines turn off in the heat, let’s immediately clarify that in our case they are all working, there is no damage to the wiring, but the machine operates some time after being turned on again.
Repair features
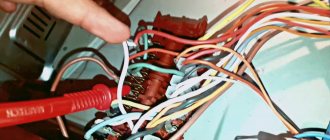
After cleaning, you need to connect all the wires
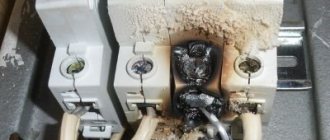
If the contacts of the switch are melted, this indicates that a short circuit has occurred, as a result of which the mechanism overheated and became deformed. In this case, only replacement will help; such a switch can no longer be repaired. In order for the new device to fit, you need to take the old one with you to the store, then there will be no problems with choosing accessories.
In addition, the wire contacts at the terminals may become loose. If everything looks fine on the outside, you should try unscrewing the wiring from the mounting points and screwing it back on, tightening the screws tightly. If the check reveals that this is not the case, then it is worth checking the quality of the wiring with a special device - a multimeter.
https://youtube.com/watch?v=FP3_fqpoNdQ
The indicator is constantly on
If the LED lights up, this indicates that power is being supplied to the control unit. If the TV does not respond to signals from the remote control, the first thing you need to do is try to turn it on directly using the panel buttons. Perhaps the malfunction lies precisely in the incorrect operation of the remote control, and not the TV itself. If this is indeed the case, you need to take the following actions:
- Check the condition of the batteries and contacts for oxidation.
- Make sure that the emitter is intact and that the remote control buttons are not stuck.
- If possible, disassemble and clean the inside of the remote control from dust.
- If the remote control was filled with liquid and stopped working, have it repaired or purchase a new one (preferably the original one - it will last longer).
If you can’t start the TV from the panel, there are two possible scenarios.
Protection triggered
In this case, the TV may try to start, but after a few seconds the screen goes blank, or does not turn on at all. The main reason for this problem in most cases is power outages in the home network. This could be voltage fluctuations or power cuts and starts while the TV is in “sleep mode”.
The most effective way to solve the problem is to completely disconnect the device from the network for a while, not with the remote control, but to unplug the power cord from the outlet. This will be enough to restore functionality if the TV does not turn on after turning off the lights. If the voltage problem is constant, you will have to use a stabilizer, uninterruptible power supply, or at least a surge protector. And when leaving home, it is better to completely turn off the TV.
Processor or control failure
The diagram shows that the LED indicators are controlled via the Stand By wire and transistor Q211. If a short circuit occurs, the TV stops turning on.
In such a case, you cannot do without contacting service specialists. Attempting to carry out complex repairs yourself can completely damage the TV.
Pay attention to our other articles:
- Why does the TV turn on and then turn off immediately: reasons and what to do?
- DIY TV repair: LCD/LCD, plasma and kinescope. Diagrams, videos and repair secrets.
- Do-it-yourself TV remote repair. And also a video on how to fix the remote control buttons.
Nuances when disassembling various types of switches
To power a large number of spotlights, ceiling lighting and other lighting fixtures, three-key switches are often used. The design of such models is distinguished by fairly thin keys. But, as for two-key switches, dismantling a three-key switch begins with removing each of them one by one. To simplify this procedure, many models are equipped with a small rectangular hole at the bottom of the keys, into which a screwdriver can easily fit. If you want to disassemble the dimmer (adjustable switch with rotary knob). Its dismantling is fundamentally no different from the classic model. The only difference is that instead of keys, you first have to remove the regulator knob. The touch switch is disassembled by removing the outer panel
For this purpose, you can use either a regular screwdriver or a special holder, which you can make yourself from wire if it is not included in the kit. In this case, special care must be taken so that the glass does not crack. If the switch is paired with a socket, then to dismantle the first one you will need to remove the socket along with it. In this case, the socket cover will have to be removed, since one of the fastening bolts is often hidden under it. Pass-through switches have the same design as conventional ones, and, accordingly, the same disassembly procedure
The only difference is the number of wires, since the phase connection is made in several positions at the same time.
Carrying out repair work
In order to repair a room switch, you need to prepare the required tools:
- fine-grained sandpaper;
- Phillips and flat screwdriver;
- indicator screwdriver;
- felt-tip pen.
To ensure your own safety, you must turn off the power supply. You can verify that there is no voltage using the indicator in the socket closest to the switch.
Before you start work, you need to turn off the power to your house or apartment.
Next, the switch is removed from the groove. To do this, remove the decorative cover and check the voltage again, just in case. The side screws are unscrewed and the housing is pulled out of the socket.
The circuit breaker is pulled out of the box before thoroughly stripping the current-carrying conductors.
Then you need to disconnect the wires. If the device is a two-key device, it is recommended to mark the input wire with a felt-tip pen so that during subsequent assembly you do not mix up the contacts.
Next, you should begin disassembling the case. It is necessary to get close to the contacts, which in most cases are the cause of the device malfunction. These structural elements are located immediately behind the key, which is secured with screws. Repairing them is not difficult at all.
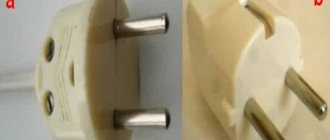
After gaining access, you need to carefully inspect the hemispherical contacts, and if there are signs of burnout on them, you should sand them until a metallic sheen appears. If the carbon deposits do not come off, you can try to remove it using a sharp screwdriver tip.
The housing is assembled in the reverse order, the wires are connected, and the switch housing is inserted into the box.
The switch is secured in the socket after repair using a screwdriver
The machine located in the control panel is turned on and the functionality of the device is checked. If the switch operates correctly, and no extraneous visual or sound effects are observed during its operation, then the device has been repaired successfully.
If the contacts are not cleaned well enough, you will have to disassemble the switch again and repeat all repair procedures.
Dismantling
Another stage that must be completed before repairing a light switch is disassembling its housing. The sequence of actions depends on the type of device.
Two-gang switch
- Take a thin screwdriver or knife and pry the decorative panel with the tool. New models are usually equipped with a special recess that allows you to remove the cover without any tools.
- Unscrew the screws under the buttons. We put them in a previously prepared container (so as not to lose them).
- Unscrew the fasteners and remove the device from the wall. Be sure to mark the location of the switch on the wall.
- Using a marker, mark the wire going to the main terminal responsible for voltage.
Single key switch
We dismantle the device as follows:
- Use a screwdriver to pry up the key and remove it from the switch. Most often, the key is held in place by a retaining plate. It needs to be removed.
- We remove the decorative panel.
- The switch is held on by a pair of screws. We unscrew them and put them in a container for storing spare parts.
- There are holes for wires on both sides of the case. In the case of a single-key device, there is only one wire, so it will be easier to figure out.
Old models
We disassemble the case as follows:
- Unscrew the two screws from the front side. The screws are located on the top and bottom of the key.
- We remove the decorative panel. It is not necessary to remove the key, as it will not interfere with the repair.
- To remove the mechanism from the socket box, unscrew the clamps holding it. Remove the special bracket.
- We take out the conductors from two holes.
Repair algorithm
Dismantling the switch
If the switch shorts, you can repair it yourself, working in stages:
- Line loss. The machine in the input panel is turned off.
- Checking for voltage. This can be done by touching the indicator screwdriver to an outlet in another room.
- Dismantling the device. You will need to remove the switch from the groove and remove the decorative trim. After this, the voltage is checked again, the screws on the sides are unscrewed, and the housing is removed from the socket.
- Disconnecting cables. For two-key models, you will need to mark the input wire with a marker.
- Disassembling the case and searching for contacts. The contact group is located above a plastic button mounted on screws.
- Troubleshooting. The contacts are cleaned or the device is completely replaced.
- Reassemble the case in the reverse order, reconnect the wires. The finished mechanism in the housing is returned to the socket box.
- Turning on the machine in the panel and testing the switch for serviceability.
The neutral wire in the internal wiring system has burned out
This is the most common reason. In the absence of a neutral connection, the phase through the filament of light bulbs in a chandelier, or through electrical appliances connected to other sockets by induced current will also be present on the neutral wire. In this case, the socket, which contains two phases, does not work. This cause can be correctly diagnosed by turning off the electrical appliances plugged into them from all sockets by disconnecting the plugs from the sockets. Next, you need to turn all switches to the off position. If you don’t know in which position the switch is on and in which it is off, you can simply unscrew the light bulbs from the chandeliers and lamps, the effect will be the same. After you have completed all the steps indicated above, you need to check the voltage in the outlet again. You should get the following: there should be a phase on the phase wire, accordingly the indicator gives a light warning, and when you touch zero, the indicator light should not light up. In this case, you should start looking for the cause of the problem:
- in places where paintings and photographs were recently hung on the wall. As a rule, in 95% of cases, such home tuning ends with a broken wire. In this case, you need to turn off the power supply to the apartment (turn off plugs, circuit breakers, package switches) and make sure there is no voltage. Next, remove the layer of plaster and release the wire, visually diagnose the location of the damage and eliminate the fault by connecting the wires and insulating them. After all the work has been completed, turn on the power supply and check the functionality of the outlet. After this, the damaged area can be covered with plaster or gypsum mortar.
- if no work was carried out to update the design of the housing before two phases appeared in the socket, then a possible malfunction may be in the junction box. In this case, you should start your search with distribution boxes, which are located in the room where the outlet is located. We turn off the power supply to the apartment, remove the cover of the distribution box, look for burnt, melted or fallen off wires. If there is no fault in this junction box, open the nearest one. Once you have visually diagnosed the problem, we proceed to fix it. We make a new connection, isolate it, close the lid of the distribution box, turn on the power supply and check the functionality of the outlet.
- in the electrical panel. If you have access to the power panel, you can open it and visually view all the contacts and connections. If you find melted wires, burnt contacts, or wires that have fallen off the connection points, you must immediately contact the organization servicing this electrical panel to troubleshoot the problem. Carrying out independent repairs without relieving tension is DANGEROUS TO LIFE.
How does the filter work?
- Varistors limit surges and surges in voltage and protect devices from failure. You can see their effect in the middle diagram. The first diagram shows how strong the jumps can be. Such bursts will instantly kill your equipment.
- Choke – smoothes the current. These are inductor coils, in essence - a copper wire wound into a coil may have a ferrite core. Installed in series with the circuit.
- Capacitors smooth out the voltage waveform, like an inductor, but are installed in parallel.
To understand why this happens, you need to remember the laws of commutation:
We've sorted out the filters. A logical question arises: if filters need to be installed from the production line, why then are lamps and switching power supplies “noisy”? The answer is very simple, because an unscrupulous manufacturer simply solders jumpers instead of a filter.
When you turn on the light there is a crackling sound in the switch. Why does a socket or switch spark: what to do?
Why does a light switch sometimes spark and crackle?
Probably every person has observed such a picture as when you turn on the light, the switch sparks.
And it sparks more when turned on than when turned off. This question is quite common, but I did not find a specific answer when searching, and therefore I decided to enlighten my readers a little. Let's start in order. When you turn on the switch, especially in the dark, a spark is typically visible in the form of a small short-term flash. Then the light turns on and the sparking disappears. There may be 3 main reasons here.
1 reason:
The contacts of the switch are overgrown with carbon deposits (oxidation) and when approaching each other they create an electric arc, which we see. This is the most common reason for the switch to spark, since the deposits on the closing plates already look like shoots, and they create sparking before the contact is completely closed.
Reason 2:
The spring (plate) pressing the contact when turned on has weakened significantly. Do you hear a clicking sound when you turn it on? It should be sharp and clear, that is, pressed and immediately click. If your switch turns on softly and you literally have to press it with your finger (sometimes the light doesn’t turn on until you press hard), then it means the spring is the problem. Here the sparking process may not disappear, but spark constantly (some people observe it) since the contacts are not closed with the required force and the reason for the sparking is a weak contact.
Reason 3:
The switched light source, chandelier, floor lamp, sconce have powerful lamps (especially halogen), which significantly overload the load on the same closing contacts. Here you need to look at the power consumption of all lamps, and, if possible, change the switch according to the design. That is, in more budget switches, the contacts and plate (spring) are not made very well and can give a “soft start”. You also need to look at what machines are on this line; perhaps their power does not correspond to the load.
Definitely, if your sparking lasts a split second and disappears, or if completely new switches spark, it’s okay; in practice, it has been observed that almost all switches spark when turned on. And if you observe constant sparking, heating of the switch key, as well as flickering of light bulbs in chandeliers and lamps, immediately begin repairing the switch. The switch is rarely repaired (if you only tighten the spring and clean the contacts, but this will not last long), it is usually replaced
It is also worth paying attention to the wiring that goes to the switch and its attachment to the contacts. Sometimes the contact weakens and sparking begins, turning off and heating the key, in this case you need to tighten the screws of the contacts
If you see that the switch is constantly sparking (you can see a glow), heating up, crackling (making noise), you should immediately call an electrician to your home and repair the lighting circuits.
Remember, a sparking switch can become a source of fire!
Electricity is no joke!
masternachasspb.ru
Why does the socket switch spark? Do-it-yourself repair and construction
Quite often it happens that when you turn on the switch, the light begins to flash and sparking, accompanied by crackling, is observed in the switch. Then everything calms down, and the next time you turn it on, everything repeats. The same thing happens
10i5.ru
Practical advice
- If an old-style switch breaks, you can of course fix it, but there is no point in doing so, because... Every part wears out over time, and in electrical work it is very dangerous to use old switches and sockets, especially if they often break down. Today, even such leading companies as Legrand have inexpensive but reliable products, even with lighting, a chain (cord) or a dimmer.
- The reason why the contacts on the key switch burn out quickly is because the light bulbs are too powerful. We recommend replacing incandescent lamps with more efficient and at the same time less powerful light sources - LED lamps. In this case, you can forget about repairing the switch for a long time.
- Before proceeding with complete disassembly of the case, check how well the wires are tightened with screws. You may be able to fix the switch simply by tightening the screws with a screwdriver.
- In order not to confuse the order of assembly of spare parts of a disassembled case, we recommend using a camera: take photographs of each of the disassembly stages one by one and, if necessary, assemble the structure from the photo.
That's all I wanted to tell you about how to fix a light switch with your own hands. We hope that the provided instructions and photo examples will help you repair a switch that does not turn off or turn on the lighting in the house!
Also read: