What you need to know before remodeling
Before converting a screwdriver from nickel-cadmium to lithium-ion batteries, you need to know the answers to some questions.
For example, know exactly the voltage that the old battery produced. You can usually read this information from the sticker on the battery. If there is no such data there or they have been erased, you will have to disassemble the battery pack and determine the voltage value by the number of elements installed in the screwdriver.
You also need to know that, in addition to positive qualities such as high specific capacity, low self-discharge, lack of memory effect, there are a number of features. They are afraid of overcharging, deep discharge, temperature changes - they cannot be heated above 45 degrees. Low temperatures are also dangerous; in the cold, the capacity of devices decreases.
After replacing Ni-Cd with li-ion, you can charge the battery at any time, rather than waiting until it is completely discharged.
Design and types of batteries for screwdrivers
Almost all manufacturers in all countries of the world produce batteries for screwdrivers that are identical in design and principle of operation. Many manufacturers produce batteries for several manufacturers of screwdrivers at once. The battery is removable and looks like this.
Battery from Bosch PSR 14.4 V screwdriver
Disassembling the battery is easy. The cover is held on by four screws. We unscrew them, disassemble the case and inside we see a garland of batteries connected in series.
In our case, this is a battery for a Bosch PSR 14.4 V screwdriver. It initially contains one self-tapping screw covered with plastic. If opened, the warranty will be void.
Battery assembly
"Garland"
Single cell
Since the batteries are connected in series, the total voltage of the battery is the sum of their voltages.
On each such element the values of the rated voltage and capacity, as well as the type of battery, are indicated. Ni─Cd batteries are most often used for screwdrivers, but there are other varieties. Below are the types of cells used in screwdriver batteries:
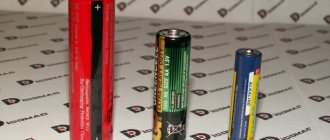
- Ni─Cd. Nickel-cadmium batteries. The nominal voltage of one element is 1.2 volts;
- Ni─MH. Nickel metal hydride. The nominal voltage of one element is 1.2 volts;
- Li─Ion. Lithium-ion. Nominal voltage 3.6 volts.
Types of elements for a screwdriver battery
Ni─Cd
Nickel-cadmium batteries for screwdrivers are the most common today. They have an affordable price, remain operational at low temperatures, and can be stored in a discharged state without losing their characteristics. At the same time, cadmium batteries for screwdrivers also have their disadvantages. These are the toxicity of cadmium (harmful production and difficult disposal), the “memory effect”, fairly high self-discharge and small capacity, a small number of charge-discharge cycles. Recycling car batteries is much easier than cadmium batteries.
Ni─MH
Nickel-metal hydride batteries are less common than nickel-cadmium batteries for screwdrivers. Their advantages include the absence of toxic components, environmentally friendly production, a slight “memory effect” and lower self-discharge than nickel-cadmium batteries. In addition, when compared with Ni-Cd batteries, Nickel-Metal Hydride batteries have a larger capacity and can withstand a greater number of charge-discharge cycles.
Additionally, we recommend reading about how to charge Ni─MH batteries. Disadvantages include high cost and sensitivity to negative temperatures. In addition, Ni─MH batteries lose some of their characteristics when stored in a discharged state.
Li─Ion
Lithium-ion batteries are less common in screwdrivers.
Among the advantages, it is worth noting the absence of a “memory effect” and self-discharge. The capacity of lithium-ion batteries is higher and the number of charge-discharge cycles is many times greater than that of nickel oxide batteries. In addition, the element has a higher rated voltage. Therefore, a smaller number of cells is required, which means that such batteries have less weight and size. Among the disadvantages, the high cost should be noted. When compared with Ni─Cd batteries for screwdrivers, the price of Li─Ion is almost three times higher. It is worth noting that over 2-3 years of intensive use of a Li-Ion battery, the battery significantly loses capacity due to the decomposition of lithium.
Battery design for a screwdriver
There is nothing complicated in the design of the battery. Its analysis was shown above. You just need to add information about the contacts on the case. The battery for the screwdriver has four of them (the Bosch PSR 14.4 V model is being considered).
Screwdriver battery contacts
The following contacts are marked in the image:
- 1 – plus;
- 2 – minus;
- 3 ─ thermistor contact (temperature sensor). A thermistor is needed to limit or turn off the charging current. It is triggered when the temperature of the battery cells increases to a certain value. During accelerated charging, a large current flows through the element and it heats up, and the thermistor prevents its failure;
- 4 ─ this contact is connected through a resistance and is called service. It is used by complex chargers designed to equalize the charge on battery cells.
Preparing an old battery for conversion
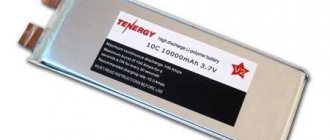
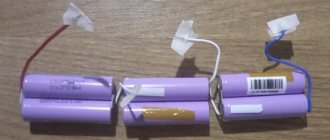
When converting a screwdriver to lithium-ion batteries, you will need high-current elements of the 18650 type. Batteries from old laptops cannot be used, because they have a current output of 3 to 4 A, and the screwdriver battery must be capable of delivering at least 15 A. In addition, the capacity and other characteristics of the batteries should be almost the same. Therefore, it is better to purchase them together from one seller.
The batteries must be charged equally, so they should be charged separately. And only after that put them together.
Those who do not want to solder can purchase a ready-made assembly.
View on Aliexpress
Manufacturing a power supply based on the battery compartment of a screwdriver
Initial data
We have two Chinese cordless screwdrivers in stock. Only one of them has a battery compartment; and even that one, over the years, unfortunately, stopped holding a charge. It did not seem economically feasible to buy a new battery compartment or replace batteries due to the fact that its cost is often comparable to the cost of a new similar screwdriver.
Result of the work performed
The inside of the battery compartment has become unusable
Task
Upgrade the battery pack to obtain an easy-to-use power supply from mains voltage with low financial costs. In the end it came out to about $7, since there was a lot in stock.
PSU manufacturing
List of elements used:
- Step-down transformer 220/12 (was available)
- Diode bridge KVRS 2510 ($1.5)
- Adjustable Voltage Stabilizer 20A ($3)
- Capacitor 10000uF/25V ($1)
- Two diodes (were available)
- Network connectors 4 pieces ($1)
- Fan 12V (was available)
- Radiator (was available)
List of necessary tools, in addition to standard ones:
- Construction hair dryer with temperature control - for extruding the desired shape of a plastic case
- Mini-drill engraver - for grinding and finishing holes for plugs
- Soldering iron 100W - for straightening plastic
- Three clamps for extrusion
Sequence of work:
Making holes for the stems
To do this, we use a powerful 100W soldering iron. Plastic melts well. We remove the remains with pliers and modify the hole to the required shape with a mini-drill with the necessary attachments.
We make holes for the remaining two plugs in the same way.
Transformer installation
Due to the fact that the available transformer did not fit slightly (by 4 mm) into the battery compartment, it was decided to enlarge the latter by squeezing out the plastic when heated.
ABS plastic softens noticeably after 100 degrees Celsius. We secure the block together with the transformer using three clamps and remnants of chipboard. Gradually heat up the plastic with a construction hairdryer and tighten the handles of the clamps in parallel. We achieve the desired degree of extrusion and let the plastic cool. After this we remove the load.
As a result, we obtain an acceptable block shape.
Installation and testing of “electronic filling”
The connection diagram of the elements is quite simple.
Transformer - diode bridge - voltage stabilizer - capacitor.
A radiator was attached to the transistor to remove heat. Additionally, a fan is connected to improve air circulation. I also subsequently made a dozen holes in the case to improve air circulation. The capacitor was placed in the vertical part of the block. The output voltage was set to 14.4V
Plugs and reverse polarity protection in screwdriver housings
A diode was added to the wiring inside the screwdrivers to protect against over-reversal.
Finish photos
Result
Supply voltage at the power supply output without load = 14.4V.
At idle, when one screwdriver is connected = 12.8V (current 1.3A) In operating mode, the current approaches 3A. At idle when two screwdrivers are connected = 10.2V
To use the power supply, three power cables were soldered in length: 2.7 m, 4.9 m, 10.4 m. The voltage drop when using them, respectively: 0.2V - 0.3V - 0.9V (at idle, i.e. e. current 1.3A)
The temperature regime when operating two screwdrivers in XX mode for three minutes is satisfactory. The temperature rose to 55 degrees Celsius.
Video (photo collage) showing the manufacturing process:
Video showing the process of demonstrating the work:
PS There is a suspicion that there are too many photos in the post. If this is the case, I apologize. The first post - it’s not entirely clear to what extent everything needs to be presented and shown.
Selecting a battery assembly scheme based on capacity, voltage and available space
Depending on the voltage required for power, we determine how many 18650 batteries for the screwdriver need to be connected in series. Dependence of the number of batteries on voltage:
- for 12 volts – 3 pcs.;
- for 14 volts – 4 pcs.;
- for 18-20 volts – 5 pcs.
If space allows, then to double the capacity, you can connect the same number of batteries in parallel to the existing ones.
Operating principle of the charger
This is done instrumentally using changeover contacts actuated by a reverse lever. Although this current is directly related to the maximum operating current, therefore there are usually no problems here.
In addition, sometimes a connector is provided for balancing screwdriver batteries. In most cases, repairing a screwdriver ratchet consists of cleaning its components from dirt and applying new lubricant. Drilling holes for the lithium polymer battery is also not a problem. Now, carefully, remove the switching mechanism from the housing, holding the return spring.
And to use a screwdriver while the battery is charging, you can make a power adapter. After the last discharge of the battery, it is disconnected from the charger and stored without connection to the screwdriver.
How to do something yourself, with your own hands - home craftsman website
The operating time of the U1 chip is set to one hour of operation, after which power is removed from the transistor Q1 and, accordingly, from the relay. After such a repair, the button will serve for some time, but you will still have to buy a new one! By increasing the tightening value, you screw the screw in deeper. To do this, complete disassembly of the screwdriver is not required.
During training, charge the battery for about 10 hours to provide it with the maximum possible energy. We hope you found the article useful. Disassembling the unit, for example, to repair the battery of a Hitachi screwdriver shown below, is very simple - unscrew the screws around the perimeter and disconnect the case. A reduced alternating voltage of 18V from the secondary winding of the transformer is supplied to the diode bridge through fuse FU1.
The capacity of the standard battery is 1 Ah. The screwdriver is equipped with a double-sided bit, photo 3. We assemble a 12V screwdriver battery with a capacity of 5 Ah.
What BMS board is needed and how to connect it
Lithium 18650 batteries are susceptible to overcharging and deep discharging. When connecting elements in series, it is impossible to guarantee synchronous operation of the elements. If one bank has a smaller capacity, then when charging it will be replenished with energy faster than the others, and upon further charging it will recharge. During operation, a battery with a smaller capacity will discharge faster than others, which can lead to a deep discharge.
A protection board with balancing will help solve all these problems. BMS boards:
- protect against short circuit;
- are restored after the protection is triggered;
- monitor the voltage on each bank and turn off the load when at least one of the cells is completely discharged (deep discharge protection);
- carry out balancing (overcharge protection).
The BMS board for a screwdriver must withstand a maximum peak current of at least 30 A. In addition, when choosing, you need to focus on the number of cans connected in series. A 12V screwdriver requires 3 batteries, select the 3S board. If you need a 14 V source for power supply, then we buy 4S, and for 18 V we buy 5S.
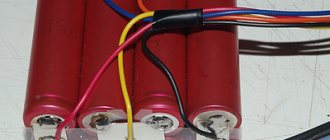
How to connect 2, 3 or 4 banks in series to the BMS board is shown in the figure.
A mixed series-parallel connection can also be used. In this case, we connect the same number of batteries in parallel to the series-connected banks.
Malfunctions of batteries for screwdrivers
As a rule, when a Ni─Cd battery for a screwdriver malfunctions, one or more battery cells fail. Therefore, the first priority when repairing a screwdriver battery is to identify the failed elements.
When diagnosing elements, you will need a multimeter to measure voltage. On Ni─Cd and Ni─MH batteries, the voltage is in the range of 1.2─1.4 volts, and Li─Ion – 3.6─3.8 volts.
Total series voltage
Voltage of one element
What should I do?
- Fully charge the screwdriver battery;
- Disassemble the body;
- Measure the voltages of all elements and mark those whose voltage is lower than the rated voltage. The rated voltage is marked on the body of each can. Typically, they are wrapped in a paper casing;
- Then apply a load to the battery (turn on the screwdriver). If you don’t want to assemble it again, then connect a load in the form of a 12-volt light bulb to the terminals of the “garland”;
- After some time, measure the voltage on the elements again. Those banks whose voltage differs from the average by 0.5-0.7 volts must be restored or replaced. During a visual inspection, special attention should be paid to cans with traces of corrosion and smudges.
Discharging the screwdriver battery with a light bulb
Then work is carried out with the elements that are diagnosed as faulty. More on this below. And here it is also worth mentioning such malfunctions as soldering failures at the junctions of elements, failure of a temperature sensor, etc. But these types of breakdowns are very rare and do not deserve attention.
Spot welding
The safest way to join cans is spot welding. Its essence is as follows: electrodes are pressed to the welding site. A large current is passed through them for a short period of time. During this time, the metal of the plate has time to melt and weld to the battery. In this case, heat does not have time to penetrate inside the battery and cause harm to it.
It works like this:
- We place the cans that need to be connected on a flat surface; for convenience, they can be wrapped with electrical tape or tape so that they are positioned in the same way as in the finished assembly;
- We place connecting tape on top of the battery;
- We press the electrodes to the tape and turn on the current.
You can purchase a spot welding machine or make it yourself.
Restoration and repair of Ni─MH, Ni─Cd batteries
As for lithium batteries, their recovery is impossible. During operation, lithium decomposes in them and after 2-3 years there will be nothing left to restore. In this case, you just need to replace the failed elements.
But we can still work on Ni─MH and Ni─Cd batteries. In short, the technique for restoring this type of battery boils down to passing current through it in short pulses. The current must be tens of times higher than the capacity of the Ni─Cd element. In this case, the dendrites are destroyed and the battery is, as it were, “restarted”. Next, it is trained in the form of several charge-discharge cycles.
However, the above method often does not help, and after a while the batteries refuse to work again. The problem is that during operation in Ni─Cd batteries, the volume of electrolyte decreases. Therefore, the method of adding distilled water inside the element is used. Read more in the separate article “Ni─Cd batteries restoration and repair”.
What do lithium batteries look like?
Most lithium devices are housed in a prismatic body, but some models are cylindrical. These batteries use roll electrodes and separators. The body is made of aluminum or steel. The positive pole goes to the housing cover.
In prismatic configurations, the electrodes are in the form of rectangular plates. To ensure safety, the battery is equipped with a device that acts as a regulator of all processes and opens the electrical circuit in critical situations. Increased sealing of the housing prevents electrolyte from leaking out and oxygen and moisture from penetrating inside.
Converting a 12V Hitachi screwdriver to 18640 lithium batteries
Features of converting a 12 V Hitachi screwdriver to lithium batteries. The very compact battery cell socket is designed for finger-type cells. Therefore, you should prepare space for 18650 elements. It is necessary to cut one side of the partition in order to tightly place 1 element.
You need to get flux, flat metal connecting tape, hot glue. It is necessary to install lithium batteries in a screwdriver during remodeling through a protective controller. It should handle 3 18650 cells, 3.7V and rated at 20-30 amps.
Remove the old battery from the socket, carefully disconnect the contacts in the assembly with the temperature sensor and power indicator. Clear and sign contacts. They should be brought out in one direction, connected with solder to the leads from thick wires, and the assembly should be filled with hot glue.
Assemble an energy source with one of the controllers designed for 3 elements. Assemble a sequential circuit of 3 Li-ion elements. Connect the controller. The 12-volt lithium battery conversion is complete when the structure is installed in the block, secured, and the charging indicator lights up. After full charging, measurements show 12.17 volts in the external network. But this is enough for trouble-free long-term operation of the device.
Battery cell connection methods
The block that accumulates energy can be assembled in different ways. There are three types of assembly:
- soldering;
- spot welding;
- cassette.
You need to solder as quickly as possible, so you need a powerful soldering iron of about 100 W. Lithium batteries are afraid of overheating, so they should not be heated for a long time; high temperatures will cause damage. If you lack experience, you should resort to the services of a professional.
The technique of connecting elements into a block using spot welding is considered the best. A master who has a special welding machine can do the job better.
Special cassettes are considered not a very reliable method. The resulting contacts have significant contact resistance, which will quickly begin to deteriorate at high current.
The elements are connected in series, then the voltage is summed, but the capacitance value does not change. Batteries connected in series do not all fail at the same time, therefore, in some cases, from two batteries of a screwdriver, you can restore one working bank by selecting serviceable ones. But we must keep in mind that it will not last long. Therefore, experts advise resorting to such repairs in rare cases.
Tips from home craftsmen
Despite the large selection of professional and household tools in stores, many home craftsmen make these tools with their own hands from simple and affordable materials.
How to make an electric screwdriver with your own hands
Most often, craftsmen make a mini cordless screwdriver with their own hands for disassembly, assembly and repair work with office equipment, electrical toys and other types of fasteners with miniature screws, bolts and nuts. For these purposes they use:
- four 1.5 volt AA batteries with a housing from an old spray gun;
- two three-pin metal toggle switches;
- 6 volt electric motor and gearbox from a children's toy;
- plastic magazine for bits;
- two plastic bottles.
In addition, you will need inexpensive materials and standard household tools:
- silicone glue;
- plastic strip;
- insulating tape;
- scissors;
- screwdriver;
- wire cutters;
- soldering iron
Video: how to make a mini electric screwdriver with your own hands
Converting an electric screwdriver to lithium batteries
It makes sense to replace the NiCd batteries in the cordless screwdriver with lithium ones. The benefits are obvious:
- Li-ion batteries are used more often and are easier to buy;
- they can be charged without waiting for complete discharge;
- The capacity, and therefore the power, of lithium batteries is greater than that of their cadmium counterparts.
Here we will consider an example of converting a cordless screwdriver to lithium batteries, which are used in the repair of system units, printers and other office equipment. Therefore, it will be charged from the computer port.
Tools and materials
To convert to lithium you will need:
- charge controller board TP 4056 without protection (can be purchased at any radio market);
A board for charging lithium batteries is sold in computer markets. - lithium batteries from a laptop;
- connecting wires of various lengths;
- set of files;
- hot glue gun.
To reduce the standard charging current of the board from 1 A by half, you should solder a resistor with a resistance of 1.2K to a resistor of 2.4K.
Sequence of work
Replacing batteries is quite simple; special electrical skills are not required.
- Carefully separate the halves of the housing.
To do this, unscrew the screws and remove one half. The screwdriver body is disassembled into two parts after unscrewing all connecting bolts - We take out the old cadmium batteries and figure out where to place the USB socket.
An acceptable option is in the plane of the connector. After disconnecting the NiCd battery pack, you need to determine the location for installing the USB connector through which the device will be charged. - Using a cutter, we cut out a recess in the plastic case at the junction for USB and charging LEDs.
The body of the screwdriver is usually made of thick plastic, so it is better to use a special tool to make the hole accurately. - We insert the lithium battery and charging controller into their places.
We connect wires between ourselves and the electric motor. Fix with dielectric paste. We place lithium batteries in the screwdriver handle and connect them to the charging board and to the electric motor - Assembling the body of the battery screwdriver.
To do this, degrease the joint and apply glue. Then we press the halves of the case against each other and tighten them with screws. Degrease the joint and apply hot glue to it - We connect the charging cord to the turned on computer and to the USB socket on the screwdriver body.
To check the correct assembly, you need to connect the screwdriver to the computer - the charging indicators should light up - We are waiting for the charging process to complete.
As soon as the indicators turn blue, you can start using the screwdriver. The screwdriver can be used after the indicators turn blue
Video: converting a screwdriver to a Li-on battery
Converting a cordless screwdriver into a corded one
This work is done in the following order.
- Unscrew the body halves, not forgetting to unscrew the hidden screws.
- Remove the old batteries from the battery by cutting off the wires and insulating the ends.
- Find out the voltage from the markings on the handle.
- Remove the old charging adapter.
- Instead, choose a new power adapter, with a current limit slightly higher than the rated voltage.
- Reassemble in reverse order.
In the simplest version, instead of a battery, you can insert a power adapter into the screwdriver and pull out a cable with a terminal connector