How to connect a switch with one key: rules and connection diagrams To control household electric lighting sources, various devices are used, the most common of all is the switch. This is a simple device located on the wall and connected to wires. The design of the products is different, but the internal circuit diagram of the single models is the same.
In our material we will tell you how to connect a switch with one key in order to quickly make repairs. For convenience, several connection methods will be given with thematic photographs clearly demonstrating the installation process.
In what cases is it necessary to replace the switch?
There are a number of reasons why a switch may need to be replaced. This:
- Breakdown . A switch with a broken key affects the convenience and safety of use.
- Wear . Although switches last for decades, sooner or later they wear out.
- Installation of a different type . Often it is necessary to replace a one-button switch with a two-button one or a regular one with a touch switch.
- Repair work . These elements become part of the overall interior of the room, so during renovation they are often replaced with new ones.
Sometimes the reason is the desire to change your appearance.
Switches are inexpensive, and replacing them takes only 10-15 minutes. But for this you should study the instructions in detail.
Role of the power supply
The ATX power supply, or Power Supply in English, on the one hand, is only a minor element of the entire computer system, which supplies current to all its nodes. At the same time, it is also the main source of voltage and, among other things, a “rectifier”.
After all, an alternating current of 220 volts comes from a home outlet. But for the operation of the internal components of a PC, only a constant voltage of no more than 12 V is required. Actually, this is the main role of the power supply - converting alternating voltage into direct current.
Thanks to this device, all elements of the system function:
- processor (the brain of the PC);
- motherboard (the basis of everything);
- video card (no way without it);
- hard drive (data storage);
- RAM sticks (volatile part of computer memory);
- disk drive (if present) and other components.
In this regard, we can conclude that the presence of an ATX power supply is strictly necessary. Otherwise, the PC simply will not work.
Step-by-step instructions for replacing switches
The work process for replacing the switch consists of several stages. It starts with preparation, then moves on to dismantling, disassembling and installing a new one.
Preparation
First you need to prepare all the working tools and materials that will be required. The basic list includes:
- Voltage indication tool.
- Screwdrivers (it’s better to take several Phillips and flathead ones).
- Pliers.
- Insulating tape.
- Stationery knife.
- Flashlight (it will be more convenient to work with a headlamp).
Some people decide to use the indicator as their main screwdriver. It is better not to do this so as not to damage the instrument.
Everything you need should be at hand.
If the need for replacement is caused by a malfunction of the lighting in the room, then first you should make sure whether the problem is really in the switch. To do this, you should check the operation of electricity in other rooms, the serviceability of the light bulb and socket.
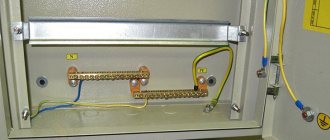
Before starting work, the apartment must be de-energized. The machine can be installed either inside the apartment or in the electrical panel on the floor. The absence of voltage must be checked with an indicator.
Important element
During long-term operation of a personal computer (PC), various types of malfunctions may arise, which experts conditionally classify into one of two groups:
- software;
- hardware
Software failures are caused by improper functioning of the software itself.
Hardware problems already imply physical malfunctions of any computer component. In this case, the presence of a breakdown in any of the groups requires timely intervention by a specialist.
Removing the old switch
To remove the old device, you must first remove the protective cover. It is fixed with two screws, which are located on the sides or under the button. If the fasteners are under the button, then you need to remove it by slightly prying it with a screwdriver or your fingers.
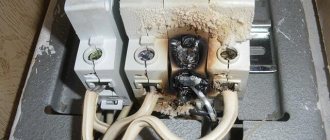
The single-key switch is installed in the socket box and is held there by spacer tabs. The design has screw terminals with connected wires. Before dismantling, it is important to figure out which core the phase is going through. An indicator is used for this. To determine the phase, you need to turn on the voltage, so it is important to be as careful as possible.
The fixation elements are located under the button.
After this, you need to turn off the voltage on the machine and continue removing:
- Unscrew the fixing elements of the spacer legs.
- Pull the switch out of the socket.
- Disconnect the wires: first the phase one, then the other.
Advice! To avoid confusion in the future which wire is phase and which is not, you need to mark it with a piece of electrical tape.
Step-by-step removal of the switch in the apartment
The internal switch has a simple design with one or more keys; its removal is carried out in several steps:
- The electricity supply to the apartment is automatically turned off.
- The keys are carefully pryed off with a screwdriver or other similar object and removed.
- The switch frame is removed.
- Then you need to unscrew the screws that secure the device to the wall.
- Pull the switch out of the socket.
- Disconnect the wires.
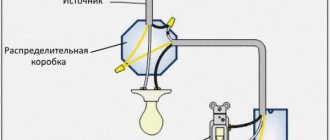
Single-key device diagram.
To avoid problems connecting a new device, you need to take a photo of how the wires are connected to the old one.
Working with wiring
Before replacing the switch with a new one, you need to make sure that the wiring is working properly and prepare it. In some rooms, a hidden wiring option is used, when the switch is installed in a special box. There is also exposed wiring with overhead products.
When dismantling the old switch, the phase wire is checked; it is important not to mix it up. If there is even slight damage on the surface of the wire, it is better to cover it with electrical tape.
Installation of a new switch
To replace the light switch design with a new one, you need to proceed as follows:
- Strip the ends of the wires to 10-15 mm of insulation. To do this, use a stationery knife or a special tool.
- Insert the cleaned wires into the contact holes of the new switch. The previously designated phase wire is inserted into the hole, which is marked on the device as L1. The neutral wire is inserted into input L2.
- After this, you need to fix the wires by tightening the contact screw. To check the tightness, you can lightly pull the wire, it should remain in place.
- The switch is inserted into the socket box and fixed inside with sliding strips.
- Next, the switch frame is inserted and screwed.
- The last step will be to install the keys. They are usually attached to special clamps.
After installing the new device, the electricity supply to the house is turned on automatically and the functionality is checked.
Types of devices for household use
There is no strict division into categories, since different manufacturers have their own “branded” model ranges, but several types of switches can be distinguished, united by one characteristic.
The two most common types of modern switches are the single-key wall-mounted model and the control panel, which is usually supplied with the lighting fixture.
For example, according to the principle of inclusion, all devices can be divided into:
- mechanical - elementary keyboard devices, easy to install and use (the function of a key can be performed by a lever, toggle switch, button, cord, rotary knob);
- electronic sensors activated by the touch of a hand;
- with remote control , equipped with a remote control or motion sensor.
The first group is considered the most popular, traditional and recognized from the first days of the invention of the electrical circuit; the popularity of the third is also gaining momentum, but the second somehow has not caught on.
Motion sensors save energy and serve as additional protection. For example, if you install such a device at the entrance to the house, it will signal the arrival of uninvited guests.
In residential premises, it is preferable to install internal models (with or without lighting), which do not protrude above the wall surface and look more aesthetically pleasing
According to the type of design, all switches are divided into single-key and multi-key (standard design for household use - with 2-3 keys). Each key serves to close/open one lighting circuit.
If there are several lighting fixtures in the room - a chandelier, ceiling lighting and sconces - a three-key switch is appropriate, which will allow you to turn on/off the devices alternately or together.
Also quite popular are two-key switches, which can be seen in almost every apartment. They are especially relevant for chandeliers with several lamps.
Based on the installation method, two groups can be distinguished: with external and internal installation. The external type is usually used when the wiring is exposed, and the internal type is used with cables sewn into the wall. To ensure the safety and stability of the installation of the built-in switch, use a mounting box (socket box) - a protective plastic case.
Based on the installation method, switches are divided into built-in and surface-mounted. The former are used for closed wiring, the latter for open wiring. Both options are installed according to similar schemes
Circuits and connections
Features of connecting wires to the switch depend on what type of device is selected. Before starting work, you should familiarize yourself with popular schemes.
Single-key option
Connecting a switch with one button is the simplest. Its peculiarity is that only two wires are connected to the corresponding contacts, regardless of whether it is an internal or external version:
- First, you need to clean the edges of the wires (strictly with the power off).
- Insert the contacts into the special compartments. For the phase contact, which is usually red, compartment L1 is intended, and for the other wire (blue or black) - L2.
- Screw clamps secure the contacts into the compartments.
- The switch is inserted into the socket box and secured in it.
- The functionality of the device is checked.
Wiring diagram for a single-key switch.
More details about connecting a single-key switch are described in this article.
Two key connection
When connecting a two-key device, follow the same instructions as when connecting a single-key device. The only differences are in the connection diagram, which here consists of three terminals.
A single phase wire is inserted into the compartment marked L3, paired wires are inserted into L1 and L2 (it makes no difference).
Connecting this type of device is even a little easier, because the phase wire always goes separately from the paired wires.
Changing one-button to two-button
Sometimes people decide to replace an old switch with one key with a new one with two. This is often done during renovations, when several more lamps are added to the room in addition to the main chandelier.
From new light sources you need to run wires to the phase wire, which was connected to the old switch and to the common wire from the ceiling. In the switch itself, everything is as usual, the phase wire is inserted into the corresponding connector.
From the video you will learn how to change a single switch to a double or triple one.
Installing a switch with a dimmer
The connection diagram for a switch with a dimmer is not much different from connecting a conventional single-key device. According to the instructions, the corresponding wires are inserted into the terminals and fixed there.
Control circuit with dimmer and one pass-through switch.
You need to match either the switch to the light bulbs, or vice versa. There are special dimmers for LED lamps, incandescent lamps, etc. There are also dimmable light bulbs.
How to connect a one-key switch to two light bulbs
If you need to turn on two light bulbs located in different places simultaneously from one switch, the same connection diagram is used.
The current supply to the lamps is controlled by a single switch, but the connection options for the lamps themselves may vary.
New cable in box
Another cable is inserted into the junction box. The ends of the conductors are stripped and connected to the same terminals as the first lamp. This will take up some additional space inside the box, but if there is enough space, then nothing bad will happen.
One way to connect two light bulbs to one switch is to connect both pairs of wires to the same terminals
Safety rules at work
Although replacing a switch is a simple task, it remains extremely dangerous. Mistakes made can lead to fire, failure of lighting equipment, or even electric shock to the person carrying out the work.
Basic safety rules:
- Power outage . Anyone can accidentally touch a bare wire, so before work, be sure to turn off the apartment’s circuit breaker.
- Studying the instructions . Switches are produced according to standards, but sometimes there are unique options with other connection schemes. Before installation, be sure to read the instructions.
- Protective clothing. Rubber gloves are a must. Safety glasses and special boots will also be useful.
Rubber gloves and suitable tools. - Instrument insulation . It is better to use tools with a rubber handle. They can also be additionally covered with electrical tape.
Visual inspection
Here you no longer need to think about how to turn on the power supply without a motherboard - this is simply not necessary. However, you will still have to remove the device from the system unit. To do this, unscrew the side panel fastening (it moves to the side, opening access to the inside of the computer). Then it remains to unscrew the bolts holding the device itself.
After the power supply is removed, you need to unscrew the screws already on its cover and remove it. Now you should carefully conduct a visual inspection of the inside, especially focusing on the capacitors. On their surface you can see a cross-shaped “cut”, which is due to structural necessity. If it is smooth, then these elements are in order.
Swollen radio components (this can be easily determined by the diverging “cuts”) have already served their service life and need to be replaced. They should be removed from the circuit, and new radio components of the same rating should be installed in their place. This work can be done by any user who knows how to hold a soldering iron.