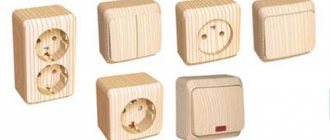
Installing a light switch is mandatory during the renovation process, because the switch is one of the main elements of the lighting system. They are in every building. The operating principle of these electrical devices is the same, but their design may be radically different, and installing a light switch requires special knowledge. There are many types of them: these include modern models and retro switches with keys, rotary knobs, and toggle switches. They are all easy to install, but it is important that they are installed in the correct location and in compliance with safety regulations.
It will be useful for a home craftsman to know what kind of light switches there are for lamps, chandeliers or just light bulbs, which model is intended for what, what installation features exist and what is required for this, what wiring is used in this or that case. Here you will learn how to properly install a light switch so that it works for a long time and perfectly. We will talk about the operational features of different types of these devices, as well as the stages of installation yourself.
Switch design
All devices have a common fixed contact and one or more movable ones, driven by external keys on the body. The normal position of the contacts is open, that is, in the off state, when the electrical circuit between the light bulb and the power source is interrupted and there is no light in the room. When the user presses a key, the moving contact connects to the fixed contact, the circuit is closed and electricity flows to the lighting fixture or socket.
Two-, three-, and four-key switches work the same as single-key switches, but the moving contacts move independently. Wires of a separate line are connected to each of them; they branch from the device either to different lighting fixtures or sockets, or go into one chandelier to different light bulbs. Multi-key switches save space on the wall, simplify installation work, and with their help you save energy, since you can easily turn off an unnecessary number of lighting elements or other electrical appliances. Key combinations are used to illuminate the room zonally or divided by levels, and using timers - by time. Using walk-through switches, you can turn off the lights by walking through the room and without returning to the entrance.
In all types of switches, a phase is broken in the circuit; in any case, this should be the case for the safety of users when repairing these devices, lamps or chandeliers, or replacing light bulbs in sockets.
Availability of backlight
Next we'll look at how to install an illuminated light switch.
Any type of switch can be additionally equipped with backlighting. Thanks to this, the problem of finding it in the dark will disappear. But this option will slightly increase the cost of work and complicate the installation process of the device.
Before proceeding with the installation of a double backlit switch, you must have at least a superficial understanding of the structure of its mechanism, the purpose of the terminals and contacts on it.
The set of switches of this type includes a neon lamp, which provides illumination. Here, on the switch, a backlight circuit is installed, consisting of a current-limiting resistor and a neon light bulb.
The light bulb and resistor are soldered to pins L and L1. The lighting system in this device works in reverse: when the light is turned off, the switch contacts open, and the neon lamp wires, on the contrary, turn on the backlight. Otherwise, the installation of the switch depends on its type (single-key, two-key, three-key).
Switch types
We will not list the types and types of electrical devices for turning off the lighting, but we will describe their two main modifications.
- Electrical switches for outdoor installation. Designed for installation in wet rooms (bathrooms, bathhouses, utility rooms, pump rooms). They are mounted on wall surfaces without making a recess. External ones are easier to repair and maintain, but in aesthetics they are somewhat inferior to internal models.
- Electrical switches for hidden installation. To install them, you need to drill a recess in the wall for the box and trench the wall for laying the wiring. However, retro wiring is usually done externally. Interior styles of the early twentieth century with the use of retro-style switches and lamps are the original fashion of our time.
Installing some and other types of switches does not require much time if you know the features of the device of a certain model, the installation sequence, and also prepare the necessary set of tools.
Compliance with safety regulations
Well, we’ve figured out how to install switches - one of the simplest electrical installation jobs that does not require special skills and talents. If you study everything in advance and understand what, how and why exactly this is done, then you can easily and quickly carry out this hitherto unfamiliar procedure for installing a switch.
And one of the most important points is compliance with safety precautions, otherwise the current strength will test your strength. And there are not so many safety rules:
- Before starting work, stop the power supply by turning off the circuit breakers in the electrical panel. Take measures to exclude the possibility of re-applying voltage.
- All tools must be in good working order. It is necessary to check for damage and chips on the insulating parts of the instruments.
Where to install switches
The user chooses the installation location where it is most convenient for him to use it. However, there are now industry requirements governing how and where switches are installed, as well as the installation process itself. This is due to the peculiarities of electrical wiring, depending on the structural elements of the room or building. The main difficulties in installation are associated not with the installation of the switches themselves, but with the laying of electrical lines. The wiring must be designed and laid initially so that it does not have to be redone later, which is quite troublesome and costly.
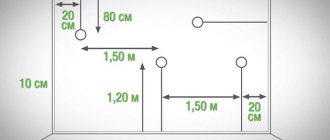
It is recommended to place switches in one room, all on the same level, and make the position of the “on” keys the same for everyone. The “on” position is usually made up, and if it is a rotary knob (as in retro switches), then to the right. Now switches are placed at a height with the level of door handles, which is more convenient to use, especially for children and people with disabilities. Having become accustomed to this arrangement, a person automatically turns the light off or on without even noticing it. The location of the switch relative to the door frame is also important. The distance between them should be no more than 20 cm and no less than 10 cm, and the switch should be located on the side of the door handle.
In living rooms, installation is done inside, in utility and technical rooms - outside. Passages are made in the corridors; they are also installed on both sides of stairs, halls with two or more entrances and exits, in private houses on the porch and inside the building.
Deciding on the height
When answering the question of how to install a light switch, the installation height is the last thing people think about, although it is precisely in this nuance that a serious mistake can be made. The location of the devices must be easily accessible for maintenance. Installing switches inside small enclosed spaces (such as closets, closets, dressing rooms, boiler rooms, bathrooms) is not safe. This makes it difficult to access them in case of an emergency.
In the case of bathrooms, the switch should not be located close to the water source. To prevent electric shock, it is prohibited to install them near conductive structures of the building or household appliances. They should be placed at a distance of at least half a meter from metal radiators of the heating system, water pipes, sinks, gas stoves, etc.
It is advisable to choose places for installing switches so that the person turning the lighting off or on can see the lighting devices connected to it.
The standard mounting height for switches is 1.5-1.8 meters from the floor. This way, you will limit access to electrical appliances for small children and pets. Switches in individual rooms are usually located near the front door on the doorknob side. Quite often you can see switches located below one and a half meters. This height is standard for European countries and is increasingly used in new buildings and country houses in the CIS. We looked at what height the light switch should be installed.
Types of wiring and connection methods
The word “wire” means one insulated core, while two- and multi-core wires are called cables. The insulation can be single-, double- or multi-layer; there are also shielded cables to protect against electromagnetic disturbances that affect the operation of electrical devices when the electrical circuit is turned on or off.
Wire and cable cores are made of aluminum or copper. In modern buildings, aluminum wires are no longer used, since the standards require only electrical wiring with copper cores. In old houses, the use of aluminum wires from those times is allowed, but provided that the wiring still complies with safety standards. However, during a thorough reconstruction of such premises, aluminum wires must be replaced with copper ones. This is due to the fact that copper can withstand heavy loads, because now many electrical household appliances and devices are used that can operate simultaneously. The following consume especially a lot of electricity:
- boilers;
- microwaves;
- electric radiators;
- boilers;
- washing machines.
Copper wires are more durable than aluminum wires, they are not as brittle and less susceptible to oxidation. If there is a line with aluminum wires in the apartment, then it should not be crossed with copper wires at the connections. Oxides quickly form on such twists, which do not allow current to pass through; such places become very hot, which can cause a fire.
Wire cores can be monolithic or consist of many threads. Multi-wire braided conductive elements are more flexible than solid ones and are more resistant to breaking under multiple bends and twists. Single-core wires with a solid core are used in the assembly of electrical panels, chandeliers, lamps, they connect line control elements, but they are not used to power devices and equipment.
The two-core wire is suitable for connecting single-key switches. Three-wire - for models with two keys, for walk-through, for controlling several lamps or individual lamps. Four-core cables are used in three-key devices to control groups of lighting fixtures and where grounding is necessary.
PVS wire
It is used in electrical network repairs. They are used to make tees, extension cords, cables for powering household appliances, for connecting sockets and switches.
PBPP wire
It has a flat cross-section with two or more braided wires. UPS brand, these are universal wires. Wiring made from such wires is considered high quality, and it is much more expensive. It is carried out where large electricity consumption is expected - in pumping stations, in heating stations, in factories with machine tools, in electric dryers and other facilities where the network power exceeds 1 kW.
It is important to know not only the markings, but also the insulation colors inherent in certain current-carrying channels:
- yellow or green - grounding
- blue color - “zero”
- brown - phase.
In special brands of multi-core cables, the phase wires are with white insulation. The letter “L” with a digital value indicates connection points on the diagrams.
Installation principles
If we do not take into account the complex installation of wiring systems with pass-through devices, the connection of which we will discuss below, then there are two main circuit diagrams for connecting switches:
1. Switching conductors directly from the power source to the lighting elements. Two lines are connected to the switch body: “0” and phase. It actually interfaces with the junction box.
This scheme is the simplest, although it is used to implement complex connection schemes; any home craftsman can understand it, having only basic electrical knowledge. Wiring is quite easy to maintain and upgrade. However, it requires a larger amount of cable, and the wires should be laid in corrugation or grooves. Contact connections must be made using blocks in mounting boxes. Such wiring can be modernized without much difficulty, its configuration can be changed, without adding new lines, and a simple light point can be made multifunctional. Direct connection to the energy source makes it possible to supplement the line with lighting level regulators and motion sensors.
2. Remote switches. This method involves wiring through distribution boxes, and connecting wires to switches only to open the circuit.
In modern apartment buildings, such a scheme is considered standard, although the PUE does not prescribe any mandatory specific schemes. Such electrical lines use a minimum of wires, and the tradition comes from the times of the USSR, when they saved on everything. The line diagrams are also simple, and almost every apartment owner can implement them.
The complexity of installing a device in such schemes lies in the need to install additional wiring boxes on each switch. This is not suitable for the aesthetics of Euro-style walls. Yes, and modernization also has its difficulties: in order to install an additional lighting device, it is necessary to lay a new line. Changing a remote device to a touch-sensitive lighting controller (not resistor-based) is not entirely easy. The circuit is used only with the use of single-key switches without any proposed modernization. The owner decides which circuit to use in the house, based on what electricity costs are acceptable to him.
conclusions
Electrical switches are a fairly simple device, and to understand their system component, it is enough to understand the installation of at least one of their many varieties. Using examples of installation of switches of different types, one can clearly trace a single algorithm, which will logically change in proportion to the complexity of the device design itself. All you have to do is substitute new variables, taking into account the features of the new switch and the tasks that you set for it.
If you decide not to seek the help of specialists, the main thing is to adhere to the basic safety rules when working with electrical appliances described above. Don't start work unless you're sure you have everything figured out.
In addition, if you still have questions, or the installation and connection diagrams are not detailed enough for you, there is nothing wrong with using the video instructions presented above.
How to install a switch correctly: step-by-step instructions
1. Before installation, you should prepare the necessary tools and materials. You will need both electrical and construction tools:
- hammer drill, grinder, drill, screwdrivers
- assembly knife, tool for stripping wires from insulation
- soldering iron and solder or welding device for wires
- phase indicator, voltmeter
- wires, insulating tape, heat-shrinkable tubes, contact groups, corrugation
- putty knife.
2. If lines have not yet been connected to the location of the switches, then you will need a wall chaser. However, this is a professional tool, and not every home has it, so the grooves will have to be made with a grinder, or, in the worst case, with a chisel and hammer if the footage is small. Note that in some concrete floors it is very difficult to make grooves even with a grinder. But in brick or gypsum blocks, grooves for wires can be made with hand tools.
3. At the next stage, using a hammer drill and a special cylindrical cutter, you need to cut out glasses in the walls for boxes of hidden switches. They are not made for external wall mounting. To drill holes in a concrete wall, it is better to buy a diamond drill; it is more expensive than a regular drill, but the costs are offset by significant savings in effort and time. You can cut out glasses in a wall made of gypsum blocks using a drill or even a screwdriver.
4. Next, install the housings; We will connect the wires after construction work.
5. Having installed the switches, prepare a cement or gypsum mortar. We cover the cracks in the socket boxes, carefully level everything with a spatula and give it time to harden. Before installation, you need to prepare buckets and building materials (alabaster, plaster, cement, sand, water) in advance.
6. Connect the wires according to the diagram. The phase should be connected to the movable terminals, the “zero” to the articulated fixed contact. All new models have a grounding terminal; according to the PUE, it must be connected. A three-core cable is used for this. When connecting wires, you must observe the color of the insulation: yellow with yellow, brown with only brown and nothing else. The twist needs to be tinned and soldered for reliability, but only after checking the line. In boxes, it is better to connect the wires with a welding device.
7. Assembling the switches. Only this should be done after testing the line, so that you don’t have to disassemble it again if something doesn’t work as it should. We determine the phases on the wires with a phase detector, and the presence of voltage on the contacts with a voltmeter. If everything is assembled correctly and the line is working, then we put on the decorative trims and covers. Let's check the line again.
Installation of surface-mounted switch
Overheads are used in open lines, as well as in places where it is not possible to hide the wiring. However, if desired, they can also be installed on points with hidden wiring. Surface-mounted switches are usually used to turn on any one lighting element, which is why they are mostly single-key or two-key.
Installing a hidden switch
Hidden ones are distinguished from overhead ones by the type and shape of the socket box, which is mounted in a recess drilled in the wall. They look more aesthetically pleasing compared to overhead devices. However, retro switches are made mostly overhead, and hidden ones are rare, since they do not correspond to the very concept of retro.
Switch sockets differ in fastening for concrete and drywall, which you need to pay attention to in the store when purchasing. Installation of a hidden switch is done sequentially:
- We choose a location and make markings.
- Let's disassemble the switch.
- Using a hammer drill with a cylindrical cutter, we drill a recess for the socket box (we drill a hole in the plasterboard) with a diameter 1-2 mm larger than the diameter of the socket box.
- We install and secure the socket box. Socket boxes for concrete or brick walls have screw spacers; switch housings for plasterboard slabs are mounted in the holes using spring clips or self-tapping screws (in cheap models).
- We make grooves and lay the wires, bringing out the ends in the socket box.
- We connect the wires according to the phase and colors of the insulation.
- We check the operation of the line.
- Seal the cracks with mortar.
- We assemble the switch, put on the cover and cover, and insert the keys.
Before installing the device, the room must be de-energized; to be sure, you can test the wire terminals using a voltmeter.
Installation of pass-through switches
The method of installing pass-through switches differs from the usual one, since it is based on an understanding of the principle of constructing a circuit. Pass-through switches are also called changeover switches. One circuit is closed on one side and closed on the other and vice versa. Manufacturers show a diagram of the device on the housings of walk-through models, but not all have it, so let’s look at the installation in more detail.
1. You need to prepare a three-core cable with multi-colored insulation. Let us remind you that brown is phase, blue is zero, yellow is grounding.
2. De-energize the room, turn off the electricity in the panel.
3. In the switch located near the distribution box, we take out the phase wire and connect it to the common phase terminal in the box. The other two wires, according to the colors, are also connected to the corresponding wires in the box. If the groove is already sealed, then it is worth checking the compliance with a voltmeter.
4. We connect the phase of the lamp with the phase of the opposite switch. We connect the remaining two wires between the feedthroughs, observing the color.
5. We connect the wires from the junction box to the lamp.
6. Close the lid of the box and assemble the switch.
The installation work is similar to the procedure already described with other types of switches. We turn on the electricity in the panel and check whether the circuit works correctly. One and the other switch should both turn off the light and turn it on. If this does not happen with any of them, then you should take a closer look at the circuit and find the error.
The situation is more complicated with two-key pass-through switches. They operate as two separate lines, each to its own lighting fixture in different rooms or parts of the same room. They use two three-core cables or one five-core cable.
Preparation of the workplace
When performing any electrical installation work, first of all, it is necessary to turn off the power supply, check that there is no voltage, and exclude the possibility of unauthorized re-switching on the voltage. Using a voltage indicator, determine which of the wires in the junction box is phase and mark it with a marker.
Prepare the necessary tools:
- pliers;
- voltage indicator;
- screwdriver;
- construction knife;
- marker.
How to connect a proximity switch
The contactless switch controls the lighting automatically, working as an actuator paired with a motion sensor, light sensor or timer. The light sensor gives a signal to the switch if it gets dark outside. The moment of operation can be adjusted according to the preferred degree of darkness outside.
Contactless switches can be used as walk-through switches. When entering the house, you do not need to turn on the light with your hand and turn it off from the other side. In this case, it is necessary to install a motion sensor. Their modifications are infrared, radio wave, and ultrasonic.
The light in any room of the house can be turned on automatically according to time. To do this, you need to set a timer with the switch. Contactless, save energy, these are recommended devices if there are children at home who forget to turn off the lights. Their installation is no different from those described, you just need to know how to connect and configure the control device - a sensor or timer.