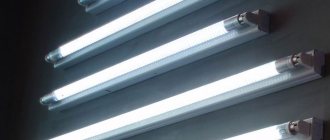
One of the most popular sources of artificial lighting is fluorescent lamps. They consume 5-6 times less energy than standard incandescent lamps, but still shine with the same brightness. LED lamps with drivers are more economical, but due to their high cost, they have not been able to displace fluorescent lamps (FLL) from the market. With prolonged use, fluorescent lamps may lose their functionality. It is possible to fix such problems, but to do this you need to know how to check a fluorescent lamp, including using a multimeter.
Design and principle of operation of fluorescent lamps
Many of the advantages of LDS are due to the fact that they are gas-discharge devices in which ultraviolet radiation is generated due to electrical discharges in mercury vapor.
There is only one peculiarity here - visible illumination from the lamp occurs only after the ultraviolet radiation is modified. Such a transformation is possible only when using those compounds that contain calcium halophosphate or other compounds with the presence of phosphors.
Based on the principle of operation, LDS can be equated to gas-discharge lighting sources. An inert gas is placed in a glass flask, after the air has been pumped out of it, and then 30 mg of mercury is added to the gas. Spiral-shaped electrodes, similar to an incandescent filament, are installed at both edges of the vessel. They are soldered on each side to 2 contact legs, which are placed in dielectric-type plates. The inner surface of the tube is covered with a layer of phosphor.
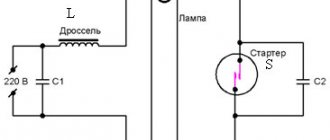
The daylight is turned on using a ballast - electromagnetic or electronic type. The electromagnetic device includes a main element - a choke. This is a ballast type resistance in the form of an inductive coil with a metal core, which is connected in series with a fluorescent lamp.
The choke is necessary to maintain uniformity of discharge and adjust the current if necessary. When the light bulb turns on, the inductor suppresses the starting current until the spiral filaments heat up, and then produces the maximum voltage from self-induction, as a result of which the LDS ignites.
The purpose of the second most important element
The starter in the design of this type of light source is designed to close the electrical circuit at the time of starting. After this, part of the voltage drops to the ballast, and the other is directed to heating the cathode.
Fluorescent lamp starter
In addition, the starter opens the contacts that bypass the lamp when the electrodes heat up. Thanks to this, the starter generates a high voltage pulse, which is applied to the lamp and lights it. When power is applied to the lamp, the starter creates a discharge that heats the bimetallic contacts. Due to this, they close, helping to increase the current in the lamp, which leads to heating of the cathodes and cooling of the contacts. Then it causes them to open again. As a result, a high-voltage pulse is created in the electrical circuit of the lamp due to the phenomenon of self-induction in the inductor, which leads to the ignition of the lamp. As you can see, the starter plays an important role in the operation of luminescent products. In this regard, in a situation where this type of device has stopped functioning, you need to check the starter at the very beginning, and only then look for the cause of the malfunction elsewhere.
Reasons for burnout of fluorescent lamps
Often the LDS burns out, which makes it similar to a traditional incandescent lamp. When turned on, an arc of electricity is formed in the bulb, as a result of which the spiral-shaped tungsten electrodes become very hot. High temperature surges lead to destruction and burnout of the threads.
To extend the service life, a layer of active alkali metal is applied to the tungsten filament. The discharge between the electrodes is stabilized and the temperature decreases, thanks to which the thread lasts much longer.
Frequent switching on/off of the lamp entails the destruction of the protective layer, it simply falls off. The discharge passing through the bare filaments heats the spiral at weak points, resulting in burnout.
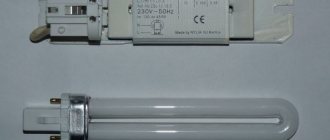
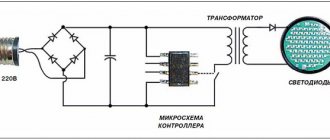
Electronic ballasts for compact LDS
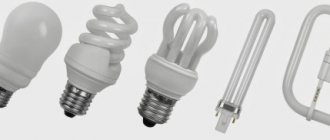
Relatively recently, fluorescent energy-saving lamps, adapted for standard sockets for simple incandescent lamps - E27, E14, E40, have become widely used in everyday life. In these devices, the electronic ballasts are located inside the socket, so repairing these electronic ballasts is theoretically possible, but in practice it is easier to buy a new lamp.
The photo shows an example of such an OSRAM lamp with a power of 21 watts. It should be noted that at present, the position of this innovative technology is gradually being occupied by similar lamps with LED sources. Semiconductor technology, constantly improving, makes it possible to quickly achieve prices for LDS, the cost of which remains practically unchanged.
OSRAM lamp with E27 base
Checking with a digital tester
Digital Voltage Tester
Using a digital voltage tester, you can check the integrity of the filaments. This can be done both in the dialing mode and in the resistance testing mode. It is necessary to set the multimeter to the desired mode and check the spiral at both ends of the tube.
In the dialing mode, if the spiral is working properly, the tester will produce a characteristic sound - a buzzer.
In the resistance test mode, if the spiral is working properly, the multimeter indicator will display a value of 5-10 Ohms.
Burnout of heating filaments is the most common failure of fluorescent lamps, which can be easily detected using a digital tester.
Diagnostic methods
The simplest method, which is most often used by radio amateurs, is to check light-emitting diodes with a multimeter for performance using probes. The method is convenient for all types of light-emitting diodes, regardless of their design and number of pins. By setting the switch to the “continuity check, open circuit check” position, touch the leads with the probes and observe the readings. By connecting the red probe to the anode and the black probe to the cathode, the working LED should light up. When changing the polarity of the probes, the number 1 should remain on the tester screen.
To accurately test multi-color LEDs with multiple leads, you need to know their pinout. Otherwise, you will have to randomly sort through the terminals in search of a common anode or cathode. Don't be afraid to test high-power LEDs with a metal substrate. The multimeter is not capable of disabling them by measuring in dial mode.
Testing an LED with a multimeter can be done without probes, using sockets for testing transistors. Typically, these are eight holes located at the bottom of the device: four on the left for PNP transistors and four on the right for NPN transistors. The PNP transistor is opened by applying a positive potential to the emitter “E”. Therefore, the anode must be inserted into the socket labeled “E”, and the cathode into the socket labeled “C”. A working LED should light up. To test in the holes for NPN transistors, you need to change the polarity: anode - “C”, cathode - “E”. This method is convenient for checking LEDs with long and solder-free contacts.
It does not matter in what position the tester switch is located. Checking the infrared LED is the same, but has its own nuances due to invisible radiation
At the moment the probes touch the terminals of the working IR LED (anode - plus, cathode - minus), a number of about 1000 units should appear on the device screen. When changing polarity, there should be a unit on the screen.
To check the IR diode in the transistor testing sockets, you will additionally have to use a digital camera (smartphone, telephone, etc.). The infrared diode is inserted into the corresponding holes of the multimeter and the camera is pointed at it from above. If it is in good condition, then IR radiation will be displayed on the gadget’s screen in the form of a glowing blurry spot.
Testing high-power SMD LEDs and LED matrices for functionality requires, in addition to a multimeter, a current driver. The multimeter is connected in series to the electrical circuit for several minutes and the change in current in the load is monitored. If the LED is of poor quality (or partially faulty), then the current will gradually increase, increasing the temperature of the crystal. The tester is then connected in parallel with the load and the forward voltage drop is measured. By comparing the measured and passport data from the current-voltage characteristics, we can conclude that the LED is suitable for use.
LEDs are used to transmit signals from remote controls, equipment, surveillance cameras, flashlights and lamps. They turn on in the forward direction, after a positive voltage appears between the cathode and anode. Therefore, in case of breakdowns, you can check the LED with a multimeter, determine the cause of the malfunction and eliminate it.
Troubleshooting and Troubleshooting
Electrode testing with an
LDS multimeter is faulty in the following cases:
- does not turn on;
- flickers temporarily before turning on;
- flickers for a long time, but does not turn on;
- buzzes;
- flickers when burning.
Integrity of spiral electrodes
You can test the spiral electrode for the presence of resistance using a multimeter. The device is set to resistance measurement mode, and after that the probes are applied to the legs of the flask on both sides.
If the spiral is faulty, the multimeter will show zero resistance - the thread is broken. A whole spiral always shows a small resistance - up to 10 ohms. If at least one of the spirals is faulty, the lamp must be replaced. It cannot be restored.
Faults in the electronic ballast
To check the serviceability of the electronic ballast, it must be replaced with a working one. If the lamp lights up, it means that it was the cause of the breakdown. You can fix a broken ballast yourself. First you need to replace the fuse with a similar model with the same characteristics. If the threads glow weakly, it means there is a breakdown in the capacitor between them. It is also replaced by a similar one, but with an operating voltage of 2 kV. weak models will burn out quickly.
Transistors may burn out due to voltage surges. They need to be changed. You can take new ones from old ballasts. After replacement, you need to check the fluorescent lamp using a 40 W lamp.
How to check the choke of a fluorescent lamp
Checking the choke without a multimeter
Before checking the choke of a fluorescent lamp with a multimeter, you need to familiarize yourself with the main signs of its failure:
- hum of a lighting fixture;
- the lamp turns on and goes out after a while, getting dark around the edges;
- LDS overheats;
- “snakes” appear inside the tube;
- The lamp flickers a lot.
To check the choke for operability, you need to remove the starter from the lamp, and then close the contacts in its socket. Then the lamp is removed and the contacts in both sockets are also short-circuited. The multimeter is set to measure resistance, after which its probes are connected to the contacts in the lamp socket. If there is a break, the device will show endless resistance. If there is an interturn short circuit, the device will show a zero value.
How to check the starter
If the lamp begins to flicker immediately after switching on, but does not light up, the starter has failed. It will not be possible to test it separately from the LDS, since without voltage its contacts are open.
Checking the serviceability of the starter is possible using another method - by connecting it in series with an incandescent lamp to a standard electrical network.
The main reason for failure is that the bimetallic plate wears out greatly.
How to check the capacitance of a capacitor with a tester
If the LDS capacitor is faulty, its efficiency indicator decreases to 35-40%. For lighting devices with a power of no more than 40 W, a capacitor with a capacity of 4.5 μF is sufficient. If it is less than this norm, the efficiency will be reduced; if it is more, the lighting will blink.
To carry out the measurement, the capacitor must be ringed with a multimeter. When the probes touch the outputs of a part, the device demonstrates endless resistance. When this indicator is less than 2 MΩ, this is a symptom of significant current leakage.
Checking the lamp
During its operation, a fluorescent lamp may fail. At the same time, you can check its component elements of the electrical circuit and fix the breakdown yourself. To do this you will need to use a multimeter or tester. To correctly check the starter of a fluorescent lamp, you must first know the version of the electrical circuit used for it.
In addition, it is necessary to dismantle or simply remove the fluorescent lamp from the ceiling or wall. After this, you can check all the important elements of the electrical circuit.
Let's consider both options for checking the electrical circuits given above. In this case, the verification method in both cases will be identical.
Note! In order to check the functionality of the starter for a fluorescent lamp, you can use any measuring instrument (tester, multimeter, etc.).
The following measuring instruments are most often used for checking:
- oometer It must be set to the position for the required resistance range to be measured;
- string type tester;
Tester for verification
- multimeter
Many experts recommend using a more advanced and versatile measuring device - a multimeter. In this case, diagnostics of the lamp (choke, etc.) should be carried out exclusively in a passive way. This means that the lighting installation cannot be connected to an external voltage source. To check a fluorescent lamp, you must carry out the following manipulations:
- put the lighting fixture on the table;
- we connect two probes of the measuring device to the wire terminals;
- measure the total resistance.
Turning on a fluorescent lamp without a choke
A burnt-out fluorescent lamp can be returned to work if it is connected to the circuit using constant voltage, excluding the starter and throttle element. Using a full-wave rectifier with voltage doubling will help here. If after some time the brightness of the lamp decreases, it must be turned over in the lamp, as a result of which the connection poles will change.
This scheme involves the use of radioelements with a voltage value of no more than 900 V. This is the value that the LDS reaches at startup.
Letter designations for light bulbs
If you have learned how to ring a light bulb, but do not know what type of battery the product belongs to, then you should look for the designation on its body. The type of lighting fixture is usually indicated by several symbols:
- LED - light-emitting diode.
- CCFL - fluorescent.
- DRL - mercury.
- LDS - daylight.
- LN - incandescent.
Fixtures may also be marked with letters. By the first character you can determine whether the device belongs to a certain category, for example:
- N - incandescent.
- D - LED.
- And - quartz-halogen.
- R - gas-discharge mercury lamp.
Regardless of whether the lighting element is used at twelve volts or connected to a household electrical network, the letter designation remains unchanged.
Connection diagram for burnt out lamps
Fluorescent lamps often become unusable due to filament burnout. You can restore a second life to such a lamp using an unconventional starting scheme, repeatedly tested by folk craftsmen.
From the table you can find out the nominal values of radioelements for LDS with different powers. Limiting resistors R1 must be made of wire.
You can repair LDS at home if you follow the diagrams and follow certain instructions. Such knowledge makes it possible to extend the operational period of the lighting device.
Disposal
Fluorescent lamps contain mercury vapor, which is extremely harmful to humans and the environment. Therefore, it is prohibited to simply throw away fluorescent lamps, since a large number of such elements in a landfill can cause negative consequences.
Fluorescent lamp disposal area
Recycling is provided by special companies that, using special equipment, recycle lamps, capture harmful vapors, and use raw materials to create new lighting devices.
Types of ballast
Different types of ballasts are grouped by implementation type: electronic and electromagnetic implementation. In addition, the models are classified according to the area of application for lighting devices, among which are:
- High frequency electronic ballast for fluorescent luminaires, with or without preheating. The first model increases the performance and service life of the device, and also reduces the noise effect. Ballast without preheating consumes less energy. High frequency ballast for sodium lamps. This is a less bulky ballast than conventional models installed on low-pressure lamps, easy to install, and with low energy consumption for its own needs.
- Electronic ballast for gas discharge devices. This model is usually designed for high pressure sodium and metal lamps, increasing their lifespan by up to 20% compared to the standard. The start-up time is reduced, as are the flashing effects. It should be noted that these ballasts are not suitable for all luminaires.
- Multi-lamp ballast. It has the advantage that it can be used with several types of fluorescent devices, including aquarium lighting, creating an optimal primer. It has the function of recording all lighting parameters in its memory.
- Digitally controlled ballast. This is the latest generation model, offering a lot of flexibility and modularity when installing luminaires. This improves the economic aspect of the LED lamp and the brightness comfort. At the same time, it is the most expensive model.
Electromagnetic implementation
Magnetic ballasts (MB) are devices with old technology. They are used for the fluorescent lamp family and some metal halide devices. They tend to cause humming and flickering because they regulate current gradually. MBs use transformers to convert and control electrical power. When the current arcs through the light fixture, it ionizes a larger percentage of the gas molecules. The more of them are ionized, the lower the gas resistance. Thus, without MB, the current will rise so high that the lamp will heat up and destroy.
Electromagnetic implementation
The transformer, which in MB is called a “choke”, is a wire coil - an inductor that creates a magnetic field. The more current flows, the greater the magnetic field, the more the current growth slows down. Because the process takes place in an alternating current environment, the current flows in one direction for only 1/60 or 1/50 of a second and then drops to zero before flowing in the opposite direction. Therefore, the transformer only needs to slow down the flow of current momentarily.
Electronic implementation
The performance of electronic ballasts is measured using various parameters. The most important is the ballast factor. This is the ratio of the luminous output of a lamp, controlled by the EB in question, to the luminous output of the same device, controlled by a reference ballast. This value ranges from 0.73 to 1.50 for EB. The significance of this wide range lies in the levels of light output that can be achieved using a single EB. This finds great use in dimming circuits. However, it has been found that too high and too low ballast factors degrade luminaire life due to lumen wear resulting from high and low current, respectively.
Electronic implementation
When EBs are to be compared within the same model and manufacturer, the ballast efficiency ratio is often used, which is the ratio of the ballast ratio expressed as a percentage to power and provides a relative measurement of the system efficiency of the entire combination.
A measure of the efficiency of a ballast, power factor (PF) is a measure of the efficiency with which the EB converts supply voltage and current into usable power supplied to the lamp with an ideal value of 1. No tags for this post.