The organization of a lighting system involves performing a wide range of technical operations. The scale of such activities depends on the nature of the design task - in particular, on the area of light coverage, on the number of lighting devices, their power, control method, etc. Since any lighting group in one form or another involves interfacing with an electrical wiring line, to perform such tasks, special standards are provided. Both the installation of lighting in a private home and the installation of street lighting equipment are carried out according to certain instructions.
General rules for installation work
Gas-discharge lamps, traditional incandescent lamps, fluorescent and LED devices are allowed for installation of components of electrified lighting systems. In systems that are based on gas-discharge radiation elements, it is necessary to provide protective equipment - as a rule, this requirement applies to objects where the influence of radio interference is expected. Sometimes combined lighting is allowed - that is, several groups of devices of different types are introduced into the lighting infrastructure.
The main power line in relation to the installation of general purpose lamps must have a voltage of no more than 380V. The limit value applies to industrial use, when electric lighting is installed in three-phase networks. For home and street lighting, elements powered by 220V are more often used. Spot models of lighting devices and lighting elements can have power supply with voltage characteristics of 127V and lower. In this case, luminescent devices with a voltage in the 127-220V spectrum are mounted at a level of no more than 2.5 m.
Spots.
Spots are another type of directional lighting fixtures. Their name speaks for itself - spot is translated from English as “spot” (here we mean a created spot of light). The basis of such lamps is a special rotating design with a large degree of freedom, which allows you to change the direction of the light flux in space within a very wide range.
Spots, first of all, are a means of lighting design. Their use is determined by the need to emphasize certain features of the interior, presenting them in a new (literally) light. The use of three color LED matrices instead of incandescent lamps is especially impressive. The color and intensity of the light spot can be easily changed using the remote control of a special controller.
Installation instructions for emergency power supplies
Emergency power supply is mandatory for industrial lighting and for devices that are planned to be operated in an open area. The regulations require that such luminaires be supplied with energy from separate independent sources. For example, leased lines can be connected to different transformers, and multiple transforming stations can be connected to a single distribution source.
It should also be noted that there is a need to separate working and evacuation lighting. Working light refers not only to a set of devices in production, but also to the communal infrastructure in ordinary residential buildings. Escape routes must have a separate supply line from the entry point that is independent of the operating panel. In critical areas, lighting installation is carried out together with the installation of protective frames that insure against accidental damage. This applies to both production premises and external lighting systems. If difficulties arise with the organization of separate power supply lines, then you can use autonomous power sources in the form of internal or external batteries, as well as generator sets (gasoline or diesel).
Installation and protection of the lighting group
When drawing up a diagram for organizing a lighting network, it is necessary to adhere to the main rule, which excludes the possibility of power wires coming into contact with elements of the main lighting and lines that supply other equipment. All wiring must be insulated - both outside the box and inside the lamp.
If outdoor lighting is being installed, then additional insulation, moisture and wind protection means are introduced into the supporting structure. The cable is fixed to the main line while maintaining a distance from other connection points and cable routes of at least 2 cm. As for the installation of technical wiring for evacuation and work lighting, it is possible to use several phases. To do this, a busbar must be introduced into the infrastructure.
Installation of lighting systems is not complete without electrical protection, the choice of which will be determined by the characteristics of starting currents, lamp powers, etc. Protective equipment is installed in groups in places that provide access for maintenance. If the lighting system is supplied from distribution lines, then distributed installation schemes can be used. In terms of restrictions in this part, it can be noted that the rules prohibit the use of automatic switches and switches, as well as fuses in the neutral wire.
Wiring diagram
Having decided on the type of wiring, you can proceed to its installation diagram.
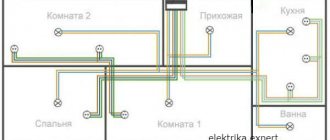
After all, before proceeding directly to installation, you must have a clear plan for load distribution and wiring:
| To create such a plan, you must know the exact number and power of all electrical receivers in each room. We have already described how to calculate these parameters more than once on the pages of our website, so we will not return to this issue again. |
| Then all consumers of electrical energy should be distributed into groups. One such group is powered by one group machine. To reduce wire consumption and organize wiring, it would be more appropriate for one group to power one, two or three adjacent rooms. This wire from the group circuit breaker to the distribution box is called the group wire. |
| The next important factor is the distribution of group wires. After all, when more than 5 wires are laid together, they will heat each other, and therefore, to achieve the rated current parameters, their cross-section will have to be increased. Therefore, they often try to distribute group wires in such a way that there are no more than five wires in one channel. |
| The next important parameter is the wiring diagram from the distribution box to the points of consumption and distribution. The ideal option is to supply a separate wire to each point. But you can reduce wire consumption with your own hands if you power several electrical points with one conductor. Only in this case, do not forget that the cross-section of the wire supplying two or more points must correspond to their maximum possible current load. |
Wiring rules
Well, we have come to the question of how electrical wiring for lighting in the house should be done. There are both mandatory norms and generally accepted rules that are not mandatory. We will tell you about all these nuances.
Where to place the junction box?
- Our wiring begins with a group wire, which goes from the machine to the distribution box. From the distribution box, wires go to each individual or group of electrical points.
- Based on this, first of all, we should decide on the location of the junction box. Usually it is marked in the upper part above the switch for the general lighting of the room at a distance of 10-30 cm from the ceiling. This distance is due to the convenience of working in the junction box.
Types and sizes of distribution boxes
- But this is not the norm, and you can install the junction box in any place convenient for you. This could be a concentration of electrical points or simply the center of the room, or it could be a place that you can simply hide behind furniture.
Note! Often the question arises of the size of the junction box and its shape. This parameter is not of fundamental importance and is selected based on ease of use and the number of connections.
Installation location for multiple light switches
- If you decide to install the distribution box as expected, above the switch, then the question automatically becomes, where should it be located? According to clause 12.29 of VSN 59-88, the switch must be installed on the wall at the entrance to the room.
- The distance from the doorway to the switch should be 10-20 cm. It should be located on the side of the door handle. According to old building codes, the installation height should be 1.5 meters, but now it is usually installed at a height of 70-80 cm.
How to install the switch?
- The only exceptions are switches for wet rooms. These include steam rooms, bathrooms and other similar rooms. For them, the light switch should be located outside the room - in front of the entrance. The same, but now without fail, also applies to distribution boxes.
- If several general lighting switches are installed in a room, then all of them must be installed in accordance with these standards. As for local lighting switches, they can be installed at any points convenient for operation.
Distribution of electrical points throughout the room
- The next common electrical appliance is the socket. According to the standards, it can be installed in any place convenient for use. Usually this is a height of 20-30 cm from the floor, but this is not a mandatory requirement, and it is quite possible to install the socket at a height of 20-30 cm from the ceiling as in the video.
- The only mandatory requirement is the prohibition of installing sockets closer than 20 cm from gas pipelines, and closer than 60 cm from sinks or showers.
The rest of the standards that you can find for the installation of sockets are recommendations.
Network grounding
High-quality grounding is carried out using an appropriate wire, subject to the rules of the technical organization of this protection. In particular, the rules require that a reliable electrical connection must first be ensured in the design of the lamp itself - for example, the gap from the lamp body to the fixing bracket must be neutralized with a protective conductor. The laying of the circuit through which the grounding will pass may concern not only the body of the lighting device. The grounding wiring is often connected to the supporting structure on which the device is mounted. For example, if the lighting installation was based on metal poles or other structures, then they must be connected to the housing with the same protective wires. If portable lamps with low voltage are used, grounding is organized using a flexible wire core.
What should ceiling lights be like?
A certain type of built-in light bulbs is designed for mounting on a specific surface and is also mounted in its own way.
If you have to mount lamps in a thin sheet, then you need to know that not all materials can withstand the intense heating of the lamps.
The size and shape of spotlights is also of great importance. To implement any design of suspended ceilings with lamps, you need to carefully consider the design of the ceiling.
Lamps have a body made of different materials, so you should not choose a lamp with a transparent body. Otherwise, light may reach the internal communications of the lamp.
As a rule, many lamps on store shelves emit light, so there is an excellent opportunity to choose lamps that are suitable in terms of power.
Rules for installing interior lighting
Single luminaires do not have to be provided with automatic switches and fuses. If it comes to group circuits supplying devices with a current strength of up to 25 A, then the introduction of such equipment is mandatory. In addition, group lines with gas-discharge lamps and incandescent lamps with a power from 42 to 125 V should be provided with auto-switch releases or fusible protective fuse links. If in such networks it is planned to form branches no longer than 3 m in steel pipes, then the installation of additional protective equipment is not required.
At home, lighting installation can be carried out on the basis that there will be no more than 20 lamps per phase. In this case, sockets should also be considered as consumers. An increase in the number of lamps is possible provided that low-power lamps are used - for illumination or spot lighting.
Results
All you have to do is put the panels in the right places, install a spotlight, and connect the cables. This takes very little time; the only tools we need are a screwdriver for pressing the cables into the structure and a jigsaw for cutting holes in the plastic panels.
I want to say that in reality there is nothing terrible in this process, if you describe the main stages of installation, you will notice that there is nothing special, you just need to do everything calmly, measuredly, if you don’t know or don’t understand something, then it’s better to do it again look on the Internet and look at options for solving the problem, maybe watch a video somewhere or call a friend for advice.
But when you install the lamp yourself, there is much more joy and you will have the feeling that the work done has made you more experienced and in the future you will only gain momentum in this direction. And why spend your money on a professional when you can hang a lamp in 15 minutes or equip an entire bathroom with light in an hour?
Rules for installing external lighting
One of the main parameters that lighting engineers focus on when organizing street light is height. Thus, cable lamps must be installed at a level of at least 6.5 m above the ground. Standard lighting of boulevards or pedestrian areas is carried out at a height of 3 m or more. If lawn tools are used, then the height value does not matter. Group installation of street lighting also implies the possibility of installing a large number of devices in one phase. In this case, the value exceeds 20 units, but only on the condition that the branch circuits have their own circuit breakers or fuses.
Marking
We make the first markings on the base, when we have not yet sheathed or plastered anything. The task is to determine the point of organization of the output according to the project. We recommend marking all these places on the rough surface.
Circles or crosses, no matter how
A couple of points. To find the center of the room, you can find the intersection of the diagonals on the floor and use a plumb line to move the point to the ceiling. If we have a row of several lamps, then for uniformity of lighting, the outermost ones are placed from the side walls at a distance equal to half the distance between the lighting fixtures inside the row. For example, to calculate the location of 3 lamps, the following formula will be applied: B/4 : B/2 : B/4, where B is the length of the wall.
Features of installation of load-bearing structures
Typically, supports are used for the technical organization of street lighting. At the intersections of lines with roads and streets, gaps of about 40 m are maintained between the supports. Anchor elements and double cable fastenings are used as mounting fittings. The process of wiring and installation of lighting poles is carried out as part of a single event. After installing the structure, a cable line is inserted, and the pole is fenced with a plinth. The base elements must have dimensions that will allow them to accommodate wiring connections, fuses and a protection unit with access to maintenance.
Rules for installing advertising lighting
Features of installation of advertising lighting are determined by the type of devices used. The most popular means of such illumination is a gas light tube. LED multimedia panels are less common due to their high cost, but their efficiency is much higher. Since the installation of such devices is carried out outdoors, the rules require the use of transformers in metal insulated casings, which also have a secondary voltage of up to 13 kV. When installing lighting poles for the same advertising multimedia panels or tubular lighting structures, it should be taken into account that current-carrying open elements must be removed from combustible materials at a distance of more than 5 cm. Transformer blocks for gas-light pipes should, if possible, be installed close to the devices being served, but so, so that third parties do not have access to them.
Instructions for working with light fittings
Auxiliary elements included in the lighting system infrastructure must comply in their characteristics with both the loads in the electrical circuit and the external operating conditions. For example, if we are talking about places subject to vibrations, then the fixing fittings are selected with a design in mind that will prevent the components of the lamp or working equipment from falling out or self-unscrewing on the line. Without fail, installation of LED lighting involves performing work with current-carrying cartridge sleeves - usually screw-type. On lines with solidly grounded neutrals, the cartridges are connected not to the phase conductor, but to the neutral conductor. However, this requirement does not apply to portable lamps that do not require grounding or grounding.
Instructions for working with installation devices
Installation accessories include switches, connectors, panels, adapters and switches. This equipment is also selected based on current characteristics and external operating conditions. There are special models for areas of high humidity, devices designed for use in explosive areas, etc. The basic operation for installing this equipment will be the installation of lighting panels, which involves mounting a protected cabinet and introducing electrical devices into it. Next, secondary fittings with boxes, which may have protective blocks, are mounted openly or hidden. If devices are installed with open electrical wiring, then pads made of non-conductive materials should also be provided - as a rule, their thickness does not exceed 1 cm.
