05/17/201606/26/2016 master
Today, many people prefer to live not in cramped apartment buildings, but in private houses. When choosing this type of home, you need to remember that there are certain nuances here that relate to both the exterior design of the house and the interior decoration. Particular attention should be paid to the outdoor lighting system and the selection of suitable lamps.
When installing an outdoor lighting system, you must remember that according to the requirements of the Electrical Installation Rules (ELR), such lamps must be grounded. The PUE requirements are the first thing a person who decides to install such lighting devices on their site should know. Today's article will tell you about everything that is important to know when creating a street type of lighting and its further grounding.
Do overhead lights need to be grounded?
Now I am renovating the room and replacing all the wiring with new ones.
From two-wire to three-wire. With the expectation of reconstructing the riser of the house. Actually I was puzzled by the question. All sockets will be grounded. But do you need to ground the chandelier? Otherwise, modern chandeliers usually have such wiring.
I won’t connect the grounding anywhere until the riser is reconstructed. Neither in the shield, nor in the sockets.
ivant1 wrote: From two-wire to three-wire. With the expectation of reconstructing the riser of the house.
ivant1 wrote: All sockets will be grounded. But do you need to ground the chandelier? Otherwise, modern chandeliers usually have such wiring.
you answered yourself.
7.1.36. In all buildings, group network lines laid from group, floor and apartment switchboards to general lighting fixtures, plug sockets and stationary electrical receivers must be three-wire (phase - L, zero working - N and zero protective - PE conductors).
7.1.70. In rooms without increased danger, it is allowed to use pendant lamps that are not equipped with clamps for connecting protective conductors, provided that the hook for their suspension is insulated. The requirements of this paragraph do not cancel the requirements of paragraph 7.1.36 and are not the basis for making two-wire electrical wiring.
ivant1 wrote: With the expectation of reconstructing the riser of the house.
For now, at a minimum, install a general 30 mA 63A RCD somewhere after the introductory circuit breaker.
ivant1 wrote: But do you need to ground the chandelier?
In apartment buildings, it is not grounding that is correct, but protective grounding, since TN systems are used. According to current standards, it is imperative to use cables with a protective wire, even if the lamps do not have a special terminal, but they must also be connected in compliance with ALL current standards, that is, for now, with a 4-wire riser before reconstruction, do not connect in socket boxes and near lamps , insulate, be sure to install at least somewhere after the input circuit breaker a general 30 mA RCD.
For chandeliers controlled by a two-key switch, lay four wires accordingly.
ivant1 wrote: I won’t connect the grounding anywhere until the riser is reconstructed. Neither in the shield, nor in the sockets.
In the floor board, the yellow-green protective wire of the PE grounding, if there is necessarily a common RCD somewhere after the input circuit breaker, it is better to connect, always under a separate bolt, to the part of the board to which the PEN 4-wire riser is directly connected. In conjunction with the RCD, it will increase fire safety to some extent, in some cases even if any machine fails!
Where there are adjacent sockets, place only separate socket mechanisms in one frame, and not one monoblock mechanism or a double or triple socket assembly!
Otherwise, in the event of a breakdown in one of the electrical appliances of protection class 1, these are those that have protective terminals on the plugs, dangerous voltage through the protective PE terminals will appear on the housings of all electrical appliances of protection class 1 connected to a monoblock socket mechanism or to a double, triple socket!
Even if there is no breakdown, the capacitive leakage currents of filters and statics of electrical appliances of protection class 1 will be summed up, which, when simultaneously touching such devices and third-party conductive parts of the building, can bite!
For this reason, you must use an extension cord with sockets without protective terminals!
Source
Electric shock protection classes
According to section 7 of GOST IEC 61140-2012 “Protection against electric shock. General safety provisions for installations and equipment"
, protection against electric shock is provided by the design measures applied to electrical equipment and devices, together with the methods of their installation.
Depending on the method of providing protection, devices are classified into classes from 0 to III. Let's consider them in more detail - as applied specifically to lamps as described in GOST R IEC 60598-1-2011 “Lamps.
Part 1. General requirements and test methods" .
But first, a few more definitions: Basic insulation
Insulation of live parts that provides basic protection against electric shock. Those. This is the insulation of the conductors themselves through which electric current flows.
Additional insulation
Self-insulating material designed to provide protection against electric shock if the primary insulation fails. It can be, for example, a durable case made entirely of insulating material, which covers almost all metal parts.
Double insulation
Insulation consisting of basic and additional.
Reinforced insulation
A single insulation system for live parts providing protection against electric shock equivalent to double insulation. It may consist of several layers, which, however, are not considered separately from each other.
Protection class luminaire 0 (only applicable for conventional luminaires)
In this luminaire, protection against electric shock is provided by the basic insulation. Connection of accessible conductive parts, if any, to the protective grounding wire of fixed wiring is not provided. The protection function in case of damage to the main insulation is performed by the outer shell.
Those. If for some reason the insulation of a live wire inside the lamp is damaged (for example, due to aging, mechanical damage, etc.), then it will remain safe only thanks to the outer sheath.
A table lamp is an example of an electrical appliance with protection class 0
An example of a lamp with protection class 0 is an ordinary table lamp, plugged into a socket with a two-pin plug. It does not provide any additional grounding, and all protection against electric shock includes a housing made of insulating material (plastic, for example) or metal, separated from the voltage by the insulation of the wires themselves.
By the way, in our catalog there are no lamps with protection class 0.
Protection class I luminaire
A luminaire in which protection against electric shock is provided not only by the basic insulation, but also by connecting accessible conductive parts to the protective (grounded) conductor of the fixed wiring in such a way that accessible parts cannot become live even if the basic insulation is damaged . Moreover, not only uncoated areas of metal, but also painted parts will be considered conductive parts. And if immediately after leaving the assembly line the paint layer has insulating properties, then it is far from a fact that it will remain so a month after the start of operation.
Hanging industrial luminaire with protection class I
Most industrial, street, explosion-proof lamps, and any other devices in metal cases (with the exception of low-voltage ones), belong to protection class I. Our catalog is no exception; most of the devices are from this category.
Protection class II luminaire
A luminaire in which protection against electric shock is provided not only by basic insulation, but also by the use of double or reinforced insulation and which does not have a device for protective grounding or special means of protection in the electrical installation.
This type includes many office lamps in plastic cases, which themselves are insulators for current. Metal solutions can also be found, provided double insulation is used.
Protection class II luminaire - note the two-wire connection
As a rule, luminaires of protection class II do not have a grounding contact. There are exceptions, but in such cases, grounding is not intended to protect the device itself, but serves some other purpose. For example, to ensure continuity of the grounding conductor when connecting lamps with a cable.
Protection class III luminaire
A luminaire in which protection against electric shock is provided by the use of safety extra-low voltage (SELV). SELV means a voltage of no more than 50 volts AC or 120 volts DC, and the circuit itself must be isolated from the main power supply using a safety isolating transformer or equivalent.
Everything here is clear from the name - such lamps include low-voltage models of LED lamps. Although not all of them - manufacturers classify some of these devices as class I. Class III lamps do not require the use of grounding, and all their protection consists of low voltage, which is safer in itself.
Do I need to ground lighting devices: lamps, chandeliers, lanterns?
Some believe that the chandelier does not need to be grounded, others believe that it is a must-have in any apartment. But how should it really be, and what to do if it is impossible to ground yourself? The answer is in our article.
There is an opinion that for low-current groups, in particular lighting in the form of chandeliers and lamps, grounding is not necessary - after all, somehow they lived in Soviet times. What does the regulatory documents say about this, and how to protect yourself if grounding is not possible? The electrician's answer is in our article.
Is grounding necessary for lighting: what is specified in the PUE?
The latest edition of the PUE in paragraph 7.1.36 states the following:
It follows from this that when installing a chandelier or lamp in an apartment, a three-core cable must be connected to it, one core of which will be the ground. Grounding must continuously come from the shield. If we connect a lamp through a plug (for example, a sconce), then it is enough that the socket is grounded.
However, you need to be honest here - almost all old apartments have a two-wire network, and there is no grounding conductor connected to the chandelier. And the chandelier itself does not have a grounding contact (modern devices already have a third contact for connecting the grounding). Replacing a two-wire network with a three-wire one (for single-phase networks) is often not possible (too expensive or you don’t want to spoil the repair). How to protect yourself in this case?
Common mistakes
Inattention often leads to problems. Sometimes a little thing missed can become a source of trouble. Therefore, you should carefully read the instructions and follow them exactly. Before turning on the device, be sure to check that all connections are correct and secure.
Many mistakes are often made by novice self-taught electricians. It is necessary to pay attention to some of these shortcomings:
Incorrect connection of double switch
Without figuring out which cable to connect to what, a novice master can confuse the wires and fasten them incorrectly. As a result, the device will not turn on or will fail. Therefore, you should carefully study the connection diagram and follow it accurately.
Label all wires to prevent tampering or mistakes. Insulate unused ends well. Use special instruments to search for phases and neutral cables.
Connecting a neutral wire instead of a phase wire
If, after connecting the device to the network, the house meter turns off and the lights go out, then a short circuit has occurred due to a phase connection with zero. To eliminate the error, you need to disconnect the lamp from the mains and carefully review the assembly diagram.
When an error is found, correct it and only then try to turn on the appliance again.
Incorrect connection diagram for the neutral wire of the chandelier
Sometimes it is difficult to determine which of the cables from the lampshade to connect to zero. Often there is a wire that contains the ends from all the light bulbs. Do not connect a cable with voltage to it, this will lead to a short circuit. To prevent this from happening, immediately mark this wire and connect it only to the neutral cable of the network.
What to do if it is not possible to provide grounding?
If it is not possible to lead a third ground wire to the lighting fixtures, then you can protect yourself by installing an RCD. One RCD with a leakage current of no more than 30 mA per lighting group is sufficient to provide protection against electric shock. From personal experience, we will say that a breakdown on the body of a chandelier or lampshade is a rather rare occurrence, so the likelihood of encountering it is minimal.
There are also chandeliers in which the metal contact of the socket is securely hidden in a dielectric plastic case, so if the insulation breaks down, even if a person touches the chandelier (for example, changing a light bulb), he will not receive an electric shock.
Tips for home electricians:
Source
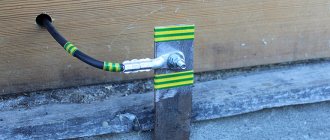
Why is it necessary to ground supports?
An insulation failure, wire break, flashover or breakdown of an insulator causes currents to flow through the mast and generate touch and step voltages. Providing supports with grounding devices protects nearby people from electrical injury.
Based on the instructions for lightning protection and the installation of grounding systems, metal supports used for outdoor lighting must be grounded.
Grounding is required when placing lightning protection equipment on a support. In the event of a direct lightning strike on a support, pulse currents are removed through the grounding device, reducing the voltage on the insulation of the power cable.
Is grounding necessary for the chandelier? How to do it?
When designing an apartment's electrical network and installing a chandelier, it is necessary to take into account many important points and resolve several issues. One of them is grounding. This operation is not used so rarely, and for each individual case there is an answer with an explanation to the question of whether it is worth grounding the chandelier.
What is grounding
First of all, it is worth understanding what grounding is. The scientific formulation is limited to the fact that this is a procedure for connecting any electrical appliance to a grounding device. On the plan and in practice, everything looks quite simple: the “ground” (i.e. soil) will attract electric current to itself, reducing the network load.
This way you can achieve a lower voltage - otherwise a person will only be able to touch the chandelier once. The ground electrode itself will be located in the ground, which will act as a conductor for the current. The quality of the established connection is determined by calculating the resistance to current flow. This indicator can be improved by increasing the area on which the grounding electrodes are located or reducing the soil resistance in a separate area.
Avito Kumertau rent a room in a hostel
Is it worth grounding a chandelier?
Firstly, not all chandeliers (and, in principle, lighting sources) can be grounded, but only those that have a metal casing. The wiring connected to them is made using modern technologies and should be well protected. It is worth connecting the ground electrode for safety - it does not matter whether the room is dry or wet.
Connecting the “earth” is necessary in a new or reconstructed house, but it will not be superfluous for an old building either. By “closing” the chandelier, you can secure the room - since the voltage in the electrical network will decrease, the room will be completely safe. There is one more nuance - compatibility with automated fire protection systems. If such a system is connected, be sure to ground it.
Preparing to connect the ground to the chandelier
It is important to devote enough time to the preparatory stage - to collect the necessary tools, and also to prepare thoroughly. The tools you will need when grounding a chandelier include:
After this, you should carefully read the diagram that comes with the chandelier. This diagram will show all the branches, the order in which the wires are connected, and the connection to the switch. For example, if three different wires are connected to a chandelier, it is described in detail how the outputs are divided and how the lamps are connected.
The situation is different with grounding: the diagram may not contain information about the corresponding PE type wire (it is yellow-green). The other two - L (phase, brown or white) and N (zero, blue), will be marked and marked, which will make the procedure for installing the chandelier extremely simple.
The procedure for grounding a chandelier
In order to connect the “ground” to a chandelier that is already installed, carry out the following steps as reconnaissance:
When installing, the grounding steps for ceiling lights should be as follows:
Visual instructions for installing the “ground” for a chandelier are shown in the video:
Source
Necessary preparation
You need to start by learning the basics of electrical engineering. First, review the electrical safety rules. Then set an achievable goal. This can be connecting a halogen chandelier or a simple one, with 1 horn or several, with or without grounding, to single-phase or two-phase wiring.
Having determined your goals, proceed to study the instructions in the chosen direction. The electrical wiring of modern buildings is very different from that installed in older buildings. The number of cables on the ceiling for installing a chandelier, their purpose and the ability of the master to determine the markings are important for further work.
Ground wire
Modern urban planning regulations require grounding in all new buildings. Therefore, 3 cable ends on the ceiling do not mean that you have a three-phase network. 1 of them can be grounding, its tone is yellow-green.
If your chandelier has a wire of this color, then it is intended for grounding. If there is no such cable on the electrical appliance, the exposed grounding on the ceiling must be carefully insulated. Otherwise, a short circuit may occur.
Phases and zero
Having decided on the grounding, we clarify the purpose of the other wires. There can be 2 or 3 of them. Some 1 of them is necessarily zero, the remaining 1 or 2 are energized. Modern technologies make the work of electricians easier and help to immediately distinguish zero from phase. A contrasting color solves this problem. But it happens that the wiring is all white, then you have to figure it out yourself.
In this case, you should use control equipment - an indicator screwdriver. When it touches a contact with voltage, the indicator lights up as a signal beacon. First check whether the machine is turned on on the electrical panel of the apartment or house.
A reliable way to determine phases is to use a special tester. Turn on the voltmeter on the device and set the value to at least 220V. Then, holding the probes by the handles, alternately touch different pairs of wires. Be careful not to accidentally touch the metal parts of the probe with your hand to avoid electric shock. If the arrow does not move, then both phases are found, and the third wire is neutral. When connecting the probe to it, the device will show 220V. Mark zero with colored tape or marker.
Grounding of lamps
As a rule, in most cases, lighting (chandeliers, lamps) uses 2 wires (phase and neutral), and this is in the vast majority of cases.
There was information on the forum that it is very useful to also run a grounding wire and that supposedly many lamps are now being produced with the ability to connect grounding to their body.
Or does it only make sense for wet areas. Or in general, there are now only a few of such models of lamps out of hundreds that are not grounded.
Mega549 wrote: it is very useful to also run a ground wire
If the house is new (or reconstructed), then this is a mandatory requirement.
If you have an RCD installed, then! In a fire protection sense, it monitors your wires in relation to the protective conductor (the third wire “ground”). If you connect the lamp body to this wire, then the RCD will also monitor your wires in relation to the lamp body. Whether you need it is up to you to decide. Like this.
lev125 wrote: If you have an RCD installed, then! In a fire protection sense, it controls your wires in relation to the protective conductor (the third wire “ground”). If you connect the lamp body to this wire, then the RCD will also monitor your wires in relation to the lamp body. Whether you need it is up to you to decide. Like this.
no one practically ever does it for themselves and only writes on the forum what is necessary and should be done.
For example, I have a new building, so what? Cables with three wires for lighting are laid in the voids of the concrete slabs along the ceiling. but naturally this was intended to connect a chandelier with two groups of lamps to a 2-key switch, and not one chandelier with grounding.
You got excited about the iron floor and barefoot. This is no longer an RCD, but a machine gun will knock you out. If you have a new building, then three wires are laid not to connect two groups, but to connect a chandelier + PE. These are the requirements of the regulations even if there is no need to ground the lamp. If you want two groups, then pull the cable onto four wires.
Mega549 wrote: for example, I have a new building and what
It's clear. Those. This is exactly what you did to yourself. One large chandelier with 5 lamps, which is all turned on at once with a single-key switch. And all for the sake of having one wire with Pe.
So no one has expressed the situation on the lamp market, how common chandeliers with grounding are.
Mega549 wrote: no one has expressed the situation on the lamp market, how common are chandeliers with grounding.
It would be better not to meet.
HOW IT BANGED.
The green wire turned out to be the body of the chandelier, and there was some kind of voltage on the metal hook in the ceiling. I feel sorry for the chandelier. But then they bought spare parts and fixed it.
Mega549 wrote: One large chandelier with 5 lamps, which is all turned on at once with a single-key switch.
Or for 18 lamps with a control panel.
Once again: the PE conductor is included in the lines not only to ground electrical receivers, but also to increase the level of safety.
“7.1.70. In rooms without increased danger, it is allowed to use pendant lamps that are not equipped with clamps for connecting protective conductors, provided that the hook for their suspension is insulated. The requirements of this paragraph do not cancel the requirements of paragraph 7.1.36 and are not the basis for making two-wire electrical wiring.”
According to current rules.
VTB! wrote: It doesn’t have to be connected if the height is sufficient, the room is dry, the hook is insulated, and there is no Pe clamp on the lamp. It must not be used for other purposes.
Or at your own risk.
in my humble opinion
Gentlemen, well done. Everyone is so cultured. But how to deal with idiocy? You probably think that he will outlive himself. Maybe you are right.
And the idiot is talking about idiocy, and contradicting himself! Wow!
More specifically?
VTB! wrote: Once again: the PE conductor is included in the lines not only for grounding electrical receivers, but also to increase the level of safety.
and there may also be a tiled floor in the kitchen and a metal stepladder
I'm not an electrical expert and I'm having similar problems. I would be very grateful if you could advise me.
Question one: what to do if there is no grounding on the ceiling? The house was built in 1990; there are only two wires on the ceiling in the hallway: phase and neutral. We bought new lamps, they all have the ability to connect three wires, that is, + ground. The instructions, of course, indicate that it is also necessary to connect the ground. What to do in this case? Is it possible to do without land? Will there be any problems with the work?
Source
Electrical wiring with grounding
Dealing with ceiling wires
Let's consider a situation where there are three terminals on the ceiling, and which of them are phase, neutral and ground you do not know. To determine these pins we will use an indicator screwdriver
and
a test lamp
, which is a regular incandescent lamp and a socket with two terminals.
Of all three terminals, the greatest difficulty is in determining the zero and ground conductor, so we will focus on finding these two terminals.
And in order to exclude all possible coincidences, we will look for a grounding conductor
, since with respect to zero its search does not require changes to the lighting scheme.
Definition of grounding conductor:
The following actions are carried out strictly point by point. Be careful and careful, as some steps will have to be performed under live voltage.
.
A)
In the house or apartment, we disconnect all household appliances from the sockets.
b)
In the apartment or house panel we find the input circuit breaker and at its input (upper) terminals we use an indicator screwdriver to determine the phase and zero. As a rule, the phase is connected to the left terminal.
V)
We turn off the input circuit breaker and disconnect the neutral wire from its lower (output) terminal.
G)
We turn on the introductory machine. Turn on the light switch and use an indicator screwdriver to find the phase terminal on one of the ceiling terminals. Let's remember it.
d)
Turn off the light switch and use a screwdriver to check that there is no phase on the phase terminal. If the phase has disappeared, then we take the lead of the test lamp and connect it to the found phase lead. We insulate it with electrical tape.
f) Perform this step very carefully, since a small spark may occur when touching the ground terminal.
Turn on the light switch and use the free terminal of the control lamp to touch the remaining two terminals one by one. When touched, the lamp will light up, and it will be the protective grounding terminal. We remember or mark it.
and)
Turn off the light switch and the input machine. We connect the previously disconnected neutral wire to the lower (output) terminal of the input circuit breaker.
h)
We connect the chandelier terminals to the ceiling terminals. We turn on the opening machine and check the operation of the chandelier.
As you can see, the process of determining the grounding conductor is not very difficult. The main thing is to understand what you are doing and be attentive and very careful during the search process.
Wiring diagram for connecting a single-key switch:
In the diagram, the protective grounding conductor PE
indicated by a green vein. Just like zero, it immediately goes from the distribution box to the ceiling. The third terminal comes out from the ceiling and connects to the metal body of the chandelier.
A terminal block is provided to connect the terminals in the chandelier. As a rule, for convenience and ease of connection, each terminal of the block is marked, and therefore connection is not difficult. The main thing is to decide on the ceiling terminals.
In the same way, the grounding conductor is connected when connecting the chandelier to the double and triple switches.
Remember
. Grounding is not involved in the operation of the lighting circuit. It serves only to protect against electric shock.
There are cases when, due to design features, the chandelier body is 90% made of dielectric material and for this model the grounding connection is not provided by the manufacturer.
In this case, the ceiling ground terminal is not connected. Its end is insulated, for example, with electrical tape and left unconnected.
And in conclusion, I post two complete lighting wiring diagrams for one room using a single-key switch.
The first diagram shows a fragment of a local panel, which includes an RCD and a circuit breaker, and the second diagram is implemented using a difavtomat.
On a note
. One RCD can be used as a common one for the entire apartment or house, or it can be divided, for example, into two, so that one controls all lighting, and the second controls all sockets.
Complete wiring diagram using RCD.
Phase L
is supplied to the input of the RCD and from its output to the circuit breaker.
From the output of the switch, the phase goes through a three-core cable into the distribution box and at point 1
is connected to the core of the wire coming from the switch.
From output terminal L1
switch, the phase with a two-core cable enters the box, and at point
2
it is connected to the core of a three-core cable coming from the ceiling. With this cable, the phase goes to the ceiling and goes to the left terminal of the lamp.
Is grounding necessary for the chandelier? How to do it?
When designing an apartment's electrical network and installing a chandelier, it is necessary to take into account many important points and resolve several issues. One of them is grounding. This operation is not used so rarely, and for each individual case there is an answer with an explanation to the question of whether it is worth grounding the chandelier. What is grounding
high humidity in the apartment affects health
First of all, it is worth understanding what grounding is. The scientific formulation is limited to the fact that this is a procedure for connecting any electrical appliance to a grounding device. On the plan and in practice, everything looks quite simple: the “ground” (i.e. soil) will attract electric current to itself, reducing the network load.
This way you can achieve a lower voltage - otherwise a person will only be able to touch the chandelier once. The ground electrode itself will be located in the ground, which will act as a conductor for the current. The quality of the established connection is determined by calculating the resistance to current flow. This indicator can be improved by increasing the area on which the grounding electrodes are located or reducing the soil resistance in a separate area.
Is it worth grounding a chandelier?
Firstly, not all chandeliers (and, in principle, lighting sources) can be grounded, but only those that have a metal casing. The wiring connected to them is made using modern technologies and should be well protected. It is worth connecting the ground electrode for safety - it does not matter whether the room is dry or wet.
Connecting the “earth” is necessary in a new or reconstructed house, but it will not be superfluous for an old building either. By “closing” the chandelier, you can secure the room - since the voltage in the electrical network will decrease, the room will be completely safe. There is one more nuance - compatibility with automated fire protection systems. If such a system is connected, be sure to ground it.
Preparing to connect the ground to the chandelier
It is important to devote enough time to the preparatory stage - to collect the necessary tools, and also to prepare thoroughly. The tools you will need when grounding a chandelier include:
After this, you should carefully read the diagram that comes with the chandelier. This diagram will show all the branches, the order in which the wires are connected, and the connection to the switch. For example, if three different wires are connected to a chandelier, it is described in detail how the outputs are divided and how the lamps are connected.
The situation is different with grounding: the diagram may not contain information about the corresponding PE type wire (it is yellow-green). The other two - L (phase, brown or white) and N (zero, blue), will be marked and marked, which will make the procedure for installing the chandelier extremely simple.
The procedure for grounding a chandelier
In order to connect the “ground” to a chandelier that is already installed, carry out the following steps as reconnaissance:
When installing, the grounding steps for ceiling lights should be as follows:
Visual instructions for installing the “ground” for a chandelier are shown in the video:
What to consider
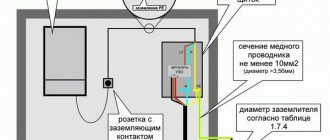
When using outdoor lighting on metal supports, grounding plays a key role in ensuring the safe operation of lamps. And this part of the PUE is regulated. When installing external lighting, you need to rely on the following points of the PUE:
- on all types of lamps used in outdoor lighting systems, protective grounding is mandatory and there are no exceptions;
- Grounding is organized using special grounding devices. These devices are designed for re-grounding, as well as protection against lightning surges and grounding of electrical equipment (luminaires) that will be mined on supports;
- the resistance that the grounding device must have is no more than 30 Ohms;
- Protective grounding for metal housings of local lighting lamps with voltages above 50 V involves the use of protective conductors. They are attached to the metal structure on which the lamp was installed. And a reliable electrical connection must be created for the bracket and the housing;
- for lamps, as well as for supports, grounding against atmospheric voltage is necessary;
- the total spreading resistance for grounding conductors (of any type) using reused PEN conductors should be within the range of no more than 5, 10 and 20 Ohms (depending on the line voltage).
PUE standards are developed for different situations, but have more or less universal application.
Is it possible to carry out electrical installation by grounding a lighting lamp from the grounding wire of the sockets?
The use of grounding conductors of another group is strictly prohibited, since if there is a sudden break or poor contact of the grounding conductor of the outlet group, the grounding of the lighting line will simultaneously be lost. You will need to carry out electrical wiring in accordance with the PUE and PTEEP.
Regarding the cost of work on a complex of electrical measurements. Count the number of sockets, lamps, panels and protection devices (circuit breakers, RCDs) installed in these panels. Indicate which and how many circuit breakers are installed in the switchboard (three-phase, single-phase). Call us and we will calculate the cost of the work within 3 minutes. If it is not possible to call, then send the above information by email.
PUE-7 1.7.124. Neutral protective conductors of circuits are not allowed to be used as neutral protective conductors of electrical equipment powered by other circuits, and also to use open conductive parts of electrical equipment as neutral protective conductors for other electrical equipment, with the exception of shells and supporting structures of busbars and complete factory-made devices that provide the possibility connecting protective conductors to them in the right place.
7.1.36. In all buildings, group network lines laid from group, floor and apartment switchboards to general lighting fixtures, plug sockets and stationary electrical receivers must be three-wire (phase - L, neutral working - N and neutral protective - PE conductors). Combining zero working and zero protective conductors of different group lines is not allowed. The neutral working and neutral protective conductors are not allowed to be connected on panels under a common contact terminal. Conductor cross-sections must meet the requirements of clause 7.1.45.
Other and useful information
Other and useful information
Wires on the chandelier
Connecting a chandelier with 2 wires is simple: screw one of them to phase, the other to zero. Which one goes where - it doesn’t matter. If there are two phases on the ceiling, and the switch on the wall is two-key, there are options:
How to connect a chandelier if it only has two wires? To the same wires on the ceiling in random order
On multi-arm chandeliers there are definitely more than two wires. We have decided on the purpose of yellow-green. This is grounding. If the same wire is on the ceiling, connect it to it. The rest also need to be dealt with.
A chandelier with 3 wires is not much more difficult to connect. If one of them is grounding (yellow-green), it can be:
Actually, there are no other options. Three wires are mainly used for lamps with one bulb. With two, this is an outdated design, with three, a more modern design that complies with current recommendations.
Rules for connecting wires
There are no small details when working with electricity. Therefore, we connect the wires in the chandelier according to all the rules. When combined into one group, it is not enough to simply twist them and screw on the protective cap.
You need to connect the wires from the chandelier and the switch in the terminal box
Such twist will sooner or later oxidize and begin to heat up. It is highly advisable to solder such connections. If you know how to handle a soldering iron and tin, definitely do this. This will guarantee normal contact and the connection will not heat up.
Now let's talk about how to connect the wires from the chandelier with the wires from the switch (which are on the ceiling). According to the latest rules, twists are not allowed. Terminal boxes must be used. Most modern chandeliers are equipped with them. If not, buy it at any hardware store or retailer of lighting fixtures.
When using such a terminal box, a problem arises: a twist of a large number of wires simply does not fit into the hole. Output: solder a conductor to the connection (copper, single-core or stranded, with a cross-section of at least 0.5 mm 2 ). This connection is well insulated, and the free end of the soldered conductor is inserted into the terminal box (a long one is not needed - 10 cm is more than enough).
Having inserted all the wires from the chandelier into the terminal block and tightened the screws, the entire structure is raised to the ceiling. There it is pre-fixed, after which the wires are connected to the terminal block in the required order. In this case, it is important to set “zeros” one opposite the other. Phases are connected to phases in random order.
How the wires on the chandelier are separated, how the conductor and the chandelier are connected to the terminal block - all this is in the video.
We connect the chandelier to single and double switches
Having dealt with the wires, proceed to the next step, which depends on the type of switch installed in the room. There are 2 options: two-key and single. You should use 1 key, and the second can be ignored.
Now let's look at different ways to connect a double switch. They depend on the number of horns in the lighting fixture.
With 2 lamps
When connecting a chandelier with 2 horns, zero is connected to both bulbs, and both phases are connected to 1 for each horn. In this case, when you press the 1st key, 1 light will light up, and when you press the 2nd button, another will light up.
The wires must be connected using special terminal blocks; this is a modern requirement for electrical safety. In this case, 1 part is enough. We connect zero to the first terminal, phases to the second, and ground to the third (if such a cable is provided for installing the lamp in this room).
With 3 lamps
When connecting a three-arm chandelier, the wires must be distributed in this way: attach the 1st phase to the first and second arms, and the 2nd phase to the third. Attach zero to all 3 horns. When you press the 1st key, 2 lamps light up, when you press the 2nd key, the third lamp lights up.
To work, you will need a connector with 4 terminals, or 3 if there is no grounding. Carefully monitor the location of the wires from the chandelier. Do not connect ends of different colors together to avoid short circuits.
With 5 lamps
The five-arm chandelier has the most variable set of connections. 1st option – 4 by 1, 2nd method – 3 by 2. In the first case, we attach the 1st phase to each of the 4 horns, and the 2nd to the fifth. In the second, we bring the 1st phase to each of the 3 horns, and the 2nd phase to the fourth and fifth. We lead the neutral cable to all connections.
As in the previous case, we separate the phases into different terminals. Make sure that the connection bolts are securely fastened and the location inside the fasteners. If you twist them together, you can solder them with tin. In this case, the service life of the nodes will be longer.
How to make grounding in an apartment if there is none
In old houses, a TN-C system is installed, which does not have grounding, and a two-wire wire is laid (phase and neutral). To ground the apartment, you will have to install new wiring, install an RCD, or install a circuit.
RCD connection
A residual current device, or, in other words, an RCD, will save a person from electric shock if there is no grounding in the house. Phase and neutral wires pass through the device. At the moment of electricity leakage, it determines the difference between the current strength passing between them and disconnects the contacts, thereby de-energizing a section of the network.
Reference! Electricians advise connecting an RCD regardless of whether there is grounding in the house or not.
There are two options for connecting an RCD:
fastening brick walls to reinforced concrete frame
The device has two input and two output terminals (phase and zero). Installation is carried out according to the diagram:
Installation of your own circuit
You can make your own grounding circuit with your own hands both in a private house and in an apartment building. In the second case, the work must be coordinated with the management company and comply with the requirements of the PUE.
Important! It is prohibited to use reinforcement as a grounding conductor. The reason is the outer hardened layer, which enhances the distribution of current, and the rapid rusting process.
Dangerous defense option
It is unacceptable to solve the grounding problem by connecting a PE wire to the water supply or gas supply system. In the event of a leak, the current will flow not through the wires, but through the pipes and battery, which can lead to electric shock not only to those living in the apartment grounded in this way, but also to neighbors.
System Features
A motion sensor and other elements of security systems are used here.
- creating the required level of illumination for the visiting part;
- sidewalk lighting;
- ensuring the required level of illumination in the territory, near fences and other barriers (for private houses);
- creation of a unified lighting and signaling system. A motion sensor and other elements of security systems are used here.
Road lighting
In order for outdoor lamps to work efficiently and for a long period of time, it is necessary to follow the requirements of the PUE. In this case, protective grounding of lamps is of great importance. To make proper grounding, you need to clearly understand this whole process. Therefore, a big role here is given to the protective function of outdoor lighting elements.
Note! For street meetings, any type of lamps and different power sources can be used. However, they must meet certain requirements to work outdoors.
Most often, outdoor lamps are installed on metal or reinforced concrete supports that stretch along roads and mourning roads. Recently, metal poles have been increasingly used to organize outdoor lighting. This is due to the following advantages of these types of supports:
- Possibility of use in different climatic zones;
- such supports can withstand large static loads;
- have a beautiful and aesthetic appearance;
- service life is longer than that of reinforced concrete structures;
Note! Metal outdoor lighting poles can last up to 75 years! Of course, provided that they, like the lamps installed on them, have high-quality grounding, carried out according to the standards established by the PUE. versatility
Any street type lamps can be installed on them
versatility. Any street type lamps can be installed on them.
Metal supports on roads
Connecting a Chinese chandelier
Most of the relatively inexpensive chandeliers on the market come from China. What's good about them is their large assortment, but there are problems with the quality of the electrical assembly. Therefore, before connecting the chandelier, you need to check its electrical characteristics.
First, check the integrity of the insulation. They can be assembled into one bundle and short-circuited to the housing. The tester should not show anything. If there are any indications, you have two options: look for and replace the damaged wire or take it for an exchange.
The second stage of testing is checking each horn. There are two wires coming from the horn. They are soldered in a cartridge to two contacts. Connect each wire to the corresponding contact. The device must show a short circuit (short circuit or infinity sign, depending on the model).
After checking, start grouping the wires as described above.
Design features of the ground loop
In single-phase and three-phase electrical networks, the ground loop circuits are practically the same. Several electrodes are buried in the ground, after which the entire structure is connected to each other, which becomes a grounding loop. The assembly itself is performed in the form of a triangle or square.
Sometimes the electrodes can be placed in series, forming an open circuit configuration. Each option is selected depending on specific conditions. Connections are made by welding or bolting, and then the finished system is connected to the distribution board through a special cable.
Why is arbitrary location of the contour not allowed? Correct installation requires compliance with certain rules and technical standards. For example, the minimum distance from the building is 1-2 meters, and the maximum is no more than 10 meters.
The depth at which the electrodes should be placed should also be taken into account. First of all, the characteristics of the soil, the presence or absence of groundwater, and their distance from the contour are taken into account. The elements are laid below the freezing level of the ground. This design allows you to create effective grounding of the bathtub in the apartment.
The material for electrodes is most often rods made of ferrous metal. First of all, these are various types of rolled metal - angles, pipes, smooth fittings, I-beams, etc. The complex configuration of the rental does not affect the functionality of the entire scheme; the choice should be made based on the convenience of driving certain structures into the ground. The most commonly used are steel angles.
Metal lighting pole features
Metal poles are most often used for installing street lighting due to their practicality and durability.
Metal products can be made from different types of alloys and can be:
- reinforced concrete;
- steel;
- aluminum.
If we compare steel supports for lamps and reinforced concrete poles, the former are superior to them in a number of indicators, ranging from weight and effectiveness to practicality. In addition, metal steel poles for outdoor lighting are cheaper than aluminum poles, which is why they are most often used for mounting lamps.
Connecting a halogen chandelier (with and without remote control)
Halogen lamps operate not from 220 V, but from 12 V or 24 V. Therefore, step-down transformers are installed in each of them and the entire circuit is assembled and ready for installation. Only two conductors remain free, which need to be connected to the wires sticking out on the ceiling. It is connected in any order, “phase” and “zero” do not matter.
If the chandelier is equipped with a remote control, a control unit is added to the transformers. The connection is similar: there are two conductors that need to be connected to the one on the ceiling. The third conductor coming from the other side (it is thin) is an antenna, with the help of which the remote control and the control unit “communicate”. This conductor remains inside the glass in the form in which it is.
How to connect a chandelier with a remote control, see the following video.
Stages of work execution
Work on installing and connecting diode spotlights is divided into three stages: searching for an installation site, preparing tools and materials, and direct connection.
Location determination
Here you need to move “from the end”: determine the area that should be illuminated by the spotlight, and then select the location for its installation so that the luminous flux falls on the desired area. Ideally, you need to make a diagram or draw a sketch. Make sure there are power sources nearby or route the wiring
It is important that the existing brackets are securely attached to the wall or selected object
Spotlights can be attached to the ceiling, supports, walls, and the main condition is the presence of a smooth surface for installation. The installation height depends on the dimensions and power of the product, the illuminated area, etc. It is recommended to mount small floodlights to a maximum height of no more than 16 m. Remember that these are multifunctional devices that allow you to easily set a specific angle of inclination.
Equipment and materials for connecting to the electrical network
During the work process you will need:
- side cutters;
- a stationery knife or a special tool for stripping wires;
- soldering iron with all accessories;
- insulating tape;
- screwdriver.
Connecting an LED spotlight with and without grounding
Read the instructions carefully. If it does not indicate anything about polarity, then you can ignore it when connecting to the network. To connect the spotlight, use flexible copper or any other conductor that is resistant to high temperatures (up to 160 degrees Celsius). There is not always a need for grounding, so you can simply insulate the yellow-green wire well and hide it in the back of the device.
Connecting a device to a particular network depends on the modification. These can be devices operating from a 220 V AC network, or equipment operating from 24 V DC sources. In the latter case, a regular household current rectifier can be used.
Before installation, inspect the body of the spotlight and make sure there are no visible mechanical damages. Free the terminal block by removing the cover to gain access to the terminals and ground connections. Unscrew the stuffing box and de-energize the room by turning off the power supply from the common distribution panel.
When replacing the spotlight with a new one, you need to throw away the old one, having first removed all the wires from it. It is advisable to select devices for which an identical mounting structure is suitable. Install the cover on an empty space - this element will protect the wires from water ingress.
Place the spotlight, attach the screws and bolts, remove the wires from the box and connect them to the required ones in accordance with the electrical diagram. Using a soldering iron, ensure secure fastening and good contact on the wires. Insulate, hide the connections inside the terminal box and replace the cover by tightening the bolts. Special latches can also be used for these purposes.
Tighten the screws on the floodlight to firmly attach it to the installation location. Apply power and make sure the light fixture is functioning.
Do I need to install a grounding conductor to the light fixture?
2. It is strictly prohibited to use PE conductors of plug sockets or other consumers to connect lamps that are not related to this group line.
3. To connect a lamp from a group lighting line, it is necessary to lay a branch of the protective conductor from the junction box or from the power panel, thereby ensuring the reliability of the connection of the protective conductor of the lamp to the neutral protective conductor of the general group circuit and the independence of its disconnection.
PUE-7 1.7.144. The connection of each open conductive part of the electrical installation to the neutral protective or protective grounding conductor must be made using a separate branch. The series connection of exposed conductive parts into the protective conductor is not permitted. The connection of conductive parts to the main potential equalization system must also be made using separate branches. The connection of conductive parts to an additional potential equalization system can be done using either separate branches or connection to one common permanent conductor.
7.1.36. In all buildings, group network lines laid from group, floor and apartment switchboards to general lighting fixtures, plug sockets and stationary electrical receivers must be three-wire (phase - L, neutral working - N and neutral protective - PE conductors). Combining zero working and zero protective conductors of different group lines is not allowed. The neutral working and neutral protective conductors are not allowed to be connected on panels under a common contact terminal. Conductor cross-sections must meet the requirements of clause 7.1.45.
7.1.68. In all rooms, it is necessary to connect the open conductive parts of general lighting lamps and stationary electrical receivers (electric stoves, boilers, household air conditioners, electric towels, etc.) to the neutral protective conductor.
Other and useful information
Other and useful information
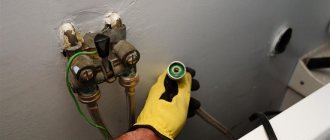
How to find the ground wire
Looking at the ceiling you can see wires sticking out from there. There may be two, three, or even eight. At least one of them is definitely zero, and new houses may also have a grounded wire. The rest of the wires are phase.
If your chandelier has a ground wire, but there is none in the wiring, it’s okay. According to the standard, it should be yellow-green in color.
You just need to insulate it well and leave it unconnected. But it is imperative to insulate it, otherwise laziness and inattention can lead to a short circuit and fire in the wiring.
Brackets fastening process
There are holes at the bottom of the supports where power cables are inserted and then pulled up. Brackets are then bolted to the tops of the supports. The number of horns should be selected in advance. After this, the lamps are connected and the light bulbs are screwed into them.
The work ends with checking the integrity of the power cable, as well as the correct connection of each lamp. Metal supports are grounded using a special cable. It is attached to the ground bolt (one end), and the other end is connected to the ground loop. The minimum circuit resistance is 40 Ohms.