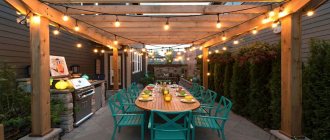
An important component of comfort in a gazebo is lighting. The lack of light both indoors and outdoors creates inconvenience for guests and hosts - in the evening it becomes dark, people begin to feel sleepy, and the rest gradually begins to end with the onset of complete darkness.
Fantastic lighting for a summerhouse
Attempts to quickly make light in a gazebo usually end in failure - the lighting of a portable flashlight or telephone is clearly not enough for a gathering of a good group of people.
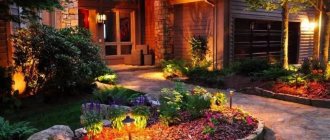
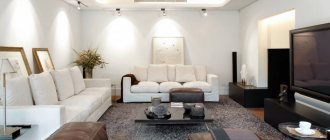
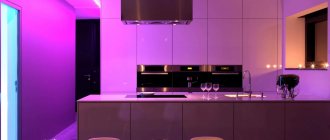
In addition to convenience, light can also perform a decorative function. Illuminated gazebos look amazing not only in photographs, but also in real life (photo on the right).
By adding warm weather, bubbling meat on the grill and interesting dialogue among the guests, you get an amazing vacation that will bring pleasure to everyone without exception in the team.
Types of lighting
Lighting methods are usually divided into three types - general, local and decorative.
General
This type is designed to illuminate the entire room or area (in this case, a gazebo). Lighting should be bright to cover the entire area. However, at the same time, the nature of the room should be taken into account: a gazebo in the evening usually acts as a resting place, so soft warm light is preferable, not too intense, so as not to tire the eyes.
Local
Local lighting is used to illuminate small areas. Examples of such light sources include floor lamps, sconces, and night lamps. All of them are designed to illuminate local areas, and not the entire room as a whole. In the gazebo, local light is used for reading or any other purpose when increased luminous flux is needed in a specific area.
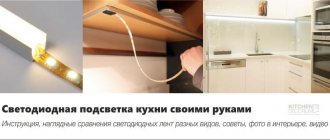
In gazebos equipped with a barbecue or kitchen table, LED strips or built-in LED lamps are used as a local source, which are placed above the work area. Sconces with manually variable luminous flux are also popular.
Decorative
General and local lighting has a functional purpose, while decorative lighting is used exclusively for beauty. There are no special nuances when organizing decorative lighting. However, in any case, it is necessary to adhere to the same safety rules as when organizing street lighting.
In the field of decorative lighting, three types of devices are known:
- One of the most commonly used options for decorative lamps is garlands. They are characterized by low electricity consumption and affordable prices.
- Hidden lighting. Recessed luminaires, most often equipped with LED bulbs.
- Chinese lanterns. The main advantage is the original appearance. Some models use candles rather than lamps. This option looks impressive, but from a fire safety point of view it is not the best choice.
Relationship between gazebo type and lighting system
Open gazebo
A very interesting option is a wooden chandelier, fixed in the center of the gazebo on the ceiling crossbar. To balance the distribution of light flux, you can additionally install a pair of shades along the edges of the gazebo. Another popular way to illuminate an open gazebo is with lanterns placed on the side of it. Since they extend beyond the building, the lamps must have an appropriate level of moisture protection and dust protection - at least IP55.
Closed gazebo
In closed gazebos you can use any lighting equipment - without restrictions. You just need to adhere to the general architectural style of the room. Forged chandeliers, sconces, wall lamps, and floor lamps are popular. Spot LED sources can be built into the ceiling of the gazebo. As for moisture and dust resistance, a device marked IP44 is quite sufficient. Recommended device power is 75 W.
Lamp location
Lighting fixtures in the gazebo can be placed in the following areas:
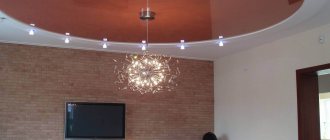
- In the center of the ceiling. Most often we are talking about a chandelier. This is the most common lighting option. The disadvantage of this approach is the inability to illuminate a specific area of the room, since the light is distributed evenly throughout the gazebo.
- Wall lamps in addition to the main lamp. The best option, as it allows you to combine general and local light.
- LED sources along the perimeter of the ceiling. This approach allows you to obtain high-quality lighting with directional light fluxes. In addition, LEDs consume very little electricity.
- Illumination using LED strip. These are the same LEDs, but they are located in a strip that can be moved to any location as desired. Mobility is the main advantage of such a source. However, the LED strip does not produce a very bright glow, and using it as the main lighting is not the best option.
- Several sconces on the walls of the gazebo. Lamps of this variety allow you to create a romantic, cozy atmosphere. There are sconces on sale that are equipped with batteries, so there is no need for electrical wiring to use them.
How to choose the right option
To choose the option you would like, you should stock up on information, which for the most part is located on our resource.
Here you can see many photographs that are characterized by exclusive design solutions
From the video you can learn about the main materials used in the construction of gazebos, as well as the lighting and basic lighting used in them. It is very important to choose the right place to build a gazebo, which should not be too lit or constantly in the shade. So, in addition to the main lighting, sometimes lighting is done in the gazebo. This can be done using energy-saving lighting devices.
Types of power supply and lamps
Most electrical equipment runs on a stationary network or regular batteries. However, extraordinary methods of power supply are also possible.
Solar panels
If there is no electricity at the dacha, an alternative method of powering lighting equipment is possible - from solar panels. Solar energy avoids electricity costs. The principle of operation of batteries is based on the use of energy coming from the sun's rays. Electricity not consumed during the day is accumulated by the battery and used at night.
Solar-powered lighting equipment is most suitable for southern regions with an abundance of sunny days. In low temperatures and cloudy weather, battery efficiency is significantly reduced.
Standard Power Supplies
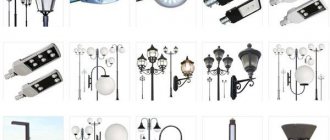
There are several types of lamps that operate from an electrical network or regular batteries:
- Incandescent lamps. They are characterized by low cost and resistance to voltage surges. The latter quality is especially important in a country house. However, such light bulbs also have significant disadvantages: short service life, high energy consumption, low light output, predominance of radiation in the red-yellow spectrum.
- Fluorescent lamps. They are characterized by high luminous efficiency, low energy consumption, long service life, and no flicker. Suitable for both pendant and wall lamps. They are considered outdated, as they also have important disadvantages: failure due to frequent switching on and off, contraindication of fluorescent radiation for certain diseases, toxic contents, high cost.
- Halogen lamps. Positive characteristics: long service life, economical energy consumption, environmental friendliness, compactness, high quality luminous flux. Disadvantages: tendency to overheat, high cost.
- LED spotlights. The best option for lighting a gazebo. They are distinguished by high quality glow, long service life, impact resistance, moisture resistance, efficiency, and lack of overheating. Disadvantages of LED devices: high cost, small angle of light propagation. Due to the latter circumstance, the use of LEDs is justified only for local lighting. If you use spotlight LEDs to organize general lighting, they need to be evenly distributed across the entire ceiling of the gazebo.
- LED strips. They have all the advantages of spot LEDs, plus they are also mobile. The downside is the lack of power.
Features of the material
Natural wood, in addition to its aesthetic properties, has a number of significant advantages. Products made from it are easy to use and environmentally friendly. When heated, wood does not emit toxic substances, but on the contrary, it has a beneficial effect on people with chronic respiratory diseases, having healing properties. This effect is especially typical for coniferous species.
Wood is a material sufficiently pliable that in the skillful hands of a master it can acquire exactly the forms that he intended. Therefore, any creative design ideas come to life. Luxurious photos of exclusive wooden lamps easily convince of this.
The material is quite versatile, due to which it can be used widely, in almost any type of interior. Interesting configurations and a variety of shapes allow the item to organically fit into any style.
Lamps made of wood in the interior look solid and noble, and besides, they go well with objects made from a wide variety of materials: plastic, glass, metal.
Along with the listed advantages, wood also has disadvantages. It is highly flammable, for this reason the products should not be placed in rooms containing fireplaces, gas stoves and other sources of possible ignition.
The material is very sensitive to temperature changes and high humidity, so placing wooden lamps in the bathroom or kitchen is extremely undesirable. In addition, wood attracts small pests - termites and other insects. It is advisable to coat the products with special protective compounds that will prevent their appearance and protect the material from deformation.
When using an electrical appliance, observe a number of simple precautions:
- place the light source at a sufficiently large distance from open fire (fireplace, stove);
- remember that the optimal location for the device is considered to be rooms with normal humidity levels and room temperature;
- wooden lamps do not allow the installation of ordinary incandescent lamps in them: their heating temperature is too high, it is unsafe; use LED, halogen, fluorescent lamps.
Installation rules
The arrangement of lighting in a gazebo is no different from the arrangement of light in any other object. However, it should be taken into account that the gazebo is an open or semi-open room operating in conditions of high humidity. In this regard, special attention should be paid to the safety of electrical wiring and lighting equipment. When arranging lighting, it is recommended to adhere to the following rules:
- Work begins with the allocation of several power lines in the house for the needs of the gazebo and lighting of the area adjacent to the facility. Below is a general diagram of the division of electrical power into several lines (indicated as “sockets”). According to current regulations, the circuit must involve an RCD (residual current device).
- If the gazebo does not have such a powerful consumer as a boiler near the barbecue, then a cable with a cross-section of 2.5 square meters will be enough for the lamps alone. mm. If you have a water heater, you will need a wire with a cross-section of 4 square meters. mm or more. As for the wire material, copper is preferable, and in extreme cases, aluminum. However, no matter what material is chosen, the connection of different types of metals (copper and aluminum) is not allowed, since in this case oxidation and breakage are inevitable. If there is still a need for a connection, it is made with bolts through a metal washer.
- When organizing street lighting, a grounding loop is required. Moreover, it does not matter whether the gazebo is made of metal or wood. The only difference is in the consequences: in the case of a metal surface, visitors to the gazebo will receive an electric shock, while a wooden structure will simply burn out.
- It is recommended to separate separate power lines for the gazebo and lighting of the surrounding area. This approach is more economical and easier to implement. For each line you will need a 10-16 A machine. There is no need to install an overly powerful one, since it simply will not react in the event of an accident. The figure below shows a diagram of an electrical panel with a single-phase meter and three-line circuit breakers.
- A schematic diagram of connecting general and local light is shown in the figure below. It can be modified if desired.
- It is prohibited to install household switches and sockets in outdoor facilities. Only waterproof fittings are suitable for the gazebo.
- Distribution boxes must be sealed, made of metal with an anti-corrosion coating. In the case of a wooden gazebo, a metal plate is installed under the plastic junction box. The wiring is carried out using metal or plastic corrugations.
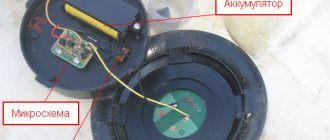
- Recently, solar-powered lighting devices with photovoltaic elements have become in demand. During the day they are recharged, and in the dark the photocell turns on the light. There are personal and complex devices. In complex systems, one large panel powers several luminaires. In personal ones, all flashlights have their own batteries. The following figure shows a diagram of the operation of an autonomous solar battery system.
- For rooms with high humidity, the installation of low-voltage lamps is justified. However, in this case you will need a step-down transformer. This device works according to the traditional scheme, the only difference is that a transformer is added to the system.
- There are several types of LED strips. All of them are connected in parallel. In other words, a wire pair comes from the power supply, and the required number of tapes is attached to it. The parallel connection diagram is shown in the figure below.
Interesting ideas
And finally, we present to your attention some interesting photos of the lighting in the gazebo:
We also recommend viewing the article: how to connect a motion sensor for lighting!
Lighting installation
Selection of electrical equipment
The first thing to do is to select the appropriate electrical equipment. We are talking about sockets, switches, automation equipment (light sensors, motion sensors, etc.).
It is recommended to pay attention to the following factors:
- Degree of dust protection and moisture protection. After the letter code (IP), there are two numbers in the marking code. The first indicates protection from moisture, and the second - from dust. The higher the number, the higher the level of protection. Electrical equipment with a degree of protection of at least IP45 is suitable for a gazebo, but it is better to choose even more protected devices.
- For outdoor installation, hidden wiring is prohibited. Therefore, you can only consider those options where open electrical wiring is used.
- Lamps must be equipped with lamp protection (have shades). This is necessary for greater moisture protection of the lamp.
- If timers, transformers or other similar electrical equipment will be installed, you will need a moisture-proof cabinet.
Lighting diagram and wiring
When organizing lighting, you should keep in mind the following points regarding the lighting scheme and wiring:
- Lighting is supplied from a separate group. The machine is installed in the switchboard. The rules for the installation of electrical installations require the separation of loads in residential and commercial premises. In this regard, if there is an electrical panel in the utility room, the gazebo is powered from it. However, the cable can be run from home if the option described above is not available for some reason.
- For power supply you will need a circuit breaker of 16 A or less. It is recommended to carry out calculations in advance in order to select the correct wire cross-section and automatic input device.
- Since the electrical network is located outdoors, there is a risk of mechanical damage. In this regard, it is advisable to install a residual current device. This will protect residents and guests of the house, as well as pets, from electric shock.
- Wiring is installed using one of two methods: underground or overhead. Underground involves laying the cable in a plastic pipe or corrugation. The air laying method is more common. Conductors are protected from damage using corrugations made of metal or plastic. A steel cable is used to support the overhead line.
- According to the requirements of the Electrical Installation Rules, metal corrugation used outdoors must be equipped with a seal. The corrugation needs to be sealed to avoid getting wet.
- If the conductor goes to the gazebo from the group machine along the wall of a wooden building, it is necessary to use a metal corrugation. In the case of brick buildings, plastic will suffice.
Arrangement of wiring in the gazebo
Below we will consider an option in which general, local and decorative lighting is installed in the gazebo. Sequencing:
- First, the power cable is connected to the facility where lighting is planned. Next, install the junction box. In the case of a wooden gazebo, the base of the box or its entire body must be metal. You can place a sheet of tin under the plastic box. In this case, it should protrude at least one centimeter on each side.
- If the base of the gazebo is made of non-flammable materials, you can use a regular plastic box.
- The main light is powered from a switch. It is mounted at the entrance to the gazebo. For two-level lighting you will need a double switch. If there are more levels, an additional switch is installed nearby.
- The local lighting is also powered by the switch. Moreover, this device should be located next to the local light lamp. The ideal option is that the switch should be on the sconce. However, it is difficult to choose a sconce that has a switch with a high level of moisture protection. In this regard, a popular option is with a conventional outdoor switch installed in close proximity to the sconce.
- Decorative lighting is powered from a light sensor (the light will turn on automatically as soon as it gets dark) or from a timer (turns on the light according to time). You can also power it in the traditional way - from a switch.
- If desired, you can organize combined control of decorative lighting. One of the methods involves installing a switch in front of the sensors, as a result of which the automation will only work when the key is in the “lights on” position. The switch can also be used in parallel with sensors, which makes it possible to use the backlight at your discretion.
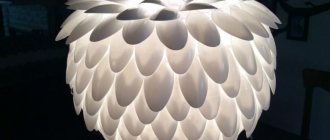
How to make a chandelier with your own hands from thread tassels and hoops
CBC Life YouTube channel
What do you need
- Yarn;
- small photo frame;
- scissors;
- 3 sets of wooden hoops of different diameters;
- 3 identical short and 1 long metal chains;
- pliers;
- bulb;
- lamp pendant.
How to do
1. Wrap the yarn around the photo frame many times and cut. Take a small piece of thread and tie it on top of the yarn so that the ends remain. Cut the threads on one side, where the frame hole is located.
CBC Life YouTube channel
2. Remove the yarn from the frame and fold it in half. Place the knotted thread in the middle so that its ends are at the bottom and the loop is at the top. Details are in the video below. Cut another piece of thread and use it to tie a tassel just below the loop.
CBC Life YouTube channel
3. Make the rest of the tassels in the same way. The quantity depends on the diameter of the hoop. The threads should frame them tightly.
CBC Life YouTube channel
4. Remove the center hoops from all hoops - you won't need them. Open the large hoop and put some of the tassels on them by the loops.
CBC Life YouTube channel
5. Close the large hoop. Place the tassels on the rest in the same way.
CBC Life YouTube channel
6. Make nine pieces of thread. Place the middle hoop into the large one and tie them in three places at the same distance from each other.
CBC Life YouTube channel
7. Place a small hoop inside and tie it to the middle one in three places. These threads should be located approximately in the middle between those that connect the large and medium ones.
CBC Life YouTube channel
8. Turn the design over and straighten the tassels. Tie short chains to a large hoop at equal distances from each other.
d4c5718f04fb1bf7f757872dfe63c9da.jpe
CBC Life YouTube channel
9. Use pliers to open the end link of the long chain. Place the attached chains on it and close it.
CBC Life YouTube channel
10. Attach the pendant to the ceiling, screw in the light bulb and thread the lampshade through the bottom. A long chain can be hung, for example, on a hook mounted on the ceiling next to the base of the chandelier.
What other options are there?
There is another way to mount a chandelier. Place a metal ring on the lamp hanger and attach chains tied to the hoop to it. The detailed process is shown in the video below. By the way, the technology for making brushes in it is slightly different. And the author does not use a hoop, but metal hoops.
The tips of the brushes can be painted in a contrasting color:
Or make a gradient chandelier from colored threads, like here:
Homemade lamps
There are many ideas on how to make a lamp for a gazebo with your own hands. The following materials can serve as the basis for such a lamp:
- bottles (glass or plastic);
- cookware;
- old lighting fixtures (plafonds, floor lamps);
- flower pots;
- radio engineering parts.
As an example, consider several options for making lamps for a gazebo:
- From a glass bottle. Beads or decorative beads are placed at the bottom of the bottle. A long wire spiral is wound around the rod. Lower the rod into the bottle. Next, an LED is attached to the neck of the bottle using glue.
- Tree branches and a balloon. Thin branches are cut from the tree and carefully glued to the ball - over its entire area. Some distance should be left between the branches for light. When the glue dries, the ball is deflated and removed. A socket with a lamp is installed in the resulting wooden structure. The lamp looks decorative and will organically fit into the interior of both wooden and metal gazebos.
- Aluminum pan. A design is applied to the clean surface of the old pan. To make the contours clear, use an electric drill. A hole is drilled at the bottom of the pan to the size of the cartridge. Next, a lamp is installed in the socket. The lighting device is ready. If desired, the structure can be painted.
Choosing lighting fixtures
A large selection of this equipment allows you to choose a product that matches your interior style and type of food. If lamps are used as decoration, then decorative lamps made in the shape of animals or figures will look interesting.
When choosing street lights, you should consider the type of landscaping in your yard. Lanterns are placed along the path leading to the house or gazebo, near the pool, flower beds, and sculptures. A popular type of power here is solar panels. On the outside of the building, sconces are also attached, which are made invisible or made to look antique (example in the photo).
Photo: wall-mounted street lamp
A floor lamp is appropriate indoors as an additional light source when it is not possible to install several switches in the room. It is convenient because it can be easily transported to another place.
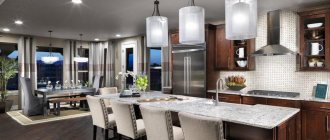
If you choose a standard type of lighting - a ceiling chandelier, then it is better to choose one made of glass, wood, or with forged metal elements.
A homemade device made from improvised materials will cost inexpensively, since you do not need to purchase material for it.
Additional Security Measures
Mentioned above are some safety rules regarding the organization of electrical wiring in the gazebo (selection of a suitable cross-section and protection of the cable with a corrugated pipe). It is also important to eliminate overloads in the electrical network. If many switches are used, an automatic circuit breaker will be needed. This device will protect the network from overloads and turn off the lights when critical indicators are reached.
Too bright lighting is uncomfortable for vision. Therefore, for normal perception of light by the visual organs, it is recommended to use lamps with matte shades. A useful feature of lighting equipment is the ability to adjust the brightness of the light.
Conclusion
From a technical point of view, installing gazebo lighting according to the schemes presented above is simple; as practice has shown, it is more difficult to create a single ensemble, but here everyone has their own taste. The video in this article contains interesting thoughts on this topic, if after watching you still have questions, write in the comments, I will try to help.
The lighting technique for the terrace and gazebo is similar.
Did you like the article? Subscribe to our Yandex.Zen channel