The socket is an important element of the lighting device; it connects the base to the electrical cable and secures the lamp. And in some models of lamps a shade or lampshade is attached to it.
If you don’t know how to connect the socket to the wires on the ceiling, and don’t want to call an electrician, then try to figure out the installation yourself. To carry out high-quality work, you need to understand how it works, study the installation features of different types of products, and follow safety regulations. After this, you will be able to repair the failed device yourself.
Marking of electric sockets
All electric cartridges have a similar operating principle. They differ in design, size and materials. But regardless of the type, this device plays an important role in lamps - it conducts current to the light bulb.
Quite often, people who are far from electricians have problems deciphering the markings that are applied to the body of the device. It consists of letters and numbers that determine the power and voltage of the device.
Explanation of the markings of common cartridges:
| Marking | Maximum load current (A), power (W) | Features of cartridges |
| E14 | 2A, 440W | Type – threaded. Minion is used for low-power light sources. |
| E27 | 4A, 880W | Type – screw. The thread is round. Can be installed on almost all ceiling, table and wall lamps. |
| E40 | 16A, 3500W | Type – screw. The thread is round. Material – ceramics. Suitable for high-power luminaires. |
| G4–G10 | 5A, 60W | Pin cartridges. Used with low-power light bulbs. |
| G9 | 5A, 60W | Type – pin. Suitable for bases that have a flat contact. |
| GU10 | 5A, 50W | Connects to low-power halogen bulbs and LEDs. Has an increased diameter of the entrance to the base. The detachable connector is first inserted and then turned clockwise to make the fixation more secure. |
| G13 | 4A, 80W | Suitable for tubular lamps. After installing the lighting element into the socket, it must be rotated at a right angle relative to its axis. |
| GX23 | 2A, 75W | Has 2 contacts. Suitable for U-shaped discharge lamps or LED cylindrical devices. |
| G24 | 2A, 75W | Has 4 contacts. Suitable for connecting U-shaped fluorescent and tubular LED light sources. |
| 2G7 | 2A, 50W | Equipped with 4 contacts. The same light bulbs are installed in it as in GX23, 2G7. |
| GX53 | 5A, 50W | The design is similar to the GU10 cartridge, but the GX53 is thinner. The device is connected to spotlights. |
Cartridges designated E (Edison) are used with screw bases, and G – with pin bases.
The number in the marking determines the base diameter (mm) for type E devices, or the distance between contacts (mm) for type G products.
Attention! Full load current and power depend on the material from which the cartridge is made. For example, ceramic devices are designed for higher current, so more powerful light bulbs are connected to them than to plastic ones.
Features and application of some types of lamp bases
Screw base E
The labeling of this group is quite simple. It includes the letter “E” and the designation of the body diameter. For better compatibility, you can often find special adapters that make the job much easier. The most popular sockets of this type are E10, E14, E27, E40. This subspecies is used for both incandescent and energy-saving and LED lamps. The most popular are the classic E27 and E14. The largest type is used for lighting large areas - streets, parks, industrial buildings.
Pin socket G
This type of design uses pins and does not have any threads. They are used in small halogen light bulbs, as well as built-in and spotlights. The most common of them are G4 (the most compact, designed for spot lighting of interiors), G5.3 (most often found in ceiling lamps), G9 (used in decorative lighting under 220 V voltage), G10 (sometimes found in wall lamps) , G13 and G23 (used in standard fluorescent lamps for indoor lighting, but have a larger illuminated area than incandescent lamps).
Base with recessed contacts R
This is a type of base that is designed for high power and temperature, designed for halogen, tubular and quartz lamps. The marking also contains numbers indicating the length of the tube in mm.
Pin base B
This same group is notable for its asymmetrical edges, which are installed in the socket according to a strictly specified position, an example of focusing light in a specific position, which is necessary in car light bulbs. This option is more compact than the standard Edison screw and features a faster process for replacing a broken lamp.
Soffit plinth S
This is a type of double-sided plinth structures designed to illuminate bathrooms or illuminate various objects (showcases, license plates, mirrors). Often used in stage equipment. It is distinguished by the characteristic arrangement of contacts on both sides. Marked Sx, where x denotes the diameter of the body. Can be fixed on both sides or on one.
Focusing base P
This base variation is made using a prefabricated lens to direct the flow of light. They are used for navigation lights, film projectors or searchlights. When marking, the diameter of the flange that focuses the light, or of an arbitrary part of the body, is indicated.
Telephone socket T
These rarely seen designs usually provide fine illumination of equipment, on a computer keyboard or in control panels. The terminals are installed on an external base, the width of which is indicated by marking numbers.
A rare variety that is often used in projection equipment.
Baseless type W
The most elementary subtype, where wire contacts are brought out through a glass flask, the thickness of which with one current terminal is indicated in the marking. Next, put the multiplying sign for the width of the base in millimeters. Examples of them can be found in garlands and as direction indicators.
Device
The design features of the cartridges depend on the series. Type E devices are most often used. Therefore, the structure of cartridges can be considered using their example:
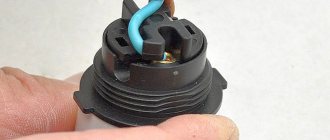
- The outer body with a sleeve on which there is a thread.
- Donyshko.
- The insert on which the contacts are placed.
Thanks to two brass plates on the insert and threaded mounting strips, electric current is supplied to the detachable lamp connector.
In the image above you can see how the plates are in contact with the base part.
To avoid electric shock, connect the phase conductor to the central contact of the base.
G-type sockets function in the same way, but their structure is simpler than that of the E-series devices. In addition, the pin devices transmit current to the detachable bulb holder in a slightly different way.
Modern European sockets
Connecting two wires to an outlet was used before - about 10-15 years ago. Nowadays, sockets manufactured according to European standards are used. When you open such an outlet, you can see not two, but three wires inside. The first of them, the phase one, which is energized, has any color except blue. Blue or cyan coloring is used for the neutral working conductor. The third wire, painted yellow-green, is called protective neutral.
In European sockets, the phase conductor is located on the right, and if in switches, then on the top. The protective neutral conductor is located on the left in sockets, and on the bottom in switches. The role of the first two wires has already been clarified; it remains to answer the question: what is the third, protective wire for? When the equipment connected to the outlet is in fully working order, the zero is inactive. Its protection occurs during a short circuit, when current enters areas that are not usually energized. The protective wire will take this current and redirect it to the ground or to the source. That is, you will only feel a slight electric shock.
In general terms, we found out what phase and zero are. These values are basic for all electrical networks.
Mounting methods
If the cartridge fails, it must be replaced. Beginners are interested in how to do this.
The device is secured in the lighting device by the bottom part. The cable entry hole has a thread. The E14 cartridge is manufactured with a threaded entry - M10x1, and E27 - M10x1, M13x1 or M16x1.
There are several options for mounting the device: by a conductive cable, on a tube, using a sleeve or screwless clamps.
For conductive wires
Connecting directly to conductors is prohibited. First you need to securely fix the device in the chandelier. To do this, a nylon or polyamide sleeve is screwed into its bottom, which is equipped with a hole for wiring. Then the cable is secured with a screw. This is necessary to protect the conductor from bending or breaking.
Wire distribution
It is best to distribute the wires at the stage of forming the suspended ceiling frame and secure them to the frame in advance so that when drilling holes for the lamps, you can get the wire loops and make the connection.
As a last resort, the wire is supplied to the first of them, and for all subsequent wires they are threaded from hole to hole. The disadvantage of the latter option is the impossibility of securing the wires to the frame, and they will simply lie on the surface of the suspended ceiling material.
With normal advance distribution of the wire, it is enough to lay a two- or three-core cable along the optimal route to all installation locations of the lamps, leaving a loop of 10-15 cm of bent wire at each point.
Fastening to the frame should be done using plastic ties, but not tightly and with a slight sag of the wire, without tension. This will prevent damage to the wire due to thermal changes in its length. After this, you can begin covering the suspended ceiling.
When installing a suspended ceiling, place the wires close to the intended recess locations for the light bulbs. Professionals advise doing this by leaving a 10-15 cm loop around the entire perimeter of the ceiling: this way you can change the layout of the lamps at the last moment, if necessary.
Calculation of the number of lamps
It is advisable to purchase lamps of the same type and from the same company, so that there are no problems with design and direct installation. Consider the area illuminated by LED lamps - about 1.5 - 2 square meters. It is better to buy more lamps than to suffer from a lack of light.
Don't overdo it: take into account the entire weight of the structure on the ceiling. Modern lamps are often made with metal frames, which can lead to uneven ceilings.
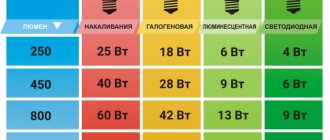
Depending on the area of the room, you can determine the optimal value of the required power level using the existing table:
| Room area sq.m. | Very bright light ~ 500 lux | Bright light ~ 300 lux | Soft light ~ 150 lux |
| less than 6 | 150W | 100W | 60W |
| from 6 to 8 | 200W | 140W | 80W |
| from 8 to 10 | 250W | 175W | 100W |
| from 10 to 12 | 300W | 210W | 120W |
| from 12 to 16 | 400W | 280W | 160W |
| from 16 to 20 | 500W | 350W | 200W |
| from 20 to 25 | 600W | 420W | 240W |
| from 25 to 30 | 700W | 490W | 280W |
There is now a new model on the market called “dancing light”, the rays of which perfectly illuminate the surfaces around the bulb, which creates additional illumination in the room.
Forming holes for lamps
Prepare a bit for drilling into wood. Usually they drill sockets for switches and furniture elements for wires (for example, a tabletop). At the end you will get perfectly even circles for further processing.
Measure the diameter of the protruding part of the lamp and drill holes 1 cm smaller than this circle - this will allow you to remove the wires from the visibility of the suspended ceiling.
You can finally decide on the position of the lamps only after the ceiling is completely sheathed. During the design, the moment of placing the spots at a distance from the frame elements was already taken into account.
Now you should also take into account the location of the seams between the elements of the suspended ceiling; this is especially important when installing lamps in a suspended ceiling covered with plastic or aluminum. If the lamp is placed at the junction of the ceiling elements, then it should be moved to the middle of one of the strips
The holes are drilled using a special wood bit, which also drills recesses for the socket boxes. In this case, perfectly straight holes are obtained; this option allows you to effectively fix the lamp in drywall. The diameter of the holes must be selected in accordance with the dimensions of the devices used.
It should be 3-4 mm smaller than the outer diameter of the front part of the lamp, but larger than the dimensions of its inner part. The most commonly selected size is 60 or 75 mm
Important: Remember that once you drill a hole, it cannot be moved, so once again make sure that its location is correct
Possible problems and ways to solve them
The socket may need repair if the bulbs frequently fail, flicker, or when you turn on the lights you hear a burning sensation or smell burnt. Remove the cartridge and check the connections. If the contacts are darkened, they need to be cleaned and reconnected.
The contacts may turn black if the wires leading from it to the lighting equipment are poorly connected. Then you need to check the wiring and, if necessary, clean it.
If the light bulb emits a dim light, a burning smell is felt, and a buzzing sound is heard, then it is best to completely disassemble the device. It is necessary to inspect all the cores, clean the plates, if you need to bend them closer to the contact with the detachable connector.
It often happens that several bulbs in a chandelier stop lighting. This may be due to the contacts overheating and the conductors weakening, causing them to oxidize and burn. To solve the problem, disassemble the cartridge and clean the cores and brass plates. Then assemble the device and install it in the lamp. After this the problem will be solved.
If similar problems occur with the G series cartridge, you will have to buy a new device. This is due to the fact that they are non-separable and are connected with rivets.
If the screws that hold the brass plates to the liner are not tightened tightly, the connections will overheat. Therefore, tighten the screws firmly when assembling the chuck.
In any case, in order to carry out high-quality repairs, you need to disassemble the cartridge and diagnose the connections.
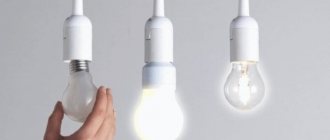
Kinds
Today there are a large number of different lamps, which are divided according to the shape and coating of the bulb, purpose and filler. It can be spherical, cylindrical, tubular and spherical; transparent, mirror and matte. There are also light sources for general, local and quartz-halogen purposes. In addition, there are vacuum, argon, xenon, krypton and halogen models.
Transparent ones are common options. Such elements are considered the cheapest and most effective; they have an uneven light flow. Mirror models are the most effective in terms of lighting, since the coating generates directional light flow. Matte ones are able to create soft and diffuse lighting for favorable working and leisure conditions. Products with local lighting operate at twelve volts, which is necessary to create safe working conditions.
Note! Such lamps are needed to illuminate inspection holes during the installation of electrical garage wiring. Incandescent lamp types table
Incandescent lamp types table
General purpose lamps
General-purpose sources are the most common light sources that are used to illuminate an apartment or factory on a network with an alternating current of 220 volts and a frequency of up to 50 hertz. There are vacuum, argon and krypton. The same group is neodymium and krypton. Essentially these are ordinary lighting lamps. It is worth pointing out that at the time of manufacturing neodymium sources, neodymium oxide is used, which absorbs the light spectrum. This improves the light quality.
Widespread use of general purpose luminaires
Spotlight lamps
Spotlight sources are installed on ship, railway, theater and other searchlights. They differ in that they have an increased light output and can be supplemented with reflectors to improve the concentration of the light beam.
Spotlights as one of the types
Mirror lamps
Mirror light sources are distinguished by the fact that they have the usual bulb shape and a special internal coating of the bulb part. This helps to collect all the light flow, which is directed in the right direction. They are used in industry, videography, farming and bathroom ceiling lighting.
Halogen lamps
Halogen lamps are powered by an inert gas, to which bromine and iodine are added to protect the filament and increase operating life. Such light sources are small in size for use as a filler of expensive inert gas. They are distinguished by their brightness, natural color rendering, good service life and significant luminous efficiency, having smaller dimensions.
Note! The only negative is the sensitivity and significant changes in mains voltage. Halogen lamps as one of the types
Halogen lamps as one of the types
Tags: machine, butterfly, beat, sconce, view, harm, choice, switch, house, , clamp, replacement, sign, cable, like, computer, design, , light bulb, marking, installation, power, load, voltage, lighting, soldering iron, connection, potential, rule, principle, wire, project, start, , work, size, revere, resistor, repair, row, garden, light, lamp, LED, connection, connection wire, means, term, diagram, ten, type, current, installation, shield, effect
Main conclusions
As you can see, you can connect the cartridge to the wires without outside help. However, when choosing a device, take into account the type and structure of the light source; they must match. To do this, you need to understand the product labeling. There are two ways to connect the device to the lamp: detachable (screws, clamps, terminals) and permanent. You can attach it to wires, to a tube, using a sleeve or screwless clamps. If you notice problems with the lamp, be sure to inspect the socket. It is recommended to disassemble it, inspect the contacts, clean the brass plates, and, if necessary, bend them closer to the contact with the lamp base. Carry out all work only with the electricity turned off!
Previous
Bases and sockets How to repair or replace a socket in a lamp
Next
Bases and socketsStandard base E27: what is remarkable about an ordinary light bulb
How to connect a light bulb socket to lamps and chandeliers
- Open the panel and inspect the circuit breakers. Depending on the design load, their number may vary. Only phase or phase and neutral wires can be connected through the machines. The grounding conductor is always connected directly to the bus. Check that all wires are color coded correctly.
- If the color of the insulation of the cable going into the apartment in the panel corresponds to the rules, open all the distribution boxes and inspect the twists. In them, the colors of the neutral insulation and the ground wire should also not be mixed up.
- Switches are connected to the phase in distribution boxes. Often installation is performed with a two-core wire having other insulation colors, for example, white and white-blue. This shouldn't bother you.
- If the installation is carried out in full compliance with the color of the insulation, it is enough to check the phase wire using an indicator screwdriver.