Want to add some bright colors to your kids' room? Or maybe add new notes to your own workplace? Or do you adore everything related to the East, where paper lighting devices were first invented?
In any case, it definitely won’t hurt to familiarize yourself with this material. We will try to tell you how, using your own imagination and plain paper, you can fill any room in your home with magic. And the fact that guests will ask you where they can buy such splendor is beyond doubt. However, by telling them that you did everything yourself, you risk being interrogated with bias. They will certainly ask how all this can be made.
Chandelier made from disposable spoons
This is one of the simplest and most importantly, inexpensive options for a homemade chandelier. After all, the material for its creation will be very cheap and the process itself will not require special skills.
You will need:
- 5 liter plastic bottle;
- disposable spoons;
- glue;
- cartridge;
- sharp knife.
Step-by-step instruction:
- Take a clean and dry bottle, remove the label from it and cut off the bottom.
- Take spoons and cut off the handles, leaving “tails” of about 2 centimeters.
- We glue the spoons with their tails up to the bottle, starting from the base and moving to the very top. We do this in a checkerboard pattern and placing the spoons as close to each other as possible so that there are no gaps.
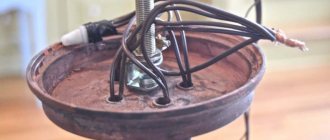
- We place the cartridge in the neck area of the bottle and fix it with glue and a frame.
- Next, you should wait until the glue is completely dry and begin installing the chandelier.
If desired, the decor of the product can be changed. You can stick spoons up to half the bottle or use them in different colors. You can also paint them yourself, which will add even more originality to the product.
Leaf chandelier
This is a very original product made from plastic bottles. The material for production has a lot of colors, which allows you to approach the process of working with your imagination and show your creativity.
Step-by-step instruction
- From plastic bottles, we cut out blanks in the form of leaves of different shapes and sizes.
- Using a soldering iron, you need to make the characteristic veins on the leaves and make the edges a little more round, which will create a natural effect.
- Using a hot needle, we make holes at the base of the leaves so that we can connect them.
- We make a frame of metal wire and strong branches, previously formed from leaves.
This technology can also be used for lamps that will complement the chandelier, creating a whole set of lighting items in the same style.
Materials
It is worth paying attention to safety precautions and using non-flammable materials. You should not use paper, plastic and similar materials that have a fairly low combustion temperature.
As for the lamps themselves, it is worth using LED lamps, as they have many advantages, such as a long service life and do not overheat. It also has several shades and, of course, saves energy.
Paper butterfly chandelier
This is an incredibly beautiful handmade chandelier. It is done very simply and does not require material costs. After all, the material from which it is made is paper.
Step-by-step instruction
- As a base, you can take the lampshade of an old chandelier or make a frame in the form of a circle out of metal wire.
- Using paper templates, cut out butterflies of different sizes. Ideally, take a velvet type of paper. Such butterflies look great, and with the help of a vacuum cleaner, they can be easily cleaned of dust.
- Using a fishing line and a needle, we string the butterflies, forming stripes of them. If desired, they can be fixed with glue; the choice remains with the master.
- The finished strips are fixed to the frame and the butterflies are distributed, creating the appearance of their accumulation.
Plastic models
Plastic products have become widespread; many products are made from this material. Many modern lamps are created from it.
It’s easy to make a beautiful chandelier with your own hands from plastic glasses, bottles, and spoons. The finished product is decorated with luminous elements and original figures.
The basis of the product can be a metal frame. For a table lamp you will need to make a drawing with a detailed drawing of all the elements. To get started you will need plastic items.
Fabric chandeliers
This type of chandelier suggests many types. After all, fabrics are so diverse that they can satisfy the taste of every person.
To make it, you will need to make a frame in the form of two circles of iron wire. Then, cut the fabric to the size of the frame from the selected fabric. While working, keep in mind that the diameter of the base of the chandelier must correspond to the width of the fabric so that the chandelier looks symmetrical. Next, we stitch the fabric, fixing it directly to the frame and then connecting its edges. If desired, you can decorate the resulting lampshade with lace, which will give the product a special design style.
Adviсe
To complete the work of making a lamp successfully, we have collected the most practical tips that will definitely come in handy:
The use of energy-saving lamps is recommended for the product. Why is it undesirable to use conventional ones? They increase the risk of overheating and fire, so if you want to use incandescent lamps, you will have to constantly monitor the condition of the lamp and also buy a fire extinguisher.
You can use old garlands left over from the New Year as decoration. The lighting they create will add coziness to the room.
To create new lighting items, you can modify old lampshades and lamps that everyone probably has lying around.
Lamps can be used to diffuse light and correct the interior, but we strongly recommend avoiding the opposite effect: hiding the light.
Chandelier made of threads and ball
An unusual lampshade, created using various threads and a ball, can be made of any size and in different colors.
You will need:
- 1 meter of dense thread, you can use wool, jute or cotton thread;
- petrolatum;
- brush;
- glue;
- cartridge;
- two balls.
Manufacturing process:
- Inflate the ball and draw borders for the threads at the top and bottom.
- Spread the entire perimeter of the ball with Vaseline.
- We begin to wind the threads around the ball in random order, first spreading them with PVA glue.
- Maintains the product until the glue dries completely. Then, we burst the ball and pull it through the threads.
- We fix the cartridge in the upper hole using a frame.
If desired, such a chandelier can be made in one color or in several. For beauty, elements in the form of butterflies or rhinestone ornaments are added. The ball can be one, large, or several medium, depending on your preferences.
Eco-friendly lamp
The material for the lamp mast is a wooden beam measuring 20 x 25 mm, 1 m long. It is sawn into 4 pieces of different lengths: 500, 250, 150, 100 mm. The ends are rounded, special cuts are made - recesses, and holes are drilled.
In this case, cuts are made on elements of 500 mm and 100 mm on one side, and on others - on both sides.
In each strip, holes are made in the middle according to the diameter of the electrical cable used. The foundation is being prepared. To do this, take a board of any arbitrary size so that the structure is stable.
A rectangle is drilled in the center according to the size of the strips used. The planks are connected to each other using a washer and a screw. Then they are attached to the base using a long wood screw.
This will ensure the reliability of the design. An interesting option could be old books connected to each other and mounted on a base. A hole is made in the center through which the rod is passed. After this, the lampshade with the cartridge is attached.
A single-core wire is connected to it (cross-section 0.75 mm of each core).
It is advisable that it be insulated, which does not have factory markings. To prevent it from hanging, it is passed through the holes in the slats. The switch can be of two options: installed directly on the wire or mounted on the base. A plug is installed at the free end.
From glass bottles
This is a difficult technology, the implementation of which requires special care. But in the end, you get an original and unusual chandelier, suitable for modern interior styles.
You will need:
- bottle (can be used for champagne or wine);
- sandpaper;
- frame made of metal or wood;
- cartridge;
- glass cutter;
- the wire.
Manufacturing process
- Take a dry and clean bottle and use a glass cutter to cut off the bottom.
- Next, sand the edges of the cut using sanding paper.
- We stretch the wire through the neck of the bottle and install the cartridge.
- We fix the product on the frame.
The final appearance of the product depends on your imagination. You can add various decorations or create a chandelier from several identical or different bottles. In any case, in the end, the result will have an original and unusual look.
Glass
Unique designs are made from glass elements. You will need several empty bottles of different shapes to create original interior decor.
DIY lamps made from scrap materials are popular today. They give the room personality and make it special. To obtain stained glass, you can decorate the glass with paints.
For chandeliers, elements from old sconces and door inserts are used. To get a hanging structure, bottles are useful. Glass is highly fire resistant, which is why it is often used to make lighting fixtures.
Chandelier made of discs
If you have a lot of disks that you don’t need, but it’s a pity to throw them away, then you can make a beautiful chandelier out of them.
Materials for work:
- two round wooden disks, slightly larger in diameter than the disks themselves. At the same time, the thickness of the wooden disks should be different;
- wooden or metal stand;
- lamp;
- disks;
- starter with switch.
Work process
- In a wider circle of wood, we make a hole and install the starter in it.
- Then we connect the lamp and string disks onto it.
- We place racks around and fix them in a circle of disks.
When finished, such a chandelier will not require careful maintenance. But you should be careful, because the edges of the disks are quite sharp. Therefore, the product should be placed so that children cannot reach it.
Advantages of a DIY LED lamp
- Economical.
- Environmentally friendly.
- Durability.
- Low cost.
- Instantly achieves full powerful luminous output.
- Significant luminous intensity.
- Low power consumption.
- Efficiency.
There is only one minus - there is no guarantee. But if you strictly follow the instructions, then it is easy to compensate.
Shabby chic style
To make lighting in this style, you will need fabric and beads. Such lampshades look elegant and amaze all guests of the house with their sophistication.
Necessary materials:
- metal carcass;
- cartridge;
- beads and beads of different sizes;
- threads and chains for decoration.
In fact, such work does not require special skills. But you will need patience, because the process will take a lot of time. Usually, for lampshades, three rings of iron wire are taken, of the same or different sizes. If they are the same, then we get lighting in the Art Nouveau style.
It is important to consider that before you start decorating the product, you need to paint it and stretch the material around the frame.
Finished lampshade, trimmed with beads and beads, to your taste. If desired, you can decorate with rhinestones.
As you can see, there are quite a lot of options for hand-made chandeliers. At the same time, such an interior element will decorate any room and make its furnishings original and unique, which will show the original nature of the housewife. With this lighting of your home, you can decorate any room and your guests will certainly admire your talent and originality of taste.
Lamp in the shape of a wreath
To make such an original lamp, you will need thick and thin wire, paint, lace paper coasters and the garland itself.
Step 1. Cut the thick wire into pieces of different lengths and roll each into a ring. We connect the ends by welding or tying them with soft thin wire. We connect the rings to each other with several jumpers.
Step 2. To prevent raw metal from showing through the decor, paint the resulting frame with white paint.
Step 3. We evenly braid the rings with a garland with small elongated bulbs. To prevent it from moving, we grab the wires here and there with thread or tape. We put paper decor on each light bulb, carefully piercing it in the center.
Step 4. Hang the wreath on the wall next to the outlet and plug it in.
You can decorate such a lamp with other available materials: tinsel, artificial flowers, bows, large beads, etc.