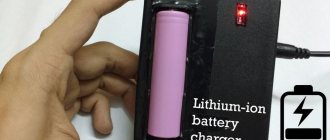
Most household electrical appliances operate on the basis of li-ion batteries, so all responsible owners need to know how to properly charge lithium-ion batteries and how to use them. To the greatest extent, such batteries have become widespread due to their small dimensions and good energy conservation.
In our article we will talk in detail about how to charge a lithium-ion battery correctly, what kind of energy recovery scheme is available, what rules are used to control the procedure, what current to charge a li-ion battery, how long does it take to charge lithium batteries, and whether it is possible to charge a regular battery charging.
How to properly charge a Li-ion battery
Among the batteries that are made on the basis of lithium ions, the most common type is 18650. The scope of its use is quite large: these components are used in batteries for screwdrivers, smartphones, tablets, landline phones, to power electric cigarettes or ordinary flashlights.
In addition, nowadays, converting nickel-cadmium screwdriver batteries to lithium-ion batteries is gaining popularity. This type is used largely due to the fact that they function much longer than the components of the previous generation.
To work with this type of battery, you need to know how to charge a lithium battery correctly and how to control this procedure. Charging of lithium-ion batteries is carried out using a circuit, and auxiliary boards control it.
General information about lithium-ion batteries
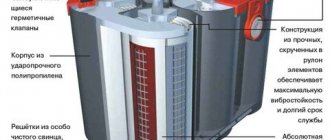
Lithium batteries appeared relatively recently, but have already firmly taken a leading position in the power supply of autonomous devices. Structurally, such a power source consists of two electrodes - a cathode and an anode. The first is made of one or another lithium compound (usually cobalt-lithium or lithium ferrophosphate), the second is made of graphite. The electrodes are immersed in an anhydrous electrolyte solution. There are different form factors and sizes of batteries of this type. The most common form factors for lithium-ion batteries are cylindrical and rectangular.
Rectangular elements can be seen in devices of small thickness - mobile phones, smartphones, tablets, etc. Typically, batteries of this shape use polymer material as an electrolyte, and the batteries themselves are called lithium-polymer.
The output voltage of all lithium batteries varies from 4.2 to 2.5 V depending on the state of charge and averages 3.7 V. Electrical capacity varies - from tens of milliamps per hour (mAh) to tens of amperes per hour (Ah). Depends on the purpose of the power source and its size.
Expert opinion
Alexey Bartosh
Specialist in repair and maintenance of electrical equipment and industrial electronics.
Ask a Question
Important! We are talking about single batteries. Batteries made up of several elements can have any voltage and any capacity. For example, electric vehicle batteries have a voltage of up to 380 V with a capacity of hundreds of kilowatt-hours, and a laptop battery produces 12.6 V.
The service life of a lithium battery depends on operating conditions and is usually 2–3 years with a number of charge/discharge cycles of up to 600 for lithium-ion batteries and up to 900 for lithium-polymer batteries. The main qualities of batteries of this type:
- high energy density per unit mass;
- low self-discharge;
- no memory effect;
- do not require maintenance;
- lose performance when overcharged and deeply discharged;
- Explosion hazard if overheated.
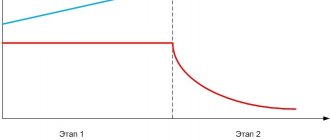
Two-stage charging scheme
This scheme is considered the best method for charging li ion batteries. Here the controller circuit has a large load, but it does not in any way affect the service life of the battery.
The completion of the 1st stage of charging for a li-ion battery depends on the saturation of the charging current. The calculated current value is from 0.2A to 0.5A, and the power is 12.6V. A stable charging current is achieved thanks to the functioning of the charger, which increases the battery potential. When the value reaches 4.2V, the battery has a state of charge of 70%. This completes the first stage of charging lithium batteries.
The second stage has a constant voltage and a gradually decreasing charge current. The device maintains voltage at a level from 4.15V to 4.25V and controls the current parameter. The higher the value, the lower the current will be. A parameter from 0.05A to 0.01A indicates the completion of the procedure.
How to measure battery capacity
During operation, as we found out, the capacity of the lithium battery gradually decreases and over time the value indicated on the case will not correspond to the real state of affairs. How to determine the actual battery capacity at home? One option is to use a special universal device “Aimak”, which contains an intelligent charger-discharge device, tester, voltmeter, ammeter and much more.
The option is not bad, but it cannot be called budget. The device is expensive, but it is needed relatively rarely. It is much easier to use a USB tester for these purposes. It costs much less, and the measurement accuracy of the device is quite decent.
To measure the actual capacity of a battery, it must be fully charged and then discharged through one or another load by connecting a tester between the element and the load. In this case, the input of the device is connected to a battery, and the output to a load, which can be used as a half-watt resistor with a resistance of 8–16 Ohms.
The USB tester requires a voltage of 5 V for its power supply (that’s why it’s USB), but it works great at voltages up to 2.5 V. So it will be possible to use it to measure the capacity of one lithium cell.
How to control charging parameters
To learn how to properly charge ion batteries, you need to be able to monitor charging indicators. Since lithium-ion batteries operate in a small voltage range, they therefore need monitoring. The best value for this parameter is from 3V to 4.2V.
The controller circuit is installed in the memory, but each battery has an individual distributor and protection system. If any violation occurs, the protection system will immediately shut down the faulty can.
The circuit is also designed to perform the following operations:
- switching to CC/CV mode;
- control of energy supply in batteries;
- current supply preventing self-discharge;
- temperature measurement, which helps prevent battery overheating;
- turning off charging.
It is possible to recharge the battery without such a circuit only by using a resistor, which must be connected in series with the device. You can also make a controller yourself, you just need to calculate the charge current, resistance, and power in advance.
What is TP4056 charging board and how to use it
We learned how to properly charge lithium-ion batteries. But how to do this? You can use a purchased charger, but if you wish, you can actually assemble a charger for lithium batteries yourself. To do this, it will be enough to buy a ready-made TP4056 module and assemble a simple circuit.
TP4056 1A Lithium Cell Charging Module
The beauty of this solution is that all the fun costs about 30 rubles on Aliexpress. To assemble a finished device based on this module, you need to assemble the following simple circuit.
By default, such a module produces a charging current of 1 A and is suitable for charging batteries with a capacity of 2,000–3,000 mAh. If we need less current, then it is enough to change the value of resistor R3 in accordance with the table:
| R3 rating, kOhm | Charging current, mA |
| 10 | 130 |
| 5 | 250 |
| 4 | 300 |
| 3 | 400 |
| 2 | 580 |
| 1,66 | 690 |
| 1,5 | 780 |
| 1,33 | 900 |
| 1,2 | 1000 |
In principle, with a current of 1 A you can charge batteries with a larger capacity, but it will take more time. But if you still need a current of more than 1 A, then it will be easy to increase it by connecting several modules in parallel. To do this, we simply connect the terminals of the modules of the same name with jumpers.
Healthy. You can do it easier by simply buying a module that provides a charging current of up to 3 A. True, this will cost a little more, but the design will be more compact and easier to assemble.
How to charge a 12 volt lithium battery
To find out how to charge a battery with a voltage of 12 volts, you must first find out what this device is, as well as what features and characteristics it has. All batteries made on the basis of lithium ions are an impenetrable structure made in the shape of a cylinder or a prism. Each battery has a voltage from 3.6V to 4.2V and a different energy capacity.
However, there is one peculiarity: if you connect 3 batteries one after another, you will get a battery with a voltage from 10.8V to 12.6V. In this case, the energy intensity is measured by the weakest lithium can.
To restore the energy capacity of the device, you need to use a charger that is equipped with a controller. You also need to have a control module (PCM) for all batteries and a protection system against over- and under-charging. In addition, there is also another battery protection system - RSV. It is better to install it with balancers so that the batteries are charged evenly.
On the charger you need to set the voltage at which the battery will operate (12.6V). On the charger, you must also set the number of batteries and the current that will be used.
Methods for restoring the energy capacity of lithium batteries:
- Use the USB connector from electrical appliances or a computer. In this case, you can get a charge current of 0.5A, but this will take much longer to restore the energy capacity.
- From the car's cigarette lighter. To perform this procedure, you need to purchase a special adapter that can work with a 12V battery.
Experts recommend using only original chargers for recharging lithium batteries, since the use of an external charger of dubious quality can have a bad effect on the functioning of the battery.
A small example of assembling your own 3A charger:
As an example, I will give an example of building my own charger from proven inexpensive components. What we need for this:
1)
The TP4056* board being reviewed:
2)
Holder/holder* for batteries:
Do not use these holders under any circumstances, 3A is too much for them:
You can try to remake a crappy exercise by melting all the guts out:
I recommend the first option, because... they can easily withstand 3A, because the contacts are much better, and they have a groove for the wire.
3)
Any suitable connector: DC port* (supplied with the board), USB (not very desirable), Molex* (when powered by a computer), model or car power connectors (whichever you have on hand):
As a last resort, you can just bring out two wires and run the whole thing on a twist, as in my case :-).
4)
High-quality copper stranded wire*:
You need copper, not copper-plated. It is easy to determine - we clean it with a knife and if the veins begin to shine and do not tin, it means that the wire is copper-plated (aluminum coated with copper). I recommend either a high-quality acoustic one or household ones, such as SHVVP.
5)
Power supply unit (PSU) 5V 5-6A (with reserve). I used PSU S-30-5 at 5V/6A*:
You can use the commonly found 12V 2-3A power supply, which comes with various devices, and a 5A DC-DC step-down converter (they hold 3A stably). But there are a couple of disadvantages here, because the circuit becomes more complicated and the cost of the charger increases. Therefore, if there is no suitable power supply available, then we use the computer’s power supply. An additional load of 15W is not scary for him, unless, of course, he is already working at the limit of his capabilities. If there is a free Molex connector available, then attaching an adapter to it will not be difficult. In this case, we need red (+) and black (-) wires.
How long to charge a lithium battery
The duration of battery charging, including the first time, is determined by the procedure for restoring energy capacity.
Energy intensity is measured in a/h. This means that if you give a charge corresponding to the capacitance value, then in 1 hour the required voltage value will be generated, and the degree of charge will be equal to 75%. Recharging in fast mode takes 1 hour.
For a full cycle of recharging batteries from several components connected in series, two modes are used - CC and CV. The first mode continues until the voltage reaches the operating parameter. Second mode: at a constant voltage, current is supplied to the battery, but as the charge increases, it approaches 0. It takes 3 hours to complete energy recovery, regardless of the energy capacity of the device.
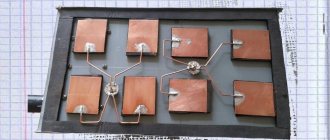
Testing 4*TP4056 3A board:
Now let's test the scarf. Does it really charge 3A? To do this, we will be helped by an ampere-voltmeter, which often appears in my reviews (measuring the charge current) and the usual multimeter (measuring the voltage on the battery). As a power source – switching power supply unit S-30-5 at 5V/6A:
As you can see, the charge actually flows with a constant current of 3A (CC phase), until the voltage on the bank exceeds 3.9V-3.95V, then it begins to gradually decrease (CV phase begins). As soon as the voltage on the bank is 4.2V, the LED color changes to green, indicating that the charge is complete. Although due to inertia the current still continues to flow:
After this, for another 10-15 minutes the current decreases, while the voltage on the battery is 4.21V. As soon as the current drops to 150mA, the controller completely turns off the charge, and the voltage on the bank drops to 4.2V.
The module charged an almost “squeezed out” Sanyo UR18650ZY 2600mah can in 75-80 minutes. Well, just great!
Can a lithium battery be charged using regular charging?
Lithium-ion and lead-acid batteries require a special approach to charging. Alkaline models are not as demanding on parameters as ionic ones.
To recharge at the 1st stage, lithium-ion batteries require a stable charging current, and at the 2nd stage, a stable voltage. If you do not monitor the 1st indicator, then overcharging may occur. However, if the battery has a built-in overcharge protection system (BMS), then monitoring is not necessary.
In alkaline batteries, the main parameter is constant voltage.
Currently, they have begun to produce universal chargers that can independently select the required charging mode.
Scarf sizes:
The scarf is very small, only 65mm*15mm:
Here is a comparison with the “people's” board TP4056 for 1A, 18650 battery and holder:
If necessary, you can bite off the front part of the board onto which the DC connector is soldered and solder to the 5V+ or 5V- contacts, or directly to the corresponding tracks:
This will make the length of the scarf 1 centimeter shorter. I’ve already remade a folk scarf before, and here’s what happened:
In our case, everything is incredibly simple, because the tracks on the printed circuit board do not suffer. Of course, for those who need a DC connector, we leave it or solder it through wires to the 5V+ or 5V- contacts. MicroUSB and miniUSB connectors are undesirable here; they will get very hot, because they are not designed for such currents. And there is no need for them, because most adapters have a 2.5A limit. But on the other hand, if the adapter does not turn off when overloaded, then we save on a discrete power supply, and the current will be slightly less. Therefore, it's up to you...
Characteristics of TP4056 modules with and without battery protection
TP4056 modules with and without protection differ only in the battery protection function, and the characteristics regarding the charging of lithium batteries are identical. Naturally, their dimensions are also different.
TP4056 Unprotected Module Specifications: Recommended Input Voltage: 5 V Input Voltage Range: 4.5 – 8 V Default Maximum Charge Current: 1000 mA Charge Stop Voltage: 4.2 V (± 1%) Board Size: 23 mm x 17 mm LED Statuses: red – charge, blue (green) – charge complete
Characteristics of the TP4056 module with protection: Recommended input voltage: 5 V Input voltage range: 4.5 - 8 V Default maximum charge current: 1000 mA Battery cut-off voltage when discharging: 2.5 V Maximum permissible discharge current: 3 A Charge stop voltage: 4.2 V ( ± 1%) Board size: 27 mm x 17 mm LED statuses: red – charging, blue (green) – charging complete
Connecting the TP4056 charge module with and without protection
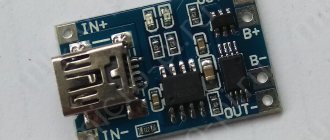
Connecting TP4056 modules with and without protection to the power source and battery, and subsequently to the consumer, is slightly different. The charging board without protection has four pins, two for input voltage and two for connecting the battery, as well as a connector for connecting power. Power is supplied to IN+ and IN-, and the battery is connected to the BAT+ and BAT- pins.
The TP4056 module with pin protection has more pins, since here the battery and load are connected to different pins. Power is supplied to IN+ and IN-, the battery must be connected to B+ and B-, and the load must be connected to the OUT+ and OUT- pins. In this case, the B+ and OUT+ pins are combined.
Schematic diagram of the TP4056 module with and without protection
A typical circuit diagram of the TP4056 module, which can be found in the datasheet, provides for connecting a temperature sensor to measure the battery temperature.
The TP4056 modules sold on AliExpress do not provide the ability to connect temperature sensors, but if desired, you can still solder them to the right places on the board. Here is a schematic diagram of TP4056 modules from AliExpress.
The circuit diagram of the TP4056 module with protection is complemented by a protection circuit.