The process of soldering wires may seem simple, and in fact it is. But not everyone succeeds in connecting two wires to each other in a high-quality manner. Why? Because there are certain requirements for the soldering iron itself, as well as for the soldering process. So, let's consider the question of how to solder wires?
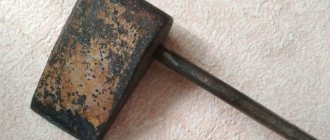
Let's start with the tool itself - the soldering iron. Before soldering, you need to prepare the soldering iron. What do I need to do?
- Clean his sting. To do this, you can use a file or sandpaper. It is important to remove any remaining tin and dirt from the file tip, that is, the main thing is to get to the copper from which the soldering iron is made.
- Now we plug the soldering tool into a 220 volt outlet. We begin to heat it up.
- Now we periodically touch the tip of the tip to either rosin or solder. We do this several times. Our task is to uniformly cover the working surface of the tool with solder.
So, the soldering iron is ready, you can move on to the question of how to properly solder wires with a soldering iron.
Connecting wires by twisting and soldering - what does the PUE say?
Let's start with the fact that twisting wires in electrical installations is prohibited. At least in the PUE, twisting is not allowed (PUE, Chapter 2.1). This can be explained by the fact that the quality of twisting depends very much on the experience, tool, and even the mood of the electrician. And there is no way to check this quality, you can only evaluate it “by eye” or test it with increased current.
Soldering in PUE is allowed, but is recommended in GOST R 50571.15-97. This is motivated by the fact that in some emergency conditions the connection temperature can reach 300°C, the solder will melt and drain. Honestly, I can’t imagine how this can happen if the circuit breakers are installed with the required rating. But even if this happens, in my opinion, such wiring will need to be completely changed! And it won’t matter whether the solder melted or not.
As for crimping - yes, the method is good, but it requires additional equipment (press molds) and consumables (sleeves). The same goes for welding - you need a transformer (inverter) and graphite rods. And experience - how many times have I seen that the ball at the end of the twist fell off due to excess current, or did not grab all the wires in the twist due to low current.
Therefore, I believe that twisting followed by soldering is the best way to connect wires in junction boxes. The soldering iron is lightweight, the price is low, the solder and rosin are cheap.
Next - more about this hot smelling process)
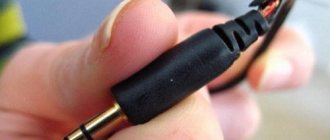
Connecting wires with connecting insulating clamps
One of the popular connecting products among electrical installers is the connecting insulating clamp (PIC) . This clamp is a plastic case, inside of which there is an anodized conical spring. To connect the wires, they are stripped to a length of about 10-15 mm and folded into a common bundle. Then the PPE is screwed onto it, rotating clockwise until it stops. In this case, the spring compresses the wires, creating the necessary contact. Of course, all this happens only when the PPE cap is selected correctly according to its rating. Using such a clamp, it is possible to connect several single wires with a total area of 2.5-20 mm2. Naturally, the caps in these cases are of different sizes.
Depending on the size, PPE has specific numbers and is selected according to the total cross-sectional area of the strands being twisted, which is always indicated on the packaging. When choosing PPE caps, you should focus not only on their number, but also on the total cross-section of wires for which they are designed. The color of the product has no practical meaning, but can be used to mark phase and neutral conductors and ground wires.
PPE clamps significantly speed up installation, and due to the insulated housing, they do not require additional insulation. True, their connection quality is somewhat lower than that of screw terminal blocks. Therefore, other things being equal, preference should still be given to the latter.
Soldering twisted copper wires
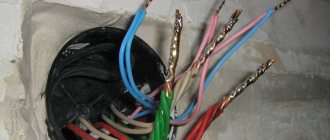
Let's start from the place where the wires are twisted in the junction box.
1. Twisting the wires in the box
In the left box, the wires are twisted according to the electrical wiring diagram. In principle, many electricians stop there. And they are 90% right, it can be insulated, such wiring will last 100 years, we don’t need any more. But this is provided that in this distribution. the box will always be dry and the circuit breaker has been selected correctly. I recommend my article about choosing a circuit breaker - How to choose a circuit breaker.
I saw that in old boxes there was a twisted connection between aluminum and copper. These were twists from 50 years ago! And everything worked great! This is very risky, and such compounds will live for a long time if several favorable conditions are met. Such twisting is usually subject to severe criticism among electricians, and it is considered extremely unprofessional. But we’ll forgive you, especially since those who made such twists are already in another world, where there is no need to connect wires...
Existing methods of connecting conductors
Basic methods of connecting conductors in a house or apartment
Connecting wires can be done in several ways:
- welding is the most reliable method, ensuring high reliability of the connection, but requiring skills and the presence of a welding machine;
- terminal blocks - a simple and fairly reliable connection;
- soldering - works well if the currents do not exceed the norm and the connection does not heat up to temperatures above the norm (65°C);
- crimping with sleeves - requires knowledge of technology, special pliers, but the connection is reliable;
- use of spring clamps - wago, PPE - are quickly installed and, subject to operating conditions, ensure good contact;
- bolted connection - easy to perform, usually used in difficult cases - when it is necessary to switch from aluminum to copper and vice versa.
The specific type of connection is selected based on many factors. It is necessary to take into account the material of the conductor, its cross-section, the number of cores, the type of insulation, the number of conductors that will be connected, as well as operating conditions. Based on these factors, we will consider each type of connection.
Soldering wires in a junction box
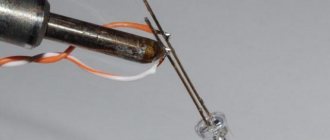
We take out a soldering iron with a power of 65 or 100 watts. The power depends on the sum of the cross-sections of the wires being soldered. For example, if you solder 3-4 wires with a cross-section of 1.5 sq. mm, then a 65 W soldering iron will be enough. If the total cross-section of twisted wires is more than 10 sq. mm, then the soldering iron should be 100 watts.
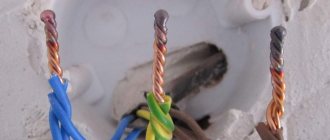
So, we take rosin in a piece or in a plastic jar. The wires should stick out with their tips facing up. We warm up the twist area and touch the rosin so that it melts and flows a little down the twist.
2. Application of rosin
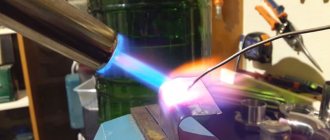
This is especially visible on the central and right wires. Then we take the solder in the rod, heat the solder and the twist at the same time, tinning the twist.
It is better to use solder with rosin; there is a lot of this on sale now. The rosin is found inside the solder rod. If there is no rosin inside, you need to apply more of it to the twist beforehand, and more carefully control the soldering time and temperature. otherwise the rosin may simply evaporate.
3. Soldering twists in the junction box
We solder the wires. Tin the twist so that the solder penetrates into all places. In this case, the copper should be covered with solder over a length of 40...80% of the twist length.
4. Wires are soldered
You must try not to overheat the soldering area so as not to damage the insulation. And in general, try to do everything quickly, automatically.
We cut off the ugly protruding ends of the soldered twists with side cutters (3-5 mm).
Soldered, insulate the soldering points with electrical tape (usually I use PVC of different colors). And that's basically it. You can wall the boxes.
5. Insulate solder joints
6. Lay wires in junction boxes
Isn’t it true that there is something mean-spirited in the word “flush”?))
7. Closed boxes. Flush
You definitely don’t have to worry about contact in such boxes; you can completely bury them under a layer of plaster. Although, it’s better, of course, to have access to the boxes, you never know – check, connect additionally, etc.
As cs-cs.net spoke on this topic: If at 2 o’clock in the morning you wanted to see how your twisting of copper and aluminum is doing, you should have access to the distribution box without any problems.
Soldering with a soldering iron
In order to start soldering, you need to prepare a workplace and the necessary tools. Regardless of the type of proposed work, the following requirements are imposed on the workplace:
- The presence of good lighting will allow you not only to work comfortably, but also to notice small flaws in the soldered parts, which is difficult if there is a lack of light;
- No flammable items;
- Free working space on which you can easily place the part to be soldered;
- The presence of ventilation will make work not only more comfortable, but also safer; inhaling molten rosin has a negative effect on the respiratory system;
- A magnifying glass makes it possible to work even with small parts and thin wires;
- A simple stand solves the problem of placing a heated soldering iron.
The next stage of preparation will be the choice of tool, and a beginner is always faced with the question of what is needed for soldering with a soldering iron.
Soldering iron selection
The basis of high-quality soldering is heating metal parts to the soldering temperature; accordingly, for each type of work it is recommended to use soldering irons of different capacities:
- For soldering radio components and microcircuits, it is best to use a soldering iron with a power of no more than 60 Watts, otherwise you can overheat the part or simply melt it;
- Parts up to 1 mm thick will warm up better when using a tool with a power of 80-100 Watts;
- Parts with a wall thickness of up to 2 mm require greater power and some experience in operation, so soldering of such parts will not be considered in this article.
After choosing the power of the soldering iron, you should prepare it for work, or rather, prepare the tip . There are soldering irons with replaceable tips that are suitable for different types of work. Models with a copper tip are also available, which can be sharpened or given any desired shape using a hammer.
A serious disadvantage of such tips is the need to constantly tin them so that an oxide film does not appear on the surface, which prevents the solder from sticking. Manufacturers also produce a more expensive version with a nickel-plated coating, but it is afraid of overheating and requires careful handling.
What else do you need for soldering?
In addition to the soldering iron itself, you need the following for soldering:
- solder;
- rosin;
- soldering acids or fluxes.
Solder is the connecting material between the parts being soldered, and without it there is no way to work. Now stores sell specially prepared solders in the form of wires of various diameters twisted into a spiral, from which it is convenient to “pinch off” the required piece with a heated tip, but you can also use a piece of tin , but the work will not be so convenient.
Rosin is used to prepare the surface for the application of solder. Solder with rosin is distributed evenly, in the absence of the latter it rolls into drops, and does not stick to some surfaces at all.
Soldering acid, or flux, is necessary to prepare contacts for soldering. A beginner should know that the flux for each material being soldered is different, and you cannot use acid to solder aluminum on a copper wire, otherwise the solder simply won’t stick.
Fluxes and solders - how to choose the right ones
For the reasons described above, the correct choice of flux and solder is almost half the success in the soldering business. Fortunately, there are quite universal brands suitable for most tasks. The area of application of almost all fluxes and solders is clearly indicated on the labels, but some aspects of their use still need to be known.
Let's start with fluxes. They are used for etching parts, removing and dissolving the oxide film with further protection of the metal from corrosion. As long as the surface is covered with flux, you can be sure of its cleanliness, as well as that the molten tin will wet it well and spread.
Fluxes are distinguished by the type of metals and alloys of the parts being joined. Basically, these are mixtures of metal salts, acids and alkalis that actively react when heated with a soldering iron. Well, since there are quite a lot of oxide forms and contaminants, the cocktail must be specially selected for a specific type of metals and alloys.
Active flux for soldering
Conventionally, soldering fluxes are divided into two types. Active fluxes are created on the basis of inorganic acids, mainly chloric and hydrochloric. Their disadvantage is that they need to be washed off immediately after soldering is completed, otherwise acid residues cause quite severe corrosion of the connection and themselves have a fairly high conductivity that can cause a short circuit. But you can solder almost anything with active fluxes.
The second type of flux is created primarily on the basis of rosin, which can also be used in its pure form. Liquid flux is much more convenient to apply; it also contains alcohol and/or glycerin, which completely evaporate when heated. Rosin fluxes are the least effective when soldering steel, but for non-ferrous metals and alloys they are mainly used or other compounds of organic chemistry. Rosin also requires rinsing because in the long term it promotes corrosion and can become conductive by picking up moisture from the air.
Liquid and solid rosin
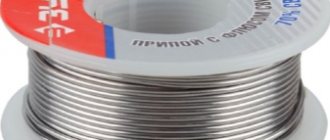
With solders everything is somewhat simpler. Lead-tin solders of the POS brand are mainly used for soldering. The number after the marking indicates the tin content in the solder. The more it is, the higher the mechanical strength and electrical conductivity of the connection and the lower the melting temperature of the solder. Lead is used to normalize the solidification process; without it, the tin may crack or become covered with needles.
Solder POS-61 with rosin inside
There are special types of solders, primarily lead-free (BP) and other non-toxic ones, in which lead is replaced by indium or zinc. The melting point of BP is higher than that of conventional ones, but the connection is stronger and more resistant to corrosion.
There are also low-melting solders that spread already at 90–110 ºС. These include Wood and Rose alloys; they are used for soldering components that are sensitive to overheating. Special solders are mainly used in soldering radio equipment.
Alloy Rose
Solder selection
Choosing the right solder for soldering twists is the most crucial moment. The final result depends on the solder. In the process of using different brands of solder, I tried to identify a pattern between the quality of soldering and the percentage of tin. However, such a relationship could not be found.
The only thing that can be said with complete confidence is that the solder must have flux inside. This is not surprising: the soldering method does not require the application of flux to the twists, but flux is necessary.
It is most convenient to use solder in a wire 1mm or so thick. It is sold in spools or plastic tubes.
By and large, you will have to choose solder by trial and error; I don’t see any other method. Well, here are a few examples of solders from several manufacturers:
This solder is well suited for soldering twists. And it’s better not to take the one below - it solders thin strands of 2 wires 1.5 mm² well, but it will only ruin thicker strands.
Here's another pretty good REXANT solder:
When choosing solder for the first time, the best option would be to buy a small tube for testing. Well, remember which of the purchased brands soldered well and which ones poorly. Actually, this is such a simple science.
In addition to solder, it is good to have a cleaner on hand - regular alcohol. Many copper strands, even new ones, are covered with layers of oxides or other deposits that make soldering difficult.
A good cleaner option is TAGS flux - it perfectly cleans the surface of copper conductors and in addition helps the soldering process.
Bolted connection
This connection is assembled from a bolt of any diameter, a suitable nut and one, or better yet, three washers. It is assembled quickly and easily, serves quite a long time and reliably.
Bolted wire connection
First, the conductors are stripped of insulation and, if necessary, the top oxidized layer is removed. Next, a loop is formed from the stripped part, the internal diameter of which is equal to the diameter of the bolt. To make it easier, you can wrap the wire around the bolt and tighten it (middle option in the right picture). Afterwards it all comes together in this order:
- A washer is placed on the bolt.
- One of the conductors.
- Second puck.
- Another conductor.
- Third puck.
- Screw.
The connection is tightened first with your hands, then with the help of keys (you can take pliers). That's all, the connection is ready. It is used mainly if it is necessary to make a connection between wires made of copper and aluminum; it can also be used when connecting conductors of different diameters.
How to connect aluminum and copper conductors
By the way, let us remind you why you cannot directly connect copper and aluminum wires. There are two reasons:
- This connection gets very hot, which in itself is very bad.
- Over time, the contact weakens. This happens because aluminum has a lower electrical conductivity than copper, and as a result, when the same currents pass through, it heats up more. When heated, it expands more, squeezing out the copper conductor - the connection becomes worse and gets hotter.
To avoid such troubles, copper and aluminum conductors are connected using:
- terminal blocks;
- wago;
- bolted connection;
- branch clamps (make connections of wires on the street).
Other types of connectors cannot be used.
Tool
To perform all operations we need the following tool:
Soldering iron 100-150 W with a copper tip. Ordinary, without frills in the form of a fireproof sting and other things. The sting can be straight or curved.
We will also need side cutters (nippers), pliers (pliers) and a construction knife. When working with thick twists, where, for example, 4 mm² cores will be present, additional pliers will be needed.
An optional tool includes pliers for stripping insulation: you can do without them, but with this tool things go faster.
Welding – high reliability in any conditions
When connecting wires by welding, the conductors are twisted and their ends are welded. As a result, a metal ball is formed, which provides a stable and very reliable connection in any conditions. Moreover, it is reliable not only in terms of electrical characteristics, but also mechanically - the metal of the connected wires after melting forms a monolith and it is impossible to isolate a separate conductor.
Welding - it is important to heat the metal, but not melt the insulation
The disadvantage of this type of wire connection is that the connection is 100% permanent. If you need to change something, you need to cut off the fused piece and do it all over again. Therefore, for such connections, a certain supply of wires is left in case of possible alterations.
Other disadvantages include the need for a welding machine, appropriate electrodes, flux and operating skills. In addition, welding takes a lot of time, it is necessary to protect surrounding objects, and it is also inconvenient to work with a welder at height. Therefore, electricians practice this type of connection in exceptional cases. If you are doing it “for yourself” and know how to handle a welding machine well, you can practice on scraps. The main trick is to not melt the insulation, but to weld the metal.
After cooling, the welding site is isolated. You can use electrical tape, you can use heat shrink tubing.
Preparing wires for soldering
Good preparation is half the success
Before soldering, the wires must be properly treated. To do this, just follow the sequence:
- At the junctions of the wire strands, the insulating layer is cut off by 2-5 centimeters.
- Bare areas are cleaned of the oxide film.
- Tinning is carried out, for example, using rosin resin.
- The wires are connected by twisting.
Now you can directly solder.