Residents of multi-storey buildings often try to save living space and grab precious square meters, saving on literally everything. It is with the aim of increasing usable space that work is underway to develop balconies and loggias.
For some they serve as a small shed, for others they organize a study on them, and in other cases it is a place for relaxation or gatherings for the whole family in Turkish style. But no matter what role is assigned to this space, a fairly important issue is the lighting of a balcony or loggia, which you often have to do yourself.
Primary requirements
Since at the stage of construction and commissioning in houses they do not even lay power supply lines on the balcony, the laying of wires and planning the location of lighting fixtures falls entirely on you. Since the climatic parameters on the balcony can differ significantly from those in the interior, the operating conditions for electrical equipment here will be relatively harsh.
Due to the danger of a combination of electricity, temperature changes and moisture, when designing and installing lighting on a balcony, a number of requirements and rules should be taken into account:
- The degree of dust and moisture protection of electrical devices must correspond to the conditions in which they will be used. They are indicated by the IP index on the case and the following two digits. The most protected are IP68, they can be called completely sealed; the smaller the digital marking, the lower the level of resistance.
- The type of lamp is selected in accordance with the temperature conditions and the purpose of the balcony. If you plan to use it for a short stay, incandescent bulbs will do just fine. At temperatures close to zero, it is not advisable to install fluorescent lamps, since they may not work correctly.
- For unheated balconies and loggias, it is advisable to reduce the number of electrical cable connections as much as possible. Therefore, it is better to install the distribution box in a heated room from which electrical wiring will be supplied.
- For small balconies, it is necessary to choose lighting elements of small dimensions so that they do not occupy the already scarce space.
- When choosing an installation location, you need to make sure that the lighting devices will not interfere with the free movement of each family member. Since if the integrity of an electrical appliance is violated, a person may receive electrical injury.
- If a balcony or loggia is divided into several functional zones, then for each of them it is advisable to provide its own lighting. For example, a relaxation area requires general dim lighting, while a directed flow with good color rendition is suitable for a work office.
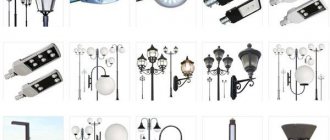
Thanks to the development and implementation of modern technologies, a huge range of lighting devices allows you to use various types of lighting on your balcony, which you can use either individually or in combination.
Video instructions and advice from experts
Cable outlet (from the junction box) for sconces on the loggia:
How to connect a chandelier:
Connection diagram for 1-key switch:
Connecting spotlights:
Ideas for balcony lighting can be borrowed from interior designers and lighting manufacturers. However, the last word belongs to the apartment owners. You can choose one of the standard options and do everything yourself, or choose an interesting design solution by turning to professionals.
YOU MAY ALSO BE INTERESTED
Types of lighting for an enclosed balcony
Before installing lamps, you need to determine the parameters of the room. Be sure to consider what you will use the balcony space for in the future:
- for a warehouse;
- under the office;
- as a dining room;
- residential area;
- recreation areas, both active and for reading, sleeping, etc.;
- as a workshop or craft corner;
- like a gym;
- for a decorative garden or living area.
Depending on the specific task, the most relevant type of lighting and devices for it are selected (main, local, decorative, marking, etc.). When choosing specific models of lighting devices, it is advisable to build on the existing or planned interior style.
Natural
Natural lighting
This type of lighting on balconies and loggias does not require the use of any electrical equipment and is the safest. This is achieved by installing large transparent windows around the entire perimeter or on the most advantageous side, if the design of the balcony allows this.
The light flux is adjusted using blinds or roller blinds. This method is most relevant if the windows face the south or southeast side, then the maximum amount of light will enter the room.
The main advantage of this type of lighting is that you do not need to spend money on purchasing equipment, laying cables and installation work. But illumination will be available only during daylight hours and directly depends on the penetration of sunlight. It is relevant to use for balconies used as storage rooms, gardens and the like, where you spend too little time or the main activity occurs only during daylight hours.
Ceiling lamps
Ceiling lamps
This category of lighting equipment is represented by a fairly large variety of models - chandeliers, spotlights, fluorescent and LED lamps and spotlights. To place them, an installation point or several must be planned, to which the electrical wiring is then installed.
When using suspended ceilings on a loggia or balcony, you can place spotlights or built-in structures under several lamps. A rather difficult issue can be a violation of the ceiling finish after laying electrical wiring, which is why you will either have to make repairs again or mount the wires in an open way.
Ceiling chandeliers should provide sufficient brightness around the entire perimeter, so if one is not enough, you can install several in a row. Depending on the type of distribution of the light flux, they can be with a reflector or with a diffuser.
Desk lamp
Table lamps
Their range includes both portable and stationary models. Table lamps are designed to provide lighting in local areas - on a desktop or workbench. If you use stationary equipment for the manufacture of any products - machines, sewing machines, etc., then stationary lamps would be appropriate here.
For hand sewing, soldering, making parts or assembling any structures anywhere on the table, it is much more advisable to use portable models with an adjustable lampshade.
They are also necessary for arranging a reading place or bedside table. When choosing, you should take into account the design of the room and its dimensions - the lighting device should be compact so that it does not take up extra space in the active zone.
Wall sconce
Wall lamps
Wall lamps can be an excellent replacement for both spotlights and ceiling lamps.
Wall sconces come in a wide variety of models:
- with a stationary diffuser lamp - used to create background lighting on the balcony;
- with a stationary directional reflector - can replace ceiling lamps with a small balcony width, creating basic lighting;
- with a rotating shade - designed for local illumination in a certain area of the balcony.
If wall lamps are used in conjunction with ceiling or table lamps, then it is better to select them in the same style. When choosing a location on the balcony, consider the distance in the horizontal and vertical planes so that they do not interfere with the passage and performance of any operations.
LEDs
LED lamps
Thanks to the widespread introduction of efficient energy-saving technologies, LED lighting is often introduced on balconies, both as a decorative decoration and as the main lighting.
For this you can use:
- LED strip - with a sufficient level of luminous flux, it can be easily glued to the ceiling; RGB strips and models with low power are installed under window sills or along the contour of any interior elements.
- Floor lighting devices - used for decorative lighting or to illuminate objects located on the floor; models built into the floor can be used.
- LED lamps - used in any devices, are the most economical and profitable option from a financial point of view.
- Garlands help decorate a balcony or loggia and bring a festive atmosphere.
There are also exclusive models that run on solar energy and do not require connection to a circuit. For short-term visits to a loggia or balcony, you can use battery-powered LED lamps.
Which lamps to choose?
Each light bulb has both advantages and disadvantages. For a certain type of lamp, it is recommended to select the appropriate lamp intensity.
Today, stores offer a large selection of network light sources, which differ from each other:
- filament element. These are the most common lamp models. They have a transparent or matte surface. The service life of such models is quite short. It fails as a result of a sudden surge in electricity;
- luminescent. Saves electricity and has a fairly long service life;
- halogen It consumes minimal energy. The service life of such a light bulb is about 9000 hours of continuous operation;
- LEDs. The most popular lighting option. Thanks to the varied colors, an unusual atmosphere is created in the loggia area. In the event of a breakdown, specialists can easily replace the damaged element. Such lamps have a fairly low price range.
To create a comfortable environment on the balcony, it is recommended to carefully consider the presence of every detail that can add sophistication and unsurpassedness to the design. The photo of the balcony lighting shows the best lighting design options.
Open balcony lighting
Lighting on an open balcony
The main difference between an open balcony and a living space is the aggressive impact of weather factors on lighting devices and other elements of the power supply circuit. Therefore, to illuminate open structures, closed lamps with a sealed housing are used.
If in the intended installation location moisture will fall directly on the lighting device, then the degree of moisture resistance should be maximum. If during installation it will be covered by a canopy or a balcony located above, models with IP44 rating will be suitable.
Selecting a connection point
To connect the balcony to power supply, use one of three possible sources:
- Apartment electrical panel. This option is considered the most difficult to implement, since the electrical wiring will need to be connected over a considerable distance - stretching it through the entire apartment. This connection method is usually used only in case of simultaneous renovation of the home. The advantage of connecting from the panel is the ability to connect not only light, but also any powerful energy consumers, including heaters, TV, computer, etc.
- The junction box is in the next room. This connection method is used most often. You will need a distribution box in the wall, from which a new line is brought to the balcony. This method is fraught with certain difficulties. Not all cables are suitable for connecting another consumer: if the cable cores are of insufficient diameter, they will not support a new light source.
- Socket from the next room. This connection is called a daisy chain connection. The method is used when the installation box is located far from the balcony.
Organization of space
If a balcony or loggia is planned to be used as a technical, secondary space, then you can get by with one light source. It is convenient to place it centrally on the ceiling to obtain uniform lighting. A good option would be a model with an adjustable suspension, which allows you to direct the light flux in the desired direction and adjust the height of the lamp.
In other cases, to create full-fledged lighting, a comprehensive solution is required, especially for spaces with elongated geometry. On a narrow long balcony, you can install lighting only in the side part, but in order for it to be uniform, you will have to use both sides.
Lighting solution for narrow spacesSource prom.st
On a loggia, one source for improvement will also not be enough. If you use a ceiling model (chandelier or lampshade) as the main one, then the resting place will need its own light source.
Furniture (for example, a table and an armchair) and suitable lighting will help zone the space; on the loggia, the lighting design for the recreation area is selected based on convenience and personal tastes. It can be either a sconce, a table lamp or a model on a clothespin.
Winter garden on the loggiaSource i-okna.ru
Increasingly, they strive to make the space of balconies and loggias as useful as possible and equip them for specific purposes. In accordance with the method of landscaping, the type of lighting (basic, local, decorative) and lamps are selected. The design of lighting fixtures is chosen based on the interior style. The following arrangement methods are popular:
Rest zone. Owners of a loggia stretched along the floor can zone it using accent light. To do this, it is enough to place a table and a chair in the corners, complementing them with sconces or a directional lamp. An LED garland of retro lamps stretched along a load-bearing wall will help make the space more comfortable; It will turn out economically and stylishly.
Comfortable relaxation areaSource domosedy.com
Under the office. An LED panel is suitable for arranging a work area. To make it convenient to work, you need to take care of protection from reflections on the screen. A replacement for the LED panel can be an overhead backlight with adjustable brightness and direction of light. To prevent the glare of sunlight on the screen from interfering with work, blinds are hung on the window.
Working areaSource legko.com
- Winter Garden. Gardeners who fill every available space with pots and containers of flowers will need light with certain characteristics in terms of power and color temperature. LED panels will be a universal solution, and individual LED lamps on clothespins are suitable for exotic plants.
- Hobby. Bright lamps are suitable for a workshop or mini-sports room. You can additionally hang a source of directional light above your desk to do what you love.
Lighting design for the gymSource winstyle.by
About LED strip lighting in the following video:
No. 3. Hidden or external wiring?
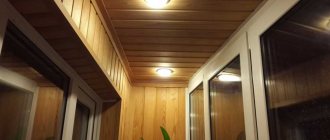
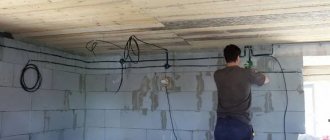
Arranging lighting for a glazed and insulated balcony can be quite aesthetically pleasing and simple. The wiring cable can be laid between the insulation layer and the finishing layer. If plywood or drywall is used as the latter, it is better to cut out places for switches and sockets in advance. Since the ceilings on balconies are also insulated, it is convenient to connect spotlights and create a cozy interior. In any case, it is better to lay the wires in a casing to minimize the consequences of unforeseen situations.
If the balcony is not glazed , and the walls and ceiling are a concrete or brick monolith, then they resort to wall gating , which is often used for glazed insulated balconies. This is an ideal option, since after all stages of finishing work the wires will not be noticeable, and the interior will only benefit from this, but the process of preparing the groove is quite labor-intensive.
The second option is external wiring . All work on its arrangement takes a minimum of time, and the cable is attached to special insulators. External sockets and switches are used, and the cable must be placed in a corrugated pipe to protect it from external influences. Today on the construction market you can find interesting decorative boxes to successfully hide wiring and add zest to the interior.
Self-installation
The choice of materials depends on the specific situation. Do-it-yourself installation of lighting on a balcony is divided into stages depending on its type.
Selection of materials and tools
To install the wiring you will need the following materials:
- cable: it is better to use a model with 3 copper cores and a cross-section of 1.5-2.5 mm. It is also worth choosing a cable with soft insulation, which bends easily and is practically not deformed;
- terminals: they connect the wires to each other;
- cable channel: this is a plastic part in which the cable will lie. It is an elongated rectangle with an opening top cover;
The cable channel looks like an elongated box that opens on one side
- fastening elements: these can be dowels and screws;
- distribution box: the cable comes from it. It is best to place it inside the apartment;
- mounting boxes: switches and sockets are “hidden” in them.
Why is all this needed?
Do-it-yourself lighting on the balcony is installed for various reasons. For some it is simply important to conduct electricity in this room without any purpose, for others there are certain motives. You will definitely have to do the lighting on the balcony yourself if you plan to make a functional room on it (a relaxation room, a workshop, a home office, a playroom, an addition to the kitchen, etc.). Indeed, in this case, a socket and lamps for the balcony are vital.
If you think that you cannot cope with electrical installation of this level, then, naturally, you need to invite specialists to carry out all installation work. By and large, there is nothing complicated in this work, and it does not take much time, so the craftsmen are unlikely to ask for a large amount of money for the completed task.
It is almost always very convenient to install pass-through switches - one on the balcony, and the other in the room at the entrance, as in the video below.
In addition, when contacting specialized companies, you can always find out the approximate cost of work on a balcony from the manager.
Description of design options
First you need to figure out how to provide lighting on the loggia. Therefore, I will tell you how to supply electricity or do without it altogether, yes, yes, this option is also possible. You need to choose the optimal solution for your conditions and repeat all the steps outlined in the corresponding section below.
Option 1 - open wiring
This option is used when the finishing is already completed or the surfaces are already sheathed with clapboard or other material.
For work we will need the following materials:
| Cable | I recommend using three-core copper options with a cross section of 1.5-2.5. Choose products with soft insulation so that they bend easily, this will simplify the installation process and reduce the likelihood of damage to the line during installation. All recommendations will be given to you in the store where you will buy the wire. |
| Cable channel | This is the name of the elements that are mounted on the walls and in which the wires are laid. These are a kind of pencil cases with an opening top, which can have different sizes, so choosing the best option will not be difficult |
| Fasteners | Cable channels and other elements of the system need to be secured; for this, self-tapping screws or quick-installation dowels can be used. It all depends on what material the walls on your balcony are made of. |
| Junction box | It is installed in the apartment and a branch goes out to the balcony. Choose the same option as installed in your apartment so that the designs are of the same type |
| Mounting boxes | They contain switches and sockets, and their number depends on how many such elements will be on the loggia. Boxes come in plaster or plasterboard or other finishes, choose the options you need |
| Terminals | The times of twisting and electrical tape are in the past; there are more modern and safer solutions that allow you to quickly and efficiently connect wires to each other. You need to count their number and remember to buy them along with the rest of the components |
Modern terminals have clamps that securely fasten all connections
To make light on the balcony, you will need a certain set of tools:
- Hammer drill – it will be used to chip the walls, and it will also help us drill a hole from the room to the outside. If you have walls made of brick or concrete, then for installation of mounting boxes you will need to make holes with a crown of the appropriate diameter;
- All measurements are taken with a tape measure, and markings are made using a pencil;
- Pliers, side cutters and screwdrivers are also needed when carrying out work; it is better to have a small set on hand, since you will never guess what you will need in a given situation;
It is advisable to have such a set in every apartment.
- A tester will be needed to determine the supply wire and, if necessary, diagnose problems in the circuit.
Now let's look at the workflow, the instructions for doing it look like this:
All steps of the process are very important, there are no trifles here
- First, you need to calculate the approximate voltage of all consumers that will be used on the balcony . This is very important, because if we connect to a weak line, big problems can arise. After this, you can decide which place to connect to; most often, the socket that is located closest to the balcony is selected;
To find out what wires are laid in your walls, you need to take a project that every homeowner should have and look at all the necessary information, everything is quite clear there and you can figure it out without any problems in a couple of minutes.
- Before wiring the light from the outlet, do not forget to turn off the power at the distribution panel, otherwise the installation may end at the very beginning. It is unlikely to kill you, but the desire to continue carrying out work will most likely disappear, and you will start calling electricians;
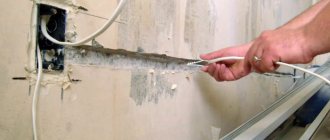
- You should not pull the cable directly from the outlet; it is better to run it into a junction box, which should be placed in the room and then pull the wire further from there . Grooves are made in the wall into which the wiring will be laid, this process is very dusty and very noisy, so choose the right time and do not forget to buy a respirator and safety glasses;
The junction box allows you to make the connection reliable and accessible for repairs in the future
- Next, a groove is made to the wall bordering the balcony, after which a through hole needs to be made in it (that is, the wall). I really hope that your house is not pre-revolutionary and you won’t have to look for a meter-long drill; for standard walls, buying a drill of the required length will not be difficult, it is better to take a product with a diameter of at least 12 mm, it is stronger and the hole is more convenient for pulling the cable through;
When choosing a long drill, pay special attention to its correct geometry; it must be perfectly level. It’s easy to check: roll the drill over a flat surface; if there are any curvatures, they will be immediately visible. I somehow forgot about this important nuance and, upon arriving at the site, I discovered that instead of holes, my drill was drawing circles on the walls.
In order not to drill the wall, you can make a hole in the corner of the plastic window block
- Along the balcony, the wire is laid in a cable channel; it should be brought to the locations of sockets, switches and a lamp or lamps. Elements are attached to concrete surfaces with quick-installation dowels, to plasterboard - with special types of dowels, and to wood - with self-tapping screws. Everything is quite simple and clear, it’s difficult to confuse something;
- With an open installation method, it is better to use surface-mounted switches and sockets; they are much easier and faster to install . Since there may be high humidity on the loggia, all equipment must have a moisture protection class of 4 or more (in the marking this is the second digit of the two-digit code), do not miss this factor when purchasing;
The easiest way is to use a block of socket and switch
- All connections are made using terminals, no twists or tape, do everything carefully, and the result will not be inferior to the work of professionals.