Benefits of installing closet lighting
Cabinet lighting performs two functions at once: practical and decorative. Therefore, backlit products have significant advantages:
- illumination of the filling and contents of the cabinet allows you to quickly find the things you need in it;
- lighting in the area in front of the mirror increases the usability of the furniture;
- lighting elements allow you to diversify the design of furniture and make the interior of the room interesting and unique.
<
>
The lighting can be installed in any type of cabinet: traditional, wardrobe, kitchen furniture, bathroom cabinets and even shoe racks.
What to especially pay attention to when choosing lamps and fixtures
Of course, it is important to take into account your wishes and preferences. But there are a number of parameters that also require attention:
- Interior Design. If the room is already decorated, the illuminated cabinet should fit harmoniously into it. Even small lamps should be chosen taking into account how the room is decorated.
- Area and level of illumination. Bulky lamps will make a small room even smaller. If, on the contrary, it is large, small light sources will look extremely ridiculous.
- If we talk about choosing lamps, it is important to take into account their power, brightness, and color.
And, naturally, you need to decide in advance on the acceptable price. It is worth remembering that cheap products from unknown manufacturers quickly fail. Therefore, experts recommend choosing high-quality lamps that can perform their functions uninterruptedly for a long time.
Types of cabinet lighting
The modern furniture market offers a variety of types of cabinet lighting. This makes it possible to choose the option that seems most acceptable to the owner of the furniture.
There are four main types of cabinet lighting:
- halogen lamps;
- LED lights;
- fluorescent lamps;
- LED Strip Light.
Halogen cabinet lighting
Halogen lamps are the most common way to organize lighting in a closet. They are designs based on halogen lamps.
A halogen lamp is an incandescent lamp filled with a special gas (iodine or bromine vapor). It allows you to extend the service life of the product and significantly increase the heating temperature of the coil - up to 500.
Despite their brightness, halogen lamps have a number of significant disadvantages:
- high heating temperatures can melt the material from which the cabinet is made, as well as cause the evaporation of harmful substances. Therefore, halogen lamps are rarely built-in;
- they should not be touched with hands, otherwise greasy marks may remain on the lamp that cannot be erased;
- The halogen cabinet light is sensitive to even small power surges.
The best option for halogen lighting for a cabinet is several overhead lamps placed on its visor.
LED cabinet lighting
LED lighting combines several advantages: efficiency, durability, safety and high quality lighting.
LEDs are semiconductor devices with an electron-hole junction that generate light by passing electricity through it. This is the safest and most environmentally friendly lighting option.
LED lamps can be made in the form of a set of three or more individual light bulbs, as well as in the form of a line - a long lamp with several diodes arranged in a row.
Unlike halogen and fluorescent lamps, LEDs do not tend to get very hot. Therefore, they are ideal for organizing built-in lighting in cabinets made of any material (including chipboard), since they do not cause melting of the material and do not lead to the evaporation of phenol and other harmful substances.
Fluorescent backlight
Fluorescent lighting is used quite rarely. As a rule, it is used to illuminate the space in front of mirrors or as part of a trampoline rod.
Fluorescent lamps are gas-discharge light sources. The principle of their operation is to generate ultraviolet radiation by discharging current in mercury vapor. They are converted into light radiation using a special substance - phosphor. As a rule, it is a mixture of calcium halophosphate with other elements.
The main disadvantage of such lamps is the mercury content, which can cause serious harm to human health if the product breaks.
Mercury is classified as a class 1 toxic substance, so disposal of burnt-out fluorescent lamps in the usual way is unacceptable, as this causes damage to the environment.
Cabinet lighting with LED strip
An LED strip is a flexible board with contacts on which small diodes are located in a row. It is one of the most convenient lighting options and is often used for decorative purposes.
LED strip is sold in skeins of 5 meters or by meter. It is recommended to take accurate measurements before purchasing a backlight.
There are different options for LED strips that allow you to implement almost any idea in organizing furniture lighting:
- self-adhesive - it can be independently attached to various surfaces;
- waterproof - ideal for cabinets installed in rooms with high humidity, for example, in bathtubs;
- multi-colored RGB tape is an interesting option for decoration. In such a tape, you can change the color of the light bulbs using a controller.
Where and how to install photodiodes
In order to minimize the number of unnecessary lights turning on when the door is opened, the type and characteristics of lighting are determined.
To do this, select the direction of installation of the device and the angle of its action. There are three main styles of lighting the interior area of the wardrobe:
- Directional;
- Scattered (decorative);
- Changeable by program.
To ensure lighting efficiency, photocells are positioned in such a way that the areas adjacent to the doors are best illuminated. Thus, the backlight will work as soon as the cabinet starts to open. If the doors are placed in a room illuminated by natural light, the devices are installed deeper, closer to the back wall of the wardrobe. In this case, the backlight will work later, and the nature of the illumination will be more strongly influenced by the design of the cabinet.
Installation sequence
It is more effective to install motion sensors at a height of 250 to 400 mm from the floor level in the cabinet and position them so that most movements occur through the sensitivity zone, and not directly to the detector.
The solution is determined by the type and number of backlight sources. It would be optimal to purchase devices whose technical characteristics allow for a maximum distance between each other. The wires connecting them to the light source are low voltage, so the user will not need to enclose them in metal or plastic conduit.
Attention! Before starting work, turn off the power supply. Then, using a tester, check the presence of voltage in the network. To do this, touch one wire of the voltage tester to the ground wire, and the other, first to the active wire, and then to the neutral
The warning light on the tester should not light up.
The motion detector sensors are easy to install, but each brand has different characteristics, so please read the included instructions carefully. And in general, before purchasing a photocell, you should familiarize yourself with its purpose. For example, power photodiodes, which are used for industrial purposes, are designed for a voltage of at least 220 V, and therefore are not needed (and even dangerous) in everyday life.
For reasons of aesthetics, all internal lines that are laid in the wardrobe should be enclosed in plastic protective housings. They must be protected from moisture (for example, during cleaning).
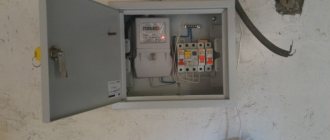
Connection method
The method of connecting the control network using fragments of the previous wiring is not always appropriate. Sometimes this wiring is made without a ground wire or includes other means of grounding, such as metal conduit. In this case, all distribution boxes will need to be grounded. Which will make the circuit cumbersome and inconvenient to use.
Additional installation tips:
- The cover of the outer electrical box must be waterproof. Carefully install the rubber gasket into a specially prepared hole, which is then closed. It’s good if the design of the wardrobe provides for the presence of plugs: they can be used for hidden installation of electrical connections.
- Sealing joints. Moisture can seep into the sensor and/or wiring and cause them to become unusable. To prevent this, the device is placed either under a protective curtain rod (usually located in the corners of the inside surface of the closet) or under another protected area. The problem will disappear if store-bought photocells already have protective lamp seals. In this case, it is enough to simply turn the backlight LEDs down so that water cannot get into the cartridge.
- The use of backlighting on incandescent lamps is not only impractical from an economic point of view, but will also contribute to unstable operation of the sensor, since the heat generated by the lamp will turn on the device every time.
- The range of adjustment of the position of the photodiodes should be such as to take into account all possible changes and redevelopments that the owner of the system will make with the wardrobe over time.
Important: Aluminum wiring will require special handling. When using it, the temperature inside may increase, which will affect the accuracy of the backlight sensor. It is recommended to use copper wiring
Methods for installing lighting devices in a cabinet
The process of installing cabinet lighting requires care. It is advisable to think through its scheme in advance.
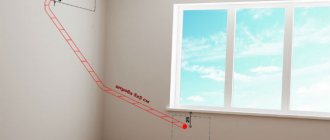
If lighting is installed from the mains, the cable can be routed in two ways:
- open - directly on the ceiling and wall;
- closed - using a cable channel.
Depending on the installation method, the following types of cabinet lighting are distinguished:
- mortise - built into pre-cut holes. Most often they are placed in canopies and separate sections of furniture. For a decorative function, lighting can be installed on the facade of the product;
- overhead – attached in those places where it is necessary. They can be of various shapes - square, round, oval, triangular and rectangular.
If bright lighting is required, it is advisable to use overhead lamps - they are more powerful than recessed ones.
Mortise structures are good to use for decorative purposes, but they are much more difficult to install.
How to install halogen lamps
Halogen lighting is often used to illuminate shelves in a closet. Stores sell ready-made kits consisting of three or five lamps. Choose a set of the appropriate size to illuminate the cabinet shelves.
The standard lighting kit includes:
- transformer;
- halogen lamps;
- wires;
- connector;
- switch.
Before installing halogen lamps, you must familiarize yourself with the diagram:
When choosing a step-down transformer, you should consider the following parameters:
- input voltage;
- power (total sum of power of lamps connected to the transformer).
In addition, study the following rules for installing the backlight:
- The power of the transformer should be five percent higher than the sum of the power of the halogen lamps.
- The transformers must output twelve volts. For example, if you need to connect five lamps (the power of each lamp is twenty watts), with a voltage of twelve volts, then you need to multiply the number of lamps by the power and add five percent to the resulting figure. Accordingly, the power of the transformer will be 105 watts.
- Take into account the compliance of the operating voltage of the connected luminaires.
- The length of the wire for connecting the lamps to the transformer should not exceed two to three meters. If you take a longer wire, the power supply over long distances may be reduced.
- It must be taken into account that during operation of the transformer it will heat up, so it should be located at a distance of twenty centimeters from heat sources (heater, battery).
Step-by-step work on connecting lamps:
- To prepare a place for halogen lamps, you need to use an electric drill and put on a cutter (crown).
- Drill a hole five to ten millimeters deep, and then turn the cutter over and drill the hole. Without this technique, you can tear out a piece of chipboard from the cabinet wall.
- On a flat surface, connect the lighting elements into a single chain.
- To connect the lamps, you need to connect the lamps to each other and connect them to a transformer.
- To make a parallel connection, you must use blocks or terminals.
It will be easier to do lighting in the closet with your own hands if you look at the connection process in the photo:
Installation locations of lamps in the closet
It is important to decide on the location where the lighting will be located. There are many options for its installation, depending on the purpose of the installation:
- on the doors. Such lighting performs more of a decorative function than a practical one. It can be used not only in a new cabinet - installing lighting on the doors of old furniture can significantly refresh it. As a rule, an LED strip is installed along the contour of the door;
- on the shelves of the closet. Lamps on the shelves illuminate their contents. These can be lamps of any type, except halogen ones - they get very hot and can damage things stored on the shelf;
- on the tramp rod. This solution allows you to illuminate the most spacious and deep compartment of the cabinet. It is made in the form of one long fluorescent lamp or LED strip;
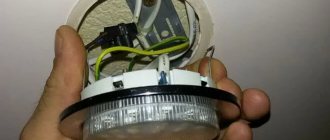
- on the cabinet cornice - the protruding upper part of the product. This is a universal option, in which both the space in front of the cabinet and its internal contents are moderately illuminated. Traditionally, cornice lighting is done using several spotlights;
- in the lower base of the cabinet - used to illuminate the lower compartments, such lighting is especially relevant for shoe racks.
Illumination installed along the inner contour of the cabinet is gaining popularity - it allows you to illuminate almost the entire depth of the furniture.
Working with glass
To make your own LED strip lighting, you must first build glass shelves. Of course, you can always buy ready-made products, but they will not always fit your room in size or style. The solution to this situation would be to manufacture products to order. But it will be quite expensive than if you did everything yourself. Therefore, it is best to make a shelf with your own hands so that you are satisfied with everything. To work with glass you need the following set of tools:
- oil glass cutter It must be of good quality;
- ruler;
- sander It is better to use a tape type device. In this case, the grain size for the working skin should correspond to the value of 120 units. Making an incision
Before you start working with glass, if you have not encountered such manipulations before, it is better to practice. This is due to the fact that the cut must be made the first time. If you run the tool over the cut again, you can easily scratch the glass.
After the cut has been made, the glass should simply be broken along the intended line. In addition to the correct cut, the stage of processing the sections is also important. It will give the glass a decorative and beautiful look.
Note! Processing of cuts is necessary for the further safe use of glass products in the house. If you do not do this, you can very easily cut yourself on the sharp edge.
Grinding the cut
So, glass processing involves the following steps:
- incision;
- breaking glass into pieces along the cut line;
- grinding the cut using a grinding machine;
- If you don’t have a grinding machine, you can process the cut yourself. But this one will take much longer;
- During grinding, it is necessary to wet the surface being treated with water. This must be done to prevent microscopic pieces of glass, which are very harmful to human health, from spreading in the air.
Perform the manipulations described above for all the glass, and you will get beautiful shelves that will need to be attached to the permanent location.
Cabinet lighting controls
When choosing a backlight, pay attention to the control method.
It could be:
- control system using a switch. This is the easiest way. In order to turn on the lighting you must use the button. But turning the light on and off manually all the time is not always convenient, especially if the cabinet is used frequently;
- automatic control: the light turns on automatically when any of the doors is opened or at the moment when a person approaches the cabinet, and turns off when closed. This method is implemented using motion sensors.
To control the characteristics of the backlight - its brightness, intensity and color, a special controller or remote control is used.
Inventory
To install a lighting system, you must first draw up a power supply diagram for the devices. Batteries, lamps and switches should be marked on it. It is most convenient to make a drawing on the cabinet diagram that comes with it. The next step is to transfer the markings to the cabinet frame, marking the places where the wires will be laid and where the lighting fixtures will be installed.
To carry out installation work, the following basic equipment is required:
- LED strips or individual spotlights;
- cables (the determining factor is power consumption);
- 12 V power supply;
- controller (when connecting a color RGB strip);
- light box (for completing closed LED strips);
- flux, solder and terminal connectors (for making electrical connections);
- switch or control panel (for manual control of the backlight);
- motion sensor (to create “smart” lighting with automated on/off).
Also during installation you will need the following tools:
- drill with attachments;
- screwdriver or screwdriver;
- construction stapler;
- stationery knife;
- soldering iron;
- pliers;
- wire cutters;
- scissors.
Types of power supply systems
There are two types of cabinet lighting power supply:
- from the household electrical network - a reliable, but not the most convenient option. In this case, you will have to think about how to hide the wire. In addition, the backlight will not function in the event of a power outage;
- Autonomous - lamps are powered by batteries or rechargeable batteries. The first option is more budget-friendly, but the batteries are durable and guarantee high-quality power supply for the backlight.
Photos of illuminated cabinets
<
>
Thus, a closet with a lamp is not only convenient, but also beautiful. And the best solution for cabinet lighting in terms of functionality, safety and aesthetics is lighting in the form of LED lamps or strips, controlled automatically using a motion sensor.
Application ideas
Apartment lighting
LED strip goes very well with other types of lighting. There are a lot of ideas for using them. It gives the room an unusual interior. If there is enough local lighting, it should be used as an addition to the existing one.
Ladder
The use of LED strip in the interior of a staircase The staircase is illuminated not only because it is original and beautiful, but also for the safety of moving along it. The LED strip can be mounted in a variety of ways: on the side of the steps, on each step, every other step, or can be built into the railing. Lighting with a motion sensor is often used. It is extremely economical and very convenient.
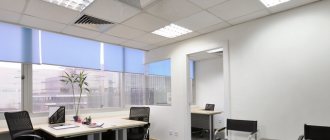
Walls
Lighting or illumination of walls allows you to visually change the size of the room and give the interior a decorative look. Paintings, photos, walls and any materials on the wall are usually illuminated. LED wallpaper is also used to decorate walls. They are very easy to use and install. They are also attached using the back adhesive side.
Curtains
This is a relatively new design move, but it is rapidly gaining momentum. In this case, the LED strip will highlight the structure of the fabric and give the interior a wonderful look. Usually it is placed in a niche near the cornice.
Furniture
It is illuminated, albeit less often than everything else, but still illuminated. LEDs cope with this task very well, as they are flexible and easily attached exactly where needed. They make furniture special and highlight its advantages.
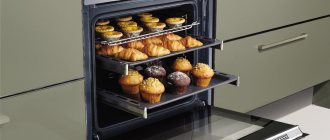
Kitchen
In the kitchen, LEDs are used in several options:
- Diode strips are used as illumination for the work area. They are mounted under kitchen furniture.
- They illuminate the kitchen apron from the inside. Usually an apron is made of glass and illuminated with a ribbon, in which case it turns into an independent lamp.
- Illuminated glass cabinets from the inside.
- They zone the room and highlight specific zones or objects.
Small living room
Lighting the bedroom at night LED lighting is extremely versatile, it can be applied to any type of room, regardless of its size. When using it in a small room, it is advisable to immediately buy a dimmer to adjust the brightness of the LEDs, as well as automatically turn it on and off. Using a dimmer, you can give a room a more homely look by adjusting the shades and brightness.
If the room is equipped with a suspended ceiling, then you cannot do without an LED strip. It will help bring additional coziness and comfort to the room.