Location of the electrical panel in the room
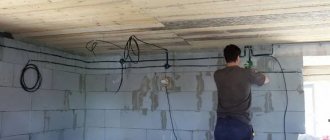
It is important to decide on the installation location of the shield. Its location requires constant access; the switchboard door must not be blocked by foreign objects.
In most cases, the shield is mounted near the entrance to the house, or already inside, but immediately in the corridor of the house or apartment. This simplifies the installation of the cable supplying voltage to the room.
- The height of the shield is determined at the eye level of the residents of the home. This arrangement is necessary for the convenience of taking meter readings when paying for electricity.
- Previously, in not-so-distant times, meters with automatic machines were installed on a wooden plank on the wall.
- Although their location was usually under the ceiling, it is undesirable to do so. In the shield, the entire structure will be in a safer position.
Modern electrical panels have high protection classes, a good solid base, and a lock with a key. What is an obstacle for small household members to enter there.
In a private house, when placing the panel, the location of the high-voltage line from where the cable will be supplied to the room is taken into account.
Basic classifications
By area of use
Main switchboard
The electrical panel ensures the safety of the supply of electricity to apartments, floors or buildings with a large area. Based on the coverage of the service area, devices are divided into several types.
- The main switchboard, or main distribution board, is a large structure that is used in electrical engineering at a transformer substation or production lines. The device supplies energy to a large object, distributing it evenly. Due to this, network overloads are prevented and there is an automatic transition from main to backup power.
- The shield installed at the input, or ASU, is used for power cables in homes, offices, and factories. It is designed to separate the lines from which the apartment or the entire floor is powered. The device takes into account energy consumption, triggering a shutdown in case of overloads and short circuits.
- ShchE – floor panel. The module is installed to divide power into 2-6 apartments. It has compartments for consumer automation, electricity meters and user equipment: telephone, television, radio, intercom. ShchK
- The ShchK input device is mounted at the entrance of the conductors to the apartment. The standard installation location is the hallway, vestibule, area near the front door. The shield prevents short circuits, overloads, ensures power sharing and controls electricity costs.
- Control room is a device that controls the automation and drives of heating, ventilation and alarm mechanisms. The user configures the parameters manually.
- SCHA - automation panels are equipped with software controllers that monitor the state of the electrical system and other networks.
- ShchBP - an uninterruptible supply panel is necessary to provide electricity to control systems, equipment of medical institutions and other equipment of the 1st category of power supply.
- ShchSN - auxiliary devices power equipment at facilities - stations and substations. Thanks to them, power transformers, control systems and basic communications operate.
Enterprises also use DC boards (DC panels) with batteries, chargers, and rectifier units.
According to the method and location of installation
Cover plate
There are several models depending on the installation method.
- Invoices. The outer panel is attached to the wall with self-tapping screws and dowels. The mounting location should be chosen taking into account the protrusion of the mounted distribution board 12-20 cm from the surface. The wall-mounted device is suitable for wooden houses, made of metal and plastic, used for hidden or open lines.
- Built-in. To install the device, a special niche is made in the wall, which complicates the installation work. The technological seam is hidden by a special flange on the front part of the built-in electrical panel.
- Floor-standing. The models are large in size, so they are not used for household power lines. The devices are relevant in production, in administrative buildings, and shopping centers.
The distribution board is mounted outdoors or indoors. The internal type of devices is installed on floors, in apartments, in special utility rooms.
The outdoor electrical panel is manufactured in surface-mounted and floor-mounted versions. Installation takes place on the wall of the building, on the body of special equipment, using supports and stands. For protection from external influences it has an all-weather housing.
The switchboard is installed in an area away from flammable substances, with good natural ventilation, ease of access and sufficient illumination.
Materials for production
Metal switchboard for the street
Depending on the production raw materials, there are two types of switchboards:
- Metal with high resistance to mechanical impacts. The products are durable, reliable, but heavy. Installation is carried out in garages, in a special panel room in production.
- Heat-resistant plastic and lightweight. Aesthetic and durable products are installed in apartments, installed in a private or country house without organizing grounding.
Budget models made of plastic turn yellow over time.
In addition to the housing part, the power distribution board consists of metal DIN rails and special mounting panels. For strength and protection from external influences, the box is equipped with rubber seals and sealed dust-proof cable outlets. Metal products often have locking mechanisms - overhead, hinged, electronic.
Dust and moisture protection
Table of degrees of protection
The degree of protection is indicated by the manufacturer's marking on the case. The most common degrees of protection include:
- IP20, IP30. A box without protection from moisture and dust is only suitable for dry rooms. The internal contents are hidden by a flap.
- IP44, IP54. Good moisture and dust resistance determines the use of products outside or in wet rooms. To protect against water flows, you will need an additional transparent casing.
- IP55, IP65. Waterproof type of devices, suitable for installation in aggressive conditions. They are installed without additional protection and are not exposed to moisture and rain. A box with IP55 is partially impervious to dust, with IP65 it is 100% dustproof.
Models of categories IP21, IP31 and IP32 are installed indoors. For outdoor installation, it is better to choose an IP54 shield with sealed flaps and sealed cable entries.
Classification by design
Accounting and distribution board
According to the design, you can select the following models:
- Modular. The electrical panel is used for relays, circuit breakers, and conductors. It is a small cabinet covered with a metal or plastic panel, with slats and busbar platforms.
- Accounting. Inside you can place an electric meter and other metering devices on DIN rails and screws. Some modifications are available with modular circuit breakers.
- Accounting and distribution. The device is equipped with a mounting rail for RCDs of branch lines, a compartment for the switch, which is sealed, closed with a lid or with a lock.
Panel devices have complete mounting panels, for which an installation project and assembly diagrams are drawn up.
By number of modules
Panel for 10 modules
An electrical panel of medium or small size may vary in the number of modules. Special compartments are intended for installation of oversized equipment.
The number of modules in devices varies. There are products with 10, 12, 16 and 18 compartments. One element has a width of 18 mm, which corresponds to the parameters of a single-pole switch.
It is necessary to select modular models depending on the number of consumers, the type of circuit breakers, the presence of automatic circuit breakers, a meter and an RCD. A two-pole circuit breaker is connected to 2 modules, a three-phase circuit breaker - to 3, a single-phase RCD - to 3, a three-phase RCD - to 5, an electric meter - to 6-8.
For an average apartment, models with 12-16 modules are sufficient. When installing the meter in a distribution box, you will need from 16 to 24 modules. In a private home, devices with a number of models from 24 pieces are used. When laying the line of a two-story country cottage, 2 panels are installed.
Industrial or homemade shield?
Nowadays different shields are sold. All kinds of shapes and sizes. They have either a primed metal, painted base or a plastic base. There are also brushes with internal factory filling. There are designs available for individual order.
But, if the shield installer has certain skills, then it is better to install the internal parts yourself, at your own discretion. The more experience, the more competently the installation of the structure in a certain volume of the electrical panel will be completed.
Electrical panel assembly
When the panel diagram has been created and the electrical wires have been laid around the apartment, we proceed to assembling the panel. If desired, you can order a prepared shield, which all that remains is to install and connect the input cable.
Marking and installing DIN rails
First, markings are made of where the modules will be located and how long the slats are needed. During the fitting process, they also take into account the distance between the rows, if there are several of them, as well as the distance between the zero and ground buses. When the marking is ready, the slats are installed in the required places.
Installation and switching of modular devices
At the stage of installation of modular devices, automatic machines and additional devices are installed on a DIN rail. They are also connected to each other. First of all, they install an input circuit breaker, then voltage relays, RCDs and differential circuit breakers, which are located in front of conventional switches.
Organization of cable entry into the electrical panel
At the stage of cable entry, it is necessary to make holes in the shield. As a rule, all insertion points are provided by the manufacturer, so it is enough to squeeze out the plastic. On one side, a general network cable is installed, which is connected to the input circuit breaker, and on the other, internal network wires.
Choosing an installation location
In most apartments, the shield is installed closer to the front door. This is not a mandatory requirement, the main thing is to follow a number of recommendations:
- quick access to turn the voltage on or off;
- remoteness from flammable and fire hazardous materials;
- natural lighting of the room where the shield is installed is an advantage during repair work.
Cable cutting
To cut the cable, use a special tool designed for stripping insulation. Typically, professional electricians use claws or a heel knife. The equipment increases the speed of cable handling. When cutting, remove the outer sheath, and then the required amount of insulation from each of the cores.
Connecting consumer groups
During installation, modules are grouped depending on various factors. For example, by purpose or premises. Automatic devices for apartment lighting are installed one at a time, after which protective devices are installed for the kitchen, bathroom and other rooms.
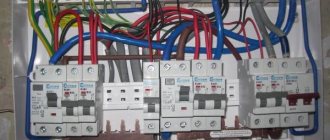
Connection diagram of circuit breakers.
Before starting work on installing the machines, you need to familiarize yourself in detail with their schematic data. Different design elements in the shield have their own designations.
Installation of new circuit breakers to replace old ones
I will say right away, responding to the claims of beauty enthusiasts. This is not Instagram, where the main thing is the picture. In my blog I show not gloss, photoshop and beauty, but real life. But in real life, anything can happen - crooked, askew, dirty, and dangerous.
Those who are spoiled by perfect Instagram pictures and pretentious chicks are definitely not for me. Come to me for real life without embellishment.
So, we don’t throw away the old AVs yet (they will be useful for the review), but we start installing the new ones from the DIN rail:
DIN rail for new machines in the panel
You can see one suitable wire (after the meter) 4 mm2 from below, and two going into the apartment.
I install new AVs, Schneider Electric Easy 9 with a rated current of 16 A and shutdown characteristic “C”:
New Schneider Electric assault rifles to replace the old Soviet AB25M
Why are there 2 wires, and the third one is wrapped with electrical tape? The third wire is intended for a powerful kitchen outlet, and is walled up somewhere under the tiles and kitchen units in the apartment. I installed the third AB, one might say, in reserve, especially since it was purchased in advance.
New Schneider machines, connection from above
Why Schneider and not IEK or ABB? I believe that 90% of the success and duration of operation of an electrical panel depends not on components, but on correct calculation, quality of installation and proper operation. This is exactly what I answer when people ask me “which brand should I choose?”
By the way, recently there was an article on the blog about how I went to Moscow at the invitation of IEK. The article is a detailed report of what was shown and told there.
Look at the ABB machine to the right with a rating of C25 - two wires are connected to its upper terminal. When the aluminum starts to burn, and this will definitely happen, bewilderment will arise: “How so, this is ABB! Probably fake!” Reasons why this terminal will light up?
- The current can be 25 x 1.45 = 36 A for an hour, taking into account the time-current characteristics and the fact that the temperature in the entrance drops significantly in winter.
- The wires are most likely not stripped and are not pulled through periodically.
I carefully clean the wires and make a loop to increase the contact area. In addition, the current through the contact (and through the wire, of course) is limited by the rating of the machine.
Main parts used in the shield
Introductory machine. Used to protect the entire wire circuit.
- The main cable is connected to its contacts.
- It is possible to install a switch in front of the machine.
- When the switch opens, you can always repair or replace any component in the electrical panel.
Do not forget to connect the power cable to the switch at the same time.
Counter
This device is installed after the machines according to the scheme. Its main task is to display the amount of energy consumed. If necessary, it can be placed separately from the electrical panel.
Residual current device
The purpose of this device is to protect against fire and electric shock. In ordinary, small houses or apartments, one RCD is installed. It is enough to handle the entire electrical current load in the room. But in the case when the calculation of energy consumption is large, up to several such devices are installed additionally.
Linear automata
They carry out their work in each individual sector of the common premises. In the event of a short circuit or high voltage, they are automatically triggered, disconnecting from the main electrical circuit. They often save you from heavy loads in room wiring when you turn on a large number of electrical appliances.
Differential machines.
They are used to protect electrical appliances on individual lines, instead of several main circuit breakers.
Mounting rail.
It looks like a metal strip. Fastening is carried out to the back of the shield. The number of rails depends on the design of the electrical panel. The more spacious the box, the more modules and slats can be installed in it. To select it correctly, first study the connection diagram of the parts.
Comb.
Has a switching function in the panel. Grounding and neutral connects each other.
Distribution bus.
This part has reliable insulation. Thanks to its special design, it connects machines for different purposes. They have good fixation, which allows high-quality fastening of the ends of the wires. They are used for both zero and phase.
The best switchboard manufacturers
Floor distribution board Elektromol
Electrical boards of Russian and foreign assembly are available on the domestic market. Among the worthy manufacturers producing quality goods are:
- Electromol. Moscow brand specializing in electrical panel equipment. They manufacture ASUs, apartment and floor switchboards.
- 1Electrical equipment. Russian company producing floor, input and distribution devices, as well as lighting control boxes.
- QMS. Novosibirsk brand, whose assortment includes ShchO panels, substations, floor boxes.
- Makel. It produces external and internal devices with transparent and opaque doors and IP40 protection. The brand does not use halogen.
External metal electrical panel Iek for meter and 24 circuit breakers - I.E.K. 98% of products are assembled in the Russian Federation, 2% in Italy, Bulgaria, and Poland. Boxes are designed for 2-96 modules. The range includes mounted, built-in, distribution and accounting devices.
- Fotka. The Greek manufacturer produces built-in steel devices with decorative front panels and doors. They have 13-80 modules, suitable for small apartments and production. The DIN rail is adjustable horizontally and vertically.
- ABC. It produces several series of switch cabinets - without frames and doors or with them. Switchboards have a row spacing of 125-150 mm, steel frames and doors, and are equipped with holders on which electrical wiring is attached.
The products of the presented brands comply with GOST standards and are distinguished by their quality and reliability.
General purpose of the machine
A circuit breaker is a device whose function is fire protection. Arising from a wiring fire experiencing an overload in the network.
Triggering of the machine leads to a break in the circuit. It turns off power in the following cases:
- Wiring short circuit
- Sudden power surge in the network (each machine has its own overvoltage threshold)
When wiring has different cross-sections, automatic machines of different power are used, which allows you to control the load on a certain section of the wiring.
What's up with the neighbors?
In such cases, I try to touch less wires that are not relevant to my business. Otherwise, an unpleasant incident may occur. Adding spice to the work are the curious grannies-neighbors, who strive to ask stupid questions and make pessimistic forecasts. Some even start pulling live wires!
The neighbors' wires and automatic machines are complete chaos and inconsistency.
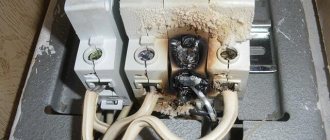
The lower terminals of the machine are burning
Here the contact will soon disappear completely, for the reasons described above.
View of the same machines from above. Almost untouched Soviet rarities. Twisting under PPE - total zero(((
The terminals are burning, I can’t look at this mess
Masterpiece. Zero tires. The main thing is not to touch anything!
The general working zero was done “coolly” - twisting wires of all kinds through PPE. I remembered my article about the differences between the consequences of a zero break in a single-phase and three-phase power supply network.
Please note that TDM circuit breakers are equipped with PVS3x2.5 to power new loads. This was done during a major renovation in a neighboring apartment. Despite the fact that here, too, one can pour negativity, everything is strategically correct - when the load increases and powerful appliances appear (such as an electric stove, air conditioner, boiler), the best solution is to lay a new line and connect it through a separate machine.
What is a machine gun
- Cocking handle. Brings the device into working condition. If necessary, you can also turn off the machine yourself by moving the lever to the bottom.
- Enabling mechanism. Located inside the case.
- Contacts. They are intended to close and open a circuit.
- Clamps. Connect to a device that provides protection.
- Mechanisms. This is a temperature-triggered release plate. Having a bimetallic base. Many machine designs have a current adjustment screw.
- Arcing chamber. It may be located inside, in different poles of the machine.
Why does the machine keep knocking out?
Main reasons for triggering:
- network congestion;
- failure of a device included in the circuit;
- breakdown of the lighting fixture;
- switch malfunction;
- short circuit.
Overload is a condition when the power of the connected devices exceeds the rated power for which the switch is designed.
To avoid such a case, you need to carefully select the socket group to which powerful household units will be connected.
Connecting a broken electrical appliance can also cause a blackout. When the machine breaks down due to the lamp being turned on, the problem should be looked for in the lamp base, the quality of the contact or the transformer of the LED chandelier. In most cases, the shutdown is due to a short circuit.
The machine on the meter is triggered and turns off without unnecessary load
Short circuit (SC) is one of the main causes of knockout. If there is a sudden power outage, there is no need to immediately try to connect the circuit breaker. First you need to check the conductors, the stability of the socket contacts, and the absence of a short circuit in the socket (for lamps). Then you should check the wiring with a tester, and the faulty section should be replaced by an electrician. After checking these factors, you can turn on the machine.
A short circuit can occur without human intervention. This is possible when the contacts of electrical devices overheat or burn out.
When replacement is needed
If the connected total load is within normal limits, and the short circuit was not detected by the tester, the cause of the breakdown may be a malfunction of the machine or poor contact.
If the switch periodically trips, it is recommended to replace it with a device of similar rating.
Tightening contacts can also help.
You cannot increase the rating of a circuit breaker if it has been calculated correctly. If the value is exceeded, the insulation on the wiring may melt.
Photo of the placement of machines in the electrical panel
Share with friends
Requirements for distribution panels
There are special requirements for electrical equipment, since it is responsible for the safe operation of household appliances. The following must be required:
- Availability of a technical passport with a description of consumers and rated current.
- Developed connection diagram.
- Marking of wires with the designation of line devices.
- Grounding the shield and all connected devices.
- If the shield is metal, the structure and doors must be grounded, and the housing coating must be dielectric.
- The presence of free terminals on the neutral and ground wire buses.
- The shield is made of non-flammable material.
We cut the cables and mount the modules
Every electrician will confirm that working with a tool specifically designed for a particular operation is easier and more enjoyable. You can cut the cables inside the shield with a regular construction knife, but if you do it with a special knife with a heel, everything turns out faster and better.
After cutting the cables, you should re-label the wires, since there will be quite a lot of them and if you get tangled in them, it will take a lot of time to restore order. When feeding cables into the shield, you should leave a length that is equal to twice the height of the shield, that is, run the cable through the entire shield, and then measure out the same amount. This measure is not wasteful: the wires inside the shield do not go in a straight line, but along an intricate curved line, and it is better to have a little extra wire left than not enough.
There are no strict rules for the arrangement of modules in the electrical panel; however, electricians usually use one of two installation schemes - linear or group. In the first case, all elements are arranged one after another in the order shown on the single-line diagram: automatic input device, RCD, automatic circuit breakers, consumer circuit breakers. Among the advantages of this location option is ease of implementation, the disadvantage is that it is difficult to find the “culprit” of the emergency situation.
If a group layout of modules is implemented in the panel, the components alternate among consumer groups: AV input, RCD, group of switches linked to this RCD. Next, the next RCD and the corresponding group of circuit breakers are installed. Such a circuit is somewhat more difficult to assemble, but the problem line is immediately visible from the triggered RCD.
Construction of a niche for an electrical panel
We measure the dimensions of the electrical panel housing. You can use a passport for an electrical panel with the indicated dimensions (see figure below)
- We measure the installation height on the wall where the electrical panel is installed. Usually 1.4-1.7 meters to the bottom of the shield.
- Draw the perimeter of the shield body on the wall.
- We make a width allowance of 2 cm on each side (for laying electrical cables).
- We line the perimeter of the niche into a checkered pattern, with the dimensions of the cells being 10x10 cm.
Since we have a concrete (or brick) wall, we will use a hammer drill.
Hammer with drill
We insert a large drill with a diameter of 18-22 mm into the hammer drill. We set the hammer drill to the “impact with drilling” mode
The further technology for constructing a niche is as follows:
- We drill holes along the ruler lines to the depth of the thickness of the electrical panel body plus one centimeter;
- We change the hammer drill attachment to a pick or blade;
- Having changed the hammer drill mode to “impact only”, we hollow out all the excess inside the niche;
- Periodically we try on the body of the electrical panel in a niche;
- After the switchboard housing fits freely into the niche, and there is also free space left in the niche for the input and laying of electrical cables, we consider that the niche is made.
If possible, drilling with a hammer drill can be replaced with cutting a niche with a wall chaser. But you will still have to hollow out a niche.
Electrical panel operation
Operating a correctly assembled shield will not be difficult. It should be understood that you will have to periodically service the device, checking the operation of the machines and tightening the terminals.
If there are small children in the house, you need to think about a lock and close the door with a key.
For greater convenience, you should create markings and signatures for each of the machines. It is also recommended to use the same colors for one group to make it easier to find the right switch. This simplifies the operation of the shield. All residents of the apartment should understand how the shield works without any questions.