An addition to the lighting device in the form of a photo relay allows you to reduce energy consumption. This small and simple device completely takes over the control of turning on/off the light bulbs depending on the level of illumination on the street.
At dusk, a photo sensor for street lighting activates the lighting near the house, and turns it off at dawn. It is simple to design and operate, but before purchasing the optimal model, you need to consider a lot. We'll tell you how to choose the perfect option.
Photo relay for outdoor work
This is a device with a special built-in photosensor, the task of which is to automatically activate the system for turning on and off the lighting on the street. The device is economically feasible because it operates in an energy-saving mode, turning on only on demand.
For correct operation of the device, it is necessary to carry out installation and configuration without errors. As a result of correct adjustment, the photosensor will turn on only in the dark; during the day it will enter standby mode.
To properly connect a light sensor, you need to know the device and principle of operation, its types, and also decide on a set of tools for connecting it. They will help you get acquainted with simple photo relay devices.
Operating principle of photo relay
The operating principle of the photo relay is based on the operation of a built-in photocell. Analyzing the power of the light flux on the street, the sensor turns the artificial light on and off. In the daytime, it is an insulator that opens the electrical circuit, and at dusk it is an excellent conductor.
- The design of the device is simple, it easily fits into a small housing with terminals for connecting to the mains.
- The photo sensor is designed to solve many problems, the main one of which is street illumination at night.
- Most devices are equipped with a regulator for setting certain values for the luminous flux that activates the lighting system.
- If the minimum value is set on the regulator, the photo relay will close the circuit late at night, if the maximum value is set at slight twilight, immediately after sunset. The average value will be the most acceptable, but for accurate work, several indicators are adjusted.
We buy a solar lamp
On the modern market, the choice of lamps for working in the local area is quite large. It’s not difficult to get confused by such diversity.
We will tell you what you should pay attention to first.
Power
The area of the illuminated space depends on how powerful the light source is. Modern realities are such that the buyer already knows the advantages of LED lamps. For models that will be used to illuminate roads or decorate gardens, powerful models are not needed.
In order to better navigate people in cars in suburban areas, there are more powerful models.
To make it easier to navigate among the variety of light bulbs, we have collected all the light bulbs in one table:
- LED;
- luminescent;
- incandescent lamps.
And we grouped them by power:
Protection class
Since it is assumed that our lamps will be used outdoors, the “Protection Class” parameter shows how protected our lamp is from the influences of the external environment.
The IP class characteristics of the device are important to us.
The table clearly shows that for street lamps the optimal protection class is IP44, but it can be higher, but it will cost more.
But the table only helps to select the right device with the right protection class. But, generally speaking, you must first focus on the climatic features of the area where this lantern will be installed.
Housing material
This is where it is difficult to give advice. No, of course, for outdoor lighting of large areas to last for a long time, strong and durable materials are needed.
And if these are decorative lamps, then their body can be made of anything - metal, plastic, glass and even wood. The solar panels themselves are more important here. They must be of high quality.
Types of lamps and installation methods
As already mentioned, there is a wide variety of lamps.
Based on type and method of installation, they are divided into:
- Ground - mainly used for designing garden paths, lighting, as a decoration element or landmark. The length and height of the legs can be adjusted to your liking.
- Wall-mounted - highlight a section of the wall very favorably. It can also be used as an element of illumination of the adjacent area.
- Hanging - can be hung anywhere in the local area. Mount either on chains, or on a cable, etc.
- Built-in - go deep into a structural element. Serve as lighting for garden paths or parking areas.
Main technical characteristics of photo relay
- The supply voltage for street lamps is 220 V;
- The switching current depends on the number of connected consumers (defined as the ratio of the sum of the power of all lamps to the supply voltage) and should not exceed 10 A for uninterrupted operation;
- The power range of the device is 1-4 kW depending on active or passive operation (standby mode);
The illumination range is controlled by the regulator. The sensor's power is turned on at the lower limit, corresponding to 2 lux (pitch darkness) and at the upper limit - 100 lux - it is turned off. The actual values of the work lie in a slightly different area - 10-80 lux.
Operating principle
The main element in such street lamps is photocells assembled into a single solar panel. When the photopanel is brightly illuminated by the sun, it begins to generate electric current. In principle, the lamp will start working now. But why would he work during the day? Therefore, the circuit is supplemented with a battery.
During the day, the built-in light sensor redirects energy through a diode to the battery. The diode, as it were, locks the battery and does not allow it to work during the daytime.
With the onset of darkness, the same light sensor will no longer cut off the power supply to the LEDs and opens the VD transistor. Chain: battery → emitter → transistor collector → LED panel starts working.
At dawn, as soon as the first rays of the sun hit the light sensor, the illuminator's power circuit is turned off and the battery charging circuit is turned on.
Of course, this is a simplified description of the operating principle of solar-powered street lighting devices. Industrial designs for lighting using photo panels are equipped with a complex automation system. And the batteries are supplemented with inverters that convert direct voltage from solar panels into alternating voltage to turn on lighting devices.
The duration of their operation depends on how brightly the street lamps work. When the battery is discharged, the system itself will automatically turn off the power to the lamp. This is especially true in winter, when the lamps simply do not have enough daylight to recharge the batteries.
Naturally, the time at which street lights turn on depends on the time of year. In winter they turn on closer to 18-00 pm, and in summer at 2100–2200 pm.
Another important point is the photocells themselves.
As a rule, you can find photo panels made on the basis of monocrystalline silicon on sale. They showed better reliability and durability parameters than those based on polycrystalline photocells.
Main types of light sensors
There are external and internal sensors. According to the design features, the photocell is located either inside the housing or outside it:
- External sensor. The mechanism of the device is divided into two sections - a switch and a photocell, connected into a single circuit. Such a lighting sensor is used in complex configurations, so it is important to have a good understanding of the circuitry of the panel that activates and regulates the operation of street lighting;
- Internal sensor. The most common standard type of photo relay, inside of which there is a photocell and an activation timer. Thanks to it, you can configure how to turn the device on and off. As a result of the timer operation, the street lighting is activated at the set time, which makes it possible not only to reduce energy costs, but also to increase the service life of the device itself.
Principle of operation
- Photoresistor. When irradiated with light, the level of its resistance changes
- Phototransistor. Depending on the intensity of natural light, the output signal is regulated
- Photodiode. Converts natural light entering a sensitive area into an electrical signal
- Phototriac. Synchronizes currents and performs the functions of transmitting them to the working electrodes
- Photothyristor. Under the influence of light, it connects the photo relay to direct electric current, including street lighting
Types of photo relays with additional functions
- Device name
- Functions performed
- Combined photocell with timer
- The device allows you to configure the relay operation according to time. Lights turn on and off at certain hours
- Light relay with motion sensor
- The device turns on only when there is movement
- Programmable sensors
- This option uses combined settings
Lighting of the garden area should be organized in such a way that recreation on the site is comfortable and energy consumption is rational. To solve this problem, many homeowners install sensors with built-in photocells near the house, by the pool, along garden paths and gazebos.
The photocell regulates the light intensity of street lamps and lamps, which ensures convenient lighting control and efficient use of electricity.
Content
- Photocell for street lighting: device and principle of operation video
- Advantages of using photocells on a personal plot
- Types of photo sensors and features of their application
- Tips for choosing photocells for lighting an area video
- Do-it-yourself photo relay installation for street lighting
- rules for placing photo relays
- video photo sensor connection sequence
- Application options for photo sensors
Photocell for street lighting: device and principle of operation
A photocell is a device that converts solar or light energy into electrical energy. The transformation of sunlight occurs thanks to the semiconductor materials from which solar cells are made. Typically these are: amorphous silicon, cadmium telluride/sulfide, thin film crystalline silicon.
At first, the photocell was used only for scientific experiments, but today engineers have improved the photocell and found practical applications for it.
A tube amplifier and an electric current control relay were connected to the photocell. This device was called a photosensor, and began to be actively used in everyday life and in production.
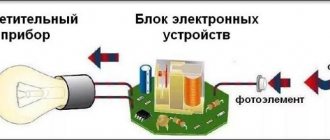
The operating principle of the photo sensor (photo relay) of street lighting is as follows:
- The solar rays fall on the cathode of the photocell.
- A photocell converts the sun's energy into electricity.
- Electrical energy passing through a tube amplifier activates a relay.
- The relay is triggered and reacts by turning on/off the lights of electrical appliances connected to it.
Externally, a modern photocell resembles an ordinary light bulb. The photosensor body can be transparent or translucent with a built-in window.
The sensors are tuned to a specific wave of infrared or ultraviolet radiation. Most models are equipped with an additional device that protects the photosensor from unnecessary reactions to interference (light from car headlights).
The light sensitivity range can be adjusted depending on the location of the photo sensor. That is, the lighting by the pool can automatically turn on as soon as the sun’s rays disappear below the horizon, and the lights along the paths can turn on at dusk.
Advantages of using photocells on a personal plot
The use of photocells for street lighting has a number of significant advantages:
- Convenient control of lighting in the local area.
- The ability to control the intensity of lighting in different areas of the site.
- Significant savings in energy costs. This is especially true when installing photocells with motion sensors.
- Long service life of photocells.
- Photo sensors are compact and will fit well into the exterior of a country house and garden landscape.
- Easy installation of photo sensors. You can carry out the installation yourself, strictly following the instructions.
- Affordable photo sensor price.
Types of photo sensors and features of their application
Types of photo sensors for street lighting can be divided into several groups:
- Photosensors with a photocell inside the housing. They work in automatic mode: at dusk the light turns on, and at sunrise it turns off. The protective housing of the photosensor is transparent.
- Photosensors with photocell and timer. It is possible to adjust the lighting intensity depending on the time of day. The operation of the device can be programmed for a certain period: week, month, year. At the dacha, it is convenient to use sensors that are programmed for individual days of the week, for example, to cancel lighting on weekdays, and on weekends to activate the operation of lanterns and lamps.
- Photo sensor with adjustable response threshold. The sensor is equipped with a knob with which you can adjust the permissible threshold of the mechanism. The operation of such a photocell will not depend on the climatic and weather conditions of the region, as well as on the time of year.
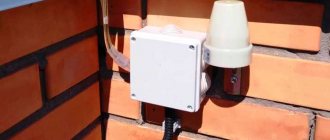
- Photo relay with external photocell. The photocell can be installed at a distance of no more than 150 meters from the sensor body. The device unit is located in a safe place (mounted in the electrical panel).
- Photocells with built-in motion sensor. The lighting turns on when the sensor detects any movement in the area.
Photocells for lighting with a built-in timer are the most expensive, but their operating mode allows for significant savings on light bills
Tips for choosing photocells for lighting your area
The market offers a wide range of photocells with different technical characteristics, different capabilities and from different manufacturers. When choosing a photosensor, you must be guided by the main quality criteria:
- High demands are placed on the photosensor housing. It must be airtight and strong.
- Trigger period. Many models respond to changes in light within 5-30 seconds.
- Operating temperature range. The choice depends on the climatic conditions of the region; most sensors have a range from – 25°C to + 50°C.
- The photo sensor must have protection against false alarms and a potentiometer.
- The photocell must be selected taking into account the power consumed by the electric lamp. There are ready-made kits on sale, in which the photocell is already matched to an electric lamp of suitable power.
- A device with an external photocell is more difficult to install - this must be taken into account when planning to install a photosensor yourself.
- It is necessary to take into account the average annual air humidity in the region where the photocell is located. If necessary, buy a photosensor with increased protection from adverse weather conditions.
Do-it-yourself photo relay installation for street lighting
rules for placing photo relays
When installing a photocell, be sure to consider the following:
- Photo relays are prohibited from being installed near combustible and flammable materials, or near a chemically active environment.
- The device is installed with the base facing down.
- The supply voltage must be 220 V, permissible deviation ± 10%.
- The photocell should not be exposed to light from a switched-on flashlight or lamp.
- The working surface of the device should not be in the shade of trees, otherwise the photosensor will not work correctly.
- When connecting the photosensor, you must follow the diagram indicated on the device box.
photosensor connection sequence
Before installation, it is necessary to check that the power of the lighting devices does not exceed the power of the photo relay. It is better to buy a photosensor with a 20% power reserve
The installation and connection procedure is as follows:
- Mount a bracket to place the photocell on the wall of the house.
- Attach the canopy to the photo relay and install it on the bracket.
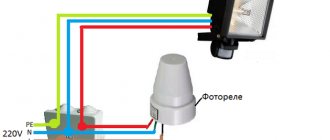
- Three wires come out of the photo relay:
- brown – phase cable;
- blue – zero;
- red – remote wire leading to the lamp.
- Connect the wires in the junction box. How to connect a photocell is shown in the diagram. Triple terminal blocks can be used for connection.
- It is advisable to install a separate machine for this controller in the switchboard.
- To check the correct connection, you need to connect the starter to the network and see if the flashlight or spotlight will work.
Application options for photo sensors
When arranging street lighting, a photosensor can be used in two ways:
- Install a photocell for each lamp. This option must be used if each lamp has its own power supply, for example, a solar battery. In this case, it will be more difficult to achieve synchronous switching on/off of the lights. Some may be in the shade of trees, others in bright light. You must constantly monitor the cleanliness of the optics of each sensor - if it becomes dusty, the photo relay will not work.
- Installing one photocell sensor for all lights is a more convenient option for street lighting. It is used when all the lights located along the path and on the site are connected to a single electrical circuit with a separate switch. The sensor is installed on the first lamp. The circuit is constantly closed due to the switch, but due to the high resistance in the phototransistor, no current flows through it. When darkness falls, the resistance drops and the circuit is completely closed - all the lights light up simultaneously.
The use of photocells in a personal plot is a convenient and economical way to organize street lighting. When choosing a photo sensor, it is necessary to take into account a number of factors: the location and power of the lights, the time spent on the site (permanent or seasonal), the presence of additional functions (timer, motion sensor). A correctly selected photocell and its proper installation are the key to long-term and uninterrupted operation of the entire lighting system in the local area.
Author: Sergey and Svetlana Khudentsov
0
Astro timer
A device programmed for different time zones, responding to sunrise or sunset. A specific belt is selected for operation, and the device operates automatically. Does not depend on installation location
Having learned information about the types of sensors, you need to study the theory of how to connect a photo relay.
Where to put
The installation location is selected so that the photocell is not exposed to light from a lamp, window, or advertising board. When the house is located near the roadway, the light from the lights of passing cars should not be directed at the device. The choice of location is limited by height requirements - 1.8-2 meters from the ground (if installed higher, a stool/chair or ladder/step-ladder will be required for adjustment).
Solving this problem is made easier by using some tricks. The photo sensor can be protected with a piece of black plastic pipe of the appropriate diameter, 15-20 cm long. The cutting angle is 30-45° from the pillar or wall. If there is only one spotlight, the photo relay is placed on the other side of the pole. The parameters are adjusted more accurately if the sensor is placed on the west or east side.
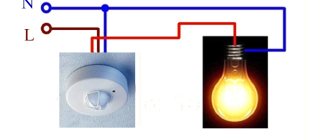
Possible connection diagrams
Light sensors are usually installed close to the light source, the operation of which they must activate and regulate.
For the device to work correctly, artificial light should not fall on it.
- It is important to accurately connect the contacts coming out of the photo relay housing.
- The blue conductor points to zero; in addition, the wire from the lighting device is connected through it.
- Red regulates the sensor and is passed to the consumer through the internal regulator.
- To activate the device from the mains current, a brown wire (phase) is used.
Sometimes, when using a lighting system, the circuit contains an additional conductor that acts as grounding. It connects directly to a lamp or spotlight.
The marking of conductors may vary depending on the manufacturer, but connecting zero and phase always has the same algorithm. Therefore, a do-it-yourself photo relay wiring diagram will not look like a complicated process. You can connect the device to lighting without any specific skills.
Conclusions and useful video on the topic
The installation of the LED spotlight is demonstrated in the following video:
LED floodlight is a bright and economical lighting device, ideal for industrial premises, home areas, construction sites and any protected areas. The presence of motion and light level sensors significantly expands the functionality of the device, allowing you not only to illuminate the desired area, but also to find out in time that strangers have entered the facility.
Are you already using an LED spotlight or are you just choosing the right option? If you use it, share your impressions with our other readers - the feedback form is located below this publication. If you have questions, ask our experts.
Step-by-step instructions for connecting a photo relay
When installing a street lighting system, instructions will help that will tell you how to quickly and correctly carry out the work:
- Install the distribution panel. Installation is usually carried out on the wall.
- Connect the photo relay using the diagram from the technical documentation supplied with the device. Install the mounting bracket in a place where the solar rays fall on the photocell, excluding other light sources.
- Adjust the system using a regulator - select the indicators of the light sensor’s response to certain changes in illumination.
- Install the regulator on the external part with the required characteristics: response range 5-10 lux; power – 1-4 kW, switching current no more than 10 A.
Depending on the difficulty of installation, relays are divided into several types. The most common is the one with a built-in timer. The installation sequence is the same for all photo relays; it is important to identify zero and phase.
Pros and cons of controllable LED lighting
Spotlights are often used in street lighting of various objects. In addition to private houses, this list includes industrial enterprises, parking lots, pedestrian crossings, tunnels, bridges, etc. LED floodlights with a light sensor are often included in a backup or emergency lighting system.
LED floodlights have gained wide popularity due to many positive qualities. Among them the following can be noted:
- High economic indicators, ranging from energy consumption to relatively low cost, simple connection diagram.
- The long service life is several times greater than that of similar models with other lighting sources.
- Good tolerance to loads and mechanical influences, including vibration.
- LED street floodlights do not require regular maintenance or frequent replacement of lamps.
- They have a high luminescence intensity, which is an important factor when lighting streets at night.
- They can operate in a wide temperature range, from minus 60 to plus 50C. Equipped with protection from moisture and dust.
However, the combined use of floodlights with light sensors makes the advantages and disadvantages of these systems approximately the same.
The main advantages include the following:
- There is no need to use a switch or other switching means.
- Ability to detect light intensity by sensor. The device turns on only in the dark, and during the daytime the lamp remains off.
Photo photo relay for street lighting
Share with friends