Indicator lamps are predominantly gas-discharge elements with a cold cathode. During the working process, an independent glow discharge occurs, which is accompanied by a glow. Its color depends on the composition of the filler. For indicator analogues, this is most often an orange-red color. The electrodes can be nickel, aluminum, molybdenum or iron.
Connecting the indicator lamp
To connect the light element, a transformer is selected along the length of the lamp, taking into account the composition of the gas filler. Secondary voltage is calculated using special tables.
Further manipulations:
- Electronic voltage converters are mainly suitable for indoor environments, unless otherwise provided in the technical accompanying documentation.
- When installed outdoors, neon indicator lamps require mandatory grounding.
- Next, you should select a high-voltage wire of the required cross-section with a minimum margin of length. To protect the wiring from metal elements, PVC tubes are used.
- The lamp is placed in polycarbonate clamps according to the diagram indicated on the transformer. The connection points are insulated using electrical tape and polymer tubes.
- All conductive parts must be grounded.
- Since glass is used in the design of neon light elements, additional protection made of polycarbonate or plexiglass should be installed.
- When installing, follow safety rules: do not throw or shake the lamp. This can lead to depressurization, resulting in the element not working.
- If you add mercury vapor or phosphor, the glow will change color.
Continuity check (searching for the right conductor)
To check the integrity of electrical wiring or search for one core in a multi-core cable, a digital tester turned on in resistance measurement mode is sufficient. When carrying out such an operation, it is necessary to create a closed chain consisting directly of a multimeter (tester), a pair of measuring “ends” and the conductor being tested itself.
In this case, a small electric current is passed through the test area, and the multimeter determines the value of its internal resistance. This is not a dialing test yet, but it is a fairly convenient method.
During such a test, according to the readings of the multimeter display, it will be possible to judge the integrity or break in the section of the circuit or conductor being tested. A reading of zero or close to several ohms means that the wiring is not broken; at the same time, the electric current generated by the device flows freely through it.
It is also possible that during testing it is discovered that the device displays readings in the megohm region, but does not produce a sound signal during the test call. This means that there is an internal break in the wiring section that is not visually detectable.
Essentially, a vertebra is a determination with a multimeter whether there is contact between the wires or not. The multimeter produces a small current, and if the circuit is intact, then the voltage is recorded, as a result, a sound signal is heard - a bell, and zeros are displayed on the multimeter display. The continuity test checks fuses, light bulbs, wires, and the integrity of circuits.
The resistance value is determined by the total length of the cable product being tested with a multimeter. At the same time, there should be no contact between all components of the multi-core cable and adjacent conductors, which checks continuity.
Peculiarities
Neon indicator lamps are divided into three main types:
- A fluorescent electrical device is a daylighting element that is mounted in special lamps. The disadvantages of this model include frequent burnout.
- Signal modifications are designed for light indication of electrical impulses. The design includes a pair of electrodes in the form of cylinders, disks or rods, which have different configurations and are placed in a glass flask. The container contains a special mixture that gives a red or orange glow.
- Decorative indicator lamps are designed for installation in a regular E14 or E27 standard socket and operate on a 220 Volt network. The elements include a ballast resistor, which allows them to be connected directly to the lighting network.
It is worth noting that green fluorescent analogues are used as a signal light source. The inside of the glass tank is covered with a special coating that turns the red color into green. Small neon bulbs can serve as a backlight when paired with an LED element.
What are neon signs made of?
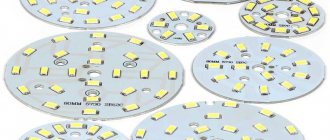
Various materials can be used as a substrate for neon advertising signs, as well as for LED volumetric letters: ()
Colored or transparent acrylic 3 – 12 mm thick. Multi-colored glass is a good choice if you want to create an unusual, original design. Transparent acrylic, transmitting 90% of light, is almost invisible: it seems as if the bright illumination is freely “floating” in the air
This design looks stylish and instantly attracts attention. PVC is an inexpensive, practical and easy-to-maintain material that is highly resistant to humidity, temperature changes and ultraviolet radiation. The finished structure is often covered with decorative film: multi-colored, mirror, with a glossy or matte surface. Composite materials
Composite panels are lightweight, so they are often used to reduce the overall weight of neon outdoor and indoor advertising. Wood – the use of hardwood and proven processing technologies ensures neon signs are resistant to deformation, rotting and drying out. To decorate themed establishments, wooden structures can be given a resemblance to antiques by brushing (artificial “aging”). Metal – these neon signs look “expensive” and elegant. When creating advertising, aluminum or stainless steel is usually used. Metal signs are durable, wear-resistant and weather-resistant, making them suitable for outdoor use.
Combining several materials is a good way to get an exclusive product. Thus, a wooden structure can be framed in a metal frame.
Production stages.
Creating LED neon signs begins with preparing the layout. The sketch is performed in specialized computer programs. After the project has been agreed upon with the customer, the material selected for the substrate is sent for milling. The use of milling machines is the optimal processing method, allowing:
- Receive workpieces of any size and configuration.
- Achieve full compliance with the specified parameters.
- Complete even the most complex work in the shortest possible time.
- Eliminate the possibility of releasing defective products due to full automation of equipment.
After making the substrate, neon strips are laid into the prepared holes and closed with plugs at the ends. All connections are carefully sealed to ensure structural integrity and avoid premature failure.
You can place lighting made of flexible neon even in hard-to-reach places. However, it is problematic to carry out installation without experience and specific knowledge, so it is recommended to entrust such work only to professional specialists.
Main characteristics
When choosing indicator lamps, the following basic parameters are taken into account:
- External diameter.
- Linear length.
- Color index.
- Color rendering index.
- Light flux in the ranges of 50-80 A.
- Power consumption at the same current.
- Electric length.
Let's take a more specific look at the characteristics using the example of the MH-7 modification:
- The maximum discharge voltage is 87 V.
- A similar indicator for maintaining the discharge (maximum/minimum) is 67/48 V.
- Estimated brightness – 50 cd/sq.m.
- Operating current (maximum/minimum) – 2.0/0.5 mA.
- Ballast resistance – 60 kOhm.
- Indicated operating time – 500 hours minimum.
- The diameter of the flask is 40 mm.
- Weight – 9 g.
- Base – B15d/18.
Piercing connectors
The two types of connectors discussed above, when used for a long time, show not entirely satisfactory results and quality of contact.
For example, the most painful part of the NLSC is the retaining plastic cover. It often either breaks off on its own or the retaining lock on the side breaks off.
Another disadvantage is the contact patches, which do not always adhere with their entire surface to the pads on the tape.
If the power of the tape is high enough, then the weak contacts cannot withstand and melt.
Such connectors simply cannot pass large currents through themselves.
When trying to bend them, when there is some mismatch of the pressure spot, they may break off.
Therefore, recently more modern models designed on the puncture principle have appeared.
Here is an example of a similar double-sided piercing connector.
On one side it has dovetail contacts for the wire.
And on the other in the form of pins - under the LED strip.
With its help you can connect the LED strip to the power supply. Such models can be found for both open and sealed silicone tapes.
To connect, insert the end or beginning of the backlight segment into the connector and press it on top with the transparent cover.
In this case, the contact pins first appear at the bottom of the copper patches, and then, literally piercing the protective layer and copper tracks, form a reliable contact.
In this case, it is no longer possible to pull the tape out of the connector. You can check the connection points through the transparent cover.
To connect the power wires you don’t even have to strip them. The process itself is somewhat reminiscent of connecting twisted pair cables to Internet connectors.
To open such a connector it will be necessary to apply a certain force. It's unlikely to be possible to do this simply by hand. Use a knife blade to pry the sides of the lid and lift it up.
LED indicator lamps
These light elements are divided into several categories. Let's start the review with the DIP modification. These LEDs are a crystal with or without a convex lens that is housed in a lead package. The base can be cylindrical or rectangular in shape. Lamps are available in a wide range of colors, including IR and UV versions. There are single-color and multi-color versions on the market that combine several different crystals. The disadvantages of this group include a small scattering angle (no more than 60 degrees).
Varieties
They can be used to connect several tapes together.
And for connecting to a power source or RGB controller (connecting and power supply clamps) with wires at the ends.
The connectors are 2-pin, for a monochrome tape, or 4, 5-pin, for RGB and RGBW tapes.
Types of connectors
1 of 4
Options are also available for connecting LED strips with a voltage of 220V. They are a completely different design and will not fit 12-24V models.
types of connectors 220V
1 of 6
Advantages of connectors over soldering:
relatively low cost
#td_uid_9_615d30dec096e .td-doubleSlider-2 .td-item1 { background: url(https://svetosmotr.ru/wp-content/uploads/2017/11/107-80×60.jpg) 0 0 no-repeat; } #td_uid_9_615d30dec096e .td-doubleSlider-2 .td-item2 { background: url(https://svetosmotr.ru/wp-content/uploads/2017/11/108-80×60.jpg) 0 0 no-repeat; } #td_uid_9_615d30dec096e .td-doubleSlider-2 .td-item3 { background: url(https://svetosmotr.ru/wp-content/uploads/2017/11/106-80×60.jpg) 0 0 no-repeat; }
1 of 3
ease of installation
no need to purchase fluxes, solders, etc.
There are three main disadvantages:
susceptibility to oxidation
inability to pass large currents
a potential fire site due to the fact that the plastic in them is cheap and not heat-resistant
First of all, choose them according to the width of your ribbon. Otherwise, you can make a mistake with the distance between the contacts. For example, one type for SMD tapes 3528 may easily not be suitable for SMD 2835 or SMD 5050.
LED strip width LED strip connector width
The most common models come in 8mm and 10mm widths.
To make the backlight you may need 3 types of connectors:
for direct connection of tape to tape on straight sections
for connection strictly at an angle of 90 degrees
for connection at any arbitrary angle
Some people simply try to bend the tape itself, without any adapters. However, this cannot be done. The radius of its longitudinal bending should be no more than 2cm.
And even more so, its transverse curvatures are unacceptable. Here are the consequences of such bends:
Based on the connection principle, they are also divided into 3 types:
just clamping
clamp connector clamp connector
with a latch securing the top cover
piercing
Super Flux Piranha Model
The design of these LEDs includes high-brightness elements housed in a rectangular housing equipped with 4 pins. This solution makes it possible to securely mount the light bulb on the board. “Piranhas” are produced in red, blue, white and green colors, lens sizes – 3 and 5 mm. The dispersion index ranges from 40 to 120 degrees. The main scope of application of these elements is the illumination of automobile instrument panels, advertising signs, and running lights.
2nd and 3rd generation - differences
The laces themselves, in addition to colors, differ in both diameter and design.
The most popular size is 2.3mm. He belongs to the second generation.
This also includes diameters: 1.4mm-2.3mm-3.2mm-5mm.
Moreover, buying a larger size does not always make sense. The thicker the brighter rule doesn’t work here. It is mainly the central part of the cord that glows.
A thicker shell will not give you more exposure. It will only diffuse the central light. Thickness here has a greater effect on strength.
According to the degree of brightness decrease, the following pattern is observed here:
3.2mm – the brightest and then in descending order
2.3mm
5.0mm
1.4mm
In addition, a larger diameter will have a smaller bending radius and you will not be able to bend a 5mm cord in the same way as a 2mm one.
Third generation neon is available in 2.6mm size.
Straw Hat
An incandescent indicator lamp with LEDs of this type has a significant scattering angle. Its configuration resembles in appearance standard LED analogues with a pair of leads, but has a smaller height and an increased lens size. The working crystal is placed closer to the front wall of the lens, which differs in its characteristics, depending on its purpose. Information about this is available in the accompanying documents. The dispersion angle reaches 100-140 degrees.
You can find white, red, green, yellow and blue models on sale. LEDs are capable of creating a non-directional glow, which allows them to be used for decorative purposes and other cases where uniform illumination with low energy consumption is required.
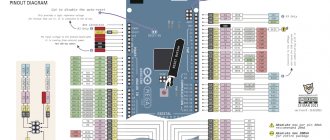
Rules for using voltage indicators
When working with this kind of tool, there are a number of rules that you need to know in order to do everything correctly. Here you need to adhere to the following recommendations:
compliance with the rules of safe work with electrical networks. This means that all manipulations with the indicator screwdriver should be carried out with the package switches turned off;
Switched off switches in electrical panel
remember that electric current always flows through a conductor along the path of least resistance (from plus to minus);
- Such an indicator meter of any type is not suitable for assessing complex electrical appliances. With its help, you can check the serviceability of electrical circuits of devices;
- in houses and apartments there is a standard network with a purity of 50Hz and a voltage of 220V;
- When working with such a screwdriver, you need to know that the (+) phase always receives voltage, the zero leads to the transformer (-), and the third wire is grounding (for example, in a socket).
When using a signal screwdriver in various works, be sure to adhere to the above rules. Otherwise, you may get the completely opposite result.
SMD
This group of LEDs includes the brightest color and white light elements with a power of approximately 0.1 W. They fit into standard surface mount housings. Models are available with and without a convex lens. Given the ease of installation of these light bulbs, LED strips are produced based on them. One of the most popular in this area is the Cree SMD 3528 type element.
Preparing the multimeter
First of all, we inspect the body of the device. If it falls apart in your hands, you need to take action - snap the holders or tighten the screws. We inspect the wires. If the insulation has peeled off in places, change the wire. Or wrap it with electrical tape. Heat shrink tubing can fix the wire nicely. We also inspect the probes. If there are sharp chips on the cases, we smooth them out so as not to accidentally get hurt. If current-carrying parts are visible, we isolate them using any available means - insulating tape, a glue gun, or heat shrink of a suitable diameter. We check the functionality. We plug the black cable into the Com socket, and the red cable into the socket with symbols of units of measurement - Latin A and V, Greek large Omega.
After turning on the device should show something on the display. If it doesn’t show, check the batteries. We set the device selector to measure alternating voltage, select the first value above 220 V. Most likely, it will be 500 V. Without touching the exposed parts of the screws, insert them into a 220 V socket. The device should show a value close to 220 V, although anything can happen. In one of the small towns, the author encountered a voltage in a regular household network of 158 V. In fact, this is a reason to contact a sales organization, but it doesn’t hurt to look for the phase. So, if the device shows voltage in the network, it is working. You can search for the phase.
Analogs
An alternative light source to the systems discussed above are incandescent indicator lamps. The SKL modification is popular in this class. The elements are used as a replacement for standard incandescent lamps in automatic systems. This allows you to increase the service life of the part by optimizing the adjustment of its operation and low power consumption.
Below are the main parameters of a 220 V indicator lamp of the SKL type:
- Current consumption – from 2.5 to 20 mA.
- Rated voltage – 220 V.
- Protection rating – IP54.
- Operating temperature – from –40 to +60 degrees Celsius.
- AC frequency – 50 Hz.
- Glow – green, yellow, white, red, blue.
- The panel installation hole is 30 mm in diameter.
- Radiation strength – 20 mCd.
Option No. 3 "An alternative circuit for connecting an LED to 220 with reverse voltage protection.
This scheme is not similar to the previous one. It also has AC reverse half-wave overvoltage protection. If in the first circuit the protective diode was in series with the LED, then in this circuit the diode is connected in parallel, and is already connected in reverse with respect to the LED. With one half-wave of alternating voltage, the indicator LED will light up (on which there will be a voltage drop to the operating value of the LED), and with a reverse half-wave, the diode will be in the open state and there will also be a voltage drop across it to a value (about 1 volt) insufficient for breakdown of the LED. As in the previous circuit, the disadvantages will be significant heating of the resistor and visible flickering of the LED, in addition, this circuit will consume more electricity due to the direct connection of the diode.
Although, instead of a regular diode, you can install another LED.
Then one LED will light up for one half-wave, and the other half-wave will light up for the opposite half-wave. Although in this case the LEDs will be protected from high reverse voltage, each of them will still burn at a frequency of 25 hertz (both will flicker).
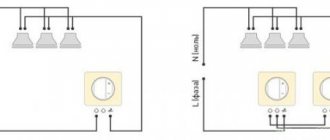
How to check the health of the lamps
Control testing of neon signal elements is carried out through their visual inspection and testing directly under voltage. The second way to monitor the operation of the indicator lamp in question is testing in a radio broadcast network using a low-frequency transformer. If there are no radio or alternating current supplies nearby, you can check the light bulb by connecting it to a battery and a power transformer or its inter-lamp analogue.
The luminescent light element is activated using an electromagnetic or electronic ballast. To check the LED or neon version, you need to take a similar working device and connect it in series according to the diagram to the control sample. If it lights up, then the problem is in the main unit. Modern designs predominantly use electronic ballasts.
Troubleshooting and Troubleshooting
Testing electrodes with a multimeter
The LDS is faulty in the following cases:
- does not turn on;
- flickers temporarily before turning on;
- flickers for a long time, but does not turn on;
- buzzes;
- flickers when burning.
Integrity of spiral electrodes
You can test the spiral electrode for the presence of resistance using a multimeter. The device is set to resistance measurement mode, and after that the probes are applied to the legs of the flask on both sides.
If the spiral is faulty, the multimeter will show zero resistance - the thread is broken. A whole spiral always shows a small resistance - up to 10 ohms. If at least one of the spirals is faulty, the lamp must be replaced. It cannot be restored.
Faults in the electronic ballast
To check the serviceability of the electronic ballast, it must be replaced with a working one. If the lamp lights up, it means that it was the cause of the breakdown. You can fix a broken ballast yourself. First you need to replace the fuse with a similar model with the same characteristics. If the threads glow weakly, it means there is a breakdown in the capacitor between them. It is also replaced by a similar one, but with an operating voltage of 2 kV. weak models will burn out quickly.
How to check the choke of a fluorescent lamp
Checking the throttle without a multimeter
Before checking the choke of a fluorescent lamp with a multimeter, you need to familiarize yourself with the main signs of its failure:
- hum of a lighting fixture;
- the lamp turns on and goes out after a while, getting dark around the edges;
- LDS overheats;
- “snakes” appear inside the tube;
- The lamp flickers a lot.
To check the choke for operability, you need to remove the starter from the lamp, and then close the contacts in its socket. Then the lamp is removed and the contacts in both sockets are also short-circuited. The multimeter is set to measure resistance, after which its probes are connected to the contacts in the lamp socket. If there is a break, the device will show endless resistance. If there is an interturn short circuit, the device will show a zero value.
How to check the starter
If the lamp begins to flicker immediately after switching on, but does not light up, the starter has failed. It will not be possible to test it separately from the LDS, since without voltage its contacts are open.
Checking the serviceability of the starter is possible using another method - by connecting it in series with an incandescent lamp to a standard electrical network.
The main reason for failure is that the bimetallic plate wears out greatly.
How to check the capacitance of a capacitor with a tester
If the LDS capacitor is faulty, its efficiency indicator decreases to 35-40%. For lighting devices with a power of no more than 40 W, a capacitor with a capacity of 4.5 μF is sufficient. If it is less than this norm, the efficiency will be reduced; if it is more, the lighting will blink.
conclusions
Experienced electricians continue to use test lamps. As long as you follow safety precautions and have confidence in your own abilities, this is acceptable. For example, during a one-time network check, when the indicator screwdriver is not at hand.
In other cases, it is safer to use voltage indicators. They are reliable and inexpensive. Examples include:
Screwdriver-indicator (probe) OP-2e IEK TPR20
Can find problems in hidden wiring. Price: 200 rubles.
Voltage indicator KROFT 203230
Price: 95 rubles.
- Related Posts
- Xenon arc lamp (types and applications).
- Fixtures and lamps for the sauna: types, ideas, operation
- What glow (color) temperature to choose.