Spotlights for plasterboard ceilings have their own design features, which allow them to be installed quickly and easily. The modern range of lamps is represented by a wide variety of models, but built-in models are the most widespread. Most lighting fixtures for suspended structures are connected to a 220V network thanks to the presence of a built-in driver. LED spotlights for plasterboard ceilings have low heating during operation, which allows them to be used also for stretched fabrics.
Types of products
When choosing a lamp for a plasterboard ceiling, it is important to take into account many factors. The modern assortment offers such different lighting sources that in order to decide, you first need to familiarize yourself with the characteristics of all types.
There are such categories of lighting devices, differing:
- by voltage;
- by the presence of a rotating mechanism;
- by type of lamps.
Based on the types of lamps, the following types of devices are distinguished:
- incandescent lamps;
- energy saving;
- LED;
- halogen.
Spotlights can be:
- overhead (installed on top of the surface);
- built-in (embedded into a suspended structure).
Overhead types are not presented in such a wide range.
Built-in models are:
- stationary;
- rotary.
The second type of lighting fixtures is the most widely used, because they allow you to easily change the direction of light, which has not only a functional meaning, but also a decorative one.
Also, ceiling lights built into plasterboard can be:
- external;
- internal.
In the first case, the lamp partially protrudes above the ceiling surface. Internal models are installed almost flush with the ceiling surface.
Types of modern lamps
Everyone knows that there are only a few ceiling options:
- Plasterboard;
- Tensioners;
- Hanging;
- Traditional concrete.
The use of point devices in suspended, plasterboard and concrete ceilings is very common. They are installed without much damage and do not spoil the technical structure of the ceiling . It is necessary to focus on stretch ceilings, because they consist of a material that damages the film when heated. Therefore, if you are installing a tension structure and want to install spot devices, then choose LED bulbs, which do not emit heat at all and are safe for such a structure.
Selecting a suitable lamp
When choosing ceiling lights built into a plasterboard structure, it is best to opt for LED lamps.
They provide bright lighting, consume little electricity, and their body does not heat up during operation, which is especially valuable when using tension fabrics. LED devices differ from their analogues in that the brightness of their radiation depends on the type of crystals used in the design. If the quality of the emitters is poor, then such lamps will not last long. To purchase a high-quality light source, pay attention to the brand of the product. Well-known brands, as a rule, use high-quality crystals, so their products last for years and produce a bright luminous flux. In addition, well-known manufacturers always provide a guarantee for their products.
Typically, LED lamps for plasterboard ceilings are sold with a lamp.
Recessed LED ceiling spotlights: review of models, photos and price
If you need good lamps of appropriate quality for installation in a plasterboard ceiling, then you should pay attention to the manufacturer of the products. Well-known brands Novotech , Arte Lamp , Light Star , Favorite Flashled offer lighting products in different shapes and colors. In addition to imported brands, you can buy domestically produced spotlights.
Table 1. Overview of LED spotlights built into the ceiling: photo and price
| Image | Manufacturer and country | Model | Material | Average price, rub. |
| Novotech (Hungary) | TOR 369112 | Steel | 152 | |
| Arte Lamp (Italy) | TOPIC A2023PL-3AB | Steel | 300 | |
| Light Star (Italy) | 212110 | Steel | 213 | |
| MW Light Cruz (Germany) | 637010201 | Steel | 690 | |
| Favorite Flashled (Germany) | 1341-6C | Steel | 1100 | |
| Favorite Flashled (Germany) | 1346-6C | Steel | 1000 |
How to choose a lamp
In order for the lighting of the house to meet all the requirements of the owner, it is important to take into account the entire set of basic parameters of lighting fixtures, as well as the features of the room, ceiling decoration and much more. In particular, you need to pay attention to the following points:
- Type of lighting fixture (stationary, rotating, with a remote diffuser, etc.) Stationary models can be purchased at a very affordable price, as they are less functional.
- Mounting method: overhead, built-in. The first option is installed on the surface, the second is cut into the plasterboard ceiling, for which you need to make a hole of the appropriate diameter in the sheet in advance. Thus, the dimensions of the lighting device, as well as the level of its heating during operation, also play an important role.
- Degree of protection. Models IP20, IP23 are suitable for living rooms and kitchens. In the bathroom and other rooms with high humidity, models with protection IP57 and higher are needed. For these premises, it is much safer to install low-voltage devices here.
- Design and material type: plastic, metal, glass, etc. Plastic models are the most inexpensive, however, for the home it is still better to opt for chrome, glass and crystal models.
- Quality of fasteners. Built-in models are equipped with a special fastening system called “springs”. This mechanism makes it possible to quickly and easily install and remove the lighting device if necessary.
How to choose lamps?
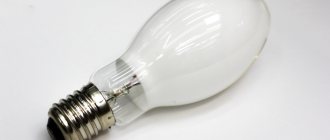
Incandescent lamps
The use of built-in spotlights is completely justified from both an economic and aesthetic point of view.
When choosing lamps for the ceiling that will be installed behind gypsum board cladding, you first need to decide on the type of lamps used. And this is not just about energy consumption (although against the backdrop of rising energy prices, this is also important).
The type of design of the lamp itself and its dimensions depend on which light bulbs are used as a light source. So we need to know in advance what exactly we will install - at least in order to lower the ceiling to a height sufficient for installing hidden electrical appliances.
Model for incandescent lamp
I will begin the description of the models of built-in lamps used with the most common group - products with incandescent lamps:
- The advantages of these lamps include low price and wide range. Such products are used for budget repairs, but at the same time they can provide effective lighting for a large area.
A huge assortment is the first advantage of these devices.
- Also a plus from my point of view is the warm spectrum of the glow, pleasant to the human eye and creating a feeling of comfort.
- An obvious disadvantage is the high energy consumption: the bulbs not only provide light, but also heat very actively, while a significant part of the energy is spent on heating. Partially, the mirror coating of the bulb helps to cope with this problem, but only partially - all the same, the share of thermal energy released by the incandescent lamp is prohibitively high.
It is better to take a lamp with a mirror bulb
This, by the way, is one of the reasons why you should not install lamps with incandescent lamps, especially powerful ones, in polymer stretch ceilings. Yes, thermal insulation rings protect the PVC sheet from overheating, but the risk of melting still remains.
By and large, you can use such products, but I still recommend considering another option: the low price of the lamps themselves will be forgotten quite quickly, but payments for electricity will continue to arrive for many years. With quite significant - and therefore unpleasant - consumption indicators.
To be fair, it should be noted that energy-saving and even LED lamps can be installed in lamps designed for installation of incandescent lamps. This manipulation will reduce lighting costs without replacing the devices themselves.
Energy-saving elements can correct the situation, but only partially
True, this solution also has another aspect: both “energy-saving” and “LEDs” for a standard base are large in size, so the light bulbs themselves will protrude from the ceiling by about 30-50 mm. So there is no need to talk about aesthetics - only functionality and savings!
Halogen lamps
Instead of an incandescent light bulb, you can pay attention to the so-called compact halogen lamp.
Its advantages are:
Halogen lamp with mirror reflector
- High energy efficiency, which is many times higher than that of incandescent lamps. Accordingly, to ensure a comparable luminous flux, you need to spend significantly less electricity.
- Compact dimensions: the dimensions of spotlights for drywall with halogen lamps are 60-75 mm, while for incandescent lamps this figure is 100-120 mm. Therefore, you can lower the ceiling not so low.
- Effective direction of light flow. Halogen devices are most often equipped with a complex mirror reflector, which minimizes the scattering of light outside the illuminated cone. The result is savings on lighting by minimizing losses.
Warm and cold spectrum lamps
Among the subjective disadvantages I would include the spectrum of the glow. Yes, usually in the manufacturer’s line there are models with “cold” and models with “warm” light, but even “warm” options differ significantly in shade from both natural light and incandescent light. However, you get used to the change in situation quite quickly.
The cost of halogen elements is also quite high, but due to their greater durability (they burn out much less often) and high energy efficiency, the overall financial balance is positive, which is good news.
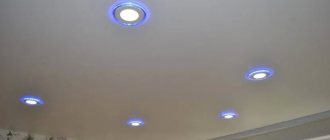
Using spotlights you can effectively and economically illuminate a room
LED as a modern solution
And yet it seems to me that the best built-in lamps in a plasterboard ceiling are LED ones:
LED model with decorative housing
- Compared to incandescent lamps, modern LED products have 8 to 10 times lower energy consumption. Accordingly, the cost of lighting the room will also be reduced, and quite significantly for the budget.
- The emission spectrum of LEDs is different, but usually the shortcomings are easily corrected by the lamp manufacturer himself, who installs corrective filters.
Colors for every taste!
- The ability to install dimmers - special electrical devices - allows you to adjust the brightness of the LEDs without much damage to the circuit elements.
This light bulb can be screwed into a standard socket
- The range of LED lamps is also quite large: today their variety is practically not inferior to the variety of products for incandescent lamps, so you can easily choose a model to suit any style and design of the room.
However, as I noted above, to save money it is not necessary to change the lamps: LED light bulbs are also produced for a standard base. Of course, such a replacement will not look very attractive, but from a functional point of view I have no complaints.
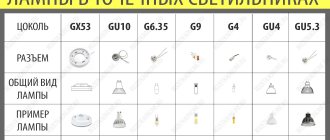
When purchasing (especially in online stores), it is important not to confuse the bases: incandescent lamps, LED lamps, and energy-saving mercury products are most often produced in two versions - for thin (E14) and thick (E27) bases.
Difference in plinth sizes
Finally, I would like to warn you against purchasing the cheapest LED products - both lamps and assembled luminaires. Even models from the lower price category cost a lot, but they last little longer than incandescent lamps, so imaginary savings can turn into even greater expenses.
Housing, reflector and other nuances
When choosing the type of light element, do not forget about other details of the ceiling lamp.
I advise you to read the list below and decide which option you prefer:
Built-in model with LEDs and spring mounting
- The first is the type of case. The most popular are hidden models, in which the body is located behind drywall. Overhead options are usually installed if the gap between the sheathing and the ceiling is extremely small - in this case, the terminals and base are located in the overlay housing, and only the wires are hidden under the sheathing.
Compact overhead model
Overhead point models can also be installed directly on the ceiling, but in this case we will have to mask the wiring in the grooves.
- Next, pay attention to the reflector. Models with a fixed reflector are more reliable (there are no moving parts - nothing to fail), so I recommend purchasing them for organizing general lighting. A movable reflector is convenient for organizing directional light, so such lamps are best suited for zoning a room, organizing local lighting, etc.
The rotary reflector is not as convenient as it seems - at least, it is used quite rarely
- Design is also very important. In principle, standard hidden models, in which the outer part is represented exclusively by a metal ring, are suitable for any interior. But you don’t have to stop at the standard, but choose a model with “antique” overlays, pendants and other decorative elements.
Decorative overlays
Recommendations for placement and calculation
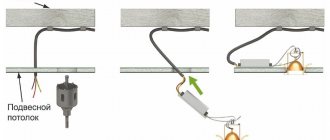
Before embedding LED lamps into a plasterboard ceiling, it is necessary to correctly mark the installation of profiles and the lighting sources themselves.
This should be done before installing the ceiling structure for two reasons:
- so that the elements of the suspended structure do not block the light source;
- in order to hide the wiring under the ceiling.
For wiring, a cable with a cross-section of 0.75 to 1.5 mm is used, the wiring is attached to the profile frame. At the future locations of the lamps, I leave a wire reserve of about 15 cm.
Lighting sources should not be placed far from each other (more than 1 meter), unless you intend to install a chandelier in the center. To connect the wires, use terminal blocks.
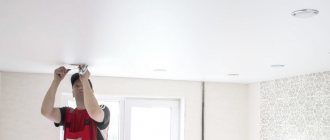
Installing spotlights in a plasterboard ceiling
Installation of such lamps in ceiling sheets of dry plaster does not require special skills. The main thing is to lay the wiring, correctly mark the holes, and then drill them. The installation process itself will take a little time.
Diagram of the location of the lamp in the inter-ceiling span
Necessary materials
To work you will need:
- multi-core copper electrical cable with a cross-section of 1.5 mm2;
- terminal blocks for connecting pieces of wire;
- corrugated pipe for placing cable in it;
- copper sleeves for crimping twists (if necessary);
- for a lighting system made of halogen lamps - a transformer;
- for lighting from LED lamps - current driver.
Advice! It is important to remember that if one device burns out during a serial connection, the entire lighting system turns off. But with a parallel connection, you will need several drivers, for each lighting fixture.
Installation stages
Tools used
To perform high-quality installation of ceiling fixtures, you need the following tools:
- roulette;
- crimping pliers;
- voltage phase indicator;
- electric drill with a core drill for drilling holes;
- Screwdriver Set;
- wire cutters;
- wire stripper.
Installation
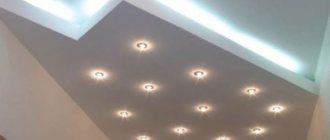
To obtain a uniform glow, installing lamps in a plasterboard ceiling requires strict adherence to certain rules:
- the gap between the wall and the lamp is 60 cm (55 cm is possible);
- inter-row distance of lighting points – no more than 1 m;
- the interval between lighting fixtures in the same row is no more than 1.5 m.
Important! When installing a surface-mounted spotlight on a ceiling, you will need a mounting platform. It is rigidly attached to the ceiling and located under the drywall. It is to this that the overhead device will be mounted.
The preliminary stage of installation of lighting elements (marking the locations of lamps and cable routing) is carried out before installing the plasterboard ceiling. Once the ceiling is ready, you can begin installing lighting fixtures.
Table 2. Installation of lighting devices
| Image | Description of the stage |
| Using a drill and a core drill, holes are drilled in the designated places for spotlights, in the plasterboard the diameter of which is slightly smaller than the diameter of the overlay ring covering the socket in the ceiling. | |
| Parts of the previously laid cable are pulled into the resulting gap. | |
| The ends of the cable are stripped and connected to the terminals. | |
| Sections of the lamp cable are also connected to the terminals. | |
| A light source connected to the wiring looks like this. | |
| By compressing the spacer side brackets, the lamp goes deep into the ceiling and is fixed there. | |
| Upon completion, the device should “sit” tightly in its place. | |
| At the end of the installation work, power is supplied and the serviceability of the lighting system is checked. |
Related article:
LED ceiling lights for stretch ceilings , suspended and others, serve as an excellent alternative. This is unusual and somewhat new, so it’s worth getting to know these lighting devices better in the article.
Installation
Before installing spotlights, you need to make appropriate holes in the plasterboard ceiling.
More precisely, all this must be done in sheets of drywall before attaching them to the frame. The holes should be slightly cone-shaped - wide at the base and narrower in the outer ring of the device. The most convenient way to make such holes is with a wood crown. The next stage is connecting the lamps to the power supply. To do this, you need to take out the cable that was left specifically for connection and connect it to the power wire.
All recessed luminaires have a special fastening. It allows you to simply install the device into the hole; you just need to press the clamps onto the device until it is in the right place. After this, the springs are released and a click can be heard, indicating that the device is locked.
Lighting installation
Power calculation and layout
If in the previous section I mainly touched on the issue of choosing a built-in lamp model, here attention will be paid to the installation of lighting fixtures. And since the instructions should cover all aspects, I’ll start from the very beginning - with the layout.
In a children's room you should not skimp on power
When designing built-in lighting for a plasterboard ceiling, we need to decide how many lamps we will install and how much power they should have. Here you should focus on the table with the minimum lighting power. The value of this indicator depends on what kind of llamas we plan to use.
Let's look at the table:
| Room | Minimum lamp power per 1m2 area, W | ||
| LED lightening | Halogen lamps | Incandescent lamps | |
| Utility/non-residential premises | 1 | 7 | 10 |
| Corridors, hallway | 2 | 15 | 20 |
| Bathroom | 3 | 20 | 25 |
| Kitchen, living room, bedroom | 4 | 25 | 30 |
| Office, children's room | 5 | 30 | 40 |
The living room will also need fairly bright lighting.
An example of the calculation is given below:
- So, let's say we need to illuminate a living room with an area of 12 square meters (3x4 m).
- For lighting we use 9W LED lamps.
- According to the table, we calculate the power consumption: 12 x 4 = 48W.
- We divide the power by the efficiency of one lamp: 48 / 9 = 5.3. Rounding up, we get the required minimum of 6 lighting points.
In any case, it is worth rounding up, since spotlights form fairly narrow cones of light with minimal scattering, which sometimes leads to the formation of shadowed areas. The exception is situations when local lighting is mounted separately - above the desktop, above the kitchen countertop, etc.
Lamps need to be evenly distributed over the area
When planning lighting, it is worth considering not only the number of lamps, but also their location.
So, for standard ceilings (2.5 - 2.8 m) it is advisable to adhere to the following restrictions:
- maximum distance between lamps – 1.2 – 1.5 m;
- the maximum distance from the lamp to the wall is 0.5 - 0.7 m.
In living rooms, bedrooms and other rooms of this type there will be no problem, but for a corridor or long hallway sometimes you have to purchase additional lamps. However, in this case it is better to simply take products with lower power - the light will not be too bright, and at the same time uniform.
Long corridor lighting option
Wiring
When installing lighting behind a suspended ceiling with our own hands, we will have to lay the wiring ourselves.
This task is not so difficult, especially if you follow the algorithm:
- First, we determine where the lamps will be installed and mark along the ceiling the routes along which the wires will be laid.
- After this, we assemble the frame of the suspended ceiling, installing brackets and support profiles on the ceiling.
Three-core copper cable in corrugation
- Then we put the PVS 3x0.75 or PVS 3x0.5 wire into a cable duct or plastic corrugation and lay it along the marked routes. We attach the casing with the laid wire to the ceiling either with special clamps or simple fasteners made of flexible wire. Opposite each lamp I form a loose loop of wire 20-30 cm long.
Wiring for lighting installation. You can immediately install terminal blocks on the hinges
Some lamp models require the installation of a hidden part fixed to the ceiling. We fix these parts to the main base using anchors, making sure that their lower edge does not extend beyond the frame.
- The wiring for the built-in light is usually done in two or three separate branches. Each branch is powered by one switch key - this way we can regulate the light intensity.
- Through the junction box we run the wires to the panel for connection. As a rule, lighting groups are “hung” on a residual current circuit breaker two or three at a time: the output is low, so the load is moderate.
Typical wiring diagram for two branches
Naturally, it is necessary to power the lighting circuit only after installing the lamps - solely for reasons of electrical safety!
Sockets for installing lights
General installation diagram
The actual installation of lamps in a plasterboard ceiling begins after it is covered. When the gypsum board is fixed to the frame and finished (roughly), you can begin installation.
The first stage of work will be preparing the mounting holes:
- We put marks on the casing opposite the installation points of the lamps.
- Using a drill bit with a diameter equal to the diameter of the selected lamp model, we make a hole in the drywall. We carefully remove the cut out fragment, clean the edges, cutting off the “rags” of cardboard.
Drilling a hole with a crown
- Instead of a crown, you can use a ballerina drill. It turns out not so neatly, but you can make two or three nests.
A ballerina is also suitable
- We remove the previously prepared rein loop from the hole. This is usually not difficult, but if the loop is far enough away, it can be hooked with a flexible wire with a hook.
Finished hole
- We cut the wire, strip the ends, removing the insulation to a length of approximately 10-15 mm.
Connecting lamps
We are left with the simplest step - connect the lamp to the wiring and install it in the hole.
As a rule, point models are equipped with a terminal block and spring fasteners, so the work takes literally a couple of minutes:
Connecting wires
- We fix the terminal block on the wires coming out of the socket (or check its fastening). Loosen the screws opposite the free terminals.
- We connect the block with the wires coming out of the ceiling (you will need a screwdriver with a thin tip). We observe the markings: PE - grounding wire, N - zero, L - phase. We check that the wires are securely clamped.
At this stage, you can install the light bulb and check whether we did everything correctly by applying power to the desired branch.
- We bring the antennae of the spring fastening together and insert the structure into the hole.
Compress the spring fastener and insert it into the hole
- We release the tendrils, which open and press against the drywall from the inside. We check that the lamp is firmly in place.
Actually, this is where the installation of spot light ends. Now it's just a matter of screwing in the light bulb and installing the trim, but I prefer to do this after finishing the ceiling so the light hole can be temporarily covered and sealed.
Photo of the installed product with a decorative overlay
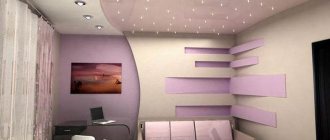
LED strip lighting
LED strip has many advantages, both functional and aesthetic.
Functional benefits include:
- ease of installation,
- long service life,
- various colors,
- economical - consumes very little electricity.
- unbreakable body - since this type of lighting device is presented in the form of a transparent strip with LEDs, it is very problematic to break or otherwise damage it;
- There are waterproof tapes that are used not only in the bathroom, but even under water to illuminate swimming pools.
The aesthetic advantages include the fact that such a lighting source is hidden from view - the tape itself is not visible, only diffused light is visible. This effect is used to add zest to the interior, as well as to create soaring ceilings.
If you install special controllers, you can adjust the lighting intensity, and in the case of using multi-colored tape, change the color.
How to hide LED strip
There are many ways to install diode strips; very often they are used in multi-tiered ceiling structures to emphasize each fragment. But even if you have an ordinary flat ceiling, you can also play with it in an interesting way. You can install such lighting even alone. In this case, you will need a special wide cornice for LED lighting.
Let's take a closer look at the algorithm of actions:
- Using a building level, mark the line for the location of the cornice, 10 cm from the ceiling.
- Glue the cornice using liquid nails, titanium or acrylic putty.
- Carefully glue the joints between the cornice strips, especially in the corners.
- Run the wiring into the cornice and connect the power supply that needs to be secured to the wall.
- Connect the LED strip to power. If you need to connect more than 5 meters of tape, then each section is connected to the power supply in parallel.