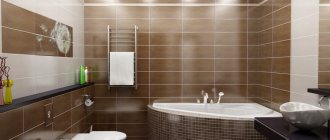
Designs of lighting systems in modern residential premises most often involve the installation of spotlights in plasterboard.
Spotlights for plasterboard ceilings allow you to obtain high-quality general light or accentuated lighting of individual areas of the room.
The features of spotlights installed behind plasterboard sheets will be discussed in this article.
Types of spotlights
Lamps for plasterboard coatings are classified according to the following parameters:
- voltage level;
- type of lamps;
- design features.
From a performance point of view, these parameters are not critical, but they are important when it comes to design ideas, the purpose of the light and the number of bulbs required. Below we will look at the features of choosing a lamp according to the above parameters.
Voltage level
There are three types of devices on the market that operate at different voltage levels:
- 220V;
- 12V;
- 3V (we are talking about LED lighting devices, for which voltage is not a defining characteristic, since their operation is related to the current driver).
The level of voltage required directly depends on the type of light bulbs. You need to decide on the type of lighting device in advance, since the design of lamps for plasterboard ceilings is characterized by some features.
A transformer is used to reduce the voltage, and the driver already mentioned above is used to operate LED lighting devices.
Note! When replacing one type of lamp with another, it may be necessary to change the wiring diagram.
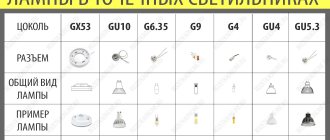
Lamp type
The following types of light bulbs are used for plasterboard ceilings:
- incandescent;
- luminescent;
- halogen;
- LED
Spotlights for plasterboard ceilings that work with conventional incandescent light bulbs do not require special devices for connecting them.
However, lamps with standard incandescent lamps have a number of disadvantages. The main one is the large size of the spotlights, since you will need a 7-8 centimeter gap between the drywall and the floor slab, and this will reduce the height of the ceiling.
In addition, incandescent lamps are prone to increased heating (especially if their power is higher than average), which will force you to take additional fire safety measures.
The advantage of incandescent lamps is their low cost and easy installation. The lighting circuit makes it possible to use a dimmer, thanks to which you can create more comfortable conditions for lighting different areas of the room.
Fluorescent lamps save electrical energy. However, like incandescent lamps, fluorescent light sources are not small in size. In terms of eye comfort, fluorescent lamps are inferior to their competitors.
And most importantly: the use of plasterboard systems implies the smallest possible number of protruding parts, and fluorescent lamps are intended for open use.
The fact is that due to insufficient dispersion (inevitable in the conditions of a lamp placed in a plasterboard ceiling), the luminous flux deteriorates, even despite the presence of reflectors. It should be noted that dimmers and fluorescent light sources are incompatible due to the technological characteristics of the latter.
Halogen bulbs are the most common spot lighting option for plasterboard ceilings. This is due to the favorable proportion between electricity consumption and the level of comfortable lighting.
Halogen bulbs produce a fairly powerful and accentuated stream of light. In addition, halogen light sources have higher efficiency compared to incandescent lamps, and this allows you to save on energy consumption.
Note! Due to their low operating voltage, halogen bulbs can be used in rooms with high humidity.
Halogen light bulbs are compact - from 3 to 4 centimeters in height, which makes it possible to avoid a significant reduction in the height of the room. Most often, for the operation of this type of light source, you need a step-down transformer that supplies 12V. Halogen light sources can be controlled using a dimmer.
LEDs in spotlights are considered the most modern method of lighting. An LED is a semiconductor that emits light when current passes through it.
Among the advantages of LED bulbs, low electricity consumption should be noted. When using LEDs, you can choose the color of the lighting, which allows you to diversify the designer's options when planning the interior. Like halogen lighting sources, LED light bulbs are compact in height - from 3 to 5 centimeters.
The disadvantage of LED devices is the relatively high cost of the equipment. Although it must be said that in the future the costs will be paid off by saving electricity.
Design Features
Spot lighting is classified according to design features:
- rotary;
- irrevocable;
- open;
- closed.
Rotating lamps, unlike non-rotating lamps, can illuminate a room from different angles. This feature may be needed for accentuated lighting of a particular area at a given moment.
Open appliances lack moisture protection, but this is not necessary in ordinary rooms such as a bedroom or living room.
Built-in plasterboard ceiling luminaires, which are of the closed type, are protected not only from moist air, but also from direct ingress of water. Such lighting devices are used in wet areas (baths, saunas, swimming pools, etc.).
Modern products are classified according to a protection class designated as IP (Ingress Protection). In addition to this abbreviation, the code contains two numbers.
The first digit indicates the degree of protection against dust:
- 0—no protection;
- 1 - protection from particles up to 50 millimeters in size;
- 2 - up to 12 millimeters;
- 3 - up to 2.5 millimeters;
- 4 - up to 1 millimeter;
- 5 - less than 1 millimeter;
- 6 - full protection.
The second number indicates the degree of protection from moisture:
- 0 - no protection;
- 1 - protection from vertically falling drops of water;
- 2 - protection from splashes falling on the lamp at a slight angle;
- 3 - protection from drops falling at a significant angle;
- 4 - operation is possible despite water splashes;
- 5 — the lamp continues to work even under running water;
- 6 - direct exposure to water;
- 7 - short immersion in water;
- 8 - long-term immersion in water is possible.
It should be remembered that we are talking specifically about the security of the lighting fixture, but not the ceiling structure as a whole. Of course, drywall is not intended for use in conditions of constant contact with water. For an ordinary room, IP2 protection class will be quite sufficient.
Variety of designs
Today, ceiling devices of a wide variety of complexity are made from plasterboard. Moreover, they are all quite accessible for DIY assembly. For such a ceiling you can do:
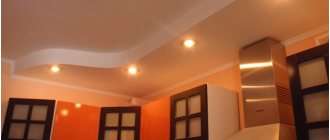
- one level. Suitable for lovers of rigor and simplicity. This ceiling will fit perfectly into a room with low ceilings. Here you won’t get much in the way of complexity and pretentiousness of the designs, but you can play around with the lighting fixtures. Spotlights of LED or fluorescent models, as well as a central ceiling-type chandelier, will fit perfectly here;
Single level ceiling
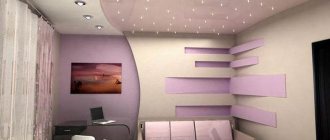
- two or more levels. This design is good for large rooms. Hidden lighting in boxes or niches (placed between levels), as well as spotlights of any type, are suitable here;
Multi-level ceiling
- curly. Such ceilings need decorative lighting for their figured elements. As a result, here in the center you can install a chandelier, and on the figures - LED hidden lighting.
Figured ceiling
Deciding what to do with your own hands - a single-level or multi-level type of ceiling structure should be based on the purpose of the room and its dimensions.
Selection of components
Installation of spotlights requires the presence of the necessary components, including:
- Electric cable with a cross section of 1.5 square millimeters. The length is selected based on the wiring diagram of the current-carrying conductors.
- Terminal blocks. These parts are used to connect cable sections.
- Copper sleeves. Necessary for crimping twists, if necessary.
- A step-down transformer. It is used when operating halogen lighting devices.
- Current driver. Used in LED light sources.
Note! When choosing a transformer, you must proceed from the required total power of all lamps. In this case, the power of the transformer should be 20–30% higher than this indicator.
The driver must have a power reserve if a serial connection type is used. However, it should be borne in mind that in a sequential circuit, the failure of even one LED will disable the entire system. That is why parallel connection is more reliable, although it requires a dedicated driver for each LED.
Note! Many spotlights for plasterboard ceilings are equipped with their own driver.
Tips for installing ceiling lights built into a plasterboard structure
When installing point devices in a plasterboard ceiling, you should understand that:
- the process of organizing lighting and technological innovations are not complicated, so any craftsman with at least some knowledge in electrical engineering and construction can handle installation in a suspended structure;
- a bold design solution in interior design and the use of modern lighting schemes will effectively affect the result of creating comfort;
- the result of the work done is the safety of the premises and the elimination of the threat of danger to the people living in it.
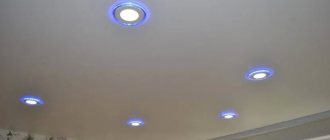
Beautifully designed ceiling made of built-in spotlights
Wiring
Laying the electrical cable is a key step when installing fixtures in a plasterboard system. Lay the wires correctly not after, but before installing the drywall - this is the only way to perform the wiring efficiently.
The wire cross-section should not be less than 1.5 square millimeters. It is recommended to opt for a parallel connection diagram, which will ensure autonomous operation of all light sources.
When laying wires, loops (20–30 centimeters each) are left in the areas connected to the chain of lighting fixtures, which will ensure future maneuverability when creating connections.
It is recommended to hide the wires in special corrugated channels with a high level of fire safety. If the ceiling is already installed, then holes are drilled in the drywall and wires are pulled through them to the lighting fixtures.
The wires are connected in accordance with the colors of the cores. For example, blue color is phase, brown is zero. When the colors have been sorted out, the supply wire going to another lighting fixture is clamped in the terminal box. In this case, only wires of the same color can be combined with each other.
The switch can only open a phase. If the circuit has a transformer, it is placed between the floor slab and the plasterboard ceiling. Twists of wires are pressed using a sleeve and insulated.
Open twists are not allowed. Wires cannot be placed diagonally relative to each other, no matter what installation diagram of electrical appliances is used. If the circuit is complex - with an abundance of wires, you will need distribution boxes in which there is a main supply wire, and all other wires are its branches.
Useful tips
In order for the installation of a spotlight on a plasterboard ceiling to be successful, it is enough to know some useful “life hacks”. For example:
When starting installation, you need to make sure that the wires are color coded. As a rule, it is standard, but sometimes there are exceptions. Electricity is no joke, so it's best to make sure the connection is correct. Grounding wiring is a direct concern for health and life. Wires can be connected in many ways, not just using terminals
The most important thing is to reliably isolate and reduce to zero the possibility of metal oxidation. The wires must be reliably insulated.
Consider the ratio of price and electricity consumption
For example, LED lamps are economical and durable, but they cost a lot; halogen lamps often burn out. The best solution seems to be energy-saving lamps. Installation of the spot should begin only after the gypsum board ceiling has been completely finished. It is better not to touch fluorescent lamps with your hands during the installation of the lamp. There is nothing dangerous about this, but it can have a negative impact on the life of the lamp. Even if the lamp has a square shape, it is better to drill the strobe with a round crown. Then you can make the corners by hand. Do not allow the lamp and ceiling to overheat. LED lamps heat up the least. In the lamp placement scheme, you need to combine the correct location with beauty. Excessive minimalism is not always appropriate here. If you are not confident in your own abilities, it is better to call a specialist.
What should you do if the lamp hits the profile on a finished ceiling?
Holes for lighting fixtures
The areas where there will be holes must be marked in advance on the drywall. This approach will allow you to avoid future inconsistencies between hinges and prevent damage to the fasteners of plasterboard sheets when drilling holes.
When preparing holes, it is recommended to follow these rules:
- Lighting fixtures are placed no further than 1.2 meters apart. It is important to observe the intersection of the angles of the light streams. At the same time, ceilings are characterized by insignificant dispersion angles.
- The distance between the place where the lighting devices are fixed to the plasterboard sheet and the wall should not exceed 60 centimeters.
- The holes are drilled using a wood crown or a circular adjustable drill. The latter option is optimal, since drills with adjustable cutters allow you to achieve better drilling quality.
- It should be kept in mind that the hole is blocked by the front side of the lighting fixture. In this case, the hole should not be larger than the internal cross-section. This is the only way to securely secure the device.
- Drilling is carried out at low speeds - this will avoid destruction of the finishing material.
Universal methods for installing holes in drywall if you come across a metal profile
The necessary crowns for installing holes are not always at hand; in addition, they have a certain size range for fairly small electrical products. What to do if you need to build acoustics, a lamp, or something else large into the ceiling when it gets into the profile of a metal frame?
The easiest way to cut a hole in drywall along with the metal profile underneath is by drilling. I think this is the first thing that comes to mind for many who encounter a similar problem.
So, for example, when installing a hole for ceiling acoustics, in one of the previous articles, we were hampered by the metal frame profile, which was located directly across the hole.
The decision was made to drill it out. To do this, holes were made along the contour of the hole with a metal drill, using a drill or screwdriver.
And then we cut the partitions between the resulting holes with metal scissors.
So, quite quickly, the ceiling profile that was interfering with installation was removed. The main disadvantage of this method is that it leaves torn edges of the profile, which can cause you to cut yourself or damage the installed electrical equipment. Therefore, it is advisable to further process them, for example, with a file.
The second way to cut a metal profile in drywall is to use various cutting power tools with metal saws. This can be a regular electric jigsaw, a reciprocating saw, or vibrating tools.
The main disadvantage of this method is that not everyone has such rather narrow-profile electrical equipment in their arsenal of home tools. In addition, many do not have experience in handling it, which will also be needed when installing holes in the metal profile of a plasterboard ceiling or wall.
I recommend using a hand hacksaw to cut through an interfering metal frame profile only as a last resort when all other options are not available. I warn you right away that this is a rather labor-intensive process that requires serious effort and patience and is more suitable for making straight cuts, but cutting out a round hole will not be easy at all.
A specialized hacksaw for drywall, like a saw with a blade for wood, will not cope with this task at all.
The best option, of course, is to accurately measure and leave the areas for installing built-in electrical equipment free at the stage of installing the drywall frame. At the same time, it is possible to strengthen the frame in particularly loaded areas.
In this way, you greatly facilitate the process of installing equipment and, most importantly, without violating the integrity of the metal frame, you maintain its structure - rigidity, which directly affects its durability.
Installation of lamps
When the wiring is ready, the installation of lighting fixtures begins. There are spacer springs on the sides of the lamp that need to be compressed, after which the body will freely fit into the niche. You need to start the device carefully so as not to damage the wiring.
It is not recommended to pre-compress the springs using ropes or pieces of wire. The housing should fit through the hole without problems, since in the future it may be necessary to remove the device from its niche.
After installing the luminaires, they are immediately checked for proper functioning.
Installing spotlights for plasterboard structures is not a complex job. However, here, as in any other matter, it is important to strictly adhere to a certain technology.
It is recommended to pay special attention to the correct selection of components, such as light bulbs, transformers and drivers. The efficiency and operational life of the entire system depend on the compatibility and quality of these products.
LED strip lighting
LED strip has many advantages, both functional and aesthetic.
Functional benefits include:
- ease of installation,
- long service life,
- various colors,
- economical - consumes very little electricity.
- unbreakable body - since this type of lighting device is presented in the form of a transparent strip with LEDs, it is very problematic to break or otherwise damage it;
- There are waterproof tapes that are used not only in the bathroom, but even under water to illuminate swimming pools.
The aesthetic advantages include the fact that such a lighting source is hidden from view - the tape itself is not visible, only diffused light is visible. This effect is used to add zest to the interior, as well as to create soaring ceilings.
If you install special controllers, you can adjust the lighting intensity, and in the case of using multi-colored tape, change the color.
How to hide LED strip
There are many ways to install diode strips; very often they are used in multi-tiered ceiling structures to emphasize each fragment. But even if you have an ordinary flat ceiling, you can also play with it in an interesting way. You can install such lighting even alone. In this case, you will need a special wide cornice for LED lighting.
Let's take a closer look at the algorithm of actions:
- Using a building level, mark the line for the location of the cornice, 10 cm from the ceiling.
- Glue the cornice using liquid nails, titanium or acrylic putty.
- Carefully glue the joints between the cornice strips, especially in the corners.
- Run the wiring into the cornice and connect the power supply that needs to be secured to the wall.
- Connect the LED strip to power. If you need to connect more than 5 meters of tape, then each section is connected to the power supply in parallel.