Before our eyes, a real revolution in lighting is taking place: the world is rapidly switching to LEDs. Just five years ago, LED lamps were still a technical novelty, but now LED lighting is used in all spheres of life: LED lights can be found even in villages, many offices, hotels and public buildings are illuminated with LED lamps, the vast majority of concert and theater lighting has become LED. Lamps of this type appear in many apartments, because they can be bought even in grocery stores, and in household goods their range is wider than other types of lamps.
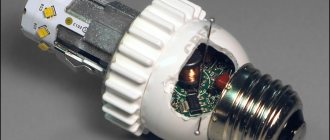
An LED lamp is a rather complex electronic device with several dozen parts on which the quality of light, its safety for health and the durability of the lamp depend.
Assembly methods
Today, several methods of assembling lighting elements are practiced, thanks to which a certain classification of modern LEDs has been created.
DIP
The Dual In-line Рaskage option is an interesting, from a design point of view, but outdated type, characterized by the following LED sizes:
- 0.3 cm;
- 0.5 cm;
- 0.8 cm;
- 1.0 cm.
In addition to the size of the bulb, semiconductors differ markedly in color and materials used for manufacturing, as well as in the shape of the chip. The main advantages of this type of LEDs include low heating and decent brightness.
Dual In-line Рaskage are available in both single-color and RGB versions, and most often have a very characteristic cylindrical shape, and have a built-in convex lens.
"Piranha"
LEDs belonging to this group are characterized by the best luminous qualities in terms of luminous flux. The design feature is represented by a rectangular shape and the presence of four special pins. Available in red, green, blue and white.
One of the main differences is the possibility of a more “rigid” fixation on the board, and the very high thermal conductivity is due to the lead substrate.
LED lamp Piranha Chameleon (RGB)
The presence of lead calls into question the safety of operation, but the wide range of operating temperatures allows the use of high input powers, which determines its wide popularity.
SMD technology
SMD LEDs, also known as Surface Mounting Device or “device fixed on a surface,” have a power of 0.01-0.2 W.
A feature of SMD LEDs is the presence of one, two or three modern crystals on ceramic rectangular bases.
SMD LEDs are coated with an individually high-quality phosphor layer. The contact pads and the circuit board base are directly connected using standard solder.
The disadvantages of this modern technology include the low maintainability of the design, as well as the need to completely replace the board with all LEDs if one of them fails.
COB technology
Modern manufacturing technology for LED lamps, called Chip On Board, is characterized by fixing crystals on a board without a housing or ceramic substrate, and coating with a common phosphor. The main advantage of any COB illuminators is the minimum luminous area with increased power levels.
LED COB lamp
The high placement density and the presence of a general coating with a layer of phosphor guarantee the most uniform glow of the lighting device.
LED indicators
To choose a suitable indicator LED element, you need to familiarize yourself with their types and types. This group includes the following types of diodes: DIP, Super Flux “Piranha”, Straw Hat, SMD. They all differ in design, size, brightness of radiation, etc. They are used in different fields.
DIP LEDs
This is a type of light-emitting device that has an output housing and often a convex lens. Different types of LEDs from this group differ in the shape and diameter of the housing. Cylindrical elements have a bulb circumference of 3 mm. Also on sale are diodes with a rectangular body.
They have a wide spectral range and come in single-color and multi-color (RGB tapes). However, their luminescence angle does not exceed 60°.
How does an LED lamp work?
A close acquaintance with the design of an LED lamp may be required only in one case - if it is necessary to repair or improve the light source.
Home craftsmen, having a set of elements on hand, can independently assemble an LED lamp, but a beginner cannot do this.
Considering that LED devices have become the basis of lighting systems for modern apartments, the ability to understand the structure of lamps and repair them can save a significant part of the family budget
But, having studied the circuit and having basic skills in working with electronics, even a beginner will be able to disassemble the lamp, replace broken parts, restoring the functionality of the device. To find detailed instructions on how to identify a breakdown and repair an LED lamp yourself, please follow this link.
Does it make sense to repair an LED lamp? Undoubtedly. Unlike analogues with incandescent filaments for 10 rubles apiece, LED devices are expensive.
Let’s assume that a GAUSS “pear” costs about 80 rubles, and a better alternative OSRAM costs 120 rubles. Replacing a capacitor, resistor or diode will cost less, and the life of the lamp can be extended by timely replacement.
There are many modifications of LED lamps: candles, pears, balls, spotlights, capsules, strips, etc. They differ in shape, size and design. To clearly see the difference from an incandescent lamp, consider the common pear-shaped model.
Instead of a glass bulb there is a matte diffuser, the filament is replaced by “long-playing” diodes on the board, excess heat is removed by a radiator, and voltage stability is ensured by the driver
If you look away from the usual shape, you can notice only one familiar element - the base. The size range of socles remains the same, so they fit traditional sockets and do not require changing the electrical system. But this is where the similarities end: the internal structure of LED devices is much more complex than that of incandescent lamps.
LED lamps are not designed to operate directly from a 220 V network, so a driver is located inside the device, which is both a power supply and control unit. It consists of many small elements, the main task of which is to rectify the current and reduce the voltage.
Basic principles of connection
As mentioned earlier, the design of a light-emitting diode involves connecting them exclusively to a DC source
However, since the working part of the LED is a semiconductor silicon crystal, it is very important to maintain polarity, otherwise the LED will not emit a luminous flux
Each LED has technical documentation, which contains instructions and directions for correct connection. If there is no documentation, you can look at the LED markings. The marking will help you identify the manufacturer, and knowing the manufacturer, you can find the required datasheet, which contains information on the connection. Here, this is not a tricky piece of advice.
How to determine polarity?
There are only 3 ways to resolve the issue:
- Constructively. According to standards accepted throughout the world, on a regular LED (not SMD type), the long leg is always the “+” or the anode. For an LED to work, a positive half-wave must be supplied to it. And the short one is the cathode.
- Using a multimeter. To check, you need to set the device switch to the “Test” mode and install the red multimeter probe on the anode, and the black probe on the cathode. As a result, the LED should light up. If this does not happen, you need to change the polarity (black to the anode, and red to the cathode). If the result does not change, then the LED has failed (to establish a more accurate diagnosis, read how to check the LED).
- Visually. If you look closely at the LED, you can see 2 tips near the crystal. The larger one is the cathode, the smaller one is the anode.
We've sorted out the polarity, now we need to decide how to connect the LED to the network. For those who do not understand, read a detailed and interesting article on determining the polarity of an LED. In it we have collected all possible methods of checking, and even using a battery.
What is LED
Externally, a light-emitting diode looks like a crystal on a metal base, covered with a plastic lens. The lighting element consists of the following parts:
- base made of aluminum or copper;
- semiconductor crystal;
- cathode (-) and anode (+);
- layer of silicone;
- plastic lens;
- protective housing.
The cathode and anode are fixed on a metal base. A semiconductor chip (crystal) is attached to the first electrode. The contacts have conductors that are connected to the chip by a pn junction (electron hole junction). In this section, using a connecting wire, 2 semiconductors with hole and electronic conductivity are combined. The structure is covered on top with a layer of silicone and a plastic bulb and placed in a housing with leads for connecting to the circuit.
Advantages and disadvantages
LEDs - LED (light emitting diode) or LED, from the English Light Emitting Diode - as sources of electric artificial light have many advantages. Compared to traditional incandescent lamps LN, incl. and halogen, they are more energy efficient. This is confirmed by such a parameter as light output. For example, light output, i.e. The ratio of the amount of light that a light source produces to the power consumed for different sources has the following values, in Lm/W:
- for ordinary incandescent lamps - from 4-5 to 12-13;
- for halogen ones - from 14 to 17-18;
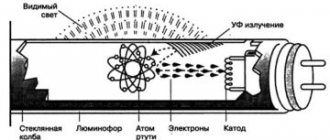
- for luminescent ones - from 45-50 to 70;
- for discharge metal halide – from 75-80 to 100-105;
- for LEDs and high-power discharge sodium lamps - about 110-115;
- for promising LEDs - about 250-270.
Other advantages include:
- long service life, which is 10-100 times longer than the nominal service life of incandescent lamps;
- efficiency significantly larger than other light sources;
- the highest reliability is ensured by the mechanical strength of the solid-state crystal, soldering on large planes of contact pads, small size and weight of the device housing, etc.;
- electrical safety - operating voltage does not exceed 12-18 V and only some LED products are powered directly from a 230 V network;
- safety for human health and nature - the materials used in the design are neutral or low-hazard, while in other energy-efficient light sources - discharge lamps, fluorescent tubes, compact, induction, etc. mercury is used - a material of the 1st hazard group, which has the ability to accumulate in the body of humans and animals;
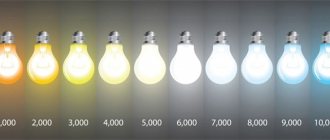
- sufficiently high quality of light: different color temperatures, accurate color reproduction, low level of light flux pulsations, etc.;
- work in different climatic conditions: with high humidity and dust in the air, at a temperature of minus 50-60℃;
- instant return to operating mode. Discharge lamps require from 30 seconds to several minutes to do this;
- unlimited number of inclusions. Fluorescent light sources have from 7-8 to 20-25 thousand inclusions;
- high stability of parameters over time.
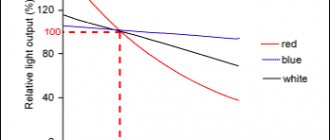
White LEDs with a three-component phosphor have 3-5 spectral lines in the emission spectrum, and modern gas-discharge lamps have 2-3. Therefore, LEDs have a higher color rendering index than fluorescent lamps.
But LEDs also have disadvantages:
- limitation on the upper operating temperature not exceeding 80-100℃;
- high cost, but it is compensated by long-term operation and a minimum of maintenance.
Some varieties of LEDs provide the desired shade of white light during production - from super warm to very cool, or almost any color. Adjustable LEDs - RGB triads, triplets of multi-colored crystals in one housing, allow you to get any white or color shade. In lamps, strips and rulers, LED-based modules, these possibilities are even greater.
Main technical characteristics of LEDs
When choosing LED bulbs, you need to pay attention to their characteristics. Typically, the device parameters are indicated on the packaging or in the technical data sheet.
When purchasing an LED device, consider the following characteristics:
- the amount of current consumption of the crystal;
- voltage;
- resistance;
- luminous flux, radiation angle;
- Colorful temperature.
In addition, you need to know how to decipher the markings on the board, which indicate the size of the LED element. These values will help you find out the length and width of the chip and determine the current strength of the crystal.
The parameters of the diode determine the possibility of its use in certain conditions and ensuring the required level of illumination.
On-chip current
There are different types of LED devices on sale: with 1, 2, 3 or 4 crystals. LED light bulbs with 1 element are designed for a current of 0.02 A. As the number of chips increases, this figure increases, for example, the current consumption of devices with 4 chips is 0.08 A (0.02 A for each crystal).
Attention! The current strength affects the stability of the LED lamp; if this parameter increases, the likelihood of its premature failure increases. With strong current surges, the LED burns out immediately.
To extend the life of the LED lamp, you need to connect a resistor to it, which stabilizes the current. To select a device with suitable resistance, you need to take into account the characteristics of the LED lamp. An online calculator will help you do this.
Voltage
When choosing, you should take into account not the supply voltage of the LED element, but the magnitude of its drop. This indicator corresponds to the voltage level at the output after current passes through it. This parameter can be found on the packaging.
There are different types of LEDs, the voltage of which depends on the color of the light. This parameter for crystals with white, green, violet, blue light is in the range from 2.2 to 4 V, for elements with red, orange, yellow light - from 1.6 to 2.2 V. The voltage of ultraviolet diodes ranges from 3.1 to 4.4 V, and infrared diodes – about 1.9 V.
When connecting different types of LEDs in parallel, you need to control the voltage drop level of each element. If the voltage increases slightly, the current also increases, and the device will burn out.
Diode resistance
Even one LED can have different resistance: differential (dynamic) and direct current. In the section of the current-voltage characteristic (volt-ampere characteristic - the dependence of current on voltage, or vice versa in the section of the electrical circuit), the dynamic resistance is insignificant and lower than the resistance of the static current. On the way back, the dynamic resistance is higher than this current indicator.
220 V LED lamps: pros and cons
Advantages of 220 V lamps
- Easy to install. These bulbs do not require a power supply or step-down transformer. Simply screw it into a chandelier or sconce and use it. This lamp has several LEDs and a driver.
- Always available. Lamps with a standard base can be purchased at any hardware store.
- There are models for spot lighting. For example, the Wolta 25S lamp with a GU 5.3 base and similar ones are ideal for a suspended ceiling. They will also work great in a bathroom or kitchen where there is high humidity. They do not require a switching power supply.
Disadvantages of 220 V lamps
Short service life. We have already written that in cheap, low-quality light bulbs, heat removal from the base where the driver is located is poorly organized, which is why it quickly burns out. In general, it has been observed that 220-volt lamps burn out more often than 12-volt lamps.
Electric shock hazard. Compared to 12 V, the danger of a voltage of 220 V is much higher. Although it is worth noting that at home, with proper use of chandeliers, spotlights and other lighting fixtures, it is extremely rare to get under voltage.
If you don’t want to bother with installing a step-down transformer or installing a power supply, feel free to take regular 220 V LED light bulbs. And in the bathroom or sauna, use protective shades.
Classification of LEDs by their field of application
Such elements can be indicator and lighting. The former were invented before the latter, and they have long been used in radio electronics. But with the advent of the first lighting LED, a real breakthrough in electrical engineering began. The demand for lighting devices of this type is steadily growing. But progress does not stand still - new types are being invented and put into production, which become brighter without consuming more energy. Let's look in more detail at what LEDs are.
Indicator LEDs: a little history
The first such red LED was created in the middle of the twentieth century. Although it had low energy efficiency and emitted a dim glow, the direction turned out to be promising and developments in this area continued. In the 70s, green and yellow elements appeared, and work to improve them did not stop. By the year 90, the strength of their luminous flux reaches 1 Lumen.
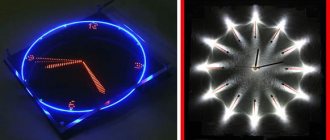
Nowadays, LED lamps can even be like this
The year 1993 was marked by the appearance in Japan of the first blue LED, which was much brighter than its predecessors. This meant that now, by combining three colors (which make up all the shades of the rainbow), you can get any color. In the early 2000s, the luminous flux already reached 100 Lumens. Nowadays, LEDs continue to improve, increasing brightness without increasing power consumption.
Use of LEDs in household and industrial lighting
Now such elements are used in all industries, be it machine or automotive manufacturing, lighting of production workshops, streets or apartments. If we take the latest developments, we can say that even the characteristics of LEDs for flashlights are sometimes not inferior to old 220 V halogen lamps. Let's try to give one example. If we take the characteristics of a 3 W LED, they will be comparable to the data of an incandescent lamp with a consumption of 20-25 W. The result is energy savings of almost 10 times, which, with daily constant use in an apartment, provides a very significant benefit.
LED flashlights with special lenses shine at a distance of up to 3 km
What are the benefits of LEDs and are there any disadvantages to them?
A lot can be said about the positive qualities of light diodes. The main ones include:
- Cost-effectiveness without loss of luminous flux power - here they are unrivaled;
- Durable housing – there is no danger of mechanical damage;
- Durability - such elements work tens of times longer than incandescent lamps;
- Compactness – have small dimensions;
- The safest - they operate from a 3-24 V network;
- Eco-friendly - do not require special disposal.
As for the negative aspects, there are only two of them:
- Work only with constant voltage;
- It follows from the first - the high cost of lamps based on them due to the need to use a driver (electronic stabilizing unit).
Ultraviolet and infrared light diodes - they even make such
Types and types of LED lamps.
There is no clear classification for LED lamps: products are produced in too many different shapes, colors and configurations.
By method of use:
- General purpose light sources for lighting apartments and offices. Characterized by a dispersion angle from 20 to 360.
- Directional light products. Such light bulbs are called spots. They are used to create lighting or highlight interior areas in a room.
- Linear type products, similar to conventional fluorescent lamps. Manufactured in the form of tubes. They are used in technical rooms, offices, store rooms and other spaces where fire safety is important. They create bright, beautiful lighting that will highlight the necessary details.
According to their purpose, LED lamps are divided into:
- Products for outdoor use. Manufactured in a dust- and moisture-proof housing.
- Products for industrial purposes, public utilities. Supplemented with a vandal-proof durable casing. They are manufactured with special requirements for lighting characteristics: stability, service life, operating conditions.
- Household lamps. They are characterized by low power, stylish design, electrical and fire safety, quality of luminous flux (color rendering index, pulsation coefficient, etc.).
Based on the voltage consumed, there are also three types of lamps:
- Powered by 4 V. Low-power LEDs that consume from one to 4.5 V. They emit light of different wavelengths from infrared to ultraviolet.
- Powered by 12 V. This voltage is safe for humans, so these light sources are suitable for rooms with high humidity. They are often produced with pin sockets, which complicates the connection process. An additional difficulty may be the need for a special power supply that will reduce the mains voltage to 12 V. Convenient for use by car enthusiasts and tourists: they can organize lighting from a battery.
- Powered by 220 V. The most common type. Widely used for household needs.
Types of socles.
In order for LED light sources to fit into the existing power supply scheme of houses, they are equipped with screw bases. As an alternative to halogen-type lamps, lamps with pin bases are produced. The main types are presented in the table.
| Base type | Purpose | Photo |
| E27 | The most common screw type for household light sources. | |
| E14 | Screw base for low-power lamps. | |
| E40 | Screw base for powerful light sources (mainly outdoor ones). | |
| G4 | Pin contacts for small light bulbs. | |
| GU5.3 | Pin contact for furniture and ceiling light sources. | |
| GU10 | Similar to GU5.3, but the contact spacing is 10mm. | |
| GX53 | Pin contact for flat luminaires. | |
| G13 | Contact similar to fluorescent tube lamps. |
Standards for illumination of a schoolchild's desk
Due to the fact that a child’s vision at school age is in the process of formation and improvement, it is especially important to choose the right lighting for the desktop at which he will study. To do this, it is necessary to take into account not only the location of the table and lamp, but also choose the right lamp model.
Illumination standards
There are lighting standards for both different rooms and their individual zones. It goes without saying that the most favorable for the human eye (including the child’s eye) is daylight. However, given that the child is in class, homework often has to be done at a time when there is no longer enough natural light.
When choosing a table lamp model for a child, you must first of all be guided by the maximum comfort of the device and its safety.
Desktop lighting standards require light output to be smooth, soft, flicker-free, shadow-free, and within 300 lux. Lux is a unit of illumination created by a light flux of 1 lm distributed over a surface of 1 m2. To measure the level of illumination, a special device is used - a lux meter.
If the child has a separate room, care must be taken to ensure that the curtains in the room let in as much light as possible and that the window is not cluttered with foreign objects. In addition to local lighting of the desk, it is necessary to use the main light in the room where the student studies. This will avoid eye strain and fatigue.
Selecting a table lamp model
When choosing a table lamp model, you must be guided by the maximum comfort of the device and its safety. The line of this product includes dozens of models. For convenience, table lamps have a flexible holder, which allows them to be quite mobile within the table. As an option, you can use a lamp with a clothespin mount, which rigidly fixes the lamp to the surface. The use of such models eliminates the risk of accidental falls.
LED lamps produce a uniform glow that does not tire the eyes
Which is better: LED or energy-saving lamp? Regarding the light sources used in table lamps, experts recommend the use of LED lamps. They emit a pleasant, uniform light without pulsating, do not burst, do not emit harmful substances and have a minimum heating temperature. The lamp power should be selected so that the light is not too saturated and not too dim.
Today, models of table LED lamps with a brightness control have appeared on sale. Such devices have several levels of illumination and touch control of the glow. Using a dimmer, you can adjust the brightness to the desired comfortable level. Dimmable lamps are the latest development in the field of lighting technology.
For table lamps, it is recommended to use LED lamps, the light of which is as close as possible to natural daylight.
Checking the infrared diode
Indeed, almost every home has such an LED. They have found wide application in remote controls. Let's imagine a situation where the remote control has stopped switching channels, you have already cleaned all the keyboard contacts and replaced the batteries, but it still does not work. So you need to look at the diode. How to test IR LED?
The human eye does not see the infrared radiation in which the remote control transmits information to the TV, but your phone's camera does. Such LEDs are used in night illumination of video surveillance cameras. Turn on the phone's camera and press any button on the remote control - if it is working, you should see flickering.
The methods for checking an IR LED and a regular one with a multimeter are the same. Another way to check if an infrared LED is working is to solder a red LED parallel to it. It will serve as a visual indicator of the operation of the IR diode. If it flickers, it means signals are being sent to the diode and the IR diode needs to be replaced. If the red does not flicker, then the signal is not being received and the problem is in the remote control itself, and not in the diode.
In the remote control circuit there is another important element that receives radiation - a photocell. How to check a photocell with a multimeter? Turn on resistance measurement mode. When light hits a photocell, its conductivity state changes, then its resistance also changes downward. Observe this effect and make sure it is working or broken.
Color coding of light diodes
There is no generally accepted worldwide marking for such products; each manufacturer designates the color as it suits them. In Russia, color coding of LEDs is used, but few people use it, because the list of elements with letter designations is quite impressive and hardly anyone would want to remember it. The most common letter designation, which many consider generally accepted. But such markings are more often found not on powerful elements, but on LED strips.
Such designations may appear on the tape markings
Features of LED lamps
Modern LED lamps are more complex than their incandescent filament predecessors. To operate LEDs, a number of electronic components are required, which are located on a printed circuit board.
All structural elements are compactly hidden inside the case. The light sources themselves take up a minimal amount of space in the lamp.
The weak point of inexpensive LED lamps is the capacitors, the low quality of which leads to pulsating light. In addition, they can burn out before the LEDs themselves.
The design of a standard LED lamp includes the following components:
- Light diffuser made of plastic. Promotes uniform distribution of light flux in all directions around the lamp.
- Printed circuit board with capacitors, voltage converters and other electronic components.
- LEDs. Their number and operating voltage are in strict accordance with the built-in electronic circuit.
- Aluminum radiator designed to remove heat from high-power lamps.
- Ventilation slots provide passive cooling of the board and LEDs.
- The socket with which the lamp is attached to the lamp.
Thus, an LED lamp is a device with a complex internal structure. It is demanding on external temperature and power supply parameters.
LED device marking
There is no generally accepted labeling of LED lamps. Each manufacturer puts its own symbols into the model name.
These markings apply to all types of lamps and help ensure compatibility between devices with different operating principles.
But there are a number of common abbreviations that are applied to lamps, regardless of their type:
- E27, E14, E40 – screw-in base and its diameter in mm.
- GU5.3, GU10 and GU13 pin base and size in mm between pins.
- A, C, R, CA, CF, G, P, S, T – cap shape.
- A, A+, A++ – degree of efficiency.
- 2700K-6000K – color temperature.
Also, the lamp body can display general technical characteristics characteristic of an electrical device: voltage and frequency, operating temperature, power, service life in hours, luminous flux level and other parameters.
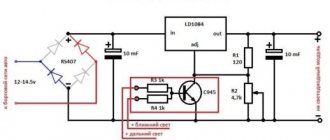
220 volt LED driver circuit
The 220 volt LED driver circuit is nothing more than a switching power supply.
As a homemade LED driver from a 220V network, we will consider the simplest switching power supply without galvanic isolation. The main advantage of such schemes is simplicity and reliability.
But be careful when assembling, since this circuit has no current limit. The LEDs will draw their required one and a half amperes, but if you touch the bare wires with your hand, the current will reach ten amperes, and such a shock is very noticeable.
- The simplest driver circuit for 220V LEDs consists of three main stages:
- capacitive voltage divider;
- diode bridge;
- voltage stabilization cascade.
The first stage is capacitance on capacitor C1 with a resistor. The resistor is necessary for self-discharge of the capacitor and does not affect the operation of the circuit itself. Its rating is not particularly critical and can be from 100 kOhm to 1 Mohm with a power of 0.5-1 W. The capacitor is necessarily non-electrolytic at 400-500V (effective peak voltage of the network).
In simple terms, only a tenth of the incoming voltage will pass through the capacitor.
The second stage is a diode bridge. It converts alternating voltage to direct voltage. After cutting off most of the half-wave voltage with a capacitor, we get about 20-24V DC at the output of the diode bridge.
The third stage is a smoothing stabilizing filter. A capacitor with a diode bridge acts as a voltage divider. When the voltage in the network changes, the amplitude at the output of the diode bridge will also change.
The assembled circuit of a 220-volt LED lamp begins to work immediately, but before connecting it to the network, carefully insulate all exposed wires and soldering points of circuit elements.
Driver option without current stabilizer
There are a huge number of driver circuits on the network for LEDs from a 220V network that do not have current stabilizers.
The problem with any transformerless driver is the ripple of the output voltage, and therefore the brightness of the LEDs. A capacitor installed after the diode bridge partially copes with this problem, but does not completely solve it.
There will be ripple on the diodes with an amplitude of 2-3V. When we install a 12V stabilizer in the circuit, even taking into account ripple, the amplitude of the incoming voltage will be higher than the cutoff range.
Voltage diagram in a circuit without a stabilizer
Diagram in a circuit with a stabilizer
Therefore, a driver for diode lamps, even one assembled with one’s own hands, will not be inferior in pulsation level to similar units of expensive factory-made lamps.
As you can see, assembling the driver with your own hands is not particularly difficult. By changing the parameters of the circuit elements, we can vary the output signal values within wide limits.
For more powerful lighting sources, it is necessary to either increase the number of output stages, or use a more powerful stabilizer with an output current of up to 5A and install it on a radiator.
Assembly types
There are 2 main types of assembly of 220 volt LED lamps:
- with diode bridge. The circuit includes 4 diodes. The bridge transforms the incoming current into a pulsating one. As the sine waves pass through the chips, they change, causing a loss of polarity. During the assembly process, a capacitor must be connected to the output in front of the bridge. Before the terminal (negative) - resistance 100 Ohms. To smooth out possible differences, another capacitor is mounted behind the bridge;
- with resistor. Assembly is accessible even to inexperienced craftsmen. To work, you should prepare 2 resistors, as well as chains with the same number of chips installed in series, taking into account polarity. On the side of the first resistor, the strip is connected by the cathode, and the second by the anode. The lamp will have a soft light due to the alternate switching on of the chips. Such devices are often used as table lamps.
Dimming
Controlling the brightness of lighting using a dimmer is a very useful and convenient feature. However, most LED lamps do not support this feature.
Finding a dimmable LED lamp of the desired shape, size, power and color is not easy and is almost always expensive.
It should be taken into account that dimming occurs by controlling the frequency parameters of the supply voltage.
And this will definitely cause pulsation on the lamp.
If you don't want ripples, skip dimming.
You can control the brightness in another way - by turning various lighting groups on and off.
Although this is less elegant, it is more effective and safer for your health.
LED strip on led 2835
LED strips (SL) are widely used for both lighting and decorative purposes. Therefore, this product, assembled on SMD 2835 LEDs, is worth talking about separately, as the most popular and affordable.
The smd 2835 LED strip is usually assembled from a 0.2 W smd LED, since cooling more powerful strip devices with relatively thin conductive paths is very problematic. The number of SMD semiconductors per 1 m of line can be different - 60 or 120. Supply voltage - 12, 24 or 220 V, and its value depends on the design and the presence of a power supply, and not on the number of LEDs per meter. For a product with an LED density of 60 pcs/m, the specific power and luminous efficiency will naturally be 2 times lower.
SL for 60 (left) and 120 SMD LEDs per meter
Important. LED strip based on SMD LEDs of this type has a relatively high power, and therefore it only needs to be mounted on a metal (usually aluminum) profile, which will serve as a radiator
By design, the LED strip differs in:
- hermetic;
- dust and waterproof;
- weakly protected;
- without protection.
When choosing a device, be sure to consider the conditions in which it will have to work. Buy tape only with the appropriate degree of environmental protection.
Now for power and light output. Knowing the power of one LED, it is easy to calculate the specific power of the SL itself. For a product with 60 diodes per 1 m, the power density will be 0.2*60=15 W/m. For a 120-diode strip, respectively, 30 W/m.
Naturally, these calculations are valid only for branded products made from real LEDs, and not from fakes. But the catch here is that 90% of tapes on the world market are made based on Chinese smd 2835! Moreover, sellers often position them as “premium”, misleading the buyer. How can you determine whether it is a real “premium” product or if they are trying to sell you a low-power fake?
How to find out the power of the LEDs used in the strip
First of all, the price. The cost of a low-power tape is several times different from the price of a real product. Next, power density. Anyone who is familiar with arithmetic can easily calculate which LEDs are installed in the strip. To do this, just look at the accompanying documentation and press the 4 buttons of the calculator.
To experiment, go to the Internet and look at the product. I went to a seemingly decent site and chose two bands: “premium” and “economy”. The first is exactly 6 times more expensive than the second:
- LED strip smd 2835 120 СW Premium.
- LED strip smd 2835 120 CW Economy.
Characteristics of the first:
- LEDs per 1 m – 120;
- specific power – 8.4 W/m;
- specific luminous flux – 635 lm/m;
- supply voltage – 12 V.
Characteristics of the second:
- LEDs per 1 m – 120;
- specific power – 9.6 W/m;
- specific luminous flux – 360 lm/m;
- supply voltage – 12 V.
Let's see what kind of premium this is. We calculate the power of 1 LED: 8.4/120=0.07 W. Luminous flux of one LED: 635/120=5.3 lm. We have arrived... This “premium” is assembled using Chinese LEDs with a power of 0.09 W and a luminous flux of 8 lm. Moreover, in order for this miracle to work longer, the designers provided the diodes with a light mode. They greatly reduced the power consumption of current-limiting resistors, which caused a decrease in luminous flux by one and a half times.
What then did they insert into the economy feed? We count. LED power: 9.6/120= 0.08 W. We will not calculate the luminous flux: it is obvious that it is 2 times lower than that of the previous model. What kind of crystal did the resourceful developers plug into the smd 2835 LED housing? Only the manufacturer himself knows about this. One can only assume that the craftsmen built a crystal from smd 3528, or even something worse, into the smd 2835 case. Or maybe, for the sake of attractiveness, they simply overestimated the power density, but forgot to recalculate the luminous flux, who knows.
As I said above, low-quality fakes are often accompanied by documentation in which the characteristics can be significantly overestimated. Therefore, the calculation method based on the stated characteristics may not work. Here all that remains is to focus only on cost and visual brightness.
There is another option: measure the resistance of the current-limiting resistor, calculate the current through it, and use the current to judge the power of the LEDs included in its circuit (usually there are 3, less often 5). But this method requires special knowledge, and therefore I will not consider it here.
Connection security
When connecting to 220V, it should be taken into account that the light switch usually opens the phase wire. Zero in this case is carried out common throughout the room. In addition, the electrical network often does not have a protective ground, so even on the neutral wire there is some voltage relative to the ground. You should also keep in mind that in some cases the ground wire is connected to radiators or water pipes. Therefore, when a person comes into simultaneous contact with the phase and the battery, especially during installation work in the bathroom, there is a risk of being exposed to voltage between the phase and the ground.
In this regard, when connecting to the network, it is better to disconnect both the zero and the phase using a batch machine in order to avoid electric shock when touching live wires of the network.
Device and principle of operation
LEDs emit light due to the presence of a pn junction. In this area, p- and n-type charge carriers come into contact. The cathode (n-type) is a semiconductor with a negative charge, and the anode (p-type) is a positive charge carrier (hole). That is, holes are formed in the first (areas where there are no electrons), and the second accumulates electrons. On their surface there are contact pads made of metal, to which leads are attached by soldering.
When a p-type semiconductor receives a positive charge and an n-type electron receives a negative charge, current begins to flow at the interface between the diode and the cathode. When connected directly, negative and positive electrons meet, and at the transition site (pn junction) they recombine (exchange). When a negative voltage is applied from the cathode to the p-type region, a forward bias occurs. Glow appears when photons are released as a result of exchange.