The rapid development of optoelectronics in recent years has allowed solid-state light sources to go beyond the indicator segment and conquer new niches in the market, confidently displacing gas-discharge and incandescent light sources.
Today, almost any lighting product with the best characteristics can be made using LEDs, and the cost has already dropped so much that traditional light sources can no longer compete with them. Following the industrial giants, radio amateurs began to quickly master LED innovations, and sometimes some homemade products made from LEDs surpass their industrial counterparts in parameters.
Not surprising! A thing made with your own hands and for yourself should be like this. Let's try to make a brief overview of products made on the basis of LEDs, which you can make yourself.
Decorative items
Radio amateur crafts in this area take a wide variety of forms.
A handful of red LEDs and a simple scheme of running lights - here you have a touching flickering heart for Valentine's Day. As you know, the best gift is one made by yourself!
You can do something more complicated if skill and patience allow. For example, here's a watch:
LED homemade products on New Year's Eve will help you decorate your apartment in an original way. A DIY Christmas tree garland can become the envy of your guests.
Craftsmen-radio amateurs create various souvenir crafts from LEDs in such variety and splendor that even full-time art workers will envy them. Now who has enough imagination for what...
Step-by-step manufacturing instructions
To make LED light figures yourself, you need:
- select and prepare a sketch. This is where such work always begins. Here you can use both ready-made sketches and use your own imagination to create completely new designs;
Note! When choosing a sketch, you need to evaluate its complexity. If you are new to handmade and working with lighting installations, then it is best to start with the simplest forms.
Variant of deer sketch
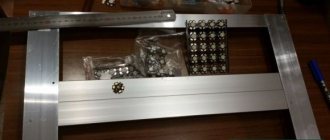
- You need to make a pattern based on the selected sketch. To make it, you can use a piece of plywood. You will need to put nails on it in those places where you plan to bend the LED cord. This way you will get a kind of three-dimensional figure. You can also use copper wire, by bending which you can make either a figurine of a deer or a snowman;
Note! Metal structures or acrylic transparent pipes can be used as material for the patterns.
Finished pattern
- Now you need to apply duralight to the prepared pattern. According to the sketch or pattern, we bend the LED cord in those places where it is necessary. To secure the bend, you can use ordinary plastic tie clamps;
- duralight needs to be fixed along the entire length of the base (pattern).
As a result of all the operations performed, you will receive a beautiful glowing figure.
Finished figure
Now all you have to do is connect your homemade sculpture to a power source. But here it is necessary to remember that duralight is an LED product and must be connected to a power source only through a converter - a power supply. This is due to the fact that all LED products are low-voltage (12 or 24 V), so they cannot be powered from a standard 220 V network. Otherwise, the LEDs will simply burn out. As you can see, almost any person who attended labor classes at school can make an LED New Year’s figure of a deer or even Santa Claus with their own hands. To make the decoration more decorative, it can be wrapped in acrylic. In this case, the homemade deer will seem to be carved out of ice.
Automotive Applications
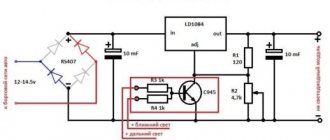
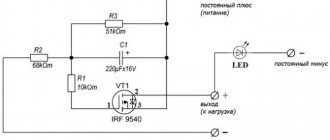
Using a scheme for smoothly switching on and off LEDs, you can create original and economical lighting in the cabin. Such crafts are no longer uncommon; all the necessary recommendations and diagrams can be easily found on the Internet. Outside, you can equip the car with LED fog or marker lights, or illuminate license plates. If you want something more original, powerful color LEDs placed on the bottom can create a unique halo for the car.
General lighting
Since the creation of powerful white LEDs, it has become clear that they will leave no chance for traditional light sources to exist. Based on LEDs, it is possible to create lighting products for almost any purpose, which is currently being done both at the industrial and amateur levels.
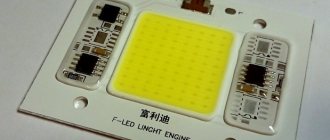
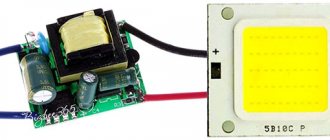
In order to make an LED lamp or lamp with your own hands, today it is not even necessary to have knowledge in the field of electronics and electrical engineering. So-called LED luminaire kits are now widely available on the market, which usually consist of three main parts: an LED module (or modules), a power supply and a housing.
After following a series of simple instructions, we get a finished lamp. Moreover, such crafts, in addition to providing an interesting pastime during the assembly process, give us a real economic effect upon further use. Naturally, provided that high-quality components are used.
If a person has amateur radio skills, then the scope of work with LEDs becomes much wider. You can completely modernize the lighting in your own apartment with your own hands. The main thing is to ensure that everything is aesthetically pleasing and safe. Homemade products powered by a 220 V network, made by an amateur, can lead to dire consequences.
The simplest thing you can do is to replace all the base lamps with LED lamps of your own making, without touching the chandeliers and lamps. It is better to use a purchased case, because It’s unlikely that anyone will find it interesting and useful to make a radiator out of aluminum yourself. You can make a power source yourself (if you have the appropriate knowledge and experience), or you can also take a ready-made one, selecting it according to the parameters corresponding to the LED module.
In areas where increased illumination is required, for example above the kitchen table, local lighting can be made using LED strips or narrow LED strips. This kind of crafts is also quite simple to implement.
It is also advisable to replace the lamps in the staircases, which operate around the clock, with LED ones. In order to save money, such homemade products can be made in the housings of existing lamps, since the power required there is not large.
DIY glowing LED decorations
By spending just a little time, you can make unusual jewelry that is visible not only in a lit room but also in the dark, which will set you apart from other people, because we will not be making ordinary jewelry, but LED jewelry. By following these instructions, you can make your own unique glow-in-the-dark earrings, brooches or pendants with LEDs.
DIY glowing LED decorations
DIY glowing LED decorations
DIY glowing LED decorations
Materials and tools that we will need for this homemade product:
- Narrow-nose pliers;
- Regular pliers;
- Wire cutters;
- Soldering station or soldering iron;
- Tweezers;
- Double sided tape;
- A piece of paper;
- Straightened brass wire with a diameter of 1 mm;
- SMD 1206 LEDs;
- Coin-cell battery (CR2016, CR2025, CR2032, ..);
- Tin solder;
- Flux.
DIY glowing LED decorations
How to make jewelry from LEDs, manufacturing process:
Step 1
To create an LED decoration, first print out one of my templates, you can download them from here, in the future you can create your own templates with your own decoration ideas. The template will help you create the exact shape of the jewelry, be it earrings or a pendant. Now we will make a glowing pendant.
DIY glowing LED decorations
Step 2
Bend the brass rod using pliers to the shape of the outline on the template. Take your time, make it as even and beautiful as possible.
DIY glowing LED decorations
DIY glowing LED decorations
Step 3
Lubricate the area to be soldered with flux and carefully solder the ends together using a soldering iron with tin solder, the flux will help the tin stick to the brass.
DIY glowing LED decorations
Step 4
One tip to keep all the parts in place before soldering and they don’t move anywhere is to use double-sided tape, stick it on paper, and put the parts on top of it.
Place all the LEDs in the correct positions and then solder them. Keep in mind that LEDs have electrical polarity and place them in the correct position for them to work. Look at my template, there is a diagram there that explains how you need to place them.
DIY glowing LED decorations
DIY glowing LED decorations
DIY glowing LED decorations
Second tip: do not use different colors of LEDs in the same necklace. Different colors of LEDs have different supply voltages, and they can merge into one color.
Third tip: double-sided tape loses its stickiness when heated, so you only have one attempt to solder the LED to the wire.
Step 5
Now you need to join the second ends of the LEDs together, so bend another piece of wire and place this shape on the tape and solder to the other ends of the LEDs.
DIY glowing LED decorations
Step 6
Bend another piece of wire and solder it to the back of the LED decoration, this will be a pocket for the battery, that is, a battery holder.
DIY glowing LED decorations
Step 7
All is ready! Now place the battery in the pendant and see how beautifully it sparkles!
DIY glowing LED decorations
There are different types of coin batteries with different diameters and thicknesses, so decide in advance on the type of battery for your LED decorations and make a holder to fit this size. The only requirement is to use a 3V battery. LED earrings or pendants, depending on the size and number of LEDs used, will last about 24 hours.
You may ask why there is no current limiting resistor and why the LEDs don't light up? My LED jewelry design uses the internal resistance of the battery, meaning the battery itself will prevent the LEDs from burning out due to the small current.
Examples of other luminous jewelry that can become pendants or earrings with LEDs:
DIY glowing LED decorations
DIY glowing LED decorations
DIY glowing LED decorations
Drawings of other decorations that were not included in the archive are made by analogy with the others, therefore without details:
DIY glowing LED decorations
Take home:000
Similar homemade products:
- Tester for LED TV strips and LED strips
- Flashing heart with LEDs and optocoupler, gift for March 8
- DIY sword pendant
- DIY cat pendant made from a fork
- Boost voltage converter for power supply…
- DIY mini 3D LED cube on Arduino
- Stencil for 3D pen – butterfly
- LED propeller clock on Arduino (improved)
- DIY water-powered flashlight
Tags:pendant, LED, earrings, decoration